来自:https://github.com/layumi/Person_reID_baseline_pytorch/tree/master/tutorial
行人重识别可以看成图像检索的问题。给定一张摄像头A拍摄到的查询图像,我们需要找到这个人在其他摄像头下的图像。 行人重识别的核心在于如何找到有鉴别力的行人表达。很多近期的方法使用了深度学习模型来抽取视觉特征,达到了SOTA的结果。
需要安装的软件包:
Python 3.6
GPU Memory >= 6G
Numpy
Pytorch 0.3+ (http://pytorch.org/)
Torchvision from the source
git clone https://github.com/pytorch/vision
cd vision
python setup.py install
开始
下载代码和数据集
Code: Practical-Baseline
Data: Market-1501
Part 1: 训练
- Part 1.1: 准备数据集 (python prepare.py)
1.下载下来的数据集是如下分布的:
├── Market/
│ ├── bounding_box_test/ /* Files for testing (candidate images pool)
│ ├── bounding_box_train/ /* Files for training
│ ├── gt_bbox/ /* We do not use it
│ ├── gt_query/ /* Files for multiple query testing
│ ├── query/ /* Files for testing (query images)
│ ├── readme.txt
2.tools -> Start SSH session… -> 选择服务器的终端
3.在终端中跑一下prepare.py程序:python prepare.py
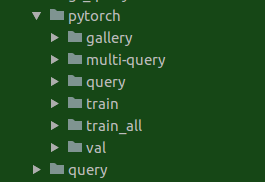
4.可以看到在Market文件夹中创建了一个子文件夹叫 pytorch
├── Market/
│ ├── bounding_box_test/ /* Files for testing (candidate images pool)
│ ├── bounding_box_train/ /* Files for training
│ ├── gt_bbox/ /* We do not use it
│ ├── gt_query/ /* Files for multiple query testing
│ ├── query/ /* Files for testing (query images)
│ ├── readme.txt
│ ├── pytorch/
│ ├── train/ /* train
│ ├── 0002
| ├── 0007
| …
│ ├── val/ /* val
│ ├── train_all/ /* train+val
│ ├── query/ /* query files
│ ├── gallery/ /* gallery files


在pytorch的每个子文件夹中,图像都是按ID来排列的。现在我们已经成功准备好了图像来做后面的训练了。
prepare.py 是如何识别同ID的图像?
对于Market1501这个数据集而言,图像的文件名中就包含了 ID label 和 CameraID, 具体命名可在这个链接看到here.
- Part 1.2: Build Neural Network (model.py)
我们可以利用预训练的模型。普遍来说,利用ImageNet预训练的网络能达到更好的结果,因为它保留了一些好的特征。
在pytorch里,我们可以通过两行代码(在python编辑器里输入)
来引入他们。(需要安装torchvision模块:pip install --user torchvision)

from torchvision import models
model = models.resnet50(pretrained=True)
可以使用下面这行代码来简单检查网络结构
print(model)

- Part 1.3: 训练 (python train.py)
我们准备好了训练数据和定义好的网络结构。
我们可以输入如下命令开始训练:
python train.py --gpu_ids 0 --name ft_ResNet50 --train_all --batchsize 32 --data_dir your_data_path
将代码中your_data_path改成你的路径
其中可能会出现如下错误:

解决方法:pip install --user pretrainedmodels

可能又提示你没有yaml模块,pip install --user yaml下载失败
pip install --user PyYAML成功

注:
–gpu_ids which gpu to run.
–name the name of the model.
–data_dir the path of the training data.
–train_all using all images to train.
–batchsize batch size.
–erasing_p random erasing probability.

训练过程:


Part 2: 测试
- Part 2.1: 特征提取 (python test.py)
这一部分, 我们载入我们刚刚训练的模型 来抽取每张图片的视觉特征
python test.py --gpu_ids 0 --name ft_ResNet50 --test_dir your_data_path --batchsize 32 --which_epoch 59
将代码中your_data_path,改成你的路径


注:
–gpu_ids which gpu to run.
–name the dir name of the trained model.
–batchsize batch size.
–which_epoch select the i-th model.
–data_dir the path of the testing data.
- Part 2.2: 评测
我们有了每张图片的特征。 我们需要做的事情只有用特征去匹配图像。
python evaluate_gpu.py

Part 3: 一个简单的可视化程序 (python demo.py)
可视化结果:
python demo.py --query_index 777

