[root@server1 ~]# yum install rpm-build 安装rpm编译工具(有可能需要安装依赖包,根据报错情况)
[root@server1 ~]# rpmbuild -tb haproxy-1.6.11.tar.gz 编译
[root@server1 ~]# cd rpmbuild/
BUILD/ BUILDROOT/ RPMS/ SOURCES/ SPECS/ SRPMS/
[root@server1 ~]# cd rpmbuild/RPMS/
[root@server1 RPMS]# ls
x86_64
[root@server1 RPMS]# cd x86_64/
[root@server1 x86_64]# rpm -qpl haproxy-1.6.11-1.x86_64.rpm 查看安装文件路径
/etc/haproxy
/etc/rc.d/init.d/haproxy
/usr/sbin/haproxy
/usr/share/doc/haproxy-1.6.11
/usr/share/doc/haproxy-1.6.11/CHANGELOG
/usr/share/doc/haproxy-1.6.11/README
/usr/share/doc/haproxy-1.6.11/architecture.txt
/usr/share/doc/haproxy-1.6.11/configuration.txt
/usr/share/doc/haproxy-1.6.11/intro.txt
/usr/share/doc/haproxy-1.6.11/management.txt
/usr/share/doc/haproxy-1.6.11/proxy-protocol.txt
/usr/share/man/man1/haproxy.1.gz
[root@server1 x86_64]# rpm -ivh haproxy-1.6.11-1.x86_64.rpm 安装
Preparing... ########################################### [100%]
1:haproxy ########################################### [100%]
[root@server1 x86_64]# cd
[root@server1 ~]# tar zxf haproxy-1.6.11.tar.gz
[root@server1 ~]# cd haproxy-1.6.11
[root@server1 haproxy-1.6.11]# ls
CHANGELOG doc include Makefile src VERDATE
contrib ebtree LICENSE README SUBVERS VERSION
CONTRIBUTING examples MAINTAINERS ROADMAP tests
[root@server1 haproxy-1.6.11]# find -name *.spec #rpmbuild可以编译是因为原文件包有这个工具
./examples/haproxy.spec
[root@server1 haproxy-1.6.11]# cd examples/
[root@server1 examples]# cp content-sw-sample.cfg /etc/haproxy/haproxy.cfg
[root@server1 examples]# cd /etc/haproxy/
[root@server1 haproxy]# ls
haproxy.cfg
[root@server1 haproxy]# grep 200 /etc/passwd
[root@server1 haproxy]# groupadd -g 200 haproxy
[root@server1 haproxy]# useradd -u 200 -g 200 -M haproxy
[root@server1 haproxy]# vim /etc/security/limits.conf
末尾添加:
haproxy - nofile 10000
[root@server1 haproxy]# vim haproxy.cfg 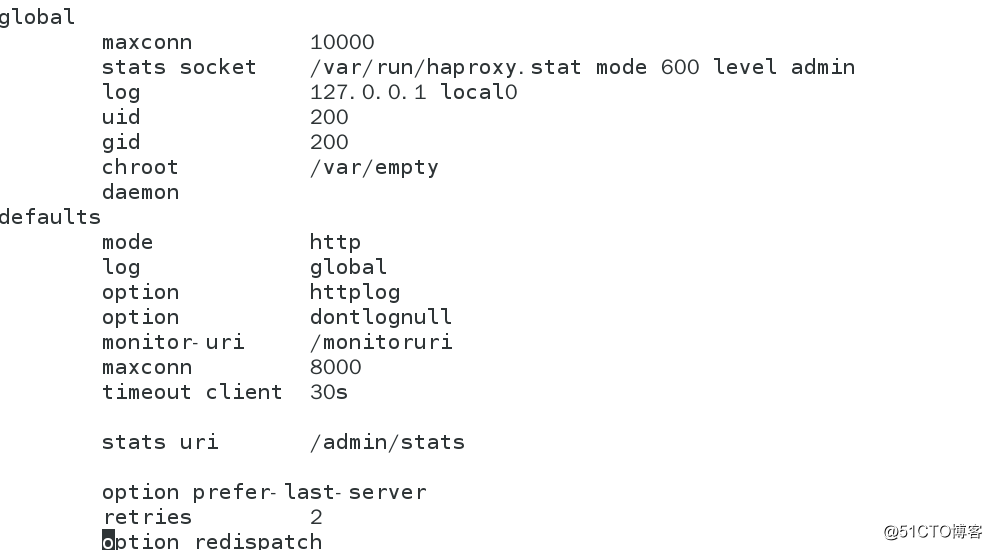
default_backend static
The static backend backend for 'Host: img', /img and /css.
backend static
balance roundrobin
server statsrv1 172.25.135.2:80 check inter 1000
server statsrv2 172.25.135.3:80 check inter 1000
[root@server1 haproxy]# /etc/init.d/haproxy start
测试一下网址:
172.25.135.1/amin/statc
安装php实现动态
[root@server3 ~]# yum install php -y
[root@server3 ~]# vim /var/www/html/index.php
<?php
phpinfo()
?>
测试172.25.135.1/index.php
[root@server1 haproxy]# vim haproxy.cfg
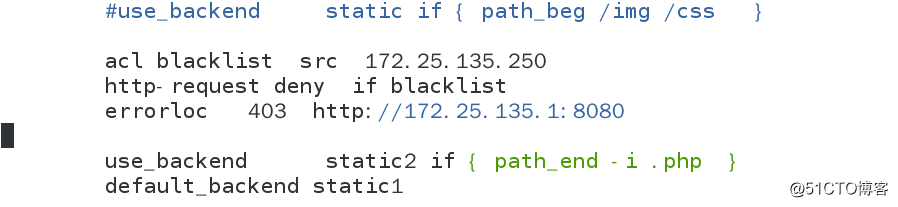
[root@server1 haproxy]# yum install httpd
[root@server1 haproxy]# vim /etc/httpd/conf/httpd.conf 改端口为8080
[root@server1 haproxy]# /etc/init.d/httpd restart
测试 172.25.135.1:8080
[root@server1 haproxy]# vim haproxy.cfg

测试:172.25.135.1/index.php #自动跳到baidu
[root@server1 haproxy]# vim haproxy.cfg 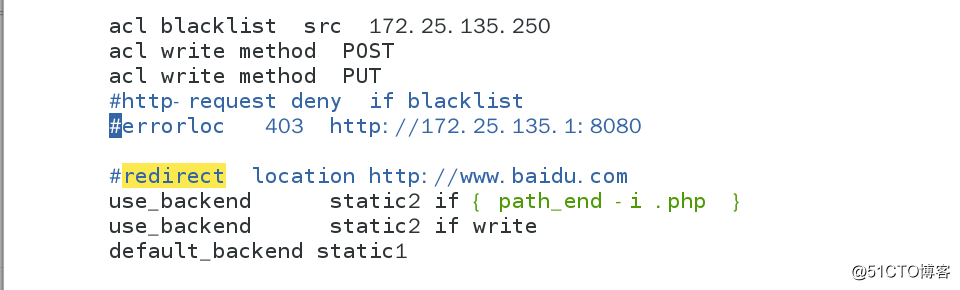
在server2和3上安装php下载upload
[root@server2 ~]# mv upload/ /var/www/html/
[root@server2 html]# chmod 777 upload/
[root@server2 upload]# mv * ..
[root@server2 html]# vim upload_file.php 将图片默认大小改到合适大小
[root@server2 html]# /etc/init.d/httpd restart #server3同操作
浏览器访问:172.25.135.1/index.php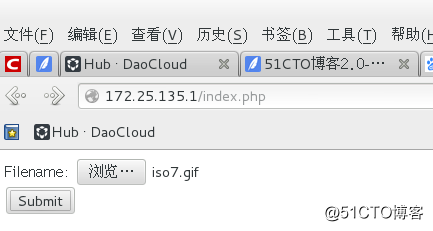
上传图片则server2无文件server3有上传文件,从而实现读写分离。
[root@server2 html]# cd upload
[root@server2 upload]# ls
[root@server3 html]# cd upload
[root@server3 upload]# ls
iso7.gif
从server1将安装包和配置文件发送到server4上
[root@server1 x86_64]# scp haproxy-1.6.11-1.x86_64.rpm [email protected]
[root@server1 haproxy]# scp haproxy.cfg [email protected]:/etc/haproxy/
[root@server1 security]# pwd
/etc/security
[root@server1 security]# scp limits.conf [email protected]:/etc/security/
[root@server4 ~]# rpm -ivh haproxy-1.6.11-1.x86_64.rpm 安装
创建用户,修改文件,开启服务和server1保持一致
[root@server1 ~]# yum install pacemaker corosync -y 安装服务
[root@server4 ~]# yum install pacemaker corosync -y 安装服务
[root@server1 ~]# vim /etc/corosync/corosync.conf
totem {
version: 2
secauth: off
threads: 0
interface {
ringnumber: 0
bindnetaddr: 172.25.135.0
mcastaddr: 226.94.1.135 根据情况,如果多用户需改同网络会冲突
mcastport: 5405
ttl: 1
}
}
末尾添加:
service {
name:pacemaker
ver:0
}
[root@server1 corosync]# scp corosync.conf server4:/etc/corosync/ 发给server4
开启server1,4的服务
[root@server1 ~]# /etc/init.d/corosync start
root@server1 ~]# yum install -y crmsh-1.2.6-0.rc2.2.1.x86_64.rpm pssh-2.3.1-2.1.x86_64.rpm 安装
[root@server4 ~]# yum install -y crmsh-1.2.6-0.rc2.2.1.x86_64.rpm pssh-2.3.1-2.1.x86_64.rpm 安装
[root@server4 ~]# crm
crm(live)# configure
crm(live)configure# show
node server1
node server4
property $id="cib-bootstrap-options" \
dc-version="1.1.10-14.el6-368c726" \
cluster-infrastructure="classic openais (with plugin)" \
expected-quorum-votes="2"
crm(live)configure# property stonith-enabled=false ##先关掉fence
crm(live)configure# commit
[root@server4 ~]# crm_verify -LV ##关掉fence后不报错
[root@server4 ~]# crm
crm(live)# configure
shoecrm(live)configure# show
node server1
node server4
property $id="cib-bootstrap-options" \
dc-version="1.1.10-14.el6-368c726" \
cluster-infrastructure="classic openais (with plugin)" \
expected-quorum-votes="2" \
stonith-enabled="false"
crm(live)configure# primitive vip ocf:heartbeat:IPaddr2 params ip=172.25.18.100 cidr_netmask=24 op monitor interval=1min
##配置vip heartbeat工具 vip netmask 健康监测时间
crm(live)configure# commit
crm(live)configure# bye
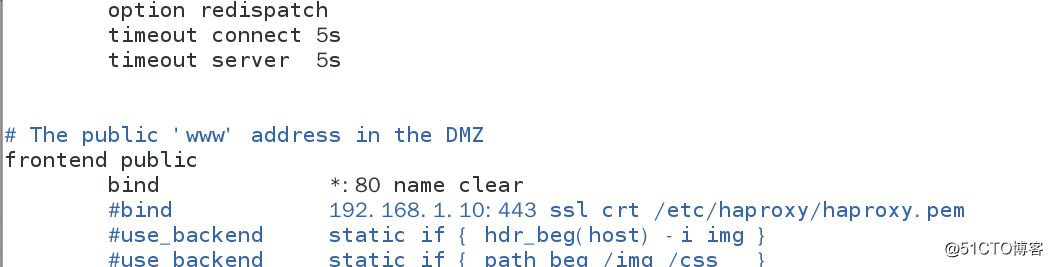
[root@server1 ~]# vim /etc/haproxy/haproxy.cfg
frontend public
bind *:80 ##监听所有的80端口(为了监听vip)
[root@server4 ~]# crm_mon ##动态监听
Last updated: Tue Apr 17 13:18:05 2018
Last change: Tue Apr 17 13:12:45 2018 via cibadmin on server4
Stack: classic openais (with plugin)
Current DC: server4 - partition with quorum
Version: 1.1.10-14.el6-368c726
2 Nodes configured, 2 expected votes
1 Resources configured
Online: [ server1 server4 ]
vip (ocf::heartbeat:IPaddr2): Started server1
[root@server4 ~]# crm
crm(live)# configure
crm(live)configure# show
node server1
node server4
primitive vip ocf:heartbeat:IPaddr2 \
params ip="172.25.18.100" cidr_netmask="24" \
op monitor interval="1min"
property $id="cib-bootstrap-options" \
dc-version="1.1.10-14.el6-368c726" \
cluster-infrastructure="classic openais (with plugin)" \
expected-quorum-votes="2" \
stonith-enabled="false"
crm(live)configure# property no-quorum-policy=ignore ##宕机后vip可以浮动
crm(live)configure# commit
byecrm(live)configure# bye
[root@server1 x86_64]# /etc/init.d/corosync stop
[root@server4 ~]# crm_mon ##server1转移到server4
[root@server1 ~]# cd rpmbuild/RPMS/x86_64/
[root@server1 x86_64]# scp haproxy-1.6.11-1.x86_64.rpm server4:~/
[root@server4 ~]# rpm -ivh haproxy-1.6.11-1.x86_64.rpm
[root@server4 ~]# /etc/init.d/haproxy start
[root@server1 x86_64]# scp /etc/haproxy/haproxy.cfg server4:/etc/haproxy/
[root@server1 x86_64]# /etc/init.d/haproxy stop ##启动集群管理1时一定要关闭haproxy和取消开机自启
Shutting down haproxy: [ OK ]
[root@server1 x86_64]# chkconfig --list haproxy
haproxy 0:off 1:off 2:off 3:off 4:off 5:off 6:off
[root@server1 x86_64]# crm
crm(live)# configure
crm(live)configure# show
node server1
node server4
primitive vip ocf:heartbeat:IPaddr2 \
params ip="172.25.18.100" cidr_netmask="24" \
op monitor interval="1min"
property $id="cib-bootstrap-options" \
dc-version="1.1.10-14.el6-368c726" \
cluster-infrastructure="classic openais (with plugin)" \
expected-quorum-votes="2" \
stonith-enabled="false" \
no-quorum-policy="ignore"
crm(live)configure# primitive haproxy lsb:haproxy op monitor interval=1min
crm(live)configure# commit
crm(live)configure# group lbgroup vip haproxy ##建立组,使crm_mon中vip和haproxy在同一server上
crm(live)configure# commit
crm(live)configure# bye
[root@server1 x86_64]# crm node standby ##控制下线
[root@server1 x86_64]# crm node online ##控制上线
[root@server1 x86_64]# stonith_admin -I ##检验fence
[root@server1 x86_64]# stonith_admin -M -a fence_xvm ##查看
[root@foundation18 Desktop]# systemctl status fence_virtd.service ##物理机上开启fence服务
拷贝/etc/cluster/fence_xvm.key 文件给server1和server4,server1和4的cluster为自建的文件夹把fencekey和物理机保持一致,不然虚拟机fence启动不了
[root@server4 cluster]# crm
crm(live)# configure
crm(live)configure# primitive vmfence stonith:fence_xvm params pcmk_host_map="server1:host1;server4:host4" op monitor interval=1min ##设置fence
crm(live)configure# commit
crm(live)configure# bye
[root@server4 cluster]# crm
crm(live)# configure
crm(live)configure# property stonith-enabled=true ##开启fence
crm(live)configure# commit
crm(live)configure# bye
[root@server1 ~]# crm
crm(live)# resource
crm(live)resource# cleanup vmfence      ##配错fence后清除更新
Cleaning up vmfence on server1
Cleaning up vmfence on server4
Waiting for 1 replies from the CRMd. OK
crm(live)resource# show
 Resource Group: lbgroup
     vip    (ocf::heartbeat:IPaddr2):   Started
     haproxy    (lsb:haproxy):  Started
 vmfence    (stonith:fence_xvm):    Started
检测:
[root@server1 ~]# echo c > /proc/sysrq-trigger ##看fence机制是否成功
echo c > /proc/sysrq-trigger