实验环境
| 主机名 | 功能 |
|---|---|
| server1 | 集群节点 |
| server2 | 集群节点 |
| server3 | 后端服务器 |
| server4 | 后端服务器 |
一.安装配置HAproxy
配置集群节点server1:
1.安装haproxy
yum install haproxy -y
2.修改配置文件
vim /etc/haproxy/haproxy.cfg

    #---------------------------------------------------------------------
# Example configuration for a possible web application.  See the
# full configuration options online.
#
#   http://haproxy.1wt.eu/download/1.4/doc/configuration.txt
#
#---------------------------------------------------------------------

#---------------------------------------------------------------------
# Global settings
#---------------------------------------------------------------------
global
    # to have these messages end up in /var/log/haproxy.log you will
    # need to:
    #
    # 1) configure syslog to accept network log events.  This is done
    #    by adding the '-r' option to the SYSLOGD_OPTIONS in
    #    /etc/sysconfig/syslog
    #
    # 2) configure local2 events to go to the /var/log/haproxy.log
    #   file. A line like the following can be added to
    #   /etc/sysconfig/syslog
    #
    #    local2.*                       /var/log/haproxy.log
    #
    log         127.0.0.1 local2

    chroot      /var/lib/haproxy
    pidfile     /var/run/haproxy.pid
    maxconn     65535
    user        haproxy
    group       haproxy
    daemon

    # turn on stats unix socket
    stats socket /var/lib/haproxy/stats

#---------------------------------------------------------------------
# common defaults that all the 'listen' and 'backend' sections will
# use if not designated in their block
#---------------------------------------------------------------------
defaults
    mode                    http
    log                     global
    option                  httplog
    option                  dontlognull
    option http-server-close
    option forwardfor       except 127.0.0.0/8
    option                  redispatch
    retries                 3
    timeout http-request    10s
    timeout queue           1m
    timeout connect         10s
    timeout client          1m
    timeout server          1m
    timeout http-keep-alive 10s
    timeout check           10s
    maxconn                 3000
    stats uri 		    /admin/stats  ##健康检查
    monitor-uri             /monitoruri	   ##监控管理

#---------------------------------------------------------------------
# main frontend which proxys to the backends
#---------------------------------------------------------------------
frontend  main *:5000
   # acl url_static       path_beg       -i /static /images /javascript /stylesheets
   # acl url_static       path_end       -i .jpg .gif .png .css .js

   # use_backend static          if url_static
   bind 	172.25.77.100:80
   default_backend             static

#---------------------------------------------------------------------
# static backend for serving up images, stylesheets and such
#---------------------------------------------------------------------
backend static
    balance     roundrobin
    server      static 172.25.77.3:80 check
    server      static 172.25.77.4:80 check
3.添加虚拟IP
ip addr add 172.25.77.100/24 dev eth0

4.重启
/etc/init.d/haproxy start
二.配置后端服务器
后端服务器server3和server4:
1.安装httpd
yum install httpd -y
2.在默认发布目录填写默认发布.html文件
vim /var/www/html/index.html
3.开启httpd
/etc/init.d/httpd start


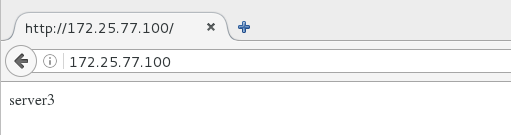
4.测试:
浏览器访问172.25.77.100可以实现轮询访问后端服务器server3和server4:

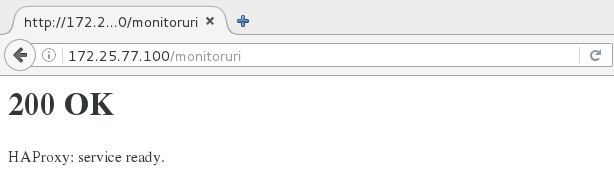
健康检查:
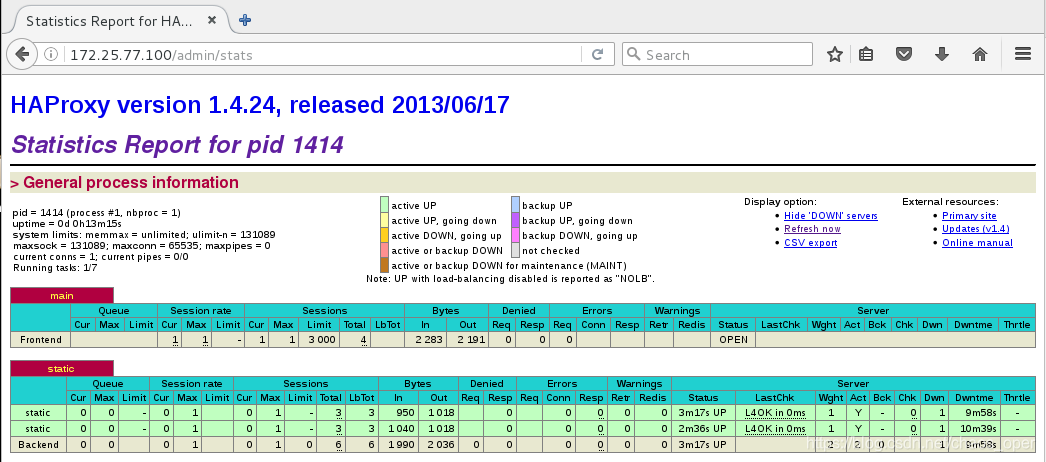
监控管理界面:
 与server1相同的配置备用节点服务器server2,防止一个节点坏掉使得服务无法正常访问。
三.配置pacemaker
Pacemaker是一个集群资源管理器。它利用集群基础构件(OpenAIS、heartbeat 、 corosync)提供的消息和成员管理能力来探测并从节点或资源级别的故障中恢复,以实现群集服务(亦称资源)的最大可用性。
1.安装pacemaker
扫描二维码关注公众号,回复:
9193241 查看本文章

yum install pacemaker corosync -y
2.安装 crmsh和pssh
rpm -ivh crmsh-1.2.6-0.rc2.2.1.x86_64.rpm --nodeps
rpm -ivh pssh-2.3.1-2.1.x86_64.rpm --nodeps


3.修改配置文件
##复制配置文件模版
cp /etc/corosync/corosync.conf.example /etc/corosync/corosync.conf
##修改配置文件
vim /etc/corosync/corosync.conf
# Please read the corosync.conf.5 manual page
compatibility: whitetank

totem {
	version: 2
	secauth: off
	threads: 0
	interface {
		ringnumber: 0
		bindnetaddr: 172.25.77.0
		mcastaddr: 226.94.1.1
		mcastport: 5405
		ttl: 1
	}
}

logging {
	fileline: off
	to_stderr: no
	to_logfile: yes
	to_syslog: yes
	logfile: /var/log/cluster/corosync.log
	debug: off
	timestamp: on
	logger_subsys {
		subsys: AMF
		debug: off
	}
}

amf {
	mode: disabled
}
service {
	name:pacemaker
	ver:0
}
aisexce {
	user:root
	group:root
}

quorum {
	provider:corosync_votequorum
	expected_votes:2
	two_node:1
}
4.重启pacemaker和corosync
/etc/init.d/pacemaker start
/etc/init.d/corosync start
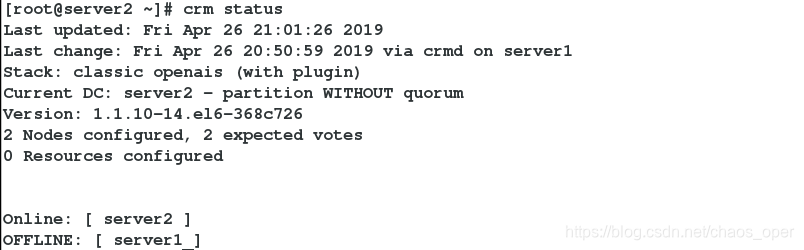
5.在server1配置pacemaker后,查看。在未在server2配置时,只有一个节点。

6.将配置文件复制给server2。server2与server1做以上相同的配置!
 7.查看有两个集群节点
 8.当关闭server1集群节点服务时
 9.移除server2集群节点
crm node standby

