Pacemaker是一个集群资源管理器。它利用集群基础构件(OpenAIS 、heartbeat或corosync)提供的消息和成员管理能力来探测并从节点或资源级别的故障中恢复,以实现群集服务(亦称资源)的最大可用性。
HAProxy是一个使用C语言编写的自由及开放源代码软件,其提供高可用性、负载均衡,以及基于TCP和HTTP的应用程序代理。
一.haproxy的安装及基于HTTP的负载均衡
工作图:
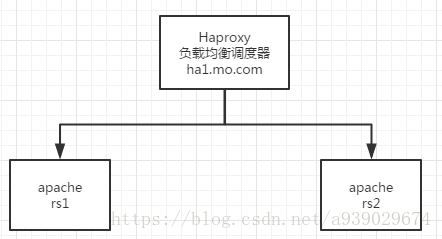
server1 haproxy
server3 and sercer4 apache
1.haproxy安装
[root@server1 ~]# yum install rpm-build -y
[root@server1 ~]# rpmbuild -tb haproxy-1.6.11.tar.gz  ##将原码转换为二进制
[root@server1 ~]# cd rpmbuild/
[root@server1 rpmbuild]# cd RPMS/
[root@server1 RPMS]# ls
x86_64
[root@server1 RPMS]# cd x86_64/
[root@server1 x86_64]# ls
haproxy-1.6.11-1.x86_64.rpm
[root@server1 x86_64]# rpm -qpl haproxy-1.6.11-1.x86_64.rpm
[root@server1 x86_64]# rpm -ivh haproxy-1.6.11-1.x86_64.rpm
[root@server1 ~]# tar zxf haproxy-1.6.11.tar.gz
2.haproxy的配置
2.1监视和负载均衡
[root@server1 haproxy-1.6.11]# cd examples/
[root@server1 examples]# ls
acl-content-sw.cfg     debug2html    init.haproxy
auth.cfg               debugfind     option-http_proxy.cfg
check                  errorfiles    seamless_reload.txt
check.conf             haproxy.init  ssl.cfg
content-sw-sample.cfg  haproxy.spec  stats_haproxy.sh
debug2ansi             haproxy.vim   transparent_proxy.cfg

[root@server1 examples]# cp  content-sw-sample.cfg  /etc/haproxy/haproxy.cfg
cp: overwrite `/etc/haproxy/haproxy.cfg'? y


[root@server1 haproxy]# groupadd -g 200 haproxy
[root@server1 haproxy]# useradd -u 200 -g 200 -M haproxy
配置实验环境
[root@server1 haproxy]# vim /etc/security/limits.conf
haproxy - nofile 56636
修改配置文件:
[root@server1 haproxy]# pwd
/etc/haproxy
[root@server1 haproxy]# cat haproxy.cfg
global
maxconn 10000
stats socket /var/run/haproxy.stat mode 600 level admin
log 127.0.0.1 local0
uid 200 ##因为这个才需要添加一个用户和组都为200
gid 200
chroot /var/empty ##这是一个保护措施,把系统跟转换到/var/empty目录下
daemon
Defaults ##这是整体设置
mode http ##用的模型为httpd
log global
option dontlognull
monitor-uri /monitoruri ##健康检查
maxconn 8000 ##转速
timeout client 30s
stats uri /admin/stats ##监管系统
frontend public
bind *:80 name clear #端口为所有的80端口
default_backend static
backend static
balance roundrobin ##算法 为轮循
server statsrv1 172.25.24.3:80 check inter 1000
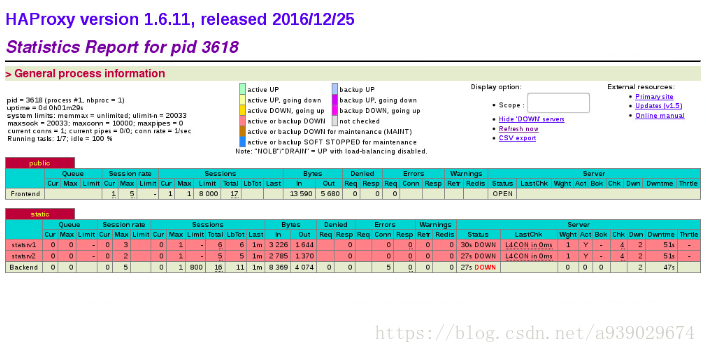
server statsrv2 172.25.24.4:80 check inter 1000测试:
浏览器测试监控
172.25.24.1/admin/stats
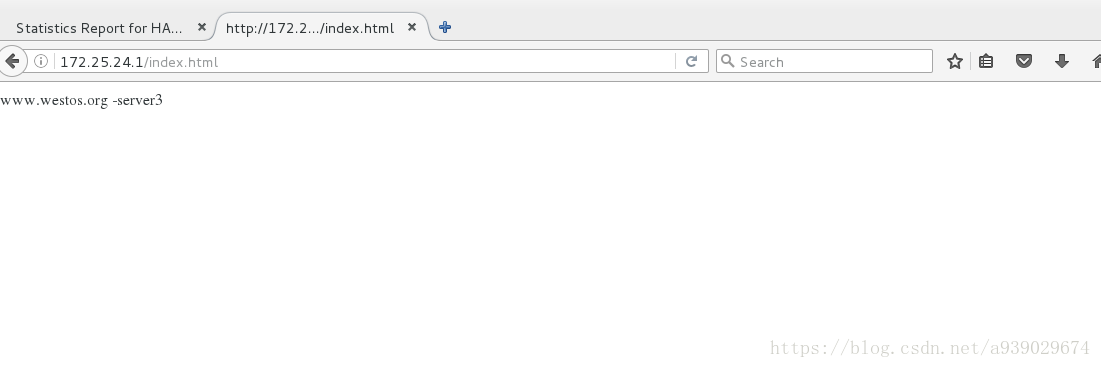
测试是否为负载均衡:
[root@foundation24 ~]# curl 172.25.24.1
www.westos.ogr      -server3
[root@foundation24 ~]# curl 172.25.24.1
www.westos.org      -server4
[root@foundation24 ~]# curl 172.25.24.1
www.westos.ogr      -server3
[root@foundation24 ~]# curl 172.25.24.1
www.westos.org      -server4
[root@foundation24 ~]# curl 172.25.24.1
www.westos.ogr      -server3
[root@foundation24 ~]# curl 172.25.24.1
www.westos.org      -server4
2.2动静分离
[root@server1 haproxy]# vim haproxy.cfg frontend public
bind *:80 name clear
backend static1
balance roundrobin
server statsrv1 172.25.24.3:80 check inter 1000
backend static2
balance roundrobin
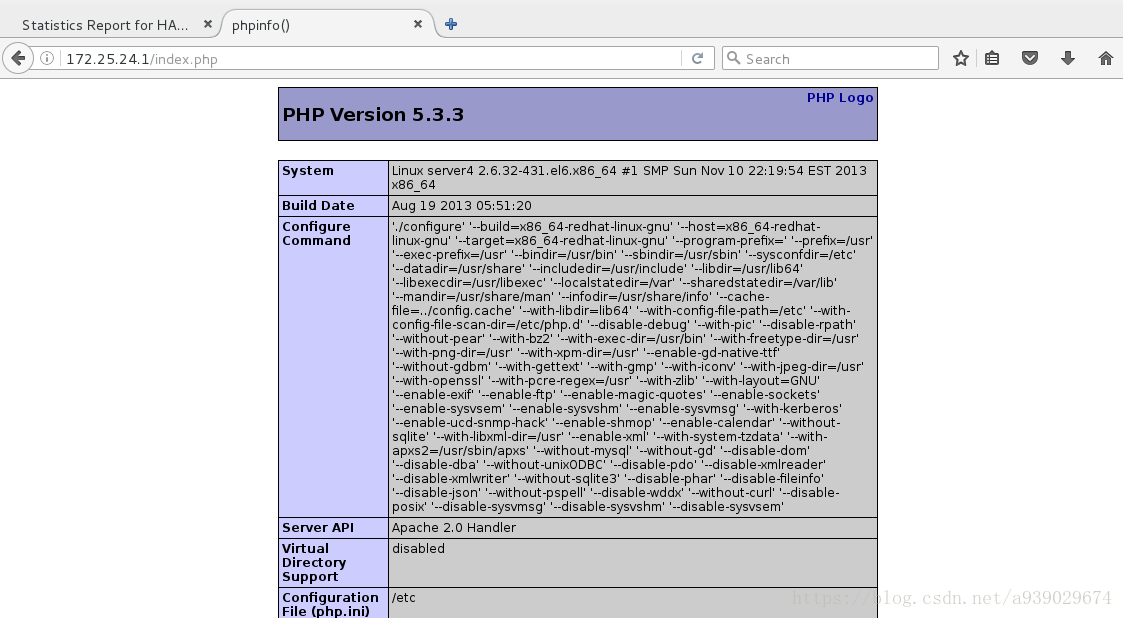
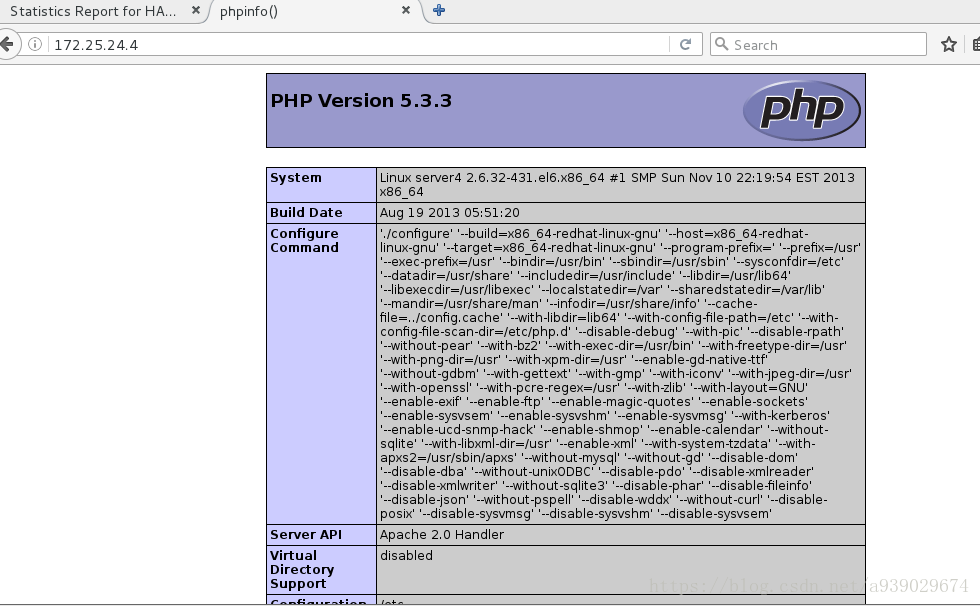
server statsrv2 172.25.24.4:80 check inter 1000server4安装php
yum install php -yoot@server4 ~]# cd /var/www/html/
[root@server4 html]# vim index.php
[root@server4 html]# cat index.php
<?php phpinfo(); ?> ##php的显示页面
server3和server4:
root@server3 ~]# /etc/init.d/httpd start
[root@server4 html]# /etc/init.d/httpd start
测试:
2.3重定向
2.3.1 先拒绝再重定向
server1设置:
cd /etc/haproxy/
 vim haproxy.cfg
acl blcklist src 172.25.24.250 ##当172.25.24.250来访问需求时
http-request deny if blcklist ##拒绝此需求server3和server4http服务打开

server1:
yum install httpd -y
vim /etc/httpd/conf/httpd.conf   ##让http监听8080端口
/etc/init.d/httpd startvim /etc/haproxt/haproxy.cnferrorloc 403 http://172.25.24.1:8080 ##将403错误转换到172.25.24.1:8080端口,开启这个配置文件
root@server1 haproxy]# /etc/init.d/haproxy restart
 [root@server1 haproxy]# cat /var/www/html/index.html
gogogo~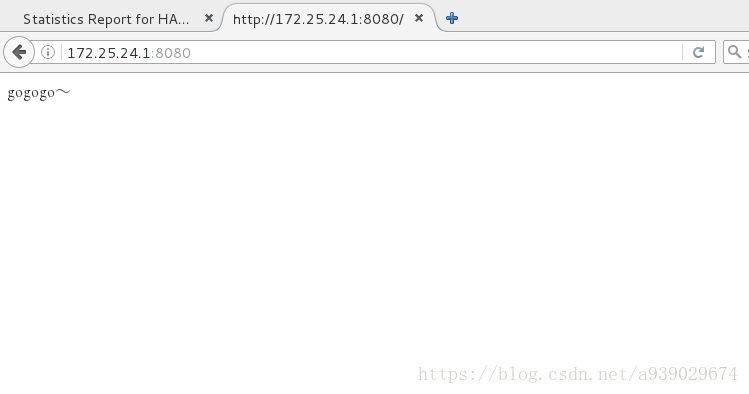
2.3.2直接重定向
[root@server1 haproxy]# vim haproxy.cfgacl blcklist src 172.25.24.250 ##当有来自172.25.24.250的请求时
redirect location http://172.25.24.4 ##直接重定向到172.25.24.4
root@server1 haproxy]# /etc/init.d/haproxy restart
3.读写分离
[root@server1 haproxy]# vim  haproxy.cfg
root@server1 haproxy]# /etc/init.d/haproxy restart

acl blcklist src 172.25.24.250
     acl write method POST
     acl write method PUT
     use_backend     static2 if { path_end -i .php }
     use_backend     static2 if write
default_backend start[root@server3 html]# cd xixi
[root@server3 xixi]# ls
redhat.jpg


##Server3:
root@server3 html]# yum install php
[root@server3 html]# ll upload/
total 8
-rw-r--r-- 1 root root 257 Apr 16  2016 index.php
-rw-r--r-- 1 root root 927 Apr 16  2016 upload_file.php
[root@server3 html]# chmod 777 upload/
[root@server3 html]# ll
total 12
-rw-r--r-- 1 root root   25 Aug  2 11:20 index.html
drwxrwxrwx 2 root root 4096 Aug  4 13:13 upload
drwxr-xr-x 2 root root 4096 Aug  4 13:41 xixi
[root@server3 html]# /etc/init.d/httpd restart
Stopping httpd:                                            [  OK  ]
Starting httpd: httpd: Could not reliably determine the server's fully qualified domain name, using 172.25.24.3 for ServerName
                                                           [  OK  ]
server4:
  chmod 777 upload
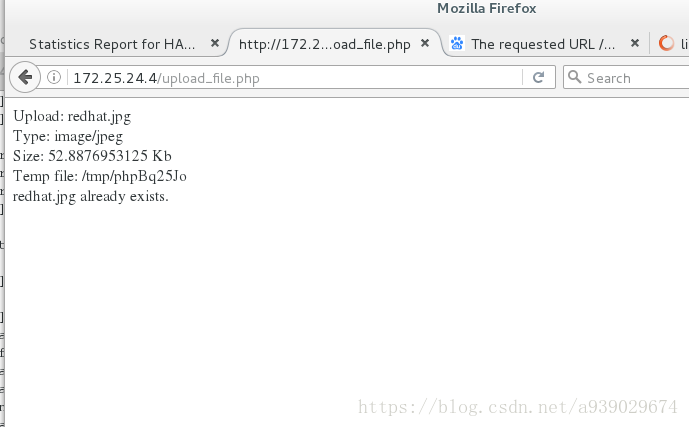
[root@server4 html]# cat upload_file.php
<?php
if ((($_FILES["file"]["type"] == "image/jpg")       ##格式
|| ($_FILES["file"]["type"] == "image/jpeg")
|| ($_FILES["file"]["type"] == "image/pjpeg"))
&& ($_FILES["file"]["size"] < 2000000))              ##大小
  {
  if ($_FILES["file"]["error"] > 0)
    {
    echo "Return Code: " . $_FILES["file"]["error"] . "<br />";
    }
  else
    {
    echo "Upload: " . $_FILES["file"]["name"] . "<br />";
    echo "Type: " . $_FILES["file"]["type"] . "<br />";
    echo "Size: " . ($_FILES["file"]["size"] / 1024) . " Kb<br />";
    echo "Temp file: " . $_FILES["file"]["tmp_name"] . "<br />";

    if (file_exists("upload/" . $_FILES["file"]["name"]))
      {
      echo $_FILES["file"]["name"] . " already exists. ";
      }
    else
      {
      move_uploaded_file($_FILES["file"]["tmp_name"],
      "upload/" . $_FILES["file"]["name"]);
      echo "Stored in: " . "upload/" . $_FILES["file"]["name"];
      }
    }
  }
else
  {
  echo "Invalid file";
  }
?>
二.haproxy和pacemaker配备高可用集群
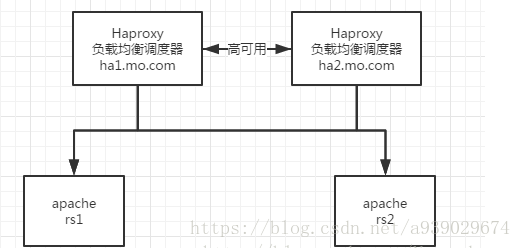
haproxy server1 和server2
apache server3 和server4
配置集群服务我们首先要停掉haproxy,而且一定要停干净
安装corosycn心跳组件,pacemaker集群资源管理器:
[root@server1 ~]# yum install -y pacemaker corosync
[root@server2 ~]# yum install -y pacemaker corosync
安装crm shell管理,可以方便我们对集群的配置和配置的分发:
[root@server2 mnt]# yum install crmsh-1.2.6-0.rc2.2.1.x86_64.rpm  pssh-2.3.1-2.1.x86_64.rpm -y
root@server2 mnt]# ls
crmsh-1.2.6-0.rc2.2.1.x86_64.rpm  pssh-2.3.1-2.1.x86_64.rpm
[root@server2 mnt]# rpm -ivh *
配置
root@server2 ~]# cd /etc/corosync/
[root@server2 corosync]# ls
amf.conf.example  corosync.conf.example  corosync.conf.example.udpu  service.d  uidgid.d
[root@server2 corosync]# cp corosync.conf.example corosync.conf
[root@server2 corosync]# vim corosync.conf


totem {
    version: 2
    secauth: off
    threads: 0
    interface {
        ringnumber: 0
        bindnetaddr: 172.25.24.0    ##改自己的网段
        mcastaddr: 226.94.1.24       ##广播地址
        mcastport: 5405             ##广播端口
        ttl: 1
    }
}

logging {
    fileline: off
    to_stderr: no
    to_logfile: yes
    to_syslog: yes
    logfile: /var/log/cluster/corosync.log
    debug: off
    timestamp: on
    logger_subsys {
        subsys: AMF
        debug: off
    }
}

amf {
    mode: disabled
}
service {
    name: pacemaker
    ver: 0
}
[root@server2 corosync]# scp corosync.conf server1:/etc/corosync/ ##将配置文件移动到另一个节点
打开corosync服务(两个节点都要打开):
[root@server1 ~]# /etc/init.d/corosync start
Starting Corosync Cluster Engine (corosync):               [  OK  ]
进入crm管理集群
1.添加VIP,并查看是否同步
[root@server2 mnt]# crm
crm(live)# configure
crm(live)configure# show
node server1
node server2
property $id="cib-bootstrap-options" \
    dc-version="1.1.10-14.el6-368c726" \
    cluster-infrastructure="classic openais (with plugin)" \
    expected-quorum-votes="2"
    crm(live)configure# property stonith-enabled=false    ##
  primitive vip ocf:heartbeat:IPaddr2 params ip=172.25.24.100 cidr_netmask=24 op monitor interval=1min ## 添加一个VIP,并设定时间为1min检测一次
crm(live)configure# commit   ##保存
crm(live)configure# property no-quorum-policy=ignore
crm(live)configure# commit
ERROR: cib-bootstrap-options: attribute node-health-policy does not exist
Do you still want to commit? y
crm(live)configure# bye
bye
在sever1打crm集群查看状态
[root@server1 mnt]# crm
crm(live)# configure
crm(live)configure# show
node server1
node server2
primitive vip ocf:heartbeat:IPaddr2 \
    params ip="172.25.24.100" cidr_netmask="24"     ##vip
property $id="cib-bootstrap-options" \
    dc-version="1.1.10-14.el6-368c726" \
    cluster-infrastructure="classic openais (with plugin)" \
    expected-quorum-votes="2" \
    stonith-enabled="false" \
    node-health-policy="ignore" \
    no-quorum-policy="ignore"
2.添加haproyx服务
在将haproxy引导server2:
root@server1 haproxy]# cd
[root@server1 ~]# ls
anaconda-ks.cfg        ldirectord-3.9.5-3.1.x86_64.rpm  nginx-sticky-module-ng
haproxy-1.6.11         nginx-1.10.1                     nginx-sticky-module-ng.tar.gz
haproxy-1.6.11.tar.gz  nginx-1.10.1.tar.gz              rpmbuild
install.log            nginx-1.14.0
install.log.syslog     nginx-1.14.0.tar.gz
[root@server1 ~]# cd rpmbuild/
[root@server1 rpmbuild]# ls
BUILD  BUILDROOT  RPMS  SOURCES  SPECS  SRPMS
[root@server1 rpmbuild]# cd RPMS/
[root@server1 RPMS]# ls
x86_64
[root@server1 RPMS]# cd x86_64/
[root@server1 x86_64]# ls
haproxy-1.6.11-1.x86_64.rpm
[root@server1 x86_64]# scp haproxy-1.6.11-1.x86_64.rpm server:/mnt
ssh: Could not resolve hostname server: Name or service not known
lost connection
[root@server1 x86_64]# scp haproxy-1.6.11-1.x86_64.rpm server2:/mnt
root@server2's password:
haproxy-1.6.11-1.x86_64.rpm                          100%  768KB 768.2KB/s   00:00

[root@server1 x86_64]# cd /etc/haproxy/
[root@server1 haproxy]# ls
haproxy.cfg
[root@server1 haproxy]# scp haproxy.cfg  server2:/etc/haproxy/
root@server2's password:
haproxy.cfg                                               100% 1681     1.6KB/s   00:00
添加haproxy服务
crm(live)configure# primitive haproxy lsb:haproxy op monitor interval=1min   ##添加haproxy服务
crm(live)configure# commit
有监控得到:server1又活过来了
vip (ocf::heartbeat:IPaddr2): Started server2
haproxy (lsb:haproxy): Started server1
crm(live)configure# group hagroup vip haproxy   ##添加组
crm(live)configure# commit
监控:
Resource Group: hagroup
vip (ocf::heartbeat:IPaddr2): Started server1
haproxy (lsb:haproxy): Started server1
Server2:
【root@server2 mnt]# crm node standby    ##让本机休息
有监控得:
Node server2: standby
Online: [ server1 ]

 Resource Group: hagroup
     vip        (ocf::heartbeat:IPaddr2):   Started server1
     haproxy    (lsb:haproxy):  Started server1


[root@server2 mnt]# crm node online  ##让本机起来
Online: [ server1 server2 ]

 Resource Group: hagroup
     vip        (ocf::heartbeat:IPaddr2):   Started server1
     haproxy    (lsb:haproxy):  Started server1
3.添加Fence:
root@foundation24 cluster]# /etc/init.d/fence_virtd status[root@server1 cluster]# crm
crm(live)# configure
crm(live)configure# primitive vmfence1 stonith:fence_xvm params pcmk_host_map="serv1:test1;server2:test2" op monitor interval=1min ##添加一个vmfence1的fence
crm(live)configure# commit ##保存
crm(live)configure# show
node server1 \
attributes standby="off"
node server2 \
attributes standby="off"
primitive haproxy lsb:haproxy \
op monitor interval="1min"
primitive vip ocf:heartbeat:IPaddr2 \
params ip="172.25.24.100" cidr_netmask="24" \
op monitor interval="1min"
primitive vmfence1 stonith:fence_xvm \
params pcmk_host_map="serv1:test1;server2:test2" \
op monitor interval="1min"
group hagroup haproxy
property $id="cib-bootstrap-options" \
dc-version="1.1.10-14.el6-368c726" \
cluster-infrastructure="classic openais (with plugin)" \
expected-quorum-votes="2" \
stonith-enabled="false" \
node-health-policy="ignore" \
no-quorum-policy="ignore"监控:
Online: [ server1 server2 ]

 Resource Group: hagroup
     haproxy    (lsb:haproxy):  Started server1
vip     (ocf::heartbeat:IPaddr2):   Started server2
vmfence1        (stonith:fence_xvm):    Started server1
测试:
[root@server1 cluster]# fence_xvm -H test1由监控得:
Online: [ server2 ]
OFFLINE: [ server1 ]

 Resource Group: hagroup
     haproxy    (lsb:haproxy):  Started server2
vip     (ocf::heartbeat:IPaddr2):   Started server2
vmfence1        (stonith:fence_xvm):    Started server2
重启之后,开启服务
root@server1 ~]# /etc/init.d/corosync start
Starting Corosync Cluster Engine (corosync):               [  OK  ]