实验环境
iptables和selinux关闭
redhat6.5
server1、server4:集群节点,server4的配置同server1
server2、server3:后端服务器
1、配置Haproxy
Haproxy是一款提供高可用性、负载均衡以及基于TCP(第四层)和HTTP(第七层)应用代理软件
yum install haproxy -y // 下载haproxy
//下载时也可用rpm安装包
yum install rpm-build
rpmbuild -tb haproxy-1.6.11.tar.gz //编译
rpm -ivh /root/rpmbuild/RPMS/x86_64/haproxy-1.6.11-1.x86_64.rpm
rpm -qpl rpmbuild/RPMS/x86_64/haproxy-1.6.11-1.x86_64.rpm
tar zxf haproxy-1.6.11.tar.gz //解压tar包,获取配置文件模板
cd haproxy-1.6.11
find -name *.spec //打包工具
cp /root/haproxy-1.6.11/examples/content-sw-sample.cfg /etc/haproxy/haproxy.cfg
cd /etc/haproxy/
vim haproxy.cfg //脚本内容里面规定脚本名称必须是haproxy.cfg
[root@server1 ~]# cd /etc/haproxy/
[root@server1 haproxy]# vim haproxy.cfg
global
maxconn 10000 //最大连接数
stats socket /var/run/haproxy.stat mode 600 level admin
log 127.0.0.1 local0
uid 200
gid 200
chroot /var/empty //保护操作系统
daemon
defaults
mode http //七层
log global
option httplog //日志记录
option dontlognull
monitor-uri /monitoruri //监控管理
maxconn 8000 //覆盖上面的值
timeout client 30s
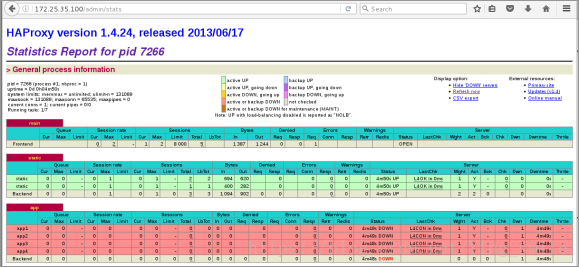
stats uri /admin/stats //对后端的健康检查,可以做用户访问控制
option prefer-last-server
retries 2 //后端测试RS会测试2次
option redispatch
timeout connect 5s
timeout server 5s
frontend public
bind *:80 name clear //监听所有ip
default_backend static
# The static backend backend for 'Host: img', /img and /css.
backend static
balance roundrobin //算法
server statsrv1 172.25.35.52:80 check inter 1000 ////后端服务器IP,check频率1000ms
server statsrv2 172.25.35.53:80 check inter 1000
[root@server1 haproxy]# vim /etc/security/limits.conf //添加如下内容
haproxy - nofile 10000
[root@server1 haproxy]# /etc/init.d/haproxy start服务器:
server2:
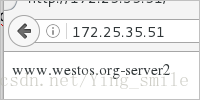
[root@server2 ~]# cat /var/www/html/index.html
www.westos.org-server2
[root@server2 ~]# /etc/init.d/httpd start
server3:
[root@server3 ~]# cat /var/www/html/index.html
www.westos.org
[root@server3 ~]# /etc/init.d/httpd start客户端测试:
[root@foundation35 kiosk]# curl 172.25.35.100
www.westos.org-server3
[root@foundation35 kiosk]# curl 172.25.35.100
www.westos.org
[root@foundation35 kiosk]# curl 172.25.35.100
www.westos.org-server3
浏览器测试:

haproxy的状态页:
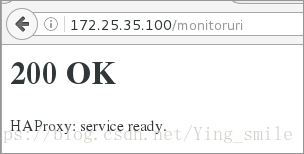
haproxy的监控页:

日志:
[root@server1 ~]# vim /etc/rsyslog.conf
 13 $ModLoad imudp
 14 $UDPServerRun 514
 42 *.info;mail.none;authpriv.none;cron.none;local0.none                /var/log/    messages
 62 local0.*                                                /var/log/haproxy.log
[root@server1 ~]# /etc/init.d/rsyslog restart
[root@server1 ~]# /etc/init.d/haproxy start
Starting haproxy:                                          [  OK  ]
[root@server1 ~]# cat /var/log/haproxy.log
Aug  4 02:48:46 localhost haproxy[1422]: Proxy main started.
Aug  4 02:48:46 localhost haproxy[1422]: Proxy static started
动静分离:
[root@server1 haproxy]# vim haproxy.cfg
52 use_backend static2 if { path_end -i .php }
53 default_backend static1
56 backend static1
57 balance roundrobin
58 #balance source
59 #option httpchk HEAD /favicon.ico
60 server statsrv1 172.25.35.52:80 check inter 1000
61 backend static2
62 balance roundrobin
63 server statsrv2 172.25.35.53:80 check inter 1000
[root@server1 haproxy]# /etc/init.d/haproxy reload
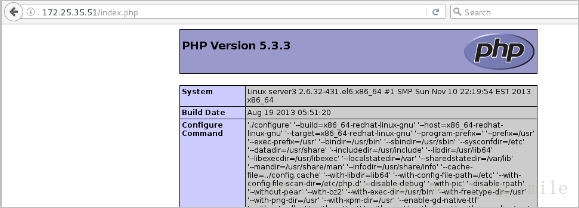
[root@server3 ~]# yum install php -y
[root@server3 ~]# cat /var/www/html/index.php
<?php
phpinfo()
?>浏览器测试:
访问控制:
[root@server1 haproxy]# vim haproxy.cfg
 46         acl blacklist    src  172.25.35.250
 47         http-request deny if blacklist
测试:

重定向:
[root@server1 haproxy]# vim haproxy.cfg  //当出现403报错
 46         acl blacklist    src  172.25.35.250
 47         http-request deny if blacklist
 48         errorloc   403  http://172.25.35.51:8080
[root@server1 haproxy]# /etc/init.d/haproxy reload
[root@server1 haproxy]# yum install httpd
[root@server1 haproxy]# cd /var/www/html
[root@server1 html]# vim index.html
系统维护中...
[root@server1 haproxy]# vim /etc/httpd/conf/httpd.conf
Listen 8080
[root@server1 haproxy]# /etc/init.d/httpd start
测试:

Curl不支持重定向
[root@foundation35 Desktop]# curl 172.25.35.51 -I
HTTP/1.1 302 Found
Cache-Control: no-cache
Content-length: 0
Location: http://172.25.35.51:8080

另外一种方法:当250访问时直接转入访问51主机的httpd
[root@server1 haproxy]# vim haproxy.cfg
 46         acl blacklist    src  172.25.35.250
 49         redirect  location  http://172.25.35.51:8080
[root@server1 haproxy]# /etc/init.d/haproxy reload

重定向到所有的ip访问到server2
[root@server1 haproxy]# vim haproxy.cfg
 50         redirect  location  http://172.25.35.52
[root@server1 haproxy]# /etc/init.d/haproxy reload
测试:
重定向到所有的ip访问到百度
[root@server1 haproxy]# vim haproxy.cfg
51         redirect  location  http://www.baidu.com
[root@server1 haproxy]# /etc/init.d/haproxy reload
测试:

读写分离:
server1:
[root@server1 haproxy]# vim haproxy.cfg
 47         acl write method POST
 48         acl write method PUT
 54         #use_backend     static2 if { path_end -i .php   }
 55         use_backend     static2 if write
 56         default_backend  static1
 57 backend static1
 58         balance         roundrobin
 59         #balance         source
 60         #option httpchk  HEAD /favicon.ico
 61         server          statsrv1 172.25.35.52:80 check inter 1000
 62 backend static2
 63         balance         roundrobin
 64         server          statsrv2 172.25.35.53:80 check inter 1000
[root@server1 haproxy]# /etc/init.d/haproxy reload

server2:
[root@server2 html]# yum install php -y
[root@server2 html]# scp -r upload/ [email protected]:/var/www/html/
[root@server2 html]# cd upload/
[root@server2 upload]# ls
index.php  upload_file.php
[root@server2 upload]# mv * ..
[root@server2 upload]# ls
[root@server2 upload]# cd ..
[root@server2 html]# ls
index.html  index.php  upload  upload_file.php
[root@server2 html]# vim upload_file.php
  5 && ($_FILES["file"]["size"] < 2000000))
[root@server2 html]# chmod 777 upload
[root@server2 html]# /etc/init.d/httpd restart

server3:
[root@server3 ~]# cd /var/www/html/
[root@server3 html]# ls
index.html  index.php  upload
[root@server3 html]# cd upload
[root@server3 upload]# ls
index.php  upload_file.php
[root@server3 upload]# mv * ..
mv: overwrite `../index.php'? y
[root@server3 upload]# ls
[root@server3 upload]# cd ..
[root@server3 html]# ls
index.html  index.php  upload  upload_file.php
[root@server3 html]# chmod 777 upload
[root@server3 html]# vim upload_file.php
  5 && ($_FILES["file"]["size"] < 2000000))
[root@server3 html]# /etc/init.d/httpd restart
测试:输入ip
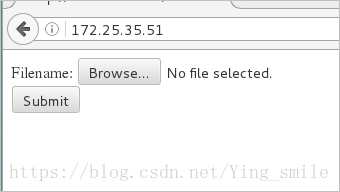
点击Browse…选择照片

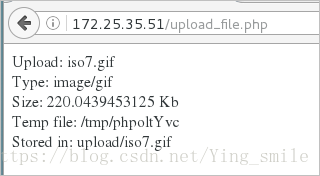
点击Submit
[root@server2 upload]# ls
[root@server2 upload]#

可以在server3上面看到上传的照片
[root@server3 upload]# ls
iso7.gif
2、配置pacemaker资源管理器和corosync心跳组件
Pacemaker是一个集群管理资源器。利用集群基础构件(corosync或heartbeat)提供消息和成员管理能力来探测并从节点或资源级别的故障中恢复,以实现集群服务的最大可能性
server2、server4:
[root@server1 haproxy]# yum install pacemaker corosync -y
[root@server1 haproxy]# cp /etc/corosync/corosync.conf.example /etc/corosync/corosync.conf
[root@server1 haproxy]# cd
[root@server1 ~]# yum install crmsh-1.2.6-0.rc2.2.1.x86_64.rpm pssh-2.3.1-2.1.x86_64.rpm -y
 //安装crm管理工具
[root@server1 ~]# vim /etc/corosync/corosync.conf
compatibility: whitetank

totem {
        version: 2
        secauth: off
        threads: 0
        interface {
                ringnumber: 0
                bindnetaddr: 172.25.35.0  //两台pacemaker的网段
                mcastaddr: 226.94.1.1  //广播地址
                mcastport: 5405
                ttl: 1
        }
}

logging {
        fileline: off
        to_stderr: no
        to_logfile: yes
        to_syslog: yes
        logfile: /var/log/cluster/corosync.log
        debug: off
        timestamp: on
        logger_subsys {
                subsys: AMF
                debug: off
        }
}

amf {
        mode: disabled
}
service{   //默认没有手动添加
        name: pacemaker
        ver:0  //连动
}
[root@server1 ~]# /etc/init.d/pacemaker start
[root@server1 ~]# /etc/init.d/corosync start
[root@server1 ~]# chkconfig corosync on
[root@server1 x86_64]# crm_verify -VL  //错误检测

//接下来只需要在server1操作
[root@server1 ~]# crm
crm(live)# status
Last updated: Fri Aug  3 08:30:36 2018
Last change: Fri Aug  3 08:08:24 2018 via crm_attribute on server1
Stack: cman
Current DC: server1 - partition with quorum
Version: 1.1.10-14.el6-368c726
2 Nodes configured
0 Resources configured


Online: [ server1 server4 ]
crm(live)# configure
crm(live)configure# primitive vip ocf:heartbeat:IPaddr2 params ip=172.25.35.100 cidr_netmask=24 op monitor interval=20s  //每隔20s监控一次
crm(live)configure# commit
error: unpack_resources:    Resource start-up disabled since no STONITH resources have been defined
   error: unpack_resources:     Either configure some or disable STONITH with the stonith-enabled option
   error: unpack_resources:     NOTE: Clusters with shared data need STONITH to ensure data integrity
Errors found during check: config not valid
Do you still want to commit? yes
crm(live)configure# property stonith-enabled=false  //关闭这个特性告诉集群:假装故障的节点已经安全的关机了
crm(live)configure# commit
crm(live)configure# cd
crm(live)# resource
crm(live)resource# status vip
resource vip is running on: server1
crm(live)resource# exit
bye
[root@server1 ~]# ip addr //上面显示server1工作,则vip分配给了server1
inet 172.25.35.100/24 scope global secondary eth0
[root@server1 ~]# crm
crm(live)# configure
crm(live)configure# primitive haproxy lsb:haproxy op monitor interval=30s
// haproxy名字,lsb资源代理,每隔30s监控
crm(live)configure# commit
crm(live)configure# group web vip haproxy  //绑定
crm(live)configure# commit
crm(live)configure# property no-quorum-policy=ignore
//忽略节点监测,集群至少为2个,实验中只有两个,忽略掉方便实验正常测试
crm(live)configure# commit
crm(live)configure# bye
Bye

server4:
[root@server4 ~]# crm_mon //监控如下图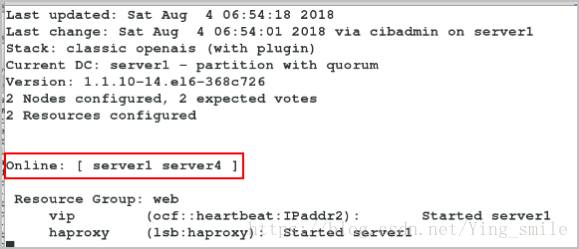
[root@server1 ~]# crm node standby //让server1歇着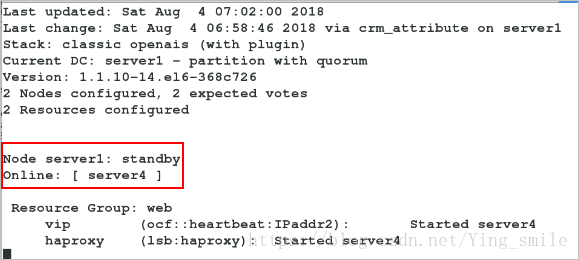
[root@server1 ~]# crm node online //开启server1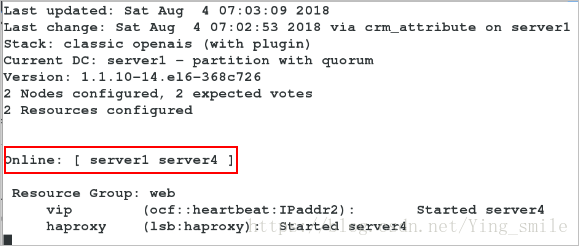
[root@server4 ~]# /etc/init.d/corosync stop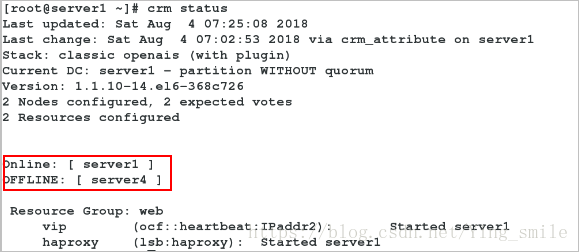
添加fence:
物理机配置好fence并开启服务:
[root@foundation69 ~]# yum install fence-virtd-multicast fence-virtd fence-virtd-libvirt -y
[root@foundation69 ~]# fence_virtd -c  //编写新的fence 信息
Module search path [/usr/lib64/fence-virt]: /usr/lib64/fence-virt //模块默认位置
Listener module [multicast]: multicast
Multicast IP Address [225.0.0.12]: 225.0.0.12
Using ipv4 as family.   //默认的
Multicast IP Port [1229]: 1229
Interface [virbr0]: br0
//这里br0是因为虚拟服务器受主机控制的网卡是br0
Key File [/etc/cluster/fence_xvm.key]: /etc/cluster/fence_xvm.key
Backend module [libvirt]: libvirt
[root@foundation69 ~]# cat /etc/fence_virt.conf  //此时查看配置文件
backends {
    libvirt {
        uri = "qemu:///system";
    }

}

listeners {
    multicast {
        port = "1229";
        family = "ipv4";
        interface = "br0";
        address = "225.0.0.12";
        key_file = "/etc/cluster/fence_xvm.key";
    }

}

fence_virtd {
    module_path = "/usr/lib64/fence-virt";
    backend = "libvirt";
    listener = "multicast";
}

[root@foundation69 ~]# mkdir /etc/cluster
[root@foundation69 ~]# dd if=/dev/urandom of=/etc/cluster/fence_xvm.key bs=128 count=1
[root@foundation69 ~]# file /etc/cluster/fence_xvm.key //查看文件类型
/etc/cluster/fence_xvm.key: data
[root@foundation69 ~]# systemctl restart fence_virtd
[root@foundation69 ~]# systemctl enable fence_virtd
[root@foundation69 ~]# netstat -anulp | grep fence_virtd
udp        0      0 0.0.0.0:1229            0.0.0.0:*                           8657/fence_virtd
[root@foundation69 Desktop]# scp /etc/cluster/fence_xvm.key server1:/etc/cluster/
[root@foundation69 Desktop]# scp /etc/cluster/fence_xvm.key server4:/etc/cluster/


server1:
[root@server1 ~]# ls /etc/cluster/
fence_xvm.key
[root@server1 ~]# crm
crm(live)# configure
crm(live)configure# primitive vmfence stonith:fence_xvm params pcmk_host_map="server1:test1;server4:test4" op monitor
interval="1min"
crm(live)configure# commit
crm(live)configure# property stonith-enabled=true
crm(live)configure# commit
crm(live)configure# show
node server1 \
    attributes standby="off"
node server4
primitive haproxy lsb:haproxy \
    op monitor interval="30s"
primitive vip ocf:heartbeat:IPaddr2 \
    params ip="172.25.35.100" cidr_netmask="24" \
    op monitor interval="20s"
primitive vmfence stonith:fence_xvm \
    params pcmk_host_map="server1:test1;server4:test4" \
    op monitor interval="1min"
group web vip haproxy
property $id="cib-bootstrap-options" \
    dc-version="1.1.10-14.el6-368c726" \
    cluster-infrastructure="classic openais (with plugin)" \
    stonith-enabled="true" \
    expected-quorum-votes="2" \
    no-quorum-policy="ignore"
crm(live)configure# exit
bye


server4:
[root@server4 ~]# ls /etc/cluster/
fence_xvm.key

[root@server4 ~]# crm_mon  //监控如下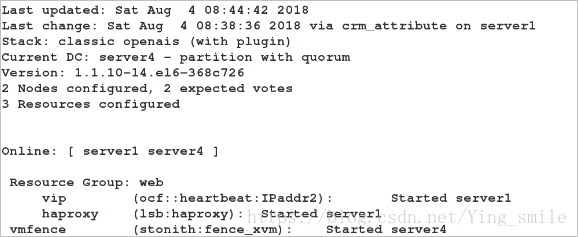
[root@server4 ~]# fence_xvm -H test1  //切换至server1,test1为server的
[root@server4 ~]# crm_mon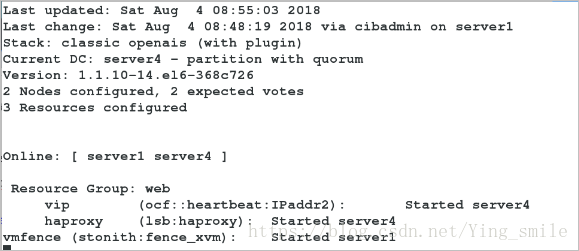
[root@server4 ~]# echo c >/proc/sysrq-trigger //server4会自动开机

[root@server1 ~]# crm_mon