RHCS套件+NGINX实现高可用集群配置(luci+ricci+fence)
https://blog.csdn.net/aaaaaab_/article/details/81381237
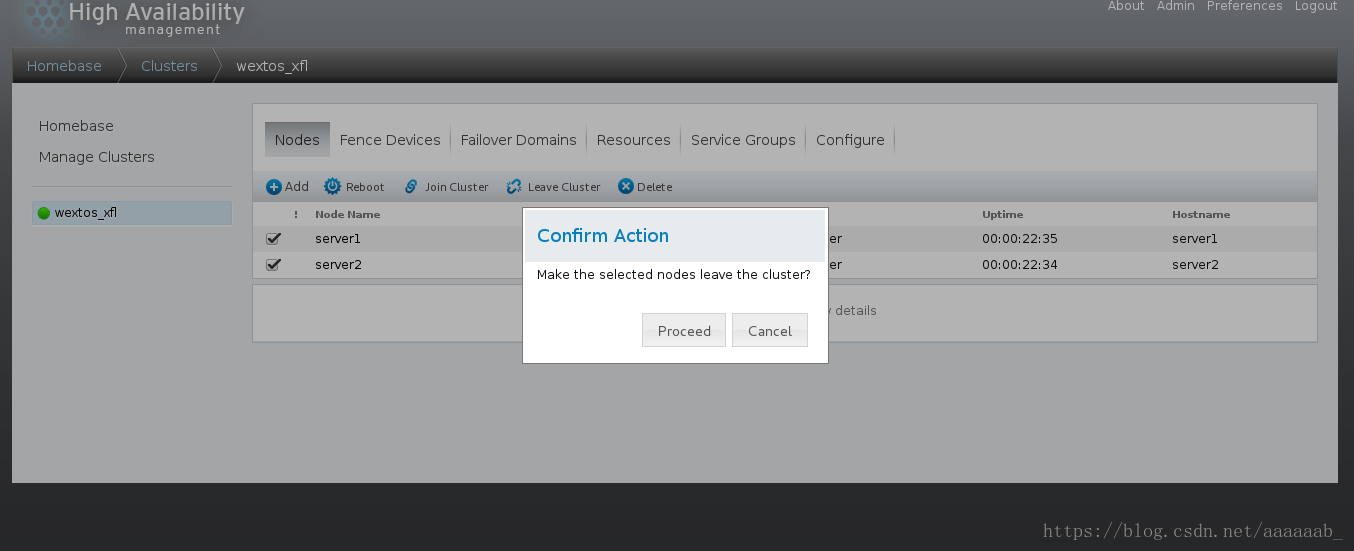
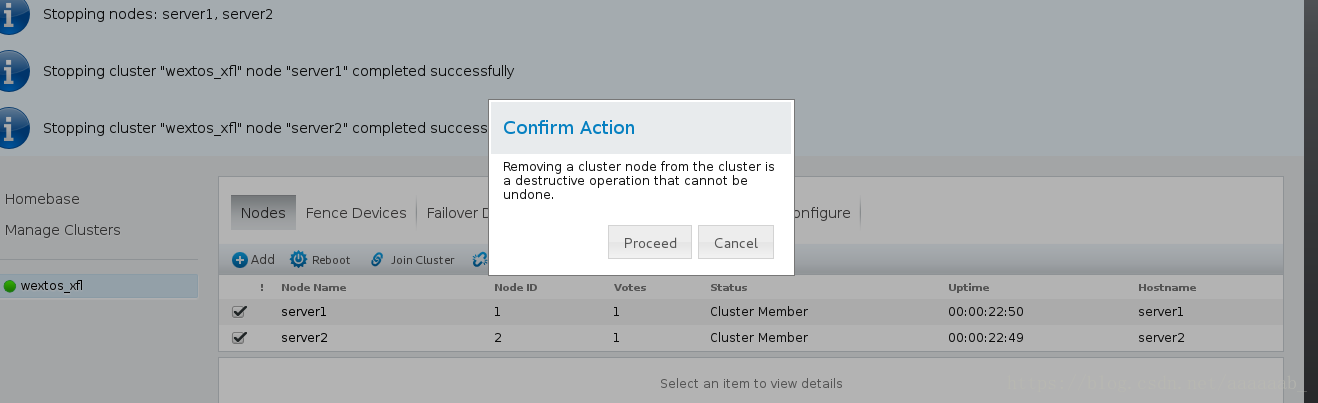
这是上一个实验配置的集群,我们将其删除:
首先到服务组停止服务:
将节点离开leave cluster:
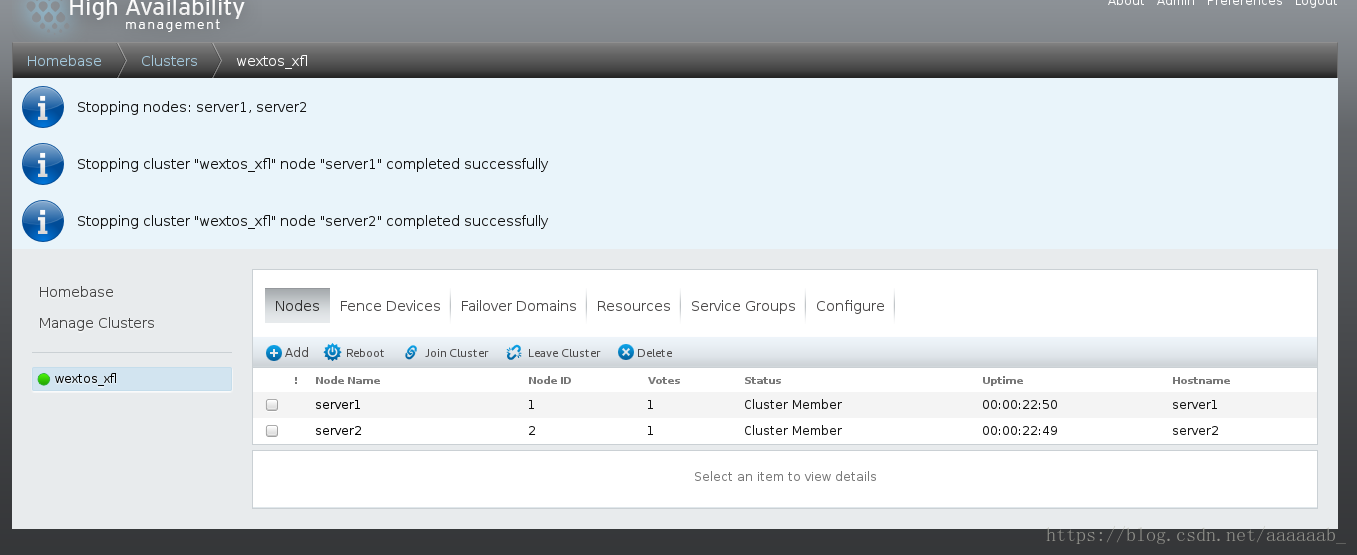
将节点删除:

CMAN和rgmanager简介:
Cluster manager 简称CMAN,是一个分布式集群管理工具,运行在集群的各个节点上,为RHCS提供集群管理任务。
它用于管理集群成员、消息和通知。它通过监控每个节点的运行状态来了解节点成员之间的有关系。当集群中某个节点
出现故障时,节点成员关系将发生改变,CMAN及时将这种改变通知底层,进而做出相应的调整。
CMAN根据每个节点的运行状态,统计出一个法定节点数,作为集群是否存活的依据。当整个集群中有多于一半的
节点处于激活状态时,表示达到了法定节点数,此集群可以正常运行,当集群中有一半或少于一半的节点处于激活
状态时,表示没有达到法定的节点数,此时整个集群系统将变得不可用。CMAN依赖于CCS,并且CMAN通过CCS读取
cluster.conf文件。
rgmanager主要用来监督、启动、停止集群的应用、服务和资源。当一个节点的服务失败时,高可用集群服务管理
进程可以将服务从这个失败节点转移至其点健康节点上,这种服务转移能力是自动动,透明的。RHCS通过rgmanager
来管理集群服务,rgmanager运行在每个集群节点上,在服务器上对应的进程为clurgmgrd。
在RHCS集群中,高可用生服务包括集群服务和集群资源两个方面。集群服务其实就是应用,如APACHE,MYSQL等。
集群资源有IP地址,脚本,EXT3/GFS文件系统等。
在RHCS集群中,高可用性服务是和一个失败转移域结合在一起的。由几个节点负责一个特定的服务的集合叫失败转移域,
在失败迁移域中可以设置节点的优先级,主节点失效,服务会迁移至次节点,如果没有设置优先,集群高可用服务将在任
意节点间转移。
在server1查看关闭CMAN以及其他的服务:
[root@server1 ~]# clustat  没有工作的服务器
Cluster Status for wextos_xfl @ Sat Aug  4 09:12:08 2018
Member Status: Quorate

 Member Name                             ID   Status
 ------ ----                             ---- ------
 server1                                     1 Online, Local, rgmanager
 server2                                     2 Online, rgmanager

 Service Name                   Owner (Last)                   State
 ------- ----                   ----- ------                   -----
 service:mysql                  (server2)                      disabled
[root@server1 ~]# /etc/init.d/tgtd status  查看状态
-bash: /etc/init.d/tgtd: No such file or directory
[root@server1 ~]# clustat  将节点离开之后
Could not connect to CMAN: No such file or directory
[root@server1 ~]# cd /etc/cluster/
[root@server1 cluster]# ll cluster.conf  将节点删除就没有了.conf文件
-rw-r----- 1 root root 1181 Aug  2 17:06 cluster.conf
[root@server1 cluster]# chkconfig --list cman  将其他套件服务都关闭
cman            0:off   1:off   2:on    3:on    4:on    5:on    6:off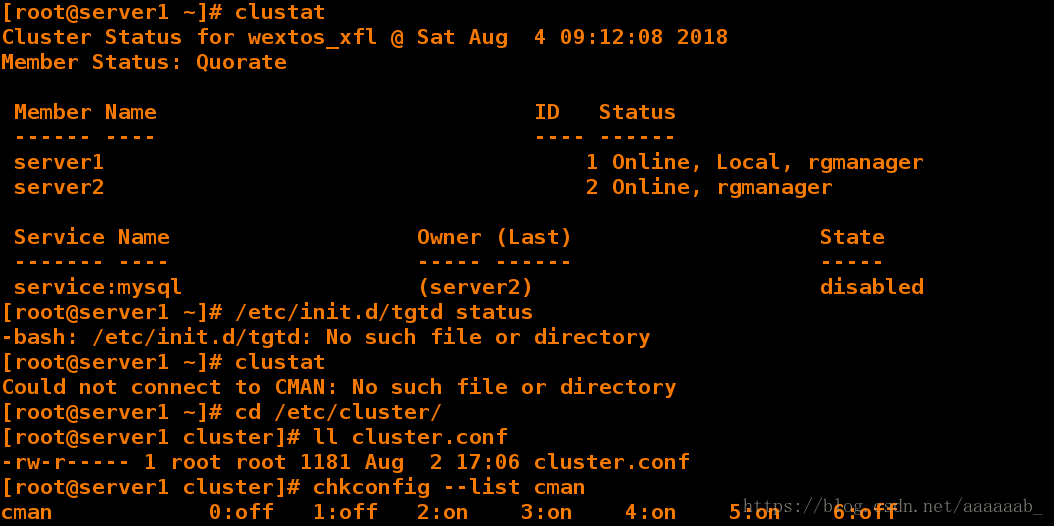
[root@server1 cluster]# chkconfig cman off 关闭cman
[root@server1 cluster]# chkconfig --list cman
cman            0:off   1:off   2:off   3:off   4:off   5:off   6:off
[root@server1 cluster]# ls
cluster.conf  cman-notify.d  fence_xvm.key
[root@server1 cluster]# chkconfig --list rgmanager
rgmanager       0:off   1:off   2:on    3:on    4:on    5:on    6:off
[root@server1 cluster]# chkconfig rgmanager off  关闭rfmanager
[root@server1 cluster]# chkconfig --list modclusterd
modclusterd     0:off   1:off   2:on    3:on    4:on    5:on    6:off
[root@server1 cluster]# chkconfig modclusterd off  关闭
[root@server1 cluster]# chkconfig --list modclusterd
modclusterd     0:off   1:off   2:off   3:off   4:off   5:off   6:off
[root@server1 cluster]# chkconfig --list iscsi  关闭iscsi
iscsi           0:off   1:off   2:off   3:on    4:on    5:on    6:off
[root@server1 cluster]# chkconfig iscsi off
[root@server1 cluster]# vim /etc/lvm/lvm.conf
[root@server1 cluster]# chkconfig ricci off  将ricci和luci的服务停掉
[root@server1 cluster]# chkconfig luci off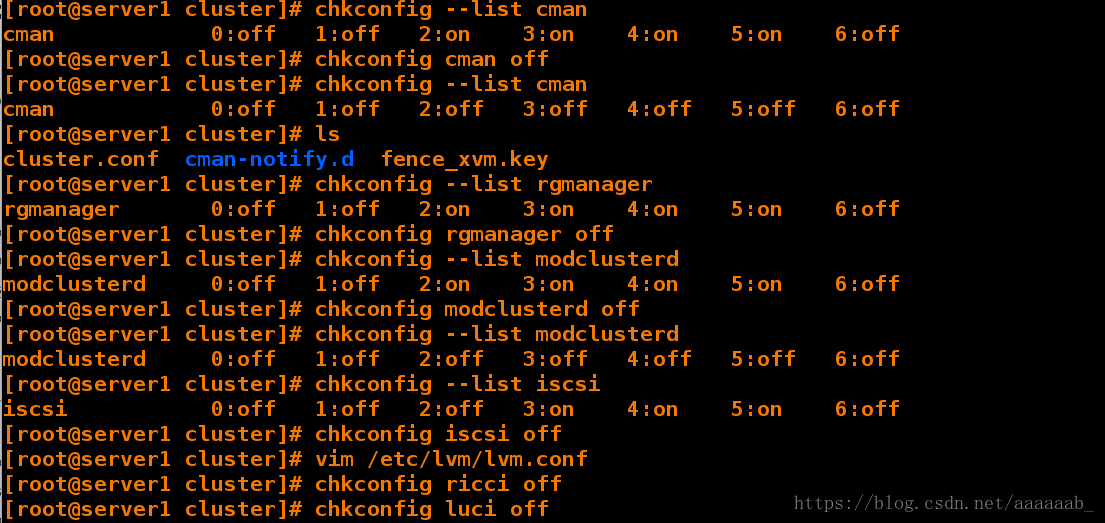
[root@server1 cluster]# /etc/init.d/modclusterd stop  依次将服务关闭
Shutting down Cluster Module - cluster monitor:            [  OK  ]
[root@server1 cluster]# /etc/init.d/ricci stop
Shutting down ricci:                                       [  OK  ]
[root@server1 cluster]# /etc/init.d/luci stop
Stop luci...                                               [  OK  ]
[root@server1 cluster]# /etc/init.d/iscsi stop
Stopping iscsi:                                            [  OK  ]
[root@server1 cluster]# cd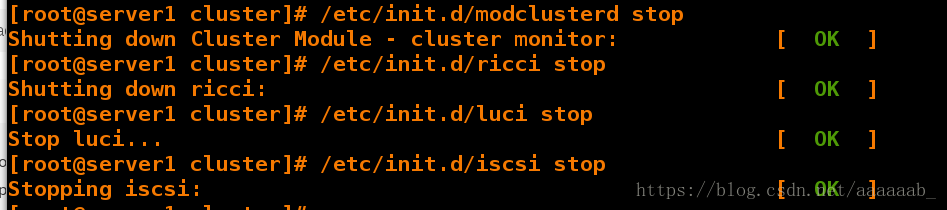
在server2结合ps ax查看是否将相关服务关闭还原环境:
[root@server2 ~]# clustat  查看状态
Cluster Status for wextos_xfl @ Sat Aug  4 09:12:26 2018
Member Status: Quorate

 Member Name                             ID   Status
 ------ ----                             ---- ------
 server1                                     1 Online, rgmanager
 server2                                     2 Online, Local, rgmanager

 Service Name                   Owner (Last)                   State
 ------- ----                   ----- ------                   -----
 service:mysql                  (server2)                      disabled
[root@server2 ~]# df  查看挂载
Filesystem                   1K-blocks    Used Available Use% Mounted on
/dev/mapper/VolGroup-lv_root  19134332 1131508  17030844   7% /
tmpfs                           251124   25656    225468  11% /dev/shm
/dev/vda1                       495844   33471    436773   8% /boot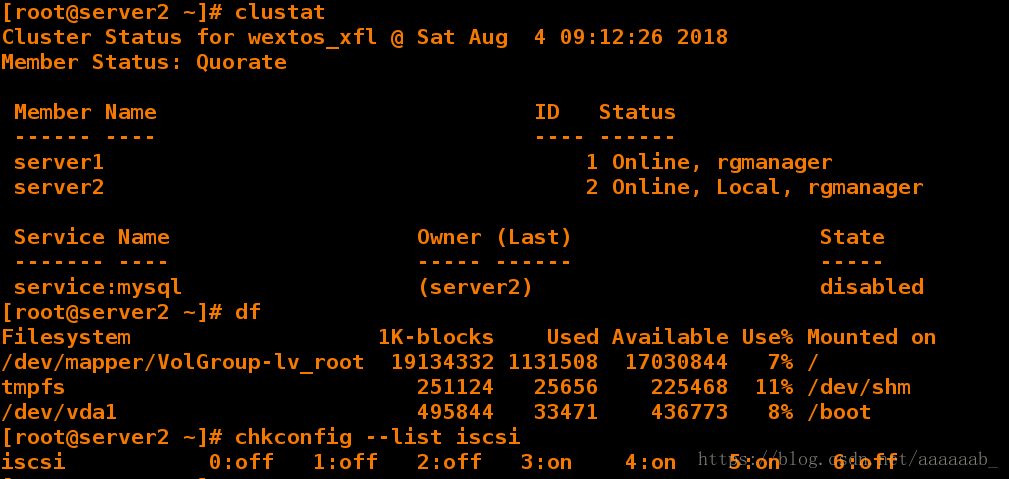
[root@server2 ~]# chkconfig --list iscsi  将套件服务均关闭
iscsi           0:off   1:off   2:off   3:on    4:on    5:on    6:off
[root@server2 ~]# /etc/init.d/tgtd status
-bash: /etc/init.d/tgtd: No such file or directory
[root@server2 ~]# chkconfig modclusterd off
[root@server2 ~]# chkconfig ricci off
[root@server2 ~]# chkconfig iscsi off
stop
Shutting down Cluster Module - cluster monitor:            [  OK  ]
[root@server2 ~]# /etc/init.d/iscsi stop
Stopping iscsi:                                            [  OK  ]
Haproxy+PaceMaker实验配置:
server1,server2:集群节点

server3,server4:后端服务器
在server1配置haproxy:
[root@server1 ~]# ls
asciidoc-8.4.5-4.1.el6.noarch.rpm   libnfnetlink-devel-1.0.0-1.el6.x86_64.rpm
haproxy-1.6.11.tar.gz               lvs-fullnat-synproxy
keepalived-2.0.6                    Lvs-fullnat-synproxy.tar.gz
keepalived-2.0.6.tar.gz             newt-devel-0.52.11-3.el6.x86_64.rpm
kernel-2.6.32-220.23.1.el6.src.rpm  rpmbuild
ldirectord-3.9.5-3.1.x86_64.rpm     slang-devel-2.2.1-1.el6.x86_64.rpm
[root@server1 ~]# yum install rpm-build -y  安装rpmbuild制作rpm包的工具
[root@server1 ~]# rpmbuild -tb haproxy-1.6.11.tar.gz
error: Failed build dependencies:
    pcre-devel is needed by haproxy-1.6.11-1.x86_64
[root@server1 ~]# yum install pcre-devel -y 解决依赖性
[root@server1 ~]# rpmbuild -tb haproxy-1.6.11.tar.gz 制作包编译
[root@server1 ~]# cd rpmbuild/RPMS/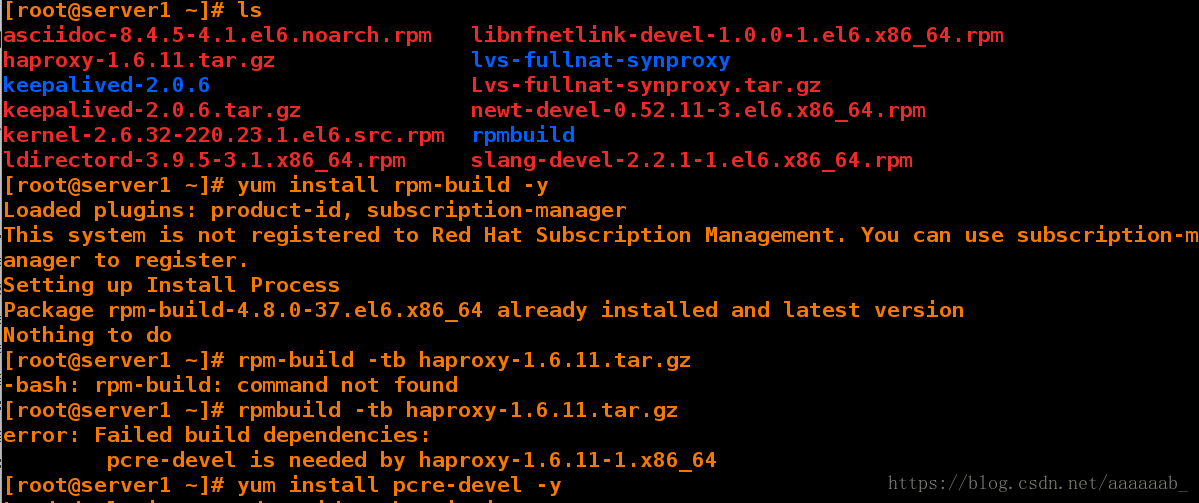
[root@server1 RPMS]# ls
x86_64
[root@server1 RPMS]# cd x86_64/
[root@server1 x86_64]# ls
haproxy-1.6.11-1.x86_64.rpm  haproxy-debuginfo-1.6.11-1.x86_64.rpm
[root@server1 x86_64]# rpm -qpl haproxy-1.6.11-1.x86_64.rpm    查看安装了那些软件
/etc/haproxy
/etc/rc.d/init.d/haproxy
/usr/sbin/haproxy
/usr/share/doc/haproxy-1.6.11
/usr/share/doc/haproxy-1.6.11/CHANGELOG
/usr/share/doc/haproxy-1.6.11/README
/usr/share/doc/haproxy-1.6.11/architecture.txt
/usr/share/doc/haproxy-1.6.11/configuration.txt
/usr/share/doc/haproxy-1.6.11/intro.txt
/usr/share/doc/haproxy-1.6.11/management.txt
/usr/share/doc/haproxy-1.6.11/proxy-protocol.txt
/usr/share/man/man1/haproxy.1.gz
[root@server1 x86_64]# ls
haproxy-1.6.11-1.x86_64.rpm  haproxy-debuginfo-1.6.11-1.x86_64.rpm
[root@server1 x86_64]# rpm -ivh haproxy-1.6.11-1.x86_64.rpm  安装haproxy
Preparing...                ########################################### [100%]
   1:haproxy                ########################################### [100%]
[root@server1 x86_64]# cd
[root@server1 ~]# ls
asciidoc-8.4.5-4.1.el6.noarch.rpm   libnfnetlink-devel-1.0.0-1.el6.x86_64.rpm
haproxy-1.6.11.tar.gz               lvs-fullnat-synproxy
keepalived-2.0.6                    Lvs-fullnat-synproxy.tar.gz
keepalived-2.0.6.tar.gz             newt-devel-0.52.11-3.el6.x86_64.rpm
kernel-2.6.32-220.23.1.el6.src.rpm  rpmbuild
ldirectord-3.9.5-3.1.x86_64.rpm     slang-devel-2.2.1-1.el6.x86_64.rpm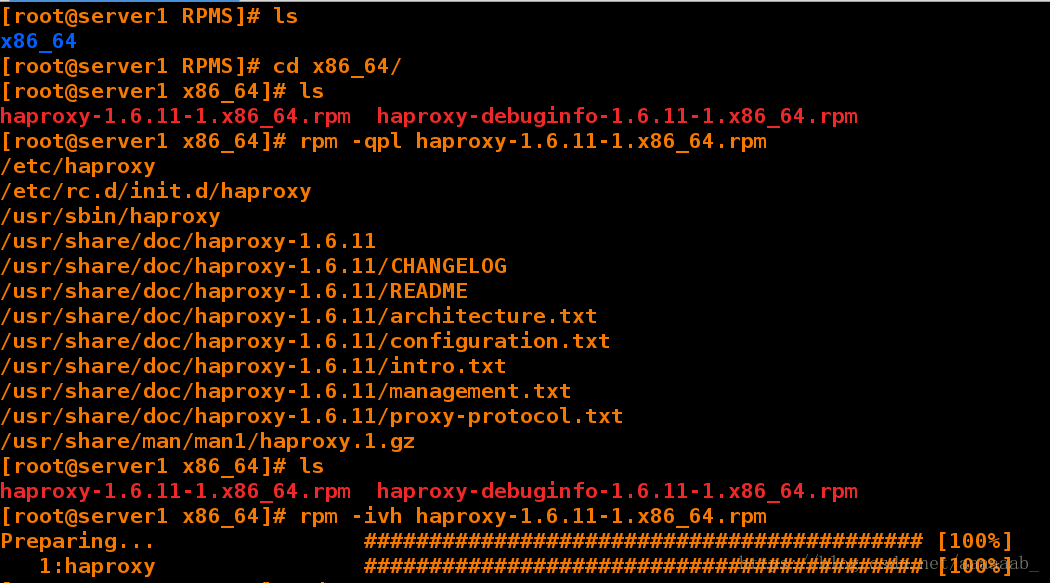
[root@server1 ~]# tar zxf haproxy-1.6.11.tar.gz  解压源码包
[root@server1 ~]# ls
asciidoc-8.4.5-4.1.el6.noarch.rpm   libnfnetlink-devel-1.0.0-1.el6.x86_64.rpm
haproxy-1.6.11                      lvs-fullnat-synproxy
haproxy-1.6.11.tar.gz               Lvs-fullnat-synproxy.tar.gz
keepalived-2.0.6                    newt-devel-0.52.11-3.el6.x86_64.rpm
keepalived-2.0.6.tar.gz             rpmbuild
kernel-2.6.32-220.23.1.el6.src.rpm  slang-devel-2.2.1-1.el6.x86_64.rpm
ldirectord-3.9.5-3.1.x86_64.rpm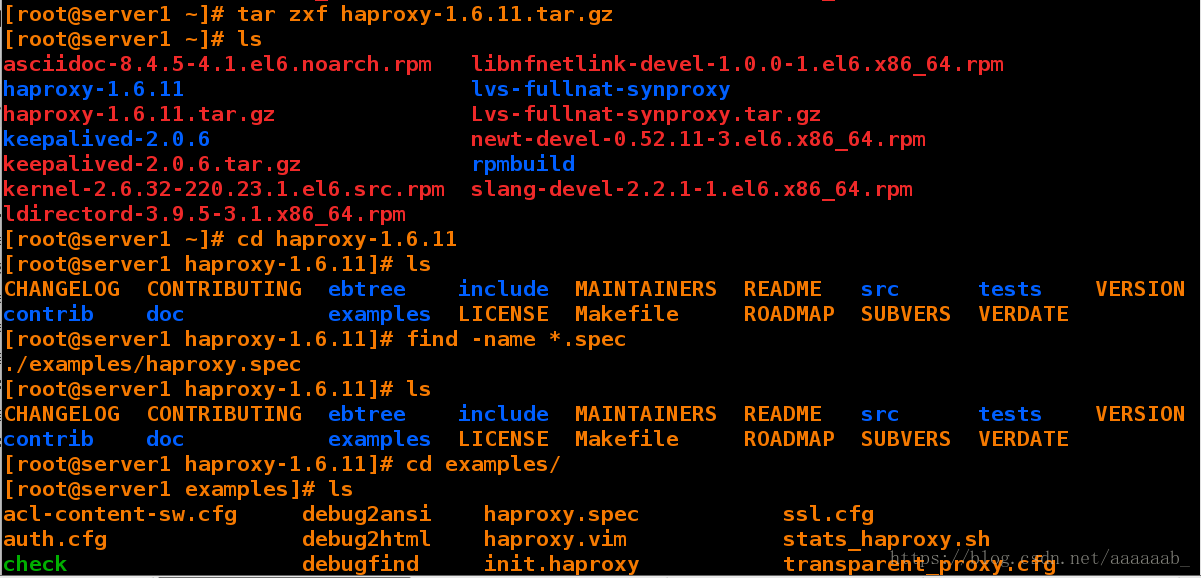
[root@server1 ~]# cd haproxy-1.6.11  进入解压好的路径
[root@server1 haproxy-1.6.11]# ls
CHANGELOG  CONTRIBUTING  ebtree    include  MAINTAINERS  README   src      tests    VERSION
contrib    doc           examples  LICENSE  Makefile     ROADMAP  SUBVERS  VERDATE
[root@server1 haproxy-1.6.11]# find -name *.spec
./examples/haproxy.spec
[root@server1 haproxy-1.6.11]# ls
CHANGELOG  CONTRIBUTING  ebtree    include  MAINTAINERS  README   src      tests    VERSION
contrib    doc           examples  LICENSE  Makefile     ROADMAP  SUBVERS  VERDATE
[root@server1 haproxy-1.6.11]# cd examples/
[root@server1 examples]# ls
acl-content-sw.cfg     debug2ansi    haproxy.spec           ssl.cfg
auth.cfg               debug2html    haproxy.vim            stats_haproxy.sh
check                  debugfind     init.haproxy           transparent_proxy.cfg
check.conf             errorfiles    option-http_proxy.cfg
content-sw-sample.cfg  haproxy.init  seamless_reload.txt
[root@server1 examples]# cp content-sw-sample.cfg /etc/haproxy/haproxy.cfg  复制文件
[root@server1 examples]# cd /etc/haproxy/
[root@server1 haproxy]# ls
haproxy.cfg
[root@server1 haproxy]# groupadd -g 200 haproxy  建立组
[root@server1 haproxy]# useradd -u 200 -g 200 -M haproxy 建立用户
[root@server1 haproxy]# id haproxy 查看用户
uid=200(haproxy) gid=200(haproxy) groups=200(haproxy)
[root@server1 haproxy]# su - haproxy  可以切换到haproxy只是提供了一个shell而已
su: warning: cannot change directory to /home/haproxy: No such file or directory
-bash-4.1$ logout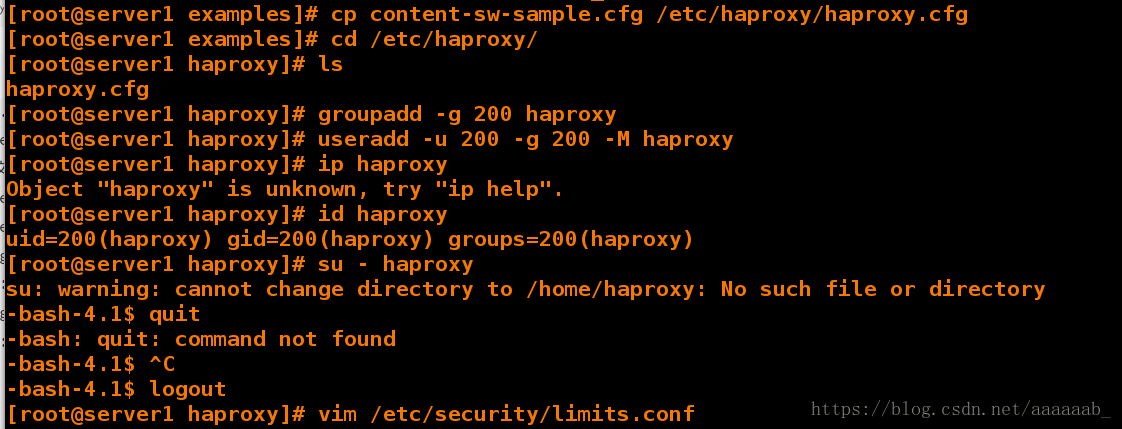
[root@server1 haproxy]# vim /etc/security/limits.conf 编辑填写最大文件数
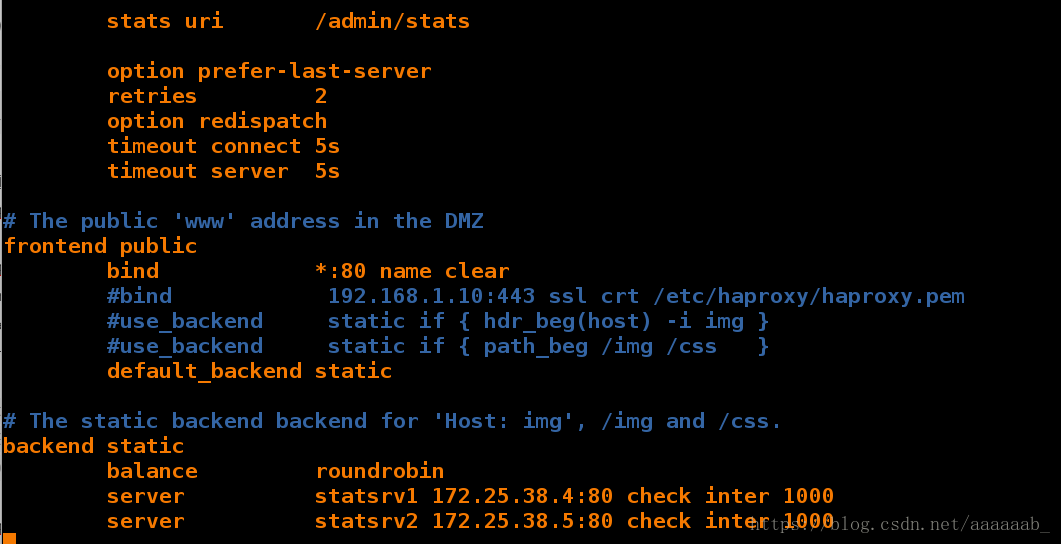
[root@server1 haproxy]# vim haproxy.cfg 编写配置文件写入健康检查监控以及后端IP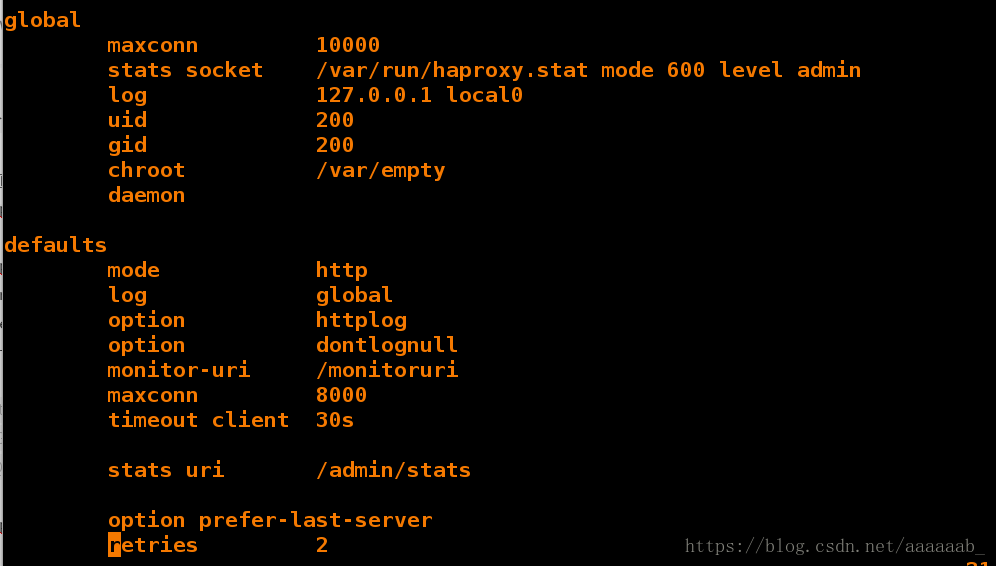
[root@server1 haproxy]# /etc/init.d/haproxy restart  重启服务
Shutting down haproxy:                                     [  OK  ]
Starting haproxy:                                          [  OK  ]
在两个后端打开阿帕奇写入访问文件:
在网页测试haproxy的轮询:


在网页测试haproxy的健康检查:
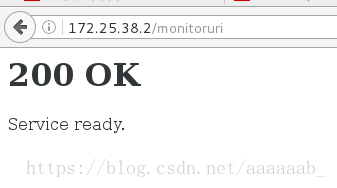
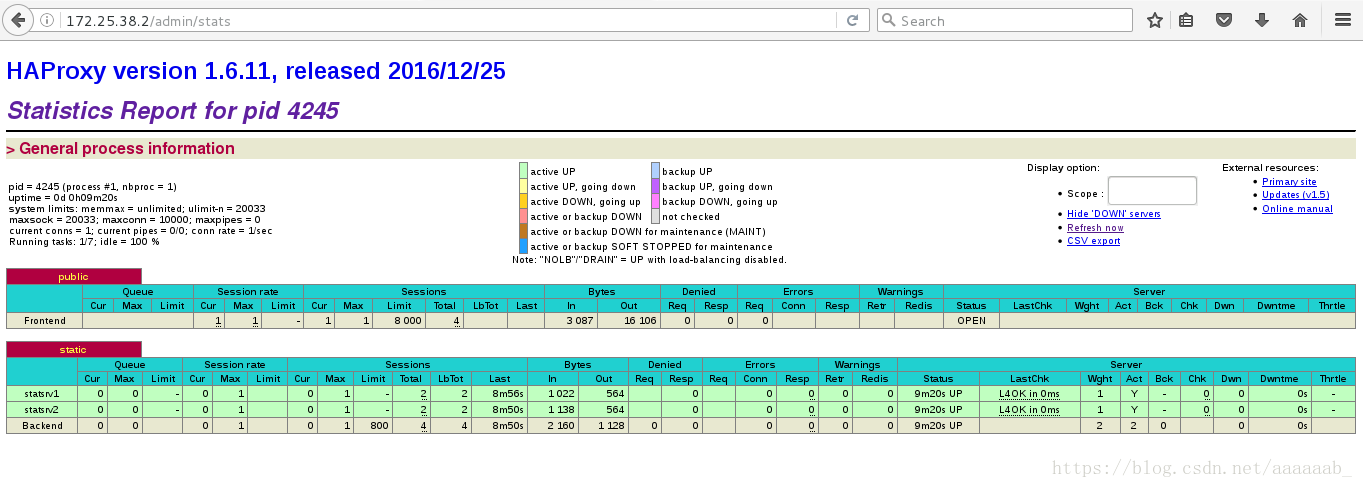
在网页测试haproxy的监控:
Haproxy有8种负载均衡算法-
1.balance roundrobin # 轮询,软负载均衡基本都具备这种算法
2.balance static-rr # 根据权重,建议使用
3.balance leastconn # 最少连接者先处理,建议使用
4.balance source # 根据请求源IP,建议使用
5.balance uri # 根据请求的URI
6.balance url_param,# 根据请求的URl参数'balance url_param' requires an URL parameter name
7.balance hdr(name) # 根据HTTP请求头来锁定每一次HTTP请求
8.balance rdp-cookie(name) # 根据据cookie(name)来锁定并哈希每一次TCP请求
演示source的算法:
[root@server1 log]# vim /etc/rsyslog.conf 编写日至的配置文件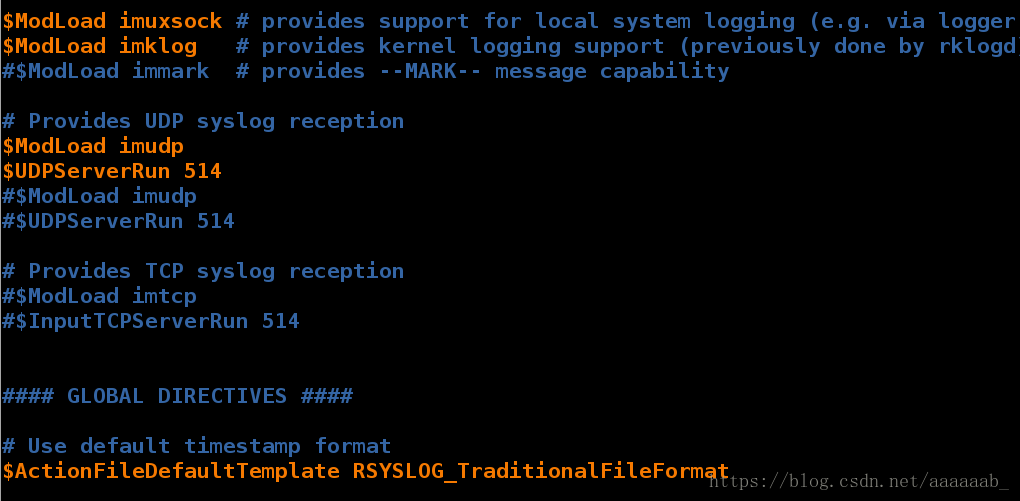
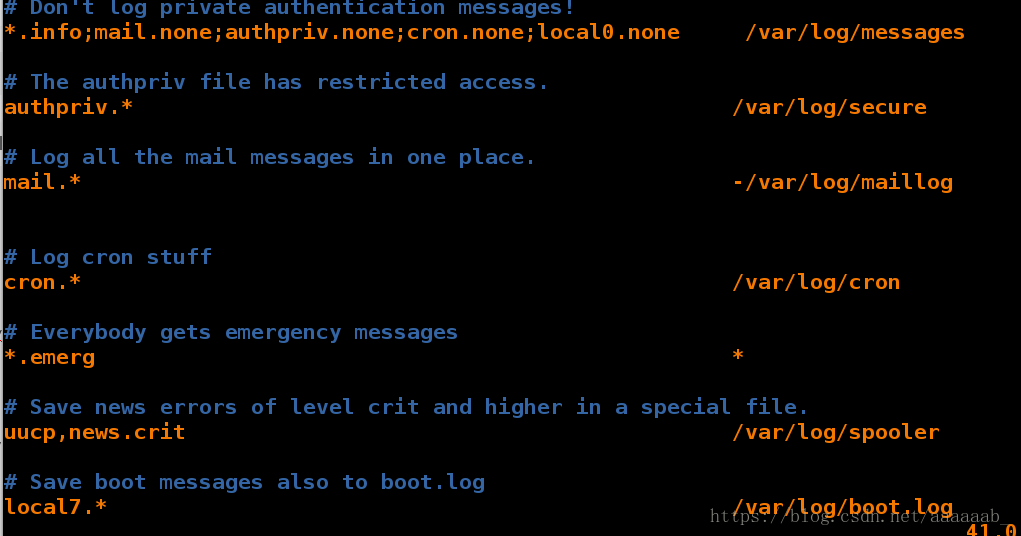
[root@server1 log]# /etc/init.d/rsyslog restart 重启服务
Shutting down system logger:                               [  OK  ]
Starting system logger:                                    [  OK  ]
[root@server1 log]# cd /var/log/
[root@server1 log]# ll haproxy.log
-rw------- 1 root root 350 Aug  4 11:38 haproxy.log
[root@server1 log]# cat haproxy.log刷新一个网页会有新的日至生成
Aug  4 11:04:52 localhost haproxy[4245]: 172.25.38.250:51558 [04/Aug/2018:11:04:52.212] public public/<STATS> 0/0/0/0/0 200 14840 - - LR-- 1/1/0/0/0 0/0 "GET /admin/stats HTTP/1.1"
Aug  4 11:38:48 localhost haproxy[4245]: 172.25.38.250:51892 [04/Aug/2018:11:38:48.299] public static/statsrv1 0/0/0/0/0 200 282 - - ---- 1/1/0/0/0 0/0 "GET / HTTP/1.1"
[root@server1 log]# cat haproxy.log
Aug  4 11:04:52 localhost haproxy[4245]: 172.25.38.250:51558 [04/Aug/2018:11:04:52.212] public public/<STATS> 0/0/0/0/0 200 14840 - - LR-- 1/1/0/0/0 0/0 "GET /admin/stats HTTP/1.1"
Aug  4 11:38:48 localhost haproxy[4245]: 172.25.38.250:51892 [04/Aug/2018:11:38:48.299] public static/statsrv1 0/0/0/0/0 200 282 - - ---- 1/1/0/0/0 0/0 "GET / HTTP/1.1"
Aug  4 11:45:35 localhost haproxy[4245]: 172.25.38.250:51904 [04/Aug/2018:11:45:35.865] public static/statsrv2 0/0/0/0/0 200 282 - - ---- 1/1/0/1/0 0/0 "GET / HTTP/1.1"
Aug  4 11:45:36 localhost haproxy[4245]: 172.25.38.250:51904 [04/Aug/2018:11:45:35.866] public static/statsrv1 680/0/0/1/681 200 282 - - ---- 1/1/0/1/0 0/0 "GET / HTTP/1.1"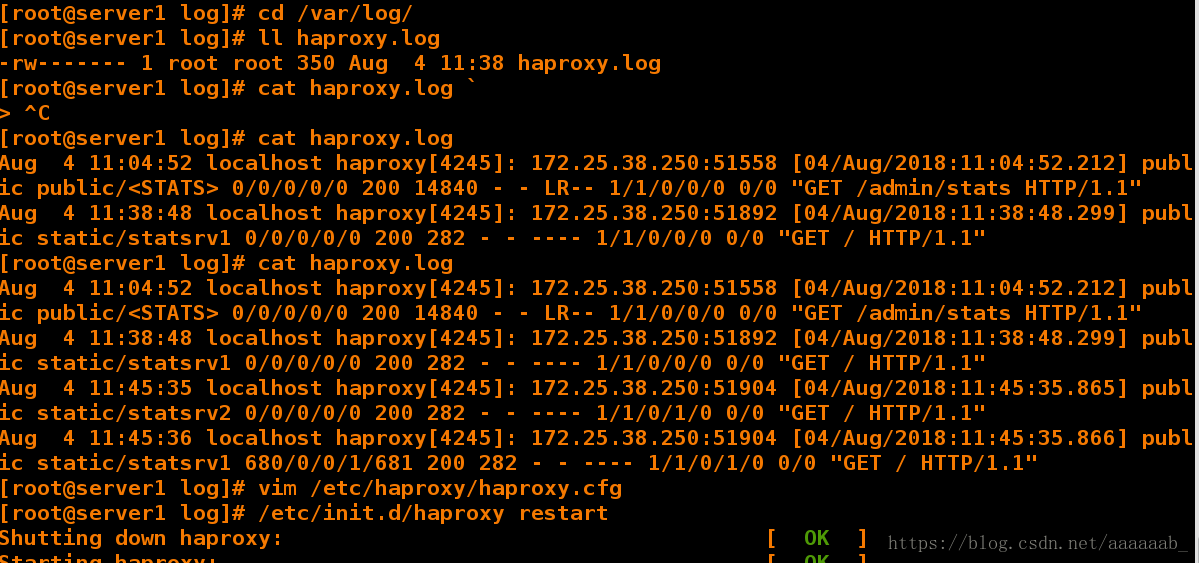
[root@server1 log]# vim /etc/haproxy/haproxy.cfg 更改算法
[root@server1 log]# /etc/init.d/haproxy restart
Shutting down haproxy:                                     [  OK  ]
Starting haproxy:                                          [  OK  ]
在server3关闭和开启阿帕其分别在网页测试:(bbs.westos.com)
关闭之后为server4的默认发布文件

打开之后默认访问为server3.这个是算法本身的问题:

用php网页测试动静分离:
在server1更改haproxy的配置文件:
[root@server1 log]# vim /etc/haproxy/haproxy.cfg   编辑haproxy配置文件
[root@server1 log]# /etc/init.d/haproxy restart  重启服务
Shutting down haproxy:                                     [  OK  ]
Starting haproxy:                                          [  OK  ]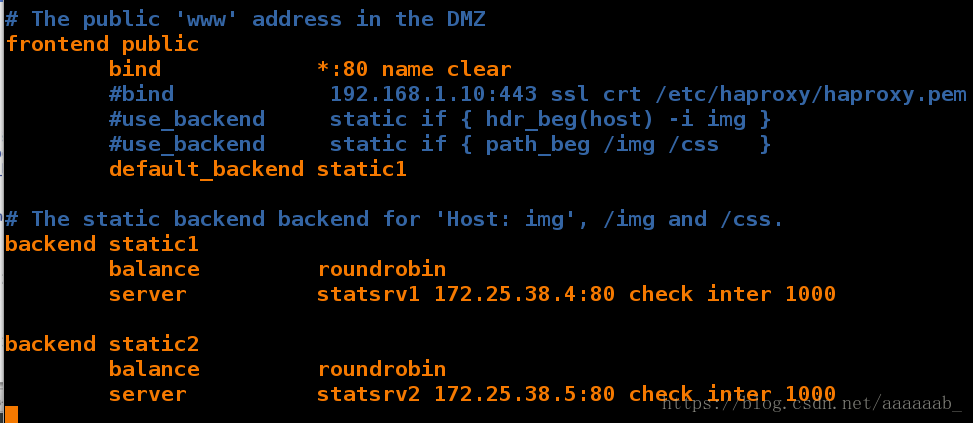
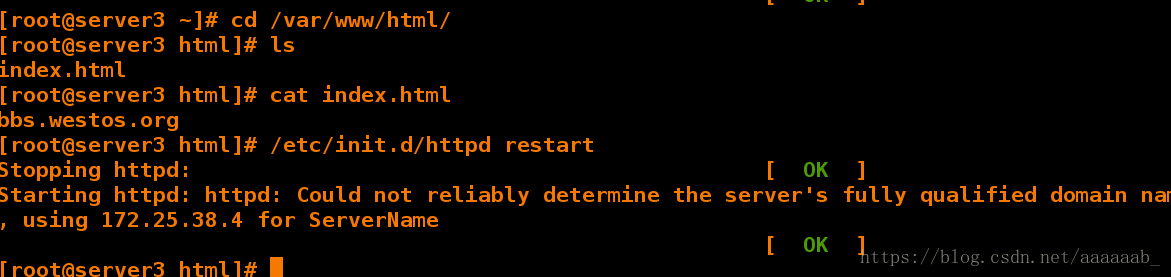
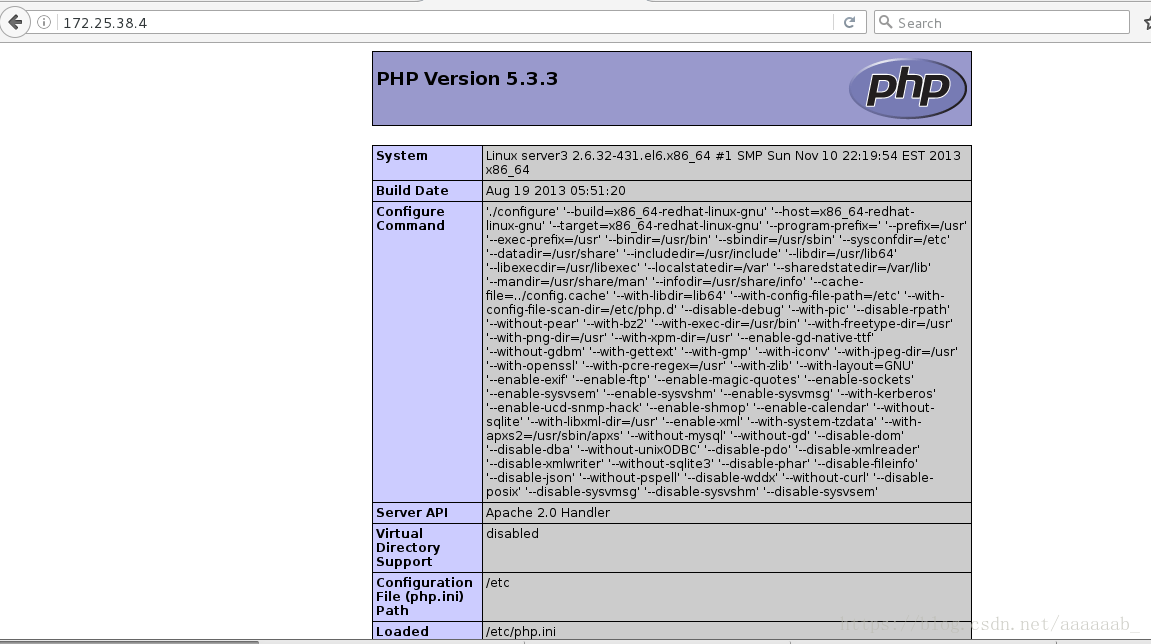
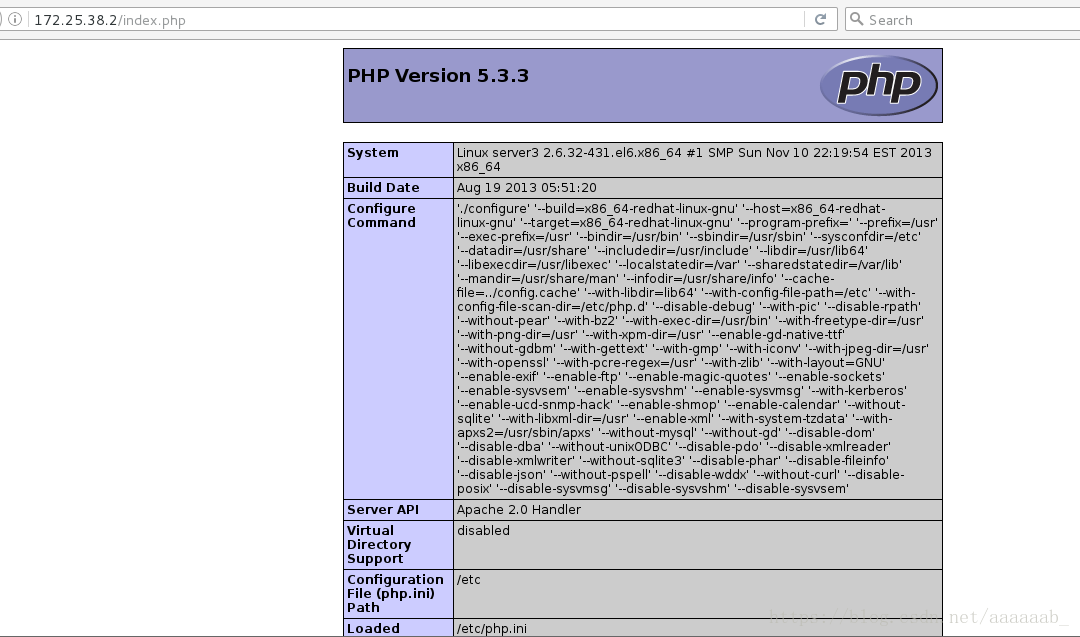
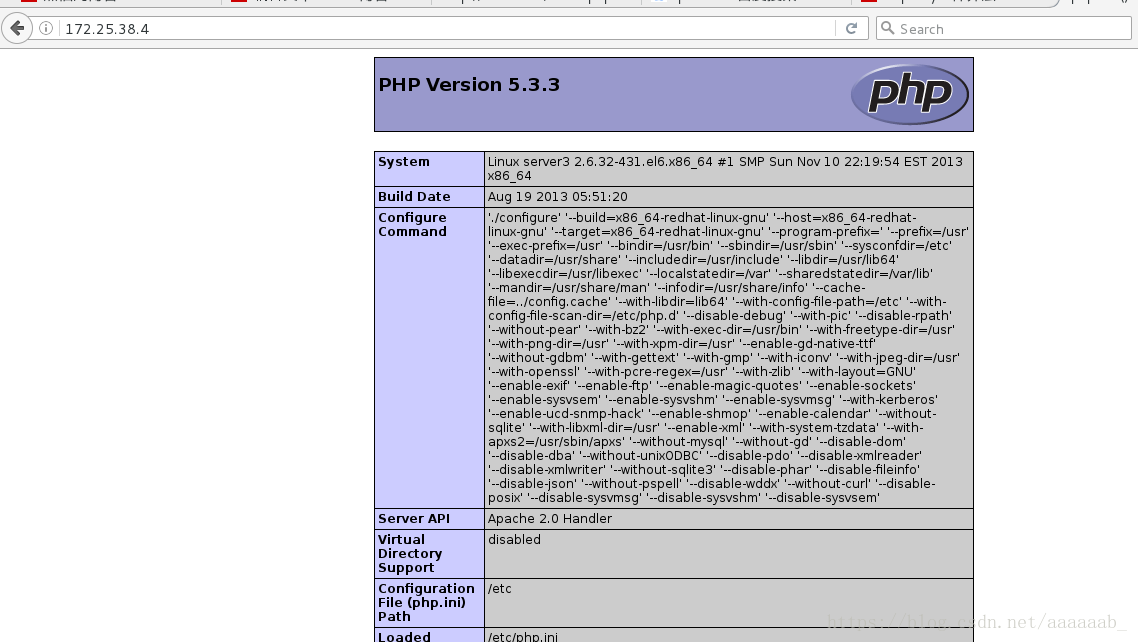
在server3:(172.25.38.4)安装php进行测试:
[root@server3 html]# yum install php -y  安装php
[root@server3 html]# /etc/init.d/httpd restart
[root@server3 html]# cd /var/www/html/
[root@server3 html]# ls
index.html
[root@server3 html]# vim index.php  写入php访问文件
在网页测试用server3本身IP可以调用证明服务是OK的:
在server1更改配置文件,当不同的访问出来不同的界面,阿帕奇和php分开,实现动静分离:
[root@server1 log]# vim /etc/haproxy/haproxy.cfg 加入具体的访问指向
[root@server1 log]# /etc/init.d/haproxy restart
Shutting down haproxy:                                     [  OK  ]
Starting haproxy:                                          [  OK  ]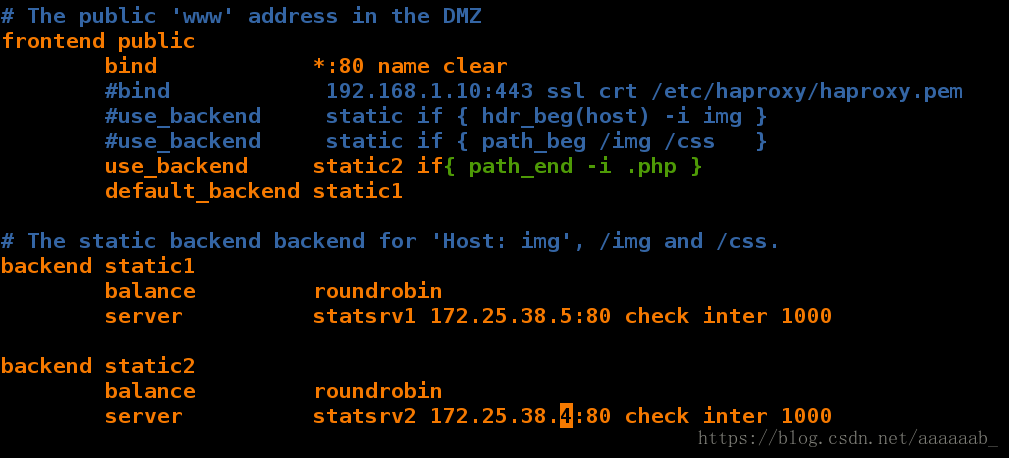
在网页进行测试调用不同的文件可以看到不同的界面实现了动静分离:

在server1更改配置文件实现重定向:
[root@server1 log]# vim /etc/haproxy/haproxy.cfg   编辑配置文件
[root@server1 log]# /etc/init.d/haproxy restart
Shutting down haproxy:                                     [  OK  ]
Starting haproxy: [WARNING] 215/130011 (4415) : parsing [/etc/haproxy/haproxy.cfg:44] : The 'block' directive is now deprecated in favor of 'http-request deny' which uses the exact same syntax. The rules are translated but support might disappear in a future version.
                                                           [  OK  ]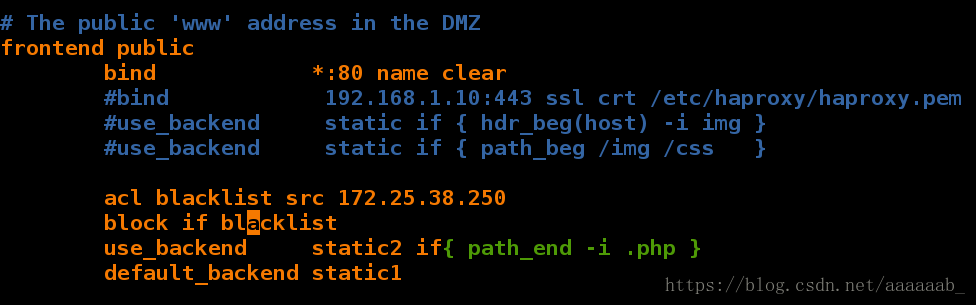
在网页测试会报错403:
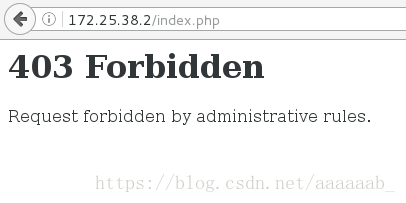
在server1进行配置不允许报错403:
[root@server1 log]# vim /etc/haproxy/haproxy.cfg 加入报错信息的指向,给用户智能提示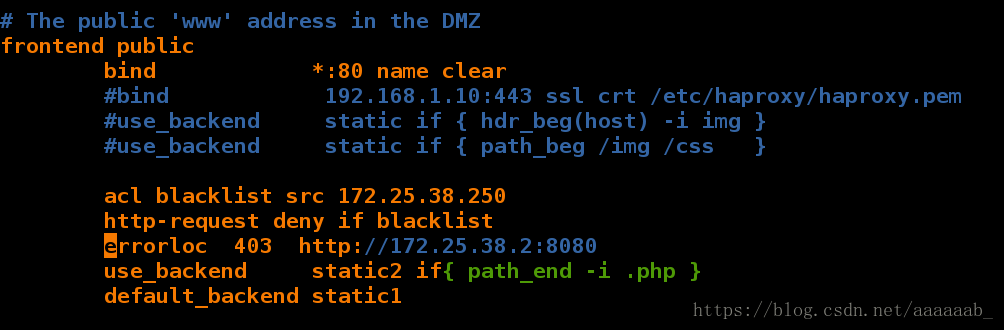
[root@server1 log]# yum install httpd -y 安装httpd
Loaded plugins: product-id, subscription-manager
This system is not registered to Red Hat Subscription Management. You can use subscription-manager to register.
Setting up Install Process
Package httpd-2.2.15-29.el6_4.x86_64 already installed and latest version
Nothing to do
[root@server1 log]# vim /etc/httpd/conf/httpd.conf 更改为8080端口,不占用端口
[root@server1 log]# cd /var/www/html/  到阿帕其默认发布目录下
[root@server1 html]# ls
index.html
[root@server1 html]# cat index.html  加入智能提示
server1 ----->此站点正在维护
[root@server1 html]# /etc/init.d/httpd start 开启阿帕其
Starting httpd: httpd: Could not reliably determine the server's fully qualified domain name, using 172.25.38.2 for ServerName
                                                           [  OK  ]
[root@server1 html]# /etc/init.d/httpd restart  重启服务保证服务生效
Stopping httpd:                                            [  OK  ]
Starting httpd: httpd: Could not reliably determine the server's fully qualified domain name, using 172.25.38.2 for ServerName
                                                           [  OK  ]
                                                          [root@server1 html]# /etc/init.d/haproxy restart
Shutting down haproxy:                                     [  OK  ]
Starting haproxy:                                          [  OK  ]
在网页测试:

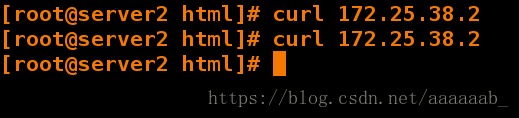
在另外一台可以看到重定向:
[root@server2 html]# curl 172.25.38.2
[root@server2 html]# www.westos.org
在server1更改配置:
[root@server1 html]# vim /etc/haproxy/haproxy.cfg
[root@server1 html]# /etc/init.d/haproxy restart
Shutting down haproxy:                                     [  OK  ]
Starting haproxy:                                          [  OK  ]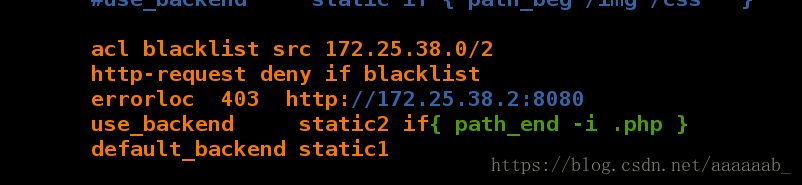
在server2看不到重定向:
在server1更改配置测试重定向:
[root@server1 html]# vim /etc/haproxy/haproxy.cfg 调用本机IP指向的是server3,访问server3安装的PHP
[root@server1 html]# /etc/init.d/haproxy restart
Shutting down haproxy:                                     [  OK  ]
Starting haproxy:                                          [  OK  ]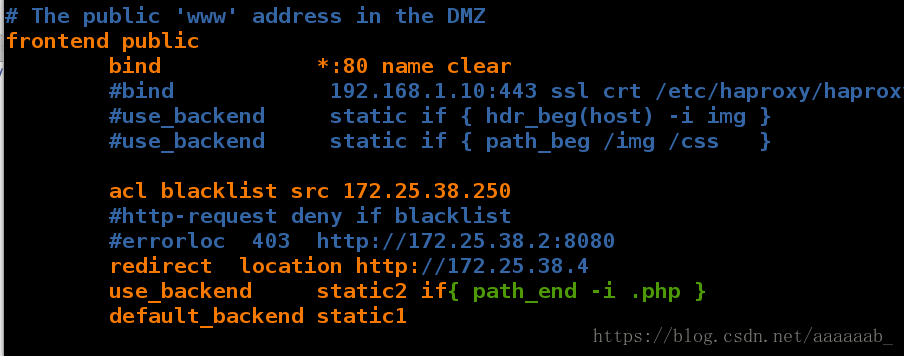
在网页测试:
在我们用taobao.com访问淘宝时会进行两次重定向:
[root@foundation38 Desktop]# curl -I taobao.com    首先定向到http://www.taobao.com/
HTTP/1.1 302 Found
Server: Tengine
Date: Sat, 04 Aug 2018 05:21:43 GMT
Content-Type: text/html
Content-Length: 258
Connection: keep-alive
Location: http://www.taobao.com/

[root@foundation38 Desktop]# curl -I www.taobao.com  再次定向到https://www.taobao.com/进行加加密
HTTP/1.1 302 Found
Server: Tengine
Date: Sat, 04 Aug 2018 05:21:48 GMT
Content-Type: text/html
Content-Length: 258
Connection: keep-alive
Location: https://www.taobao.com/
Set-Cookie: thw=cn; Path=/; Domain=.taobao.com; Expires=Sun, 04-Aug-19 05:21:48 GMT;
Strict-Transport-Security: max-age=31536000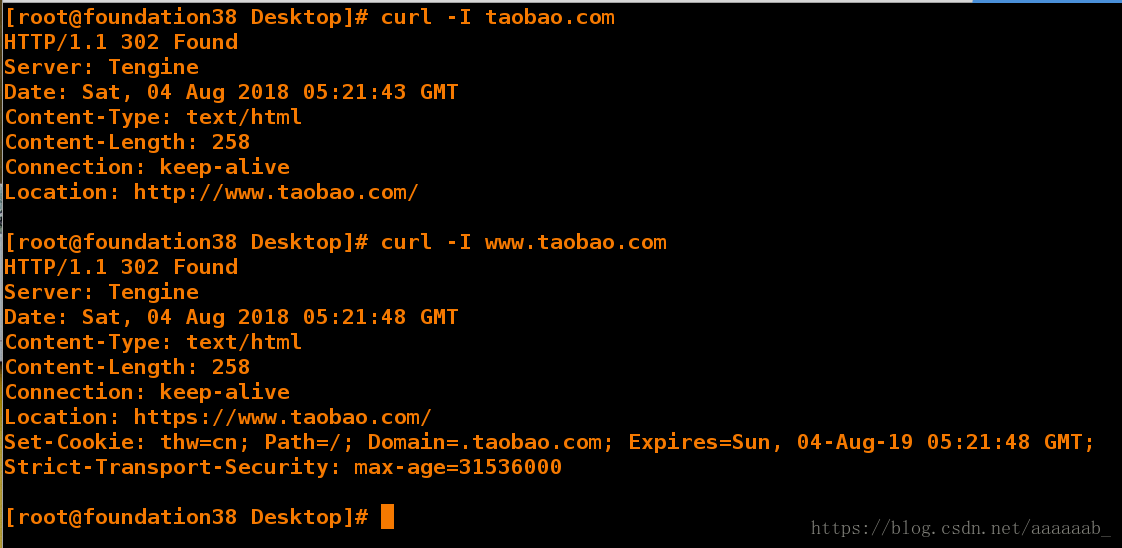
在server1作网址的重定向:
[root@server1 html]# vim /etc/haproxy/haproxy.cfg  访问本机IP时指向www.baidu.com
[root@server1 html]# /etc/init.d/haproxy restart
Shutting down haproxy:                                     [  OK  ]
Starting haproxy:                                          [  OK  ]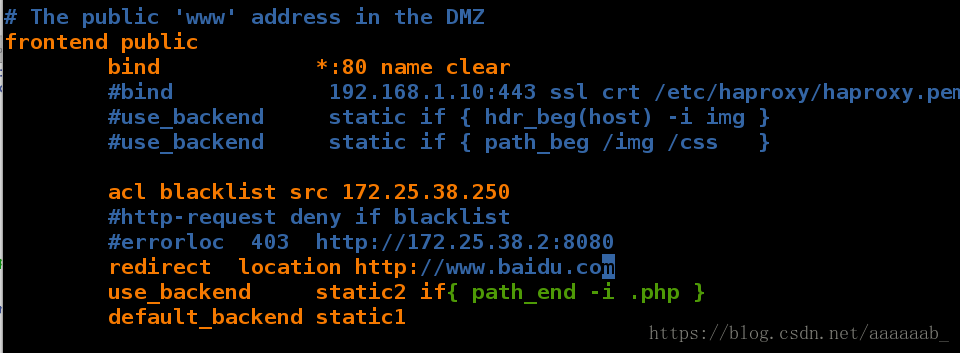
在网页输入172.25.38.2也就是server1的IP会自动调转到百度:

在server1进行配置实现图片的上传:
[root@server1 html]# vim /etc/haproxy/haproxy.cfg   记得注释掉之前的步骤
[root@server1 html]# /etc/init.d/haproxy restart
Shutting down haproxy:                                     [  OK  ]
Starting haproxy:                                          [  OK  ]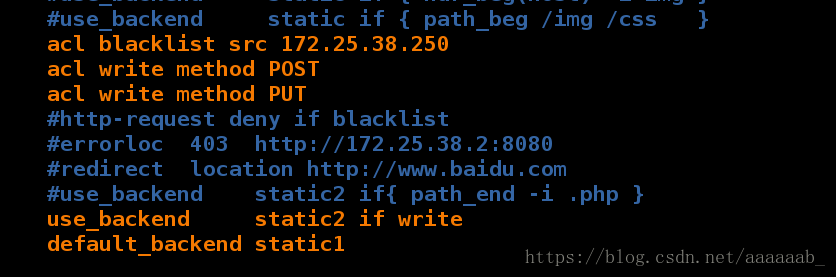
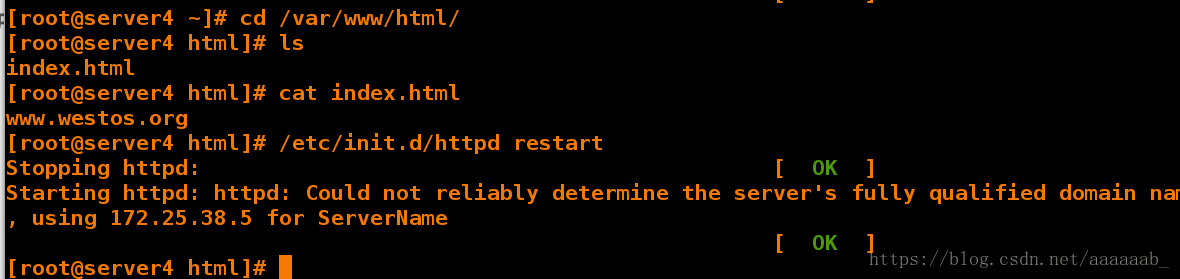
在server4进行配置默认访问目录:
[root@server4 html]# ls
index.html
[root@server4 html]# mkdir images  建立访问目录
[root@server4 html]# cd images/
[root@server4 images]# ls
[root@server4 images]# ls  准备一张图片进行测试
redhat.jpg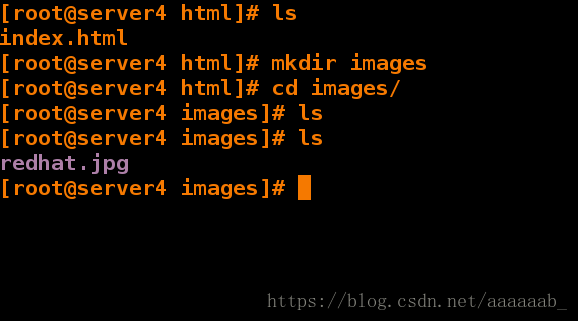
在浏览器查看读写分离的测试,调用的是server1的IP,访问的是后端服务器server4的访问目录:

进行图片的上传下载测试读写分离:
在server3:
[root@server3 html]# ls
index.html  index.php  upload
[root@server3 html]# cd upload/  写入一个访问目录
[root@server3 upload]# ls
index.php  upload_file.php
[root@server3 upload]# mv * ..
mv: overwrite `../index.php'? y  移动到阿帕其默认访问目录下
[root@server3 upload]# cd ..
[root@server3 html]# ls
index.html  index.php  upload  upload_file.php
[root@server3 html]# ll
total 16
-rw-r--r-- 1 root root   15 Jul 29 13:46 index.html
-rw-r--r-- 1 root root  257 Aug  4 14:09 index.php
drwxr-xr-x 2 root root 4096 Aug  4 14:10 upload
-rw-r--r-- 1 root root  927 Aug  4 14:09 upload_file.php
[root@server3 html]# chmod 777 upload  赋予权限
[root@server3 html]# vim upload_file.php 增加图片大小格式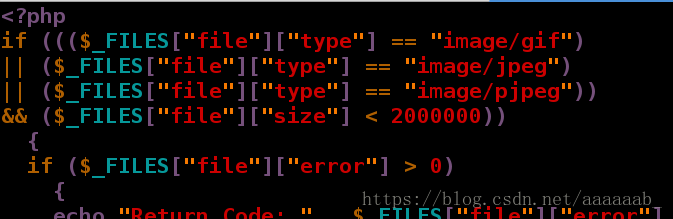
在server4进行相应的配置:
[root@server4 html]# ls
images  index.html  upload
[root@server4 html]# cd upload/
[root@server4 upload]# ls
index.php  upload_file.php
[root@server4 upload]# mv * ..  移动到阿帕其默认访问目录下
[root@server4 upload]# cd ..
[root@server4 html]# ls
images  index.html  index.php  upload  upload_file.php
[root@server4 html]# chmod 777 upload   赋予权限
[root@server4 html]# vim upload_file.php 编辑文件更改图片大小
[root@server4 html]# yum install php 安装PHP
[root@server4 html]# /etc/init.d/httpd start  打开阿帕奇
Starting httpd:
[root@server4 html]# /etc/init.d/httpd restart 重启阿帕奇
Stopping httpd:                                            [  OK  ]
Starting httpd: httpd: Could not reliably determine the server's fully qualified domain name, using 172.25.38.5 for ServerName
                                                           [  OK  ]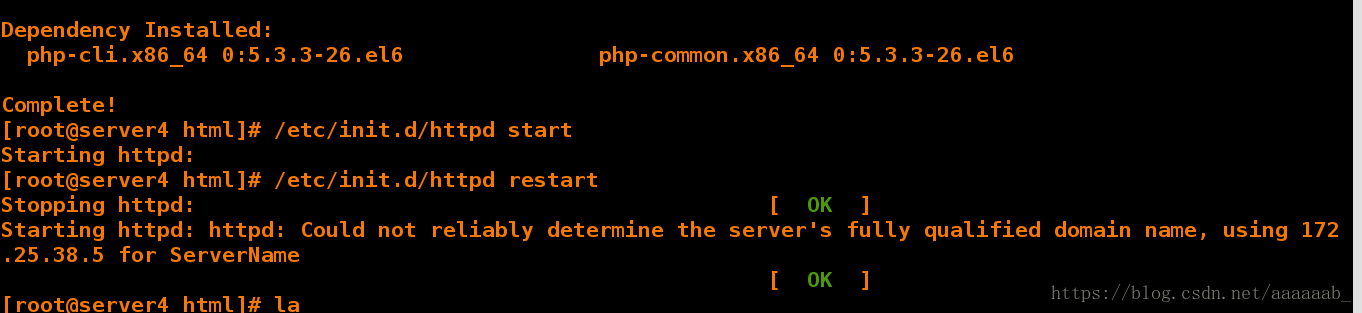
用server1的IP上传可以看到文件在server3中,因为server1默认以server2的方式上传的,但是上传到了server3实现了读写分离:

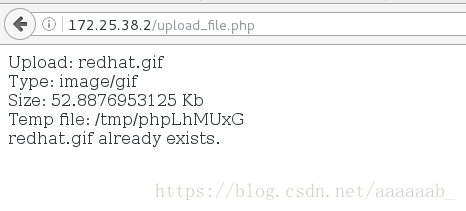
在server3中查看:
[root@server3 html]# ls
index.html  index.php  upload  upload_file.php
[root@server3 html]# cd upload
[root@server3 upload]# ls  上传成功
redhat.gif
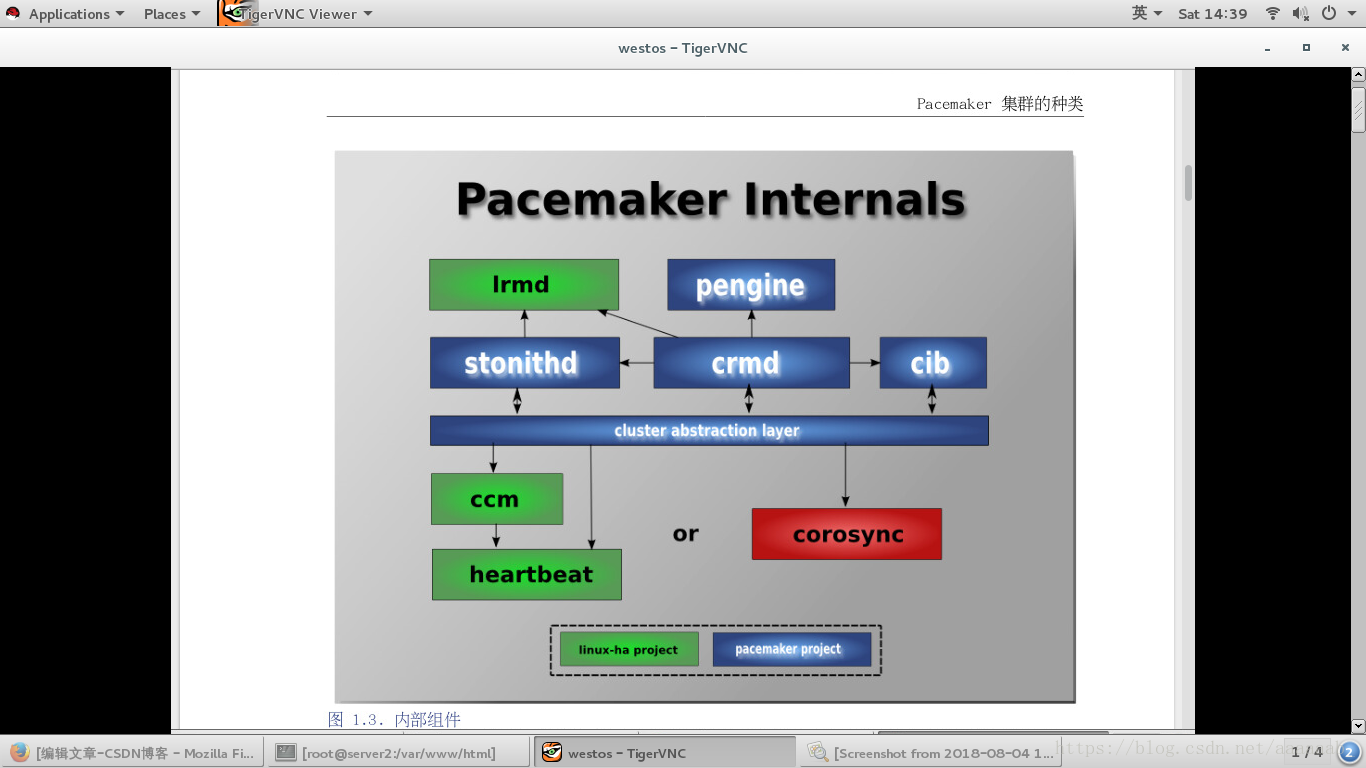
什么是PaceMaker:
在硬件层面我们可以看到多个节点上启用了不同服务,如数据库,
Apache服务等,这里你可以看到有个standby machine,这
台机器就是当前两个服务不能在它原来的节点上运行时提供备用
的。这样能保证如果某一台机器的Apache服务或者某一台机器
的数据库服务挂了,那么马上在另外一个节点上能够启动该服务。
当然首先这三个节点都是要默认安装这些服务并且做配置的。那
么这样看起来我们能够通过增加节点来提供高可用解决单点故障。
这也是HA要做的主要工作。

pacemaker作为linux系统高可用HA的资源管理器,位于HA集
群架构中的资源管理,资源代理层,它不提供底层心跳信息传递
功能。(心跳信息传递是通过corosync来处理的这个使用有兴
趣的可以在稍微了解一下,其实corosync并不是心跳代理的唯
一组件,可以用hearbeat等来代替)。pacemaker管理资源
是通过脚本的方式来执行的。我们可以将某个服务的管理通过
shell,python等脚本语言进行处理,在多个节点上启动相同
的服务时,如果某个服务在某个节点上出现了单点故障那么pacemaker
会通过资源管理脚本来发现服务在改节点不可用。

pacemaker只是作为HA的资源管理器,所以不要想当然理解它能够
直接管控资源,如果你的资源没有做脚本配置那么对于pacemaker
来说它就是不可管理的。
pacemaker内部组件:
在server2配置pacemaker::
[root@server2 ~]# yum install pacemaker corosync -y  安装组件
Loaded plugins: product-id, subscription-manager
This system is not registered to Red Hat Subscription Management. You can use subscription-manager to register.
Setting up Install Process
Package pacemaker-1.1.10-14.el6.x86_64 already installed and latest version
Package corosync-1.4.1-17.el6.x86_64 already installed and latest version
Nothing to do
[root@server2 ~]# cd /etc/corosync/
[root@server2 corosync]# ls
amf.conf.example  corosync.conf.example       service.d
corosync.conf     corosync.conf.example.udpu  uidgid.d
[root@server2 corosync]# cp corosync.conf.example corosync.conf
cp: overwrite `corosync.conf'? y
[root@server2 corosync]# vim corosync.conf  编辑配置文件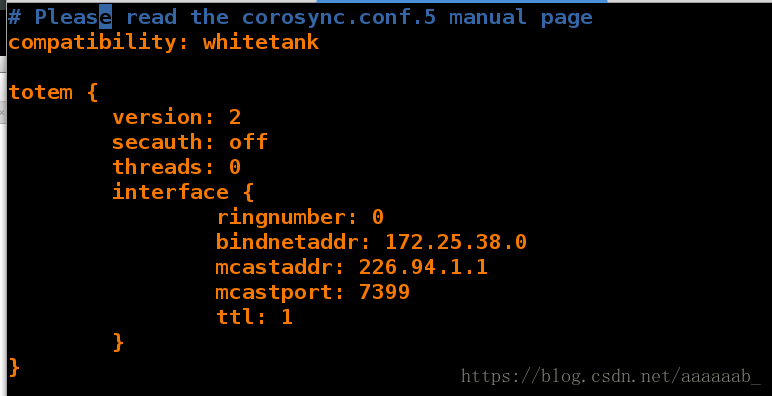
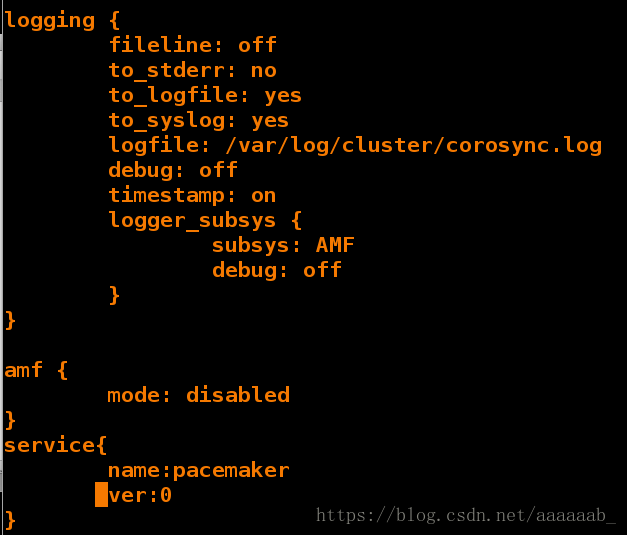
[root@server2 corosync]# scp corosync.conf server1:/etc/corosync/  将编辑好的文件传递到另外一个集群节点
root@server1's password:
corosync.conf                                             100%  479     0.5KB/s   00:00
[root@server2 corosync]# /etc/init.d/corosync start
Starting Corosync Cluster Engine (corosync):               [  OK  ]
[root@server2 corosync]# cd
[root@server2 ~]# ls
anaconda-ks.cfg                   install.log         pssh-2.3.1-2.1.x86_64.rpm
crmsh-1.2.6-0.rc2.2.1.x86_64.rpm  install.log.syslog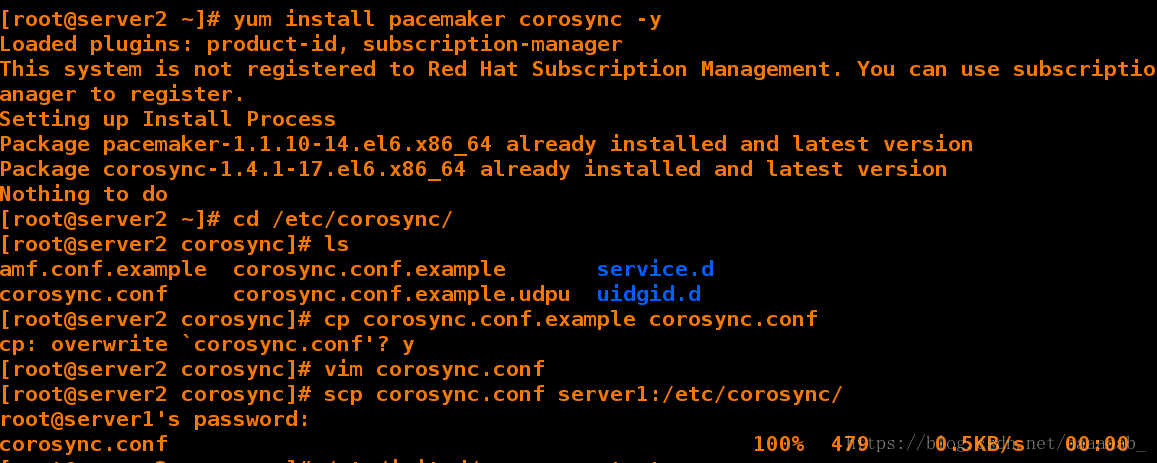
[root@server2 ~]# yum install -y crmsh-1.2.6-0.rc2.2.1.x86_64.rpm pssh-2.3.1-2.1.x86_64.rpm   安装组件
Loaded plugins: product-id, subscription-manager
This system is not registered to Red Hat Subscription Management. You can use subscription-manager to register.
Setting up Install Process
Examining crmsh-1.2.6-0.rc2.2.1.x86_64.rpm: crmsh-1.2.6-0.rc2.2.1.x86_64
crmsh-1.2.6-0.rc2.2.1.x86_64.rpm: does not update installed package.
Examining pssh-2.3.1-2.1.x86_64.rpm: pssh-2.3.1-2.1.x86_64
pssh-2.3.1-2.1.x86_64.rpm: does not update installed package.
Error: Nothing to do
在server1配置pacemaker:
[root@server1 ~]# yum install pacemaker corosync -y  安装服务
Loaded plugins: product-id, subscription-manager
This system is not registered to Red Hat Subscription Management. You can use subscription-manager to register.
HighAvailability                                                     | 3.9 kB     00:00
LoadBalancer                                                         | 3.9 kB     00:00
ResilientStorage                                                     | 3.9 kB     00:00
ScalableFileSystem                                                   | 3.9 kB     00:00
rhel-source                                                          | 3.9 kB     00:00
Setting up Install Process
Package pacemaker-1.1.10-14.el6.x86_64 already installed and latest version
Package corosync-1.4.1-17.el6.x86_64 already installed and latest version
Nothing to do
[root@server1 ~]# cd /etc/corosync/
[root@server1 corosync]# ls  已经传递过来
amf.conf.example  corosync.conf.example       service.d
corosync.conf     corosync.conf.example.udpu  uidgid.d
[root@server1 corosync]# /etc/init.d/corosync start  开启服务
Starting Corosync Cluster Engine (corosync):               [  OK  ]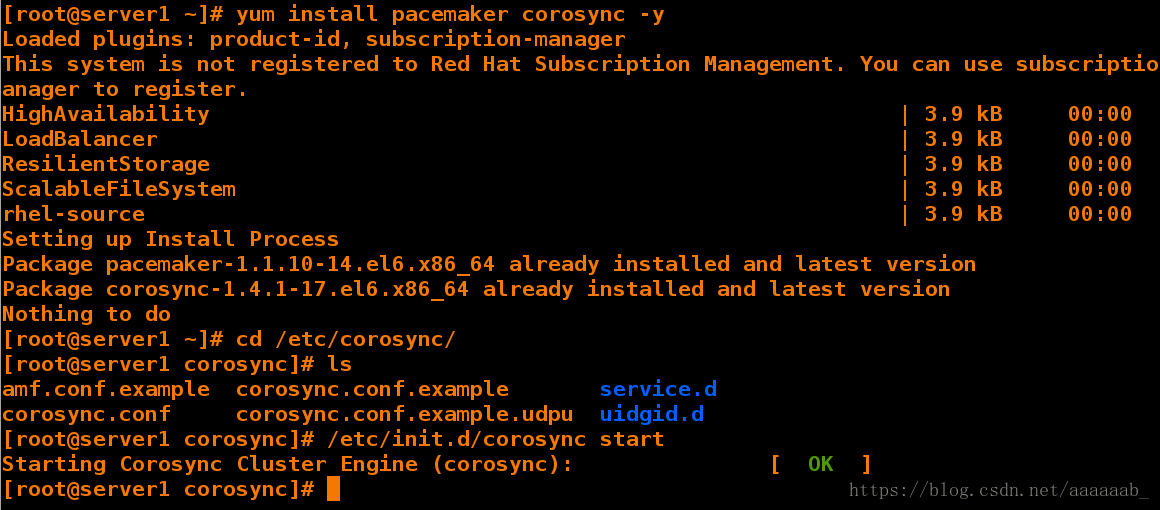
在server2调用crm进行测试:
[root@server2 ~]# crm
crm(live)# configure
crm(live)configure# show 显示
node server1
node server2
primitive vip ocf:heartbeat:IPaddr2 \
    params ip="172.25.38.250" cidr_netmask="24" \
    op monitor interval="1min" \
    meta target-role="Stopped"
property $id="cib-bootstrap-options" \
    dc-version="1.1.10-14.el6-368c726" \
    cluster-infrastructure="classic openais (with plugin)" \
    expected-quorum-votes="2" \
    stonith-enabled="false"
crm(live)configure# cd   想要删除已经激活的VIP
crm(live)# resource
crm(live)resource# stop vip  先停止VIP
crm(live)resource# delete vip
ERROR: syntax: delete vip
crm(live)resource# cd ..
crm(live)# cd ..
crm(live)# configure  进入路径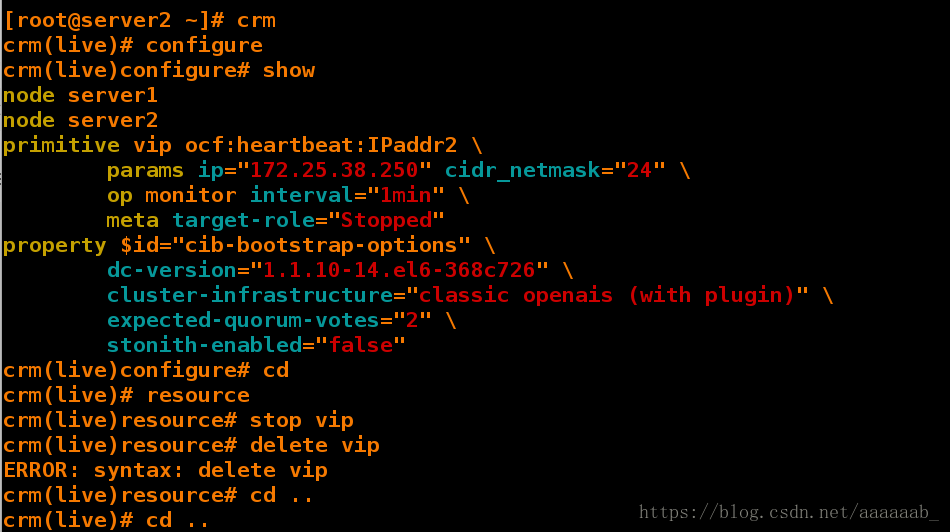
crm(live)configure# delete vip  删除VIP
crm(live)configure# show
node server1
node server2
property $id="cib-bootstrap-options" \
    dc-version="1.1.10-14.el6-368c726" \
    cluster-infrastructure="classic openais (with plugin)" \
    expected-quorum-votes="2" \
    stonith-enabled="false"
crm(live)configure# property stonith-enabled=false
crm(live)configure# primitive vip ocf:heartbeat:IPaddr2 params ip=172.25.38.100 cidr_netmask=24 op monitor interval=1min  重新添加虚拟IP
crm(live)configure# commit  提交
crm(live)configure# bye
bye
[root@server2 ~]# crm_mon  打开监控
Connection to the CIB terminated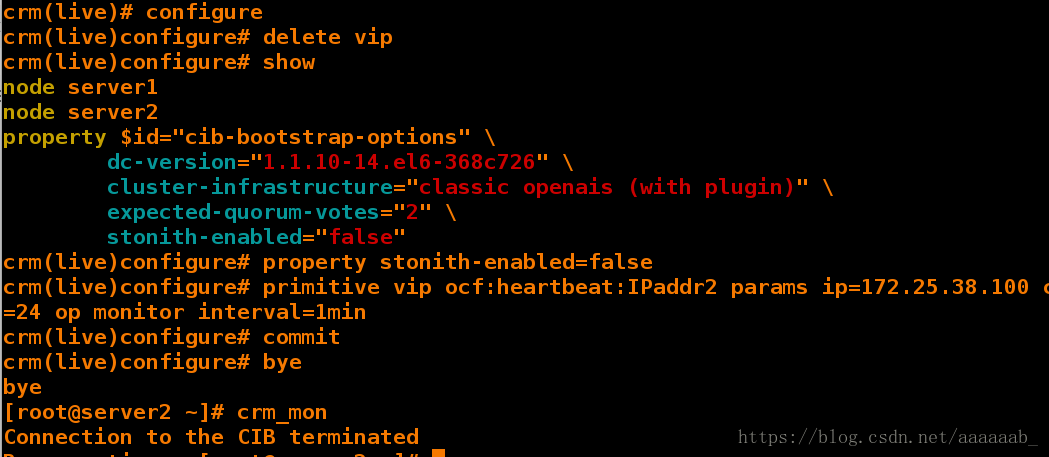
在server1监控查看配置:
[root@server1 corosync]# crm_mon  打开监控
Connection to the CIB terminated
Reconnecting...[root@server1 corosync]#
[root@server1 corosync]# crm_verify -VL  检测语法无误
[root@server1 corosync]# crm_mon
Connection to the CIB terminated
Reconnecting...[root@server1 corosync]# ip addr  查看虚拟IP是否添加
1: lo: <LOOPBACK,UP,LOWER_UP> mtu 16436 qdisc noqueue state UNKNOWN
    link/loopback 00:00:00:00:00:00 brd 00:00:00:00:00:00
    inet 127.0.0.1/8 scope host lo
    inet6 ::1/128 scope host
       valid_lft forever preferred_lft forever
2: eth0: <BROADCAST,MULTICAST,UP,LOWER_UP> mtu 1500 qdisc pfifo_fast state UP qlen 1000
    link/ether 52:54:00:cf:1f:ba brd ff:ff:ff:ff:ff:ff
    inet 172.25.38.2/24 brd 172.25.38.255 scope global eth0
    inet 172.25.38.100/24 brd 172.25.38.255 scope global secondary eth0
    inet6 fe80::5054:ff:fecf:1fba/64 scope link
       valid_lft forever preferred_lft forever
3: eth1: <BROADCAST,MULTICAST> mtu 1500 qdisc noop state DOWN qlen 1000
    link/ether 52:54:00:3e:17:9d brd ff:ff:ff:ff:ff:ff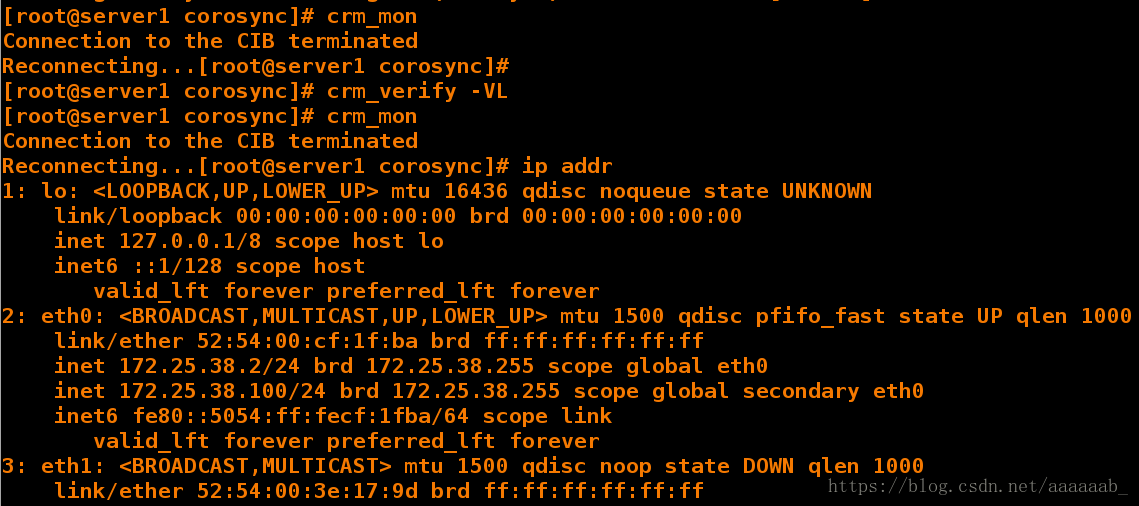
[root@server1 corosync]# /etc/init.d/corosync stop 关闭服务server1在监控可以看到server1已经OFFLINE
Signaling Corosync Cluster Engine (corosync) to terminate: [  OK  ]
Waiting for corosync services to unload:.                  [  OK  ]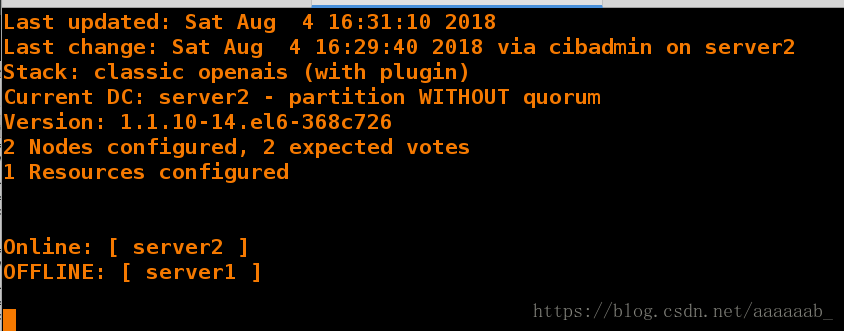
[root@server1 corosync]# /etc/init.d/corosync start  重新打开重新ONLINE
Starting Corosync Cluster Engine (corosync):               [  OK  ]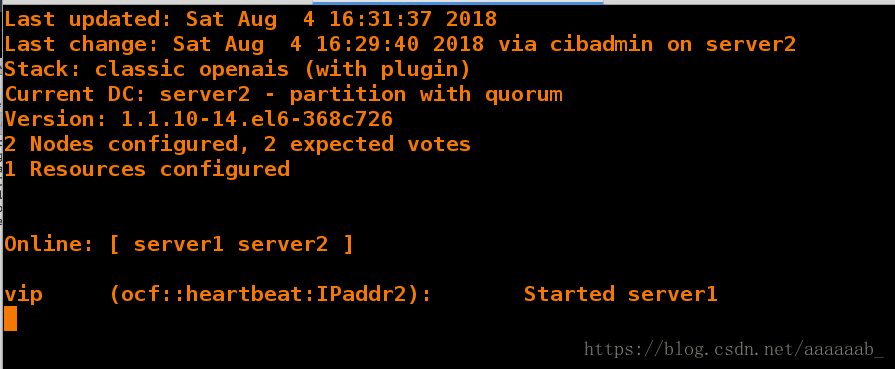
[root@server1 corosync]# crm
crm(live)# configure
crm(live)configure# show
node server1
node server2
primitive vip ocf:heartbeat:IPaddr2 \
    params ip="172.25.38.100" cidr_netmask="24" \
    op monitor interval="1min"
property $id="cib-bootstrap-options" \
    dc-version="1.1.10-14.el6-368c726" \
    cluster-infrastructure="classic openais (with plugin)" \
    expected-quorum-votes="2" \
    stonith-enabled="false"
crm(live)configure# property no-quorum-policy=ignore  配置策略
crm(live)configure# commit  提交
crm(live)configure# bye
bye
[root@server1 corosync]# /etc/init.d/corosync stop 关闭corosync检测心跳的功能
Signaling Corosync Cluster Engine (corosync) to terminate: [  OK  ]
Waiting for corosync services to unload:.                  [  OK  ]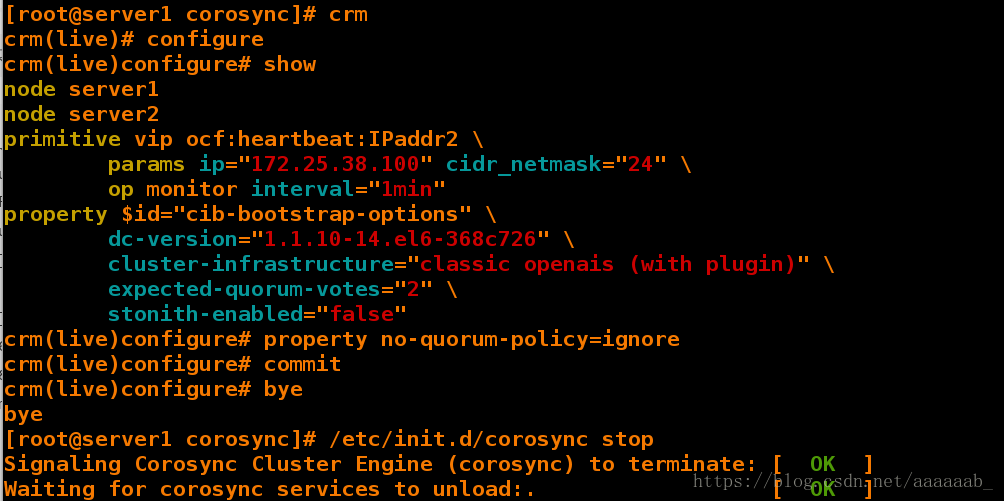
[root@server1 corosync]# /etc/init.d/corosync start  重新打开服务
Starting Corosync Cluster Engine (corosync):               [  OK  ]
[root@server1 corosync]# crm
crm(live)# configure
crm(live)configure# bye
bye
[root@server1 corosync]# ps
  PID TTY          TIME CMD
 7492 pts/1    00:00:00 bash
 8183 pts/1    00:00:00 ps
[root@server1 corosync]# cd /etc/haproxy/
[root@server1 haproxy]# ls
haproxy.cfg
[root@server1 haproxy]# cd 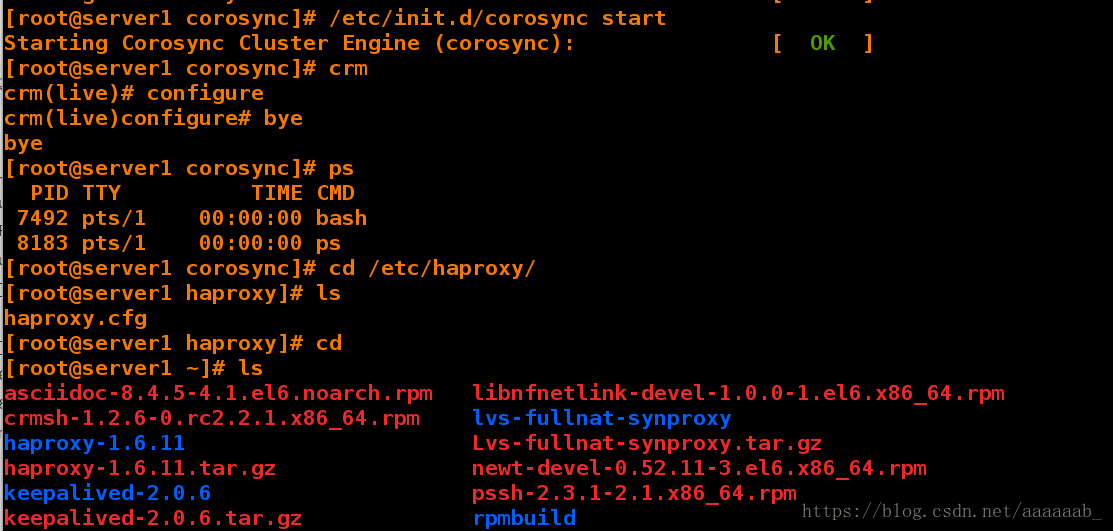
[root@server1 ~]# ls
asciidoc-8.4.5-4.1.el6.noarch.rpm   libnfnetlink-devel-1.0.0-1.el6.x86_64.rpm
crmsh-1.2.6-0.rc2.2.1.x86_64.rpm    lvs-fullnat-synproxy
haproxy-1.6.11                      Lvs-fullnat-synproxy.tar.gz
haproxy-1.6.11.tar.gz               newt-devel-0.52.11-3.el6.x86_64.rpm
keepalived-2.0.6                    pssh-2.3.1-2.1.x86_64.rpm
keepalived-2.0.6.tar.gz             rpmbuild
kernel-2.6.32-220.23.1.el6.src.rpm  slang-devel-2.2.1-1.el6.x86_64.rpm
ldirectord-3.9.5-3.1.x86_64.rpm
[root@server1 ~]# cd rpmbuild/
[root@server1 rpmbuild]# ls
BUILD  BUILDROOT  RPMS  SOURCES  SPECS  SRPMS
[root@server1 rpmbuild]# cd RPMS/
[root@server1 RPMS]# ls
x86_64
[root@server1 RPMS]# cd x86_64/
[root@server1 x86_64]# ls
haproxy-1.6.11-1.x86_64.rpm  haproxy-debuginfo-1.6.11-1.x86_64.rpm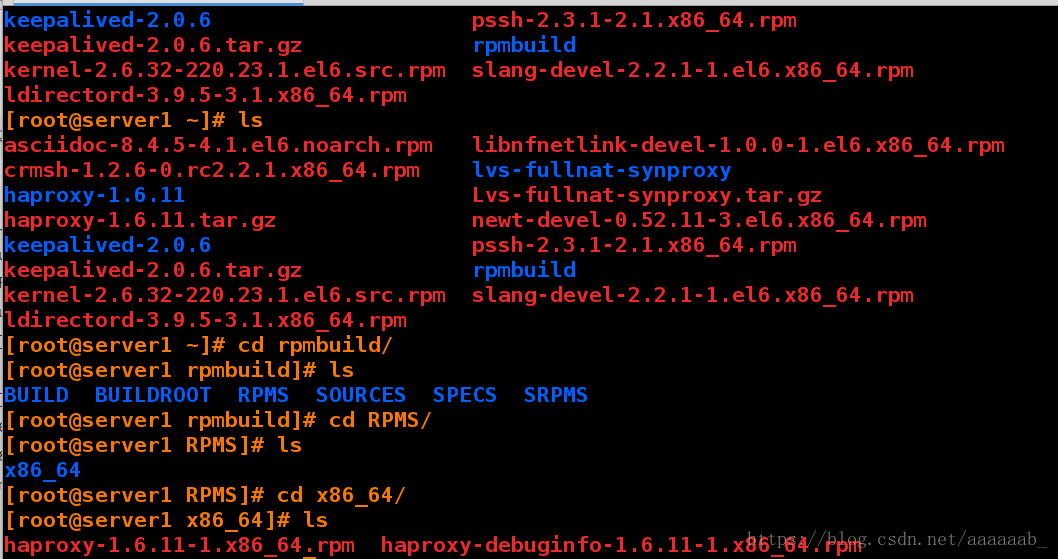
[root@server1 x86_64]# scp haproxy-1.6.11-1.x86_64.rpm server2:  在另外一个节点安装haproxy实现HA
root@server2's password:
haproxy-1.6.11-1.x86_64.rpm                               100%  695KB 695.0KB/s   00:00
[root@server1 x86_64]# cd /etc/haproxy/
[root@server1 haproxy]# ls
haproxy.cfg
[root@server1 haproxy]# scp haproxy.cfg server2:/etc/haproxy/ 将更改好的配置文件传递过去
root@server2's password:
haproxy.cfg                                               100% 1906     1.9KB/s   00:00
[root@server1 haproxy]# /etc/init.d/haproxy restart  打开服务
Shutting down haproxy:                                     [  OK  ]
Starting haproxy:                                          [  OK  ]
[root@server1 haproxy]# crm
crm(live)# configure
crm(live)configure# show
node server1
node server2
primitive vip ocf:heartbeat:IPaddr2 \
    params ip="172.25.38.100" cidr_netmask="24" \
    op monitor interval="1min"
property $id="cib-bootstrap-options" \
    dc-version="1.1.10-14.el6-368c726" \
    cluster-infrastructure="classic openais (with plugin)" \
    expected-quorum-votes="2" \
    stonith-enabled="false" \
    no-quorum-policy="ignore"
crm(live)configure# primitive haproxy lsb:haproxy op monitor interval=1min
crm(live)configure# group hagroup vip haproxy添加组防止同样的服务在不同的节点
crm(live)configure# commit  提交策略
crm(live)configure# 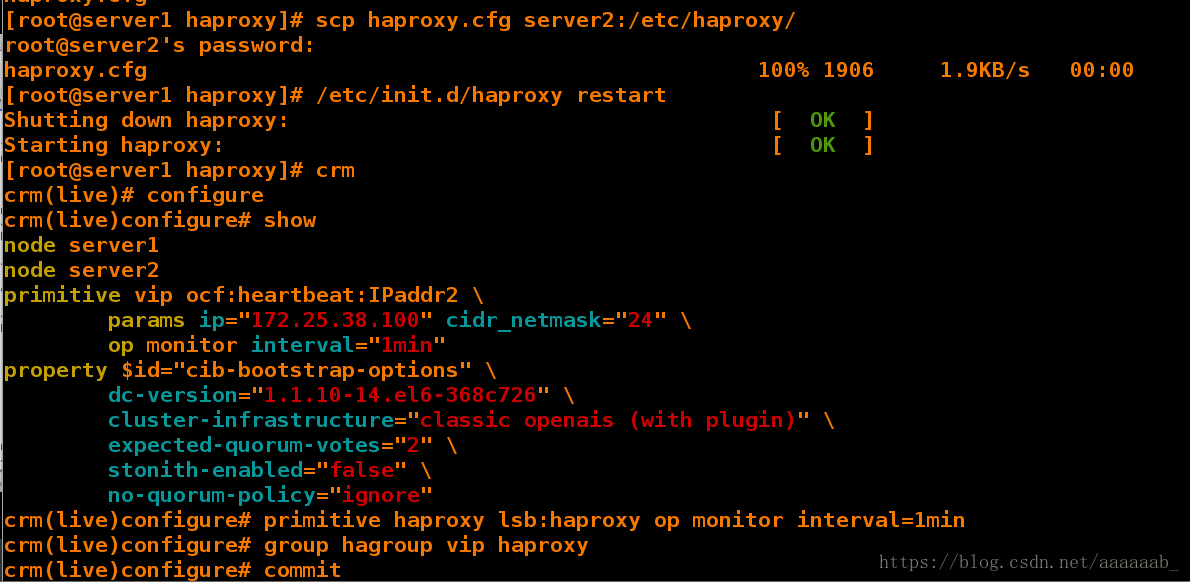
在server2进行haproxy的配置:
[root@server2 ~]# ls
anaconda-ks.cfg                   haproxy-1.6.11-1.x86_64.rpm  install.log.syslog
crmsh-1.2.6-0.rc2.2.1.x86_64.rpm  install.log                  pssh-2.3.1-2.1.x86_64.rpm
[root@server2 ~]# rpm -ivh haproxy-1.6.11-1.x86_64.rpm   安装服务
Preparing...                ########################################### [100%]
   1:haproxy                ########################################### [100%]
[root@server2 haproxy]# /etc/init.d/httpd status
httpd (pid  10261) is running...
[root@server2 haproxy]# /etc/init.d/httpd stop 关闭阿帕其
Stopping httpd:                                            [  OK  ]
[root@server2 haproxy]# /etc/init.d/haproxy restart 端口会冲突不然服务无法启动会报错
Shutting down haproxy:                                     [FAILED]
Starting haproxy:                                          [  OK  ]
[root@server2 haproxy]# /etc/init.d/haproxy restart
Shutting down haproxy:                                     [  OK  ]
Starting haproxy:                                          [  OK  ]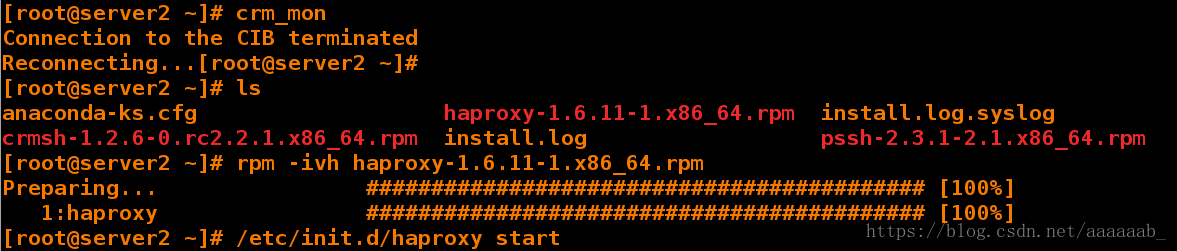
[root@server2 haproxy]# crm_mon 在server1提交组之后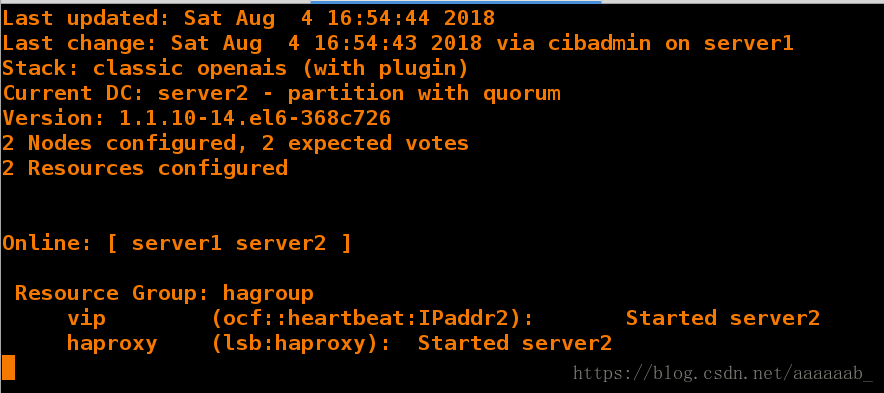
[root@server1 haproxy]# crm node standby 将节点1挂掉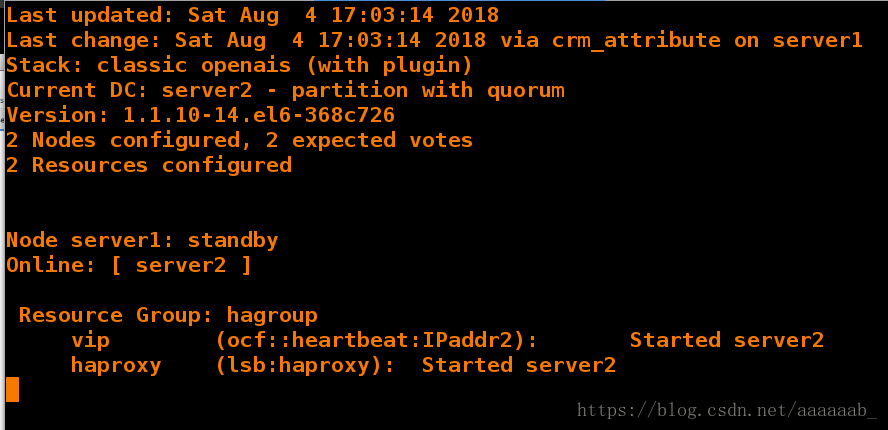
[root@server1 haproxy]# crm node online 重新打开节点1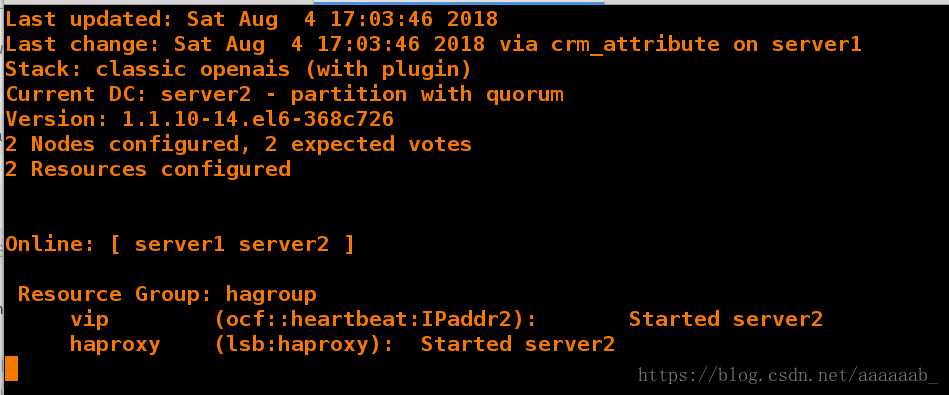
先了解什么是fence:
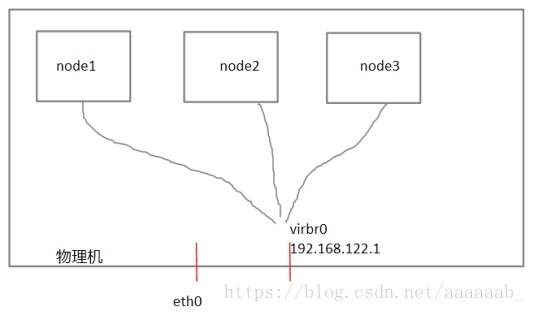
每个节点之间互相发送探测包进行判断节点的存活性。一般会有专门的线路进行探测,这条线路称为“心跳线”
(上图直接使用eth0线路作为心跳线)。假设node1的心跳线出问题,则node2和node3会认为node1出问题,
然后就会把资源调度在node2或者node3上运行,但node1会认为自己没问题不让node2或者node3抢占资源,
此时就出现了脑裂(split brain)。

此时如果在整个环境里有一种设备直接把node1断电,则可以避免脑裂的发生,这种设备叫做fence或者stonith
(Shoot The Other Node In The Head爆头哥)。
在真机查看fence的状态保证开启:
[root@foundation38 kiosk]# systemctl start fence_virtd.service 打开服务
[root@foundation38 kiosk]# systemctl status fence_virtd.service  查看状态为运行
● fence_virtd.service - Fence-Virt system host daemon
   Loaded: loaded (/usr/lib/systemd/system/fence_virtd.service; disabled; vendor preset: disabled)
   Active: active (running) since Sat 2018-08-04 17:10:22 CST; 1s ago
  Process: 19068 ExecStart=/usr/sbin/fence_virtd $FENCE_VIRTD_ARGS (code=exited, status=0/SUCCESS)
 Main PID: 19073 (fence_virtd)
   CGroup: /system.slice/fence_virtd.service
           └─19073 /usr/sbin/fence_virtd -w

Aug 04 17:10:21 foundation38.ilt.example.com systemd[1]: Starting Fence-Virt system host....
Aug 04 17:10:22 foundation38.ilt.example.com fence_virtd[19073]: fence_virtd starting.  L...
Aug 04 17:10:22 foundation38.ilt.example.com systemd[1]: Started Fence-Virt system host ....
Hint: Some lines were ellipsized, use -l to show in full.
在真机查看虚拟机的映射关系:
[root@foundation38 kiosk]# virsh list
 Id    Name                           State
----------------------------------------------------
 1     test1                          running
 2     test4                          running
 3     test2                          running
 4     test3                          running
在server1查看fence的配置:
[root@server1 haproxy]# cd /etc/cluster/
[root@server1 cluster]# ls 已经有key文件,没有的化从真机传过来
cman-notify.d fence_xvm.key
[root@server1 cluster]# ll fence_xvm.key
-rw-r--r-- 1 root root 128 Aug 2 14:02 fence_xvm.key
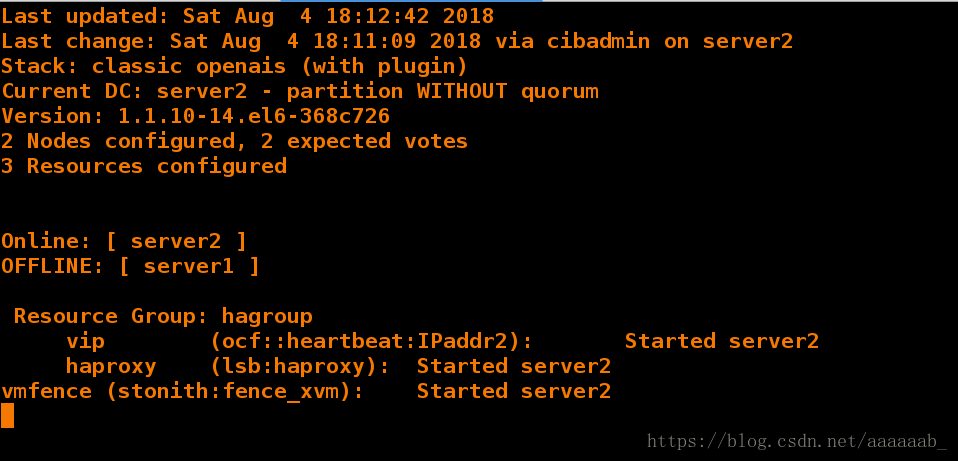
[root@server1 cluster]# crm_mon 打开监控
Connection to the CIB terminated
Reconnecting...[root@server1 cluster]# 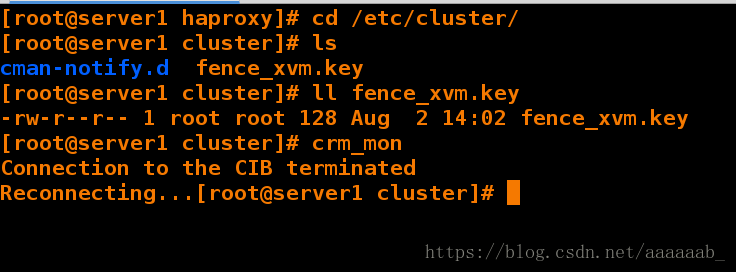
在server2查看fence的配置:
[root@server2 haproxy]# cd /etc/cluster/
[root@server2 cluster]# ls  已经有key文件,没有的化从真机传过来
cman-notify.d  fence_xvm.key
[root@server2 cluster]# ll fence_xvm.key
-rw-r--r-- 1 root root 128 Aug  2 14:03 fence_xvm.key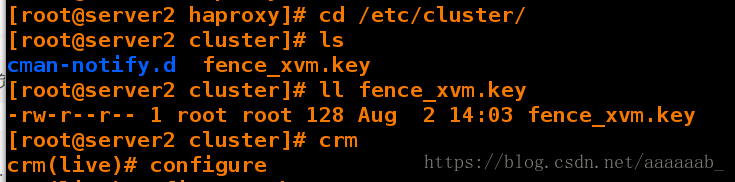
[root@server2 cluster]# crm
crm(live)# configure
crm(live)configure# show
node server1 \
    attributes standby="off"
node server2
primitive haproxy lsb:haproxy \
    op monitor interval="1min"
primitive vip ocf:heartbeat:IPaddr2 \
    params ip="172.25.38.100" cidr_netmask="24" \
    op monitor interval="1min"
primitive vmfence stonith:fence_xvm \
    params pcmk_host_map="test1:server1;test4:server4" \
    op monitor interval="1min"
group hagroup vip haproxy
property $id="cib-bootstrap-options" \
    dc-version="1.1.10-14.el6-368c726" \
    cluster-infrastructure="classic openais (with plugin)" \
    expected-quorum-votes="2" \
    stonith-enabled="false" \
    no-quorum-policy="ignore"
crm(live)configure# property stonith-enabled=true 打开fence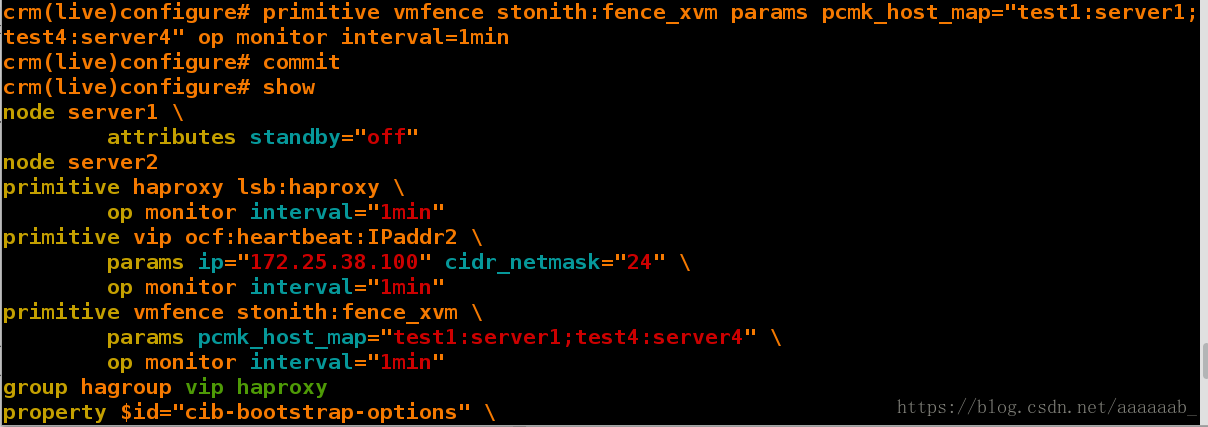
crm(live)configure# cd ..
crm(live)# resource
crm(live)resource#
?             exit          migrate       reprobe       stop          up
bye           failcount     move          restart       trace         utilization
cd            help          param         secret        unmanage
cleanup       list          promote       show          unmigrate
demote        manage        quit          start         unmove
end           meta          refresh       status        untrace
crm(live)resource# stop vmfence  关闭fence
crm(live)resource# cd ..
crm(live)# configure
crm(live)configure#
?                  erase              ms                 rsc_template
bye                exit               node               rsc_ticket
cd                 fencing_topology   op_defaults        rsctest
cib                filter             order              save
cibstatus          graph              primitive          schema
clone              group              property           show
collocation        help               ptest              simulate
colocation         history            quit               template
commit             load               ra                 up
default-timeouts   location           refresh            upgrade
delete             master             rename             user
edit               modgroup           role               verify
end                monitor            rsc_defaults       xml
crm(live)configure# edit vmfence 修改fence的映射为server1:test1
crm(live)configure# commit 提交策略
在server1摧毁内核,就是当前服务的节点:
[root@server2 haproxy]# echo c > /proc/sysrq-trigger 摧毁内核根据fence的机制,server1会断电重启