一、haproxy
haproxy 是一款提供高可用性、负载均衡以及基于TCP(第四层)和HTTP(第七层)应用的代理软件,支持虚拟主机,它是免费、快速并且可靠的一种解决方案。 HAProxy特别适用于那些负载特大的web站点,这些站点通常又需要会话保持或七层处理。HAProxy运行在时下的硬件上,完全可以支持数以万计的 并发连接。并且它的运行模式使得它可以很简单安全的整合进您当前的架构中, 同时可以保护你的web服务器不被暴露到网络上。
实验环境:
虚拟机配置可以参考上篇文章
| server1 | 172.25.1.1 | 作为haproxy服务器及集群管理服务器 |
| server2 | 172.25.1.2 | 负载均衡(后端服务器) |
| server3 | 172.25.1.3 | 负载均衡(后端服务器) |
| server4 | 172.25.1.4 | 集群管理服务器 |
二、安装配置haproxy
[root@server1 ~]# yum install haproxy -y配置vim /etc/haproxy/haproxy.cfg
#---------------------------------------------------------------------
# Example configuration for a possible web application.  See the
# full configuration options online.
#
#   http://haproxy.1wt.eu/download/1.4/doc/configuration.txt
#
#---------------------------------------------------------------------

#---------------------------------------------------------------------
# Global settings
#---------------------------------------------------------------------
global
    # to have these messages end up in /var/log/haproxy.log you will
    # need to:
    #
    # 1) configure syslog to accept network log events.  This is done
    #    by adding the '-r' option to the SYSLOGD_OPTIONS in
    #    /etc/sysconfig/syslog
    #
    # 2) configure local2 events to go to the /var/log/haproxy.log
    #   file. A line like the following can be added to
    #   /etc/sysconfig/syslog
    #
    #    local2.*                       /var/log/haproxy.log
    #
    log         127.0.0.1 local2

    chroot      /var/lib/haproxy
    pidfile     /var/run/haproxy.pid
    maxconn     4000
    user        haproxy
    group       haproxy
    daemon

    # turn on stats unix socket
    stats socket /var/lib/haproxy/stats
#---------------------------------------------------------------------
# common defaults that all the 'listen' and 'backend' sections will
# use if not designated in their block
#---------------------------------------------------------------------
defaults
    mode                    http
    log                     global
    option                  httplog
    option                  dontlognull
    option http-server-close
    option forwardfor       except 127.0.0.0/8
    option                  redispatch
    retries                 3
    timeout http-request    10s
    timeout queue           1m
    timeout connect         10s
    timeout client          1m
    timeout server          1m
    timeout http-keep-alive 10s
    timeout check           10s
    maxconn                 3000

    stats uri /status

#---------------------------------------------------------------------
# main frontend which proxys to the backends
#---------------------------------------------------------------------
frontend  main *:80
#    acl url_static       path_beg       -i /static /images /javascript /stylesheets
#    acl url_static       path_end       -i .jpg .gif .png .css .js
#
#    use_backend static          if url_static
    default_backend             app

#---------------------------------------------------------------------
# static backend for serving up images, stylesheets and such
#---------------------------------------------------------------------
#backend static
#    balance     roundrobin
#    server      static 127.0.0.1:4331 check

#---------------------------------------------------------------------
# round robin balancing between the various backends
#---------------------------------------------------------------------
backend app
    balance     roundrobin
    server  app1 172.25.1.2:80 check
    server  app2 172.25.1.3:80 check
对配置文件修改如下:


配置完成之后开启服务并查看服务状态
[root@server1 ~]# systemctl start haproxy.service
[root@server1 ~]# netstat -antlp

测试:
可以通过网页进行查看后端服务器的状态

扫描二维码关注公众号,回复:
12569226 查看本文章


roundrobin算法(根据服务器权重轮询的算法,可以自定义权重,它支持慢启动,并能在运行时修改权重,所以是一种动态算法。最多支持4095台后端主机。)

source 调度算法(对请求的源IP地址进行hash处理,根据hash运算处理结果调度至后端服务器。可使固定IP的请求始终调度至统一服务器。)

当关闭某一个服务器的http服务时如下:说明其具有对后端服务器健康检查的功能


status的加密访问


三、HAProxy的日志管理
[root@server1 ~]# vim /etc/security/limits.conf
haproxy         -       nofile          4096
[root@server1 ~]# vim /etc/sysconfig/rsyslog
# Options for rsyslogd
# Syslogd options are deprecated since rsyslog v3.
# If you want to use them, switch to compatibility mode 2 by "-c 2"
# See rsyslogd(8) for more details
SYSLOGD_OPTIONS="-r"
[root@server1 ~]# vim /etc/rsyslog.conf
[root@server1 ~]# systemctl restart rsyslog.service

测试:


四、haproxy 的动态和静态分离


[root@server3 html]# mkdir images

测试:


设置访问黑名单:


当访问失败时,给他定向到其他页面,例如: 


另外一种方式(重定向)

五、HAProxy的读写分离


server2和server3同样操作
[root@server2 html]# yum install php -y
[root@server3 html]# yum install php -y
[root@server3 html]# vim index.php<html>
<body>
<form action="upload_file.php" method="post"
enctype="multipart/form-data">
<label for="file">Filename:</label>
<input type="file" name="file" id="file" />
<br />
<input type="submit" name="submit" value="Submit" />
</form>
</body>
</html>
[root@server3 html]# vim upload_file.php
[root@server3 html]# mkdir upload
[root@server3 html]# chmod 777 upload
<?php
if ((($_FILES["file"]["type"] == "image/gif")
|| ($_FILES["file"]["type"] == "image/jpeg")
|| ($_FILES["file"]["type"] == "image/pjpeg"))
&& ($_FILES["file"]["size"] < 2000000))
{
if ($_FILES["file"]["error"] > 0)
{
echo "Return Code: " . $_FILES["file"]["error"] . "<br />";
}
else
{
echo "Upload: " . $_FILES["file"]["name"] . "<br />";
echo "Type: " . $_FILES["file"]["type"] . "<br />";
echo "Size: " . ($_FILES["file"]["size"] / 1024) . " Kb<br />";
echo "Temp file: " . $_FILES["file"]["tmp_name"] . "<br />";
if (file_exists("upload/" . $_FILES["file"]["name"]))
{
echo $_FILES["file"]["name"] . " already exists. ";
}
else
{
move_uploaded_file($_FILES["file"]["tmp_name"],
"upload/" . $_FILES["file"]["name"]);
echo "Stored in: " . "upload/" . $_FILES["file"]["name"];
}
}
}
else
{
echo "Invalid file";
}
?>注意:需要重启httpd
测试:


六、corosync+pacemaker部署
corosync是集群框架引擎程序,pacemaker是高可用集群资源管理器
下载及配置
[root@server4 ~]# yum install haproxy.x86_64
[root@server4 ~]# ssh-keygen
[root@server4 ~]# ssh-copy-id server1
[root@server4 ~]# yum install -y pacemaker pcs psmisc policycoreutils-python
[root@server4 ~]# ssh server1 yum install -y pacemaker pcs psmisc policycoreutils-python
[root@server4 yum.repos.d]# systemctl enable --now pcsd.service
[root@server4 yum.repos.d]# ssh server1 systemctl enable --now pcsd.service
[root@server1 haproxy]# scp /etc/haproxy/haproxy.cfg server4:/etc/haproxy/[root@server4 ~]# passwd hacluster
[root@server4 ~]# ssh server1 passwd hacluster
## 给用户密码##
[root@server4 ~]# pcs cluster auth server1 server4
[root@server4 ~]# pcs cluster setup --name mycluster server
##在同一个节点上使用pcs集群设置来生成和同步crosync配置##
[root@server4 ~]# pcs cluster start --all
##启动集群##
[root@server4 ~]# pcs cluster enable --all
##开机自启动##

[root@server4 ~]# pcs status
##查看集群状态##
[root@server4 ~]# crm_verify -LV
##查看集群状态报错##
[root@server4 ~]# pcs property set stonith-enabled=false
##解决刚才集群状态报错问题##
Add a Resource
[root@server4 ~]# pcs resource --help
[root@server4 ~]# pcs resource create ClusterIP ocf:heartbeat:IPaddr2 ip=172.25.1.100 op monitor interval=30s
[root@server4 ~]# pcs cluster stop server1
##当停止server1时查看集群状态##
[root@server4 ~]# pcs resource agents systemd | grep haproxy
##查看资源管理器中有没有haproxy程序管理##
[root@server4 ~]# pcs resource create haproxy systemd:haproxy op monitor interval=60s
##将haproxy与集群建立连接##
[root@server4 ~]# pcs resource group add hagroup ClusterIP haproxy
##建立资源管理组,约束资源,控制资源启动顺序,使其运行在统一服务器上##

如果ClusterIP或者haproxy服务停掉,集群就会自动重启服务或者添加ClusterIP
[root@server4 ~]# systemctl stop haproxy.service
测试:


如果将正在使用的服务器的网卡down掉,他会自动跳到集群另外一台服务器上
[root@server4 ~]# ip link set down eth0
测试:

[root@server4 ~]# yum install -y fence-virt.x86_64
[root@server4 ~]# ssh server1 yum install -y fence-virt.x86_64
##
[root@server1 ~]# echo c > /proc/sysrq-trigger
##使内核崩溃##
测试:

[root@Sun_s ~]# dnf install fence-virtd-libvirt.x86_64 fence-virtd-multicast.x86_64 fence-virtd.x86_64 -y
##在真机下载##
[root@Sun_s ~]# fence_virtd -c
Module search path [/usr/lib64/fence-virt]:
Available backends:
libvirt 0.3
Available listeners:
multicast 1.2
Listener modules are responsible for accepting requests
from fencing clients.
Listener module [multicast]:
The multicast listener module is designed for use environments
where the guests and hosts may communicate over a network using
multicast.
The multicast address is the address that a client will use to
send fencing requests to fence_virtd.
Multicast IP Address [225.0.0.12]:
Using ipv4 as family.
Multicast IP Port [1229]:
Setting a preferred interface causes fence_virtd to listen only
on that interface. Normally, it listens on all interfaces.
In environments where the virtual machines are using the host
machine as a gateway, this *must* be set (typically to virbr0).
Set to 'none' for no interface.
Interface [virbr0]: br0
The key file is the shared key information which is used to
authenticate fencing requests. The contents of this file must
be distributed to each physical host and virtual machine within
a cluster.
Key File [/etc/cluster/fence_xvm.key]:
Backend modules are responsible for routing requests to
the appropriate hypervisor or management layer.
Backend module [libvirt]:
The libvirt backend module is designed for single desktops or
servers. Do not use in environments where virtual machines
may be migrated between hosts.
Libvirt URI [qemu:///system]:
Configuration complete.
=== Begin Configuration ===
backends {
libvirt {
uri = "qemu:///system";
}
}
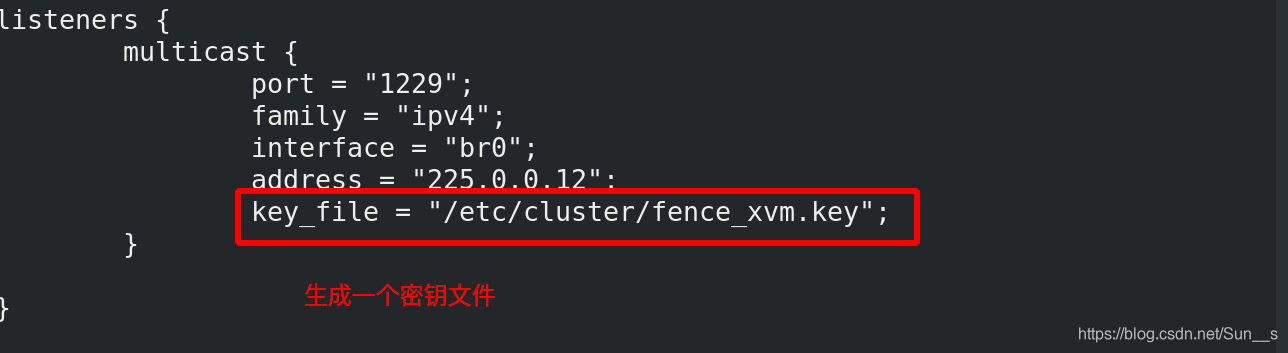
listeners {
multicast {
port = "1229";
family = "ipv4";
interface = "br0";
address = "225.0.0.12";
key_file = "/etc/cluster/fence_xvm.key";
}
}
fence_virtd {
module_path = "/usr/lib64/fence-virt";
backend = "libvirt";
listener = "multicast";
}
=== End Configuration ===
Replace /etc/fence_virt.conf with the above [y/N]? y
注意:只有网络那里需要手动输入你的网桥名字,其余全部回车即可
[root@Sun_s ~]# cd /etc/
[root@Sun_s etc]# mkdir cluster/
##由于这个目录没有,所以需要手动创建##
[root@Sun_s cluster]# dd if=/dev/urandom of=fence_xvm.key bs=128 count=1
##生成密钥##
[root@Sun_s cluster]# systemctl restart fence_virtd.service[root@Sun_s cluster]# scp fence_xvm.key [email protected]:/etc/cluster/
[root@Sun_s cluster]# scp fence_xvm.key [email protected]:/etc/cluster/
##将密钥传给资源管理的服务器##[root@server4 ~]# mkdir /etc/cluster
[root@server4 ~]# ssh server1 mkdir /etc/cluster
##创建目录存放密钥##
[root@server4 ~]# pcs stonith create vmfence fence_xvm pcmk_host_map="server1:sun1;server4:sun4" op monitor interval=60s
“将主机名和设备对应关系”加到集群中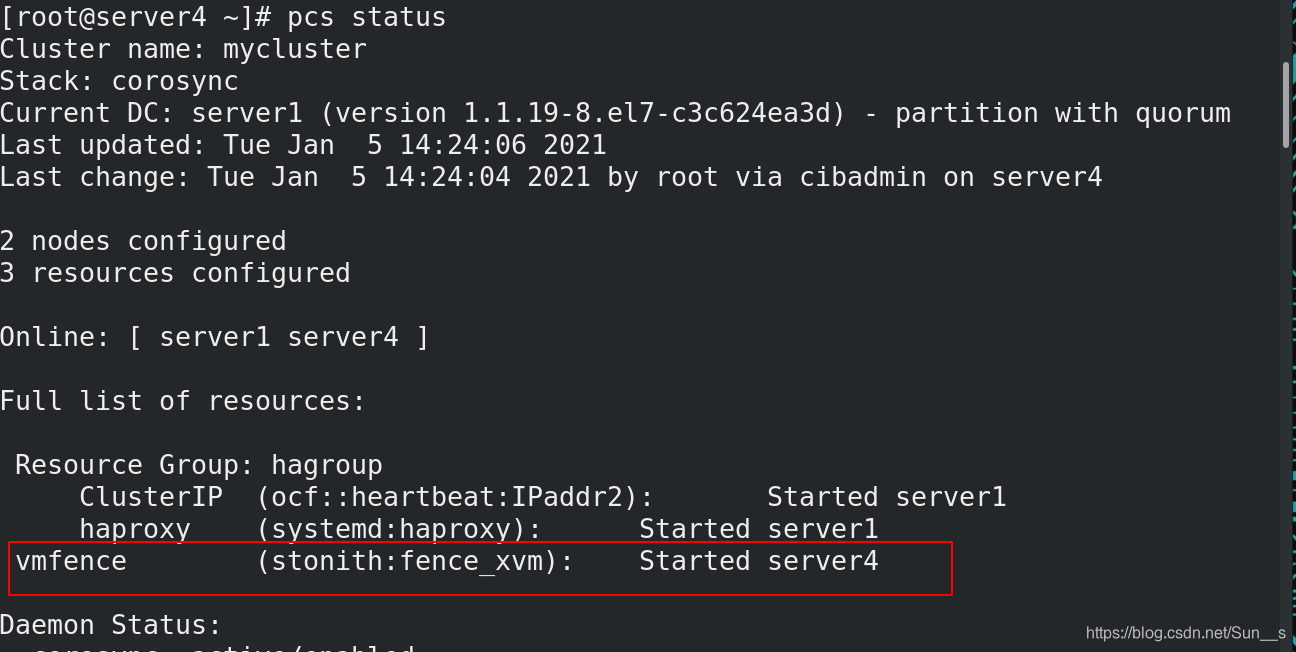
[root@server4 ~]# pcs property set stonith-enabled=true
##将stonith启用##
测试:
[root@server1 ~]# echo c > /proc/sysrq-trigger
##将server1模拟系统崩溃##此时打开server1的虚拟窗口观察变化