1.haproxy负载均衡
1)haproxy日志
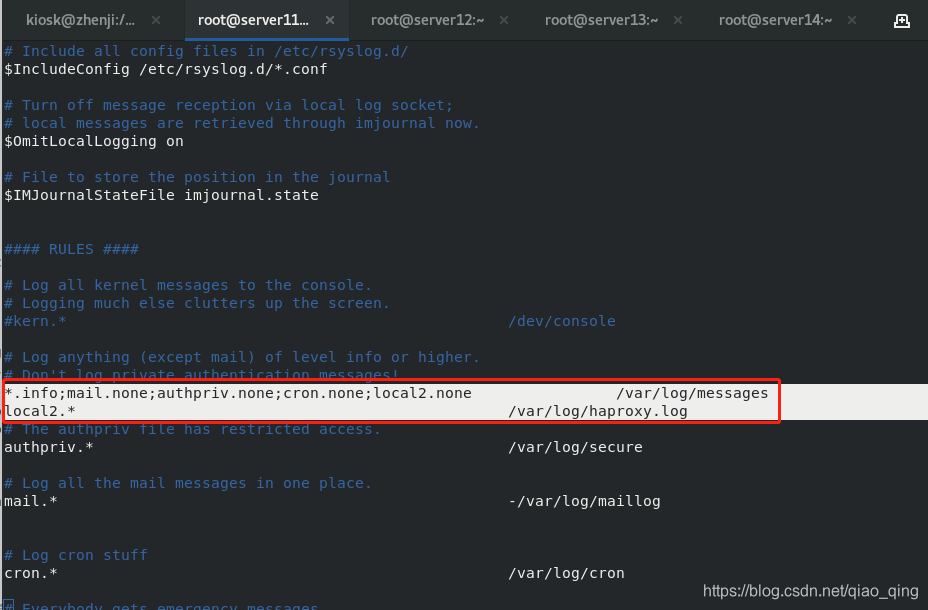
[root@server11 ~]# vim /etc/rsyslog.conf
更改:
$ModLoad imudp
$UDPServerRun 514
*.info;mail.none;authpriv.none;cron.none;local2.none                /var/log/messages
local2.*                                                /var/log/haproxy.log

[root@server11 ~]# systemctl restart rsyslog.service
[root@server11 ~]# systemctl start haproxy.service
[root@server11 ~]# cat /var/log/haproxy.log  #有日志了
Jan 10 09:24:47 localhost haproxy[3820]: Proxy static started.
Jan 10 09:24:47 localhost haproxy[3820]: Proxy app started.
2)haproxy访问参数设置
%backup
[root@server11 ~]# systemctl enable --now haproxy.service
[root@server11 ~]# vim /etc/haproxy/haproxy.cfg
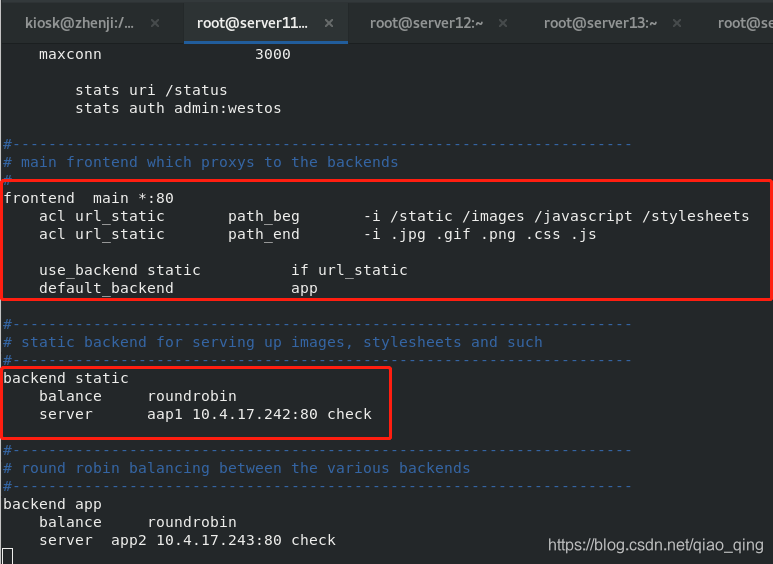
stats uri /status
stats auth admin:westos #加认证
frontend main *:80
acl url_static path_beg -i /static /image /javascript /stylesheets
acl url_static path_end -i .jpg .gif .png .css .js
use_backend static if url_static #当符合url_static上面的条件就执行static里的主机
default_backend app #默认是app里的主机
#---------------------------------------------------------------------
# static backend for serving up images, stylesheets and such
#---------------------------------------------------------------------
backend static
balance roundrobin
server app2 172.25.3.12:80 check
#---------------------------------------------------------------------
# round robin balancing between the various backends
#---------------------------------------------------------------------
backend app
balance roundrobin
#balance source
server app1 172.25.3.13:80 check
[root@server11 ~]# systemctl restart haproxy.service
[root@server12 ~]# cd /var/www/html/
[root@server12 html]# ls
index.html
[root@server12 html]# mkdir image
[root@server12 html]# cd image/
[root@server12 image]# ls
vim.jpg
网页访问http://172.25.3.12/image/vim.jpg可以访问网页,再访问调度器http://172.25.3.11/image/vim.jpg也可以访问网页。vim.jpg的路径是/image,是以.jpg结尾
%所有后端全挂了,backup才生效
[root@server11 ~]# vim /etc/haproxy/haproxy.cfg
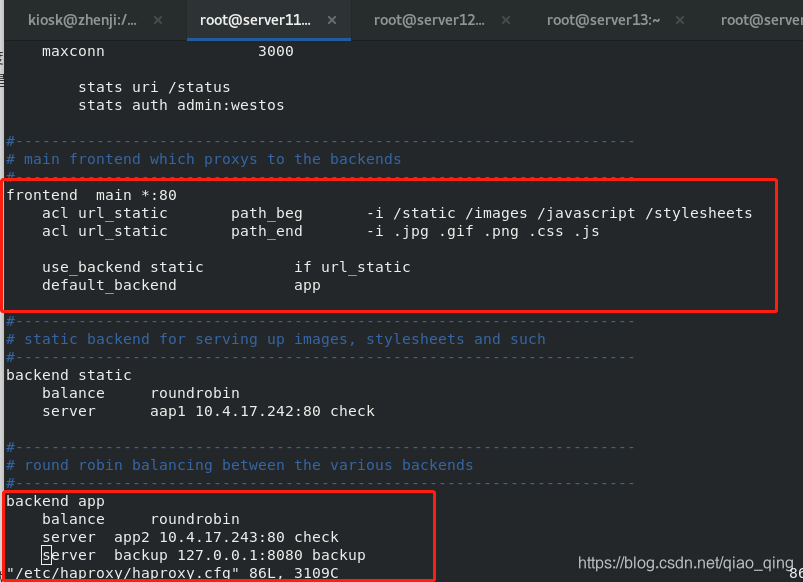
backend app
balance roundrobin
#balance source
server app1 172.25.3.13:80 check
server backup 127.0.0.1:8080 backup #添加部分
[root@server11 ~]# vim /etc/httpd/conf/httpd.conf
改为
Listen 8080
[root@server11 ~]# systemctl reload haproxy.service
[root@server11 ~]# systemctl restart httpd.service
[root@server11 ~]# cd /var/www/html
[root@server11 html]# ls
[root@server11 html]# vim index.html
[root@server11 html]# cat index.html
server11 please try again later
#server13停掉
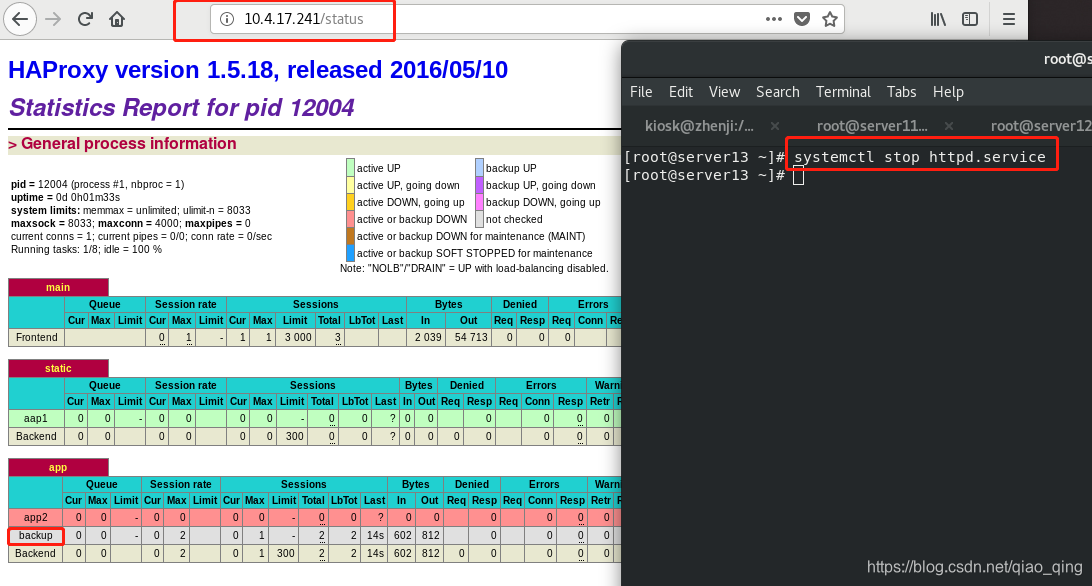
[root@server13 html]# systemctl stop httpd.service
网页查看http://172.25.3.11/status,所有后端全挂了,发现backup生效
网页查看http://172.25.3.11/,是server11 please try again later

#block直接禁用
#errorloc 对于制定错误代码重定向到其他页面
#redirect直接重定向
#http请求

%添加黑名单。src控制源
[root@server11 html]# vim /etc/haproxy/haproxy.cfg
frontend  main *:80
    acl url_static       path_beg       -i /static /image /javascript /stylesheets
    acl url_static       path_end       -i .jpg .gif .png .css .js

        acl blacklist src 172.25.3.250#src控制源

        tcp-request content reject if blacklist #如果是很名单里的就拒绝访问

    use_backend static          if url_static
    default_backend             app
[root@server11 haproxy]# systemctl reload haproxy.service

#真机上测试
[root@zhenji html]# curl 172.25.3.11
curl: (52) Empty reply from server
#其他机子上测试
[root@server12 image]# curl 172.25.3.11
server13

[root@server11 html]# vim /etc/haproxy/haproxy.cfg

frontend  main *:80
    acl url_static       path_beg       -i /static /image /javascript /stylesheets
    acl url_static       path_end       -i .jpg .gif .png .css .js
        acl blacklist src 172.25.3.250
        tcp-request content accept if blacklist #只允许blacklist
        tcp-request content reject#都拒绝
    use_backend static          if url_static
    default_backend             app
[root@server11 haproxy]# systemctl reload haproxy.service
测试:只有真机250可以
网页可以http://172.25.3.11/status
[root@zhenji html]# curl 172.25.3.11
server13
[root@server12 image]# curl 172.25.3.11
curl: (52) Empty reply from server

%block直接禁用
[root@server11 html]# vim /etc/haproxy/haproxy.cfg
        #tcp-request content accept if blacklist
        #tcp-request content reject
        block if blacklist #block直接禁用
测试:只有真机250不可以
网页不可以http://172.25.3.11/status
[root@zhenji html]# curl 172.25.3.11
server13
[root@zhenji html]# curl 172.25.3.11
<html><body><h1>403 Forbidden</h1>
Request forbidden by administrative rules.
</body></html>
[root@server12 image]# curl 172.25.3.11
server13
#errorloc 对于制定错误代码重定向到其他页面
[root@server11 html]# vim /etc/haproxy/haproxy.cfg
        acl blacklist src 172.25.3.250
	#tcp-request content accept if blacklist
        #tcp-request content reject
        block if blacklist #block直接禁用
        errorloc 403 http://www.baidu.com
[root@server11 haproxy]# systemctl reload haproxy.service
测试:
网页可以http://172.25.3.11/status.转到了百度
%redirect直接重定向
[root@server11 html]# vim /etc/haproxy/haproxy.cfg
        acl blacklist src 172.25.3.250
        #tcp-request content accept if blacklist
        #tcp-request content reject
        #block if blacklist
        #errorloc 403 http://www.baidu.com
        redirect location http://www.westos.org if blacklist
[root@server11 haproxy]# systemctl reload haproxy.service
测试:
网页可以http://172.25.3.11/status,直接转到了westos
[root@zhenji html]# curl 172.25.3.11 -I
HTTP/1.1 302 Found
Cache-Control: no-cache
Content-length: 0
Location: http://www.westos.org
Connection: close
[root@server12 image]# curl 172.25.3.11 -I
HTTP/1.1 200 OK
Date: Sun, 10 Jan 2021 02:51:09 GMT
Server: Apache/2.4.6 (Red Hat Enterprise Linux)
Last-Modified: Sat, 09 Jan 2021 03:48:28 GMT
ETag: "9-5b86f8bbed7b0"
Accept-Ranges: bytes
Content-Length: 9
Content-Type: text/html; charset=UTF-8

%http请求
frontend  main *:80
    acl url_static       path_beg       -i /static /image /javascript /stylesheets
    acl url_static       path_end       -i .jpg .gif .png .css .js

        acl blacklist src 172.25.3.250
        acl denyipg path /image/vim.jpg
        #tcp-request content accept if blacklist
        #tcp-request content reject
        #block if blacklist
        #errorloc 403 http://www.baidu.com
        #redirect location http://www.westos.org if blacklist
        http-request deny if denyipg blacklist
    use_backend static          if url_static
    default_backend             app
[root@server11 haproxy]# systemctl reload haproxy.service
测试,可以访问
[root@server12 image]# curl 172.25.3.11 -I
HTTP/1.1 200 OK
Date: Sun, 10 Jan 2021 02:55:00 GMT
Server: Apache/2.4.6 (Red Hat Enterprise Linux)
Last-Modified: Sat, 09 Jan 2021 03:48:28 GMT
ETag: "9-5b86f8bbed7b0"
Accept-Ranges: bytes
Content-Length: 9
Content-Type: text/html; charset=UTF-8
2.读写分离,默认读server13,写是在server12上
[root@zhenji html]# scp upload/* 172.25.3.13:/var/www/html/upload/
[email protected]'s password:
index.php                                                                   100%  257   352.4KB/s   00:00
upload_file.php                                                             100%  927     1.8MB/s   00:00

[root@server11 html]# vim /etc/haproxy/haproxy.cfg
frontend  main *:80
    acl url_static       path_beg       -i /static /image /javascript /stylesheets
    acl url_static       path_end       -i .jpg .gif .png .css .js

        acl blacklist src 172.25.3.250
        acl denyipg path /image/vim.jpg
        acl write method PUT
        acl write method POST
        #tcp-request content accept if blacklist
        #tcp-request content reject
        #block if blacklist
        #errorloc 403 http://www.baidu.com
        #redirect location http://www.westos.org if blacklist
        #http-request deny if denyipg blacklist

    use_backend static          if write #静态为write,server12主机为写
    default_backend             app
[root@server11 haproxy]# systemctl reload haproxy.service

[root@server13 html]# chmod 777 upload
[root@server13 html]# vim upload/upload_file.php
&& ($_FILES["file"]["size"] < 2000000)) #上传图片大小改成2M

[root@server12 upload]# yum install php -y
[root@server13 html]# cd upload/
[root@server13 upload]# ls
index.php  upload_file.php
[root@server13 upload]# mv index.php  .. #应该把index.php移到html目录中
[root@server13 upload]# cd ..
[root@server13 upload]# systemctl restart httpd.service

[root@server12 html]# mkdir upload
[root@server12 html]# scp [email protected]:/var/www/html/upload/* .
[root@server12 html]# ls  #应该把index.php放到html目录中
image  index.html  index.php  upload  upload_file.php
[root@server12 html]# mv  upload_file.php upload/
[root@server12 html]# cd upload/
[root@server12 upload]# ls
upload_file.php

[root@server12 upload]# yum install php -y
[root@server12 upload]# systemctl restart httpd.service

%server12和server13中都要有index.php  upload_file.php这两个文件,且index.php移到html目录中,都要安装php,然后网页访问172.25.3.11/index.php,进行提交vim.jpg,然后在server12里查看有vim.jpg,13没有

[root@server12 html]# ls upload
index.php  vim.jpg
3.pacemaker
#先认证,再组建集群
%server11脑裂,会导致存储伤害
#内核崩溃后,重新开机,会自动获取到集群中
%virsh或virt-manager ->libvirtd->kvm/qemu(底层的虚拟机控制),停了libvirtd,不会影响虚拟机的运行,只是影响使用端口
#server11和server14都要编辑yum源。进行安装
[root@server14 ~]# vim /etc/yum.repos.d/dvd.repo
[root@server14 ~]# cat /etc/yum.repos.d/dvd.repo
[dvd]
name=rhel7.6
baseurl=http://172.25.3.250/rhel7.6
gpgcheck=0
[HighAvailability]
name=rhel7.6
baseurl=http://172.25.3.250/rhel7.6/addons/HighAvailability
gpgcheck=0
[root@server11 haproxy]# yum install -y pacemaker pcs psmisc policycoreutils-python
[root@server11 haproxy]# systemctl enable --now pcsd.service
[root@server11 haproxy]# ssh-keygen
[root@server11 html]# echo westos|passwd --stdin hacluster
[root@server11 haproxy]# ssh-copy-id [email protected]
[root@server11 haproxy]# ssh server14 'echo westos|passwd --stdin hacluster'
[root@server14 haproxy]# yum install -y pacemaker pcs psmisc policycoreutils-python
[root@server14 haproxy]# systemctl enable --now pcsd.service
#火墙和selinux都关了,所以不用设置,作ssh-keygen
[root@server11 haproxy]# pcs cluster auth server11 server14
Username: hacluster
Password:
server14: Authorized
server11: Authorized
[root@server11 haproxy]# pcs cluster setup --name mycluster server11 server14
[root@server11 haproxy]# pcs cluster start --all
[root@server11 haproxy]# pcs cluster enable --all
[root@server11 haproxy]# pcs status #查看状态
Daemon Status:
corosync: active/enabled
pacemaker: active/enabled
pcsd: active/enabled
[root@server11 haproxy]# pcs property set stonith-enabled=false
[root@server11 haproxy]# crm_verify -LV #刷新
[root@server11 haproxy]# pcs resource standards #数据
lsb
ocf
service
systemd
[root@server11 haproxy]# pcs status corosync
Membership information
----------------------
Nodeid Votes Name
1 1 server11 (local)
2 1 server14
[root@server11 haproxy]# pcs resource providers
heartbeat
openstack
pacemaker
[root@server11 haproxy]# pcs resource create --help
[root@server11 haproxy]# pcs resource create vip ocf:heartbeat:IPaddr2 ip=172.25.3.100 op monitor interval=30s
[root@server11 haproxy]# ip addr#172.25.3.100/24已经有了
#此时server11停掉后,在server14中查看那状态转换成server14
[root@server11 haproxy]# pcs cluster stop server11
[root@server11 haproxy]# systemctl disable --now haproxy.service #一定要先手动把haproxy stop ,然后交给集群
[root@server14 ~]# pcs status
vip (ocf::heartbeat:IPaddr2): Started server14
[root@server14 ~]# yum install haproxy -y
[root@server11 haproxy]# scp /etc/haproxy/haproxy.cfg [email protected]://etc/haproxy/
[root@server11 haproxy]# pcs cluster start server11
#服务每隔30秒监测一次,把服务关掉,pcs status查看那,会30s后会自动启动
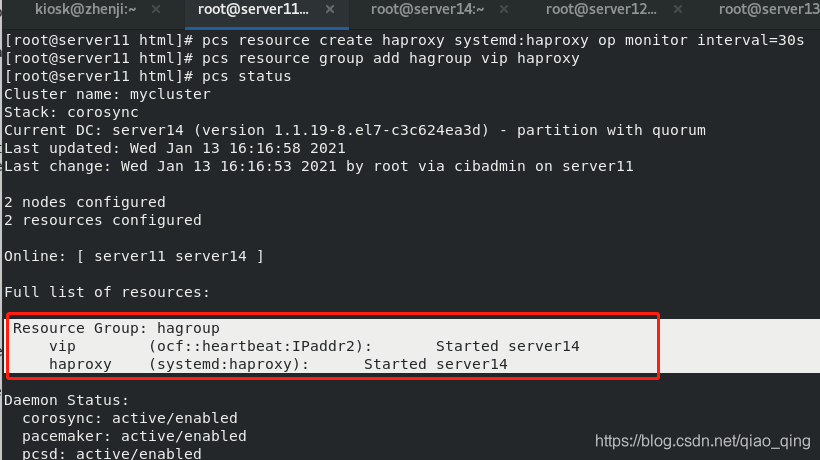
[root@server11 haproxy]# pcs resource create haproxy systemd:haproxy op monitor interval=30s
[root@server11 haproxy]# pcs resource group add hagroup vip haproxy#group把资源整合到一起,启动顺序,启动时一起启动
[root@server11 haproxy]# pcs status
Resource Group: hagroup
vip (ocf::heartbeat:IPaddr2): Started server14
haproxy (systemd:haproxy): Started server14
[root@server14 ~]# pcs node standby
#11断掉心跳后,会由14接管;当重启11时,还是14在管,防止损耗,不会切到11
[root@server11 haproxy]# pcs status
Node server14: standby
[root@server14 ~]# pcs node unstandby
%在真机里做fence,这样
[root@zhenji ~]# yum search fence-virtd
[root@zhenji ~]# yum install fence-virtd.x86_64 fence-virtd-libvirt.x86_64 fence-virtd-multicast.x86_64
#把原来的镜像
[AppStream]
name=westosdir AppStream
baseurl=http:///10.4.17.141/westos/AppStream
gpgcheck=0
[BaseOS]
name=westos BaseOS
baseurl=http:///10.4.17.141/westos/BaseOS
gpgcheck=0
改为:
[dvd]
name=rhel7.6
baseurl=http://10.4.17.141/rhel7.6
gpgcheck=0
[HighAvailability]
name=rhel7.6
baseurl=http://10.4.17.141/rhel7.6/addons/HighAvailability
gpgcheck=0
[root@zhenji yum.repos.d]# mkdir /etc/cluster
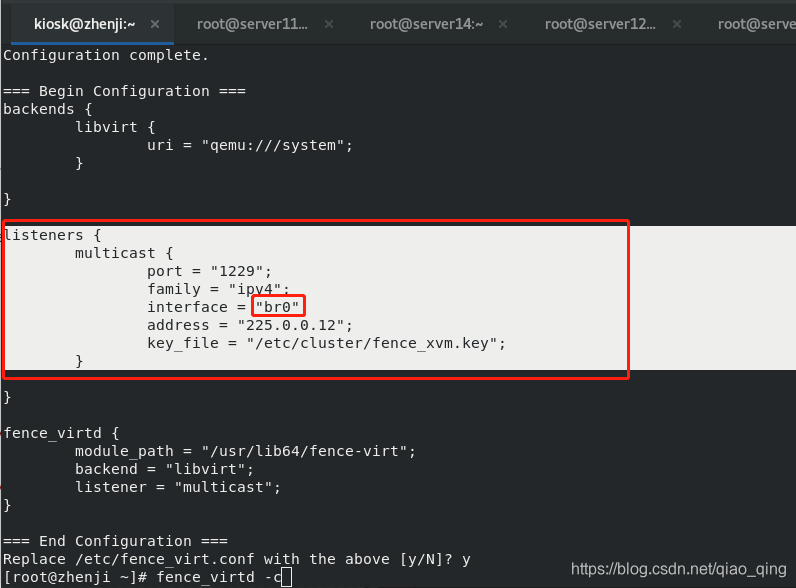
[root@zhenji ~]# fence_virtd -c #全部回车,interface 为 "br0"
listeners {
multicast {
port = "1229";
family = "ipv4";
interface = "br0";
address = "225.0.0.12";
key_file = "/etc/cluster/fence_xvm.key";
}
[root@zhenji yum.repos.d]# dd if=/dev/urandom of=fence_xvm.key bs=128 count=1
1+0 records in
1+0 records out
128 bytes copied, 6.8975e-05 s, 1.9 MB/s
[root@zhenji yum.repos.d]# systemctl restart fence_virtd.service
[root@zhenji cluster]# netstat -anulp|grep :1229
udp 0 0 0.0.0.0:1229 0.0.0.0:* 21895/fence_virtd
[root@server11 haproxy]# mkdir /etc/cluster
[root@server11 haproxy]# cd /etc/cluster
[root@server11 cluster]# ls
fence_xvm.key
[root@server14 haproxy]# mkdir /etc/cluster
[root@server14 haproxy]# cd /etc/cluster
[root@server14 cluster]# ls
fence_xvm.key
[root@zhenji cluster]# scp fence_xvm.key [email protected]:/etc/cluster/
[email protected]'s password:
fence_xvm.key
[root@zhenji cluster]# scp fence_xvm.key [email protected]:/etc/cluster/
[email protected]'s password:
fence_xvm.key
[root@server14 ~]# yum install fence-virt.x86_64
[root@server14 ~]# stonith_admin -I
fence_xvm
fence_virt
2 devices found
[root@server11 ~]# yum install fence-virt.x86_64
[root@server11 ~]# stonith_admin -I
fence_xvm
fence_virt
2 devices found
[root@server11 cluster]# pcs stonith create vmfence fence_xvm pcmk_host_map="server11:node1;server14:node4" op monitor interval=60s
#如果写错了vmfence,需要pcs stonith disable vmfence;再pcs stonith delete vmfence
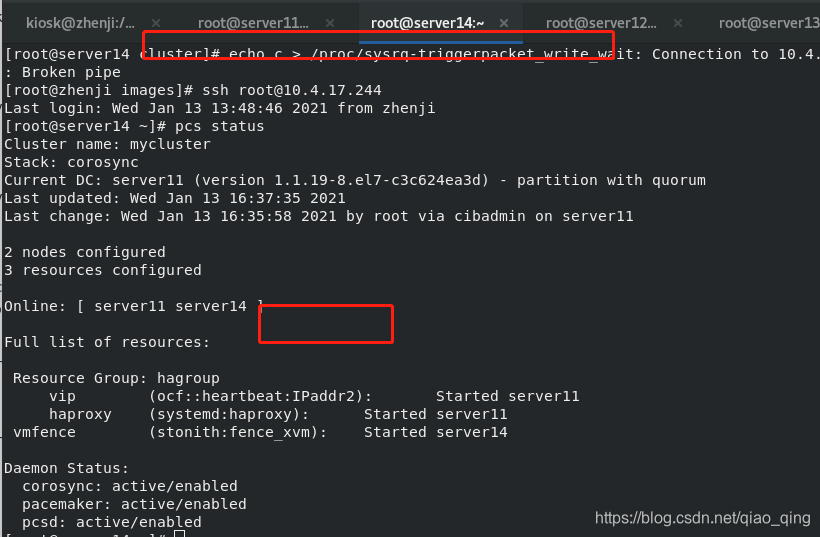
[root@server11 cluster]# pcs status
Resource Group: hagroup
vip (ocf::heartbeat:IPaddr2): Started server11
haproxy (systemd:haproxy): Started server11
vmfence (stonith:fence_xvm): Starting server14
[root@server11 cluster]# pcs property set stonith-enabled=true
[root@server14 ~]# echo c > /proc/sysrq-trigger#内核损坏,会发现server14会自动重启并加载到集群中
[root@server14 ~]# pcs status
4.源码编译
源码编译三步:
1,config
2,make
3,make install
[root@server11 ~]# pcs cluster stop --all
[root@server11 ~]# pcs cluster disable --all
[root@zhenji ~]# lftp 172.25.254.250
lftp 172.25.254.250:~> cd pub/docs/lamp/
lftp 172.25.254.250:/pub/docs/lamp> get nginx
lftp 172.25.254.250:/pub/docs/lamp> get nginx-1.18.0.tar.gz

[root@zhenji ~]# scp nginx-1.18.0.tar.gz [email protected]:/root
[root@server11 nginx-1.18.0]# tar zxf nginx-1.18.0.tar.gz

[root@server11 nginx-1.18.0]# yum install gcc
[root@server11 nginx-1.18.0]# yum install pcre-devel
[root@server11 nginx-1.18.0]# yum install openssl-devel
[root@server11 nginx-1.18.0]# ./configure --prefix=/usr/local/nginx  --with-http_ssl_module
[root@server11 nginx-1.18.0]# make
[root@server11 nginx-1.18.0]# make install
[root@server11 nginx-1.18.0]# cd /usr/local/nginx/
[root@server11 nginx]# ls
conf  html  logs  sbin
[root@server11 nginx]# du -sh
5.8M	.
[root@server11 nginx]# cd ..
[root@server11 local]# rm -fr nginx/
[root@server11 local]# cd
[root@server11 ~]# cd nginx-1.18.0/
[root@server11 nginx-1.18.0]# ls
auto  CHANGES  CHANGES.ru  conf  configure  contrib  html  LICENSE  Makefile  man  objs  README  src
[root@server11 nginx-1.18.0]# make clean
[root@server11 nginx-1.18.0]# cd auto/
[root@server11 auto]# cd cc/
[root@server11 cc]# vim gcc
把debug屏蔽
# debug
#CFLAGS="$CFLAGS -g"
[root@server11 nginx-1.18.0]# cd ..
[root@server11 nginx-1.18.0]# ./configure --prefix=/usr/local/nginx  --with-http_ssl_module
[root@server11 nginx-1.18.0]# make
[root@server11 nginx-1.18.0]# make install
[root@server11 nginx-1.18.0]# cd /usr/local/nginx/
[root@server11 nginx]# ls
[root@server11 nginx]# du -sh
[root@server11 nginx]# ls
[root@server11 nginx]# cd sbin/
[root@server11 sbin]# pwd
/usr/local/nginx/sbin/
[root@server11 sbin]# ecoh $PATH
[root@server11~]# cd
[root@server11~]# vim .bash_profile
# .bash_profile

# Get the aliases and functions
if [ -f ~/.bashrc ];then
	. ~/bashrc
fi

#User specific environment and startup programs
PATH=$PATH:$HOME/bin:/usr/local/nginx/sbin

export PATH
[root@server11~]# source .bash_profile
[root@server11~]# which nginx
[root@server11~]# nginx
[root@server11~]# cd /usr/local/nginx/conf/
[root@server11 conf]# vim nginx.conf

http {


	upstream westos {
	server 10.4.17.242:80;
	server 10.4.17.243:80;
	}
server {
	listen 80;
	server_name demo.westos.org;
	location / {
		proxy_pass http://westos;
	}
}
}
[root@server11 conf]# nginx -t
[root@server11 conf]# nginx -s reload
[root@server11 conf]#

[root@zhenji ~]# curl demo.westos.org
server12
[root@zhenji ~]# curl demo.westos.org
server13

[root@server12~]# systemctl stop httpd
[root@server12~]# systemctl start httpd