以下链接是个人关于DenseFusion(6D姿态估计) 所有见解,如有错误欢迎大家指出,我会第一时间纠正。有兴趣的朋友可以加微信:a944284742相互讨论技术。若是帮助到了你什么,一定要记得点赞!因为这是对我最大的鼓励。
姿态估计0-00:DenseFusion(6D姿态估计)-目录-史上最新无死角讲解https://blog.csdn.net/weixin_43013761/article/details/103053585
网络输入
通过上小结,我们可以知道在tools/train.py可以看到本人的如下注释:
for i, data in enumerate(dataloader, 0):
    points, choose, img, target, model_points, idx = data
    # points:由深度图计算出来的点云,该点云数据以摄像头主轴参考坐标
    # choose:所选择点云的索引,[bs, 1, 500]
    # img:通过box剪切下来的RGB图像
    # target:根据model_points点云信息,以及旋转偏移矩阵转换过的点云信息[bs,500,3]
    # model_points:目标初始帧(模型)对应的点云信息[bs,500,3]
    # idx:目标物体的序列编号
	pred_r, pred_t, pred_c, emb = estimator(img, points, choose, idx)
这个就是我们整个网络的输入数据了,以及对应的PoseNet(其上的estimator就是),那么这些数据在整个网络中是怎么运转的呢?首先我们来看看PoseNet网络的实现,其代码在lib/network.py之中,这是本人对class PoseNet(nn.Module)的注解(大致浏览下,后面有更加详细的带读)
class ModifiedResnet(nn.Module):

    def __init__(self, usegpu=True):
        super(ModifiedResnet, self).__init__()

        self.model = psp_models['resnet18'.lower()]()
        self.model = nn.DataParallel(self.model)

    def forward(self, x):
        x = self.model(x)
        return x

class PoseNet(nn.Module):
    def __init__(self, num_points, num_obj):
        """
        :param num_points:输入网络的点云数目
        :param num_obj: 目标物体的种类
        """
        # 调用父类的初始化函数,不知道有什么用
        super(PoseNet, self).__init__()

        # 点云的数目
        self.num_points = num_points

        # 做过修改的Resnet
        self.cnn = ModifiedResnet()
        summary(self.cnn,(3, 120, 120))

        self.feat = PoseNetFeat(num_points)
        summary(self.feat.cuda(), [(3, 500),(32,500)])

        self.conv1_r = torch.nn.Conv1d(1408, 640, 1)
        self.conv1_t = torch.nn.Conv1d(1408, 640, 1)
        self.conv1_c = torch.nn.Conv1d(1408, 640, 1)

        self.conv2_r = torch.nn.Conv1d(640, 256, 1)
        self.conv2_t = torch.nn.Conv1d(640, 256, 1)
        self.conv2_c = torch.nn.Conv1d(640, 256, 1)

        self.conv3_r = torch.nn.Conv1d(256, 128, 1)
        self.conv3_t = torch.nn.Conv1d(256, 128, 1)
        self.conv3_c = torch.nn.Conv1d(256, 128, 1)

        self.conv4_r = torch.nn.Conv1d(128, num_obj*4, 1) #quaternion
        self.conv4_t = torch.nn.Conv1d(128, num_obj*3, 1) #translation
        self.conv4_c = torch.nn.Conv1d(128, num_obj*1, 1) #confidence

        self.num_obj = num_obj

    def forward(self, img, x, choose, obj):
        """
        PoseNet的前向传播,进行姿态预测
        :param img: RGB图像的像素[bs,3,h,w]
        :param x: 点云数据[bs, 500, 3]
        :param choose: 选择点云的index下标[bs, 1, 500]
        :param obj: 目标物体的序列号[bs, 1]
        :return:对图像预测的姿态
        """

        #print('img.shape: {0}',format(img.shape))
        #print('x.shape: {0}', format(x.shape))
        #print('choose.shape: {0}', format(choose.shape))
        #print('obj.shape: {0}', format(obj.shape))

        #out_img[bs, 32, h, w]
        out_img = self.cnn(img)

        bs, di, _, _ = out_img.size()

        # 进行resize操作变成
        emb = out_img.view(bs, di, -1)

        # 进行复制,复制di=32次,[1, 32, 500]
        choose = choose.repeat(1, di, 1)
        #print(choose.shape)

        # contiguous()是为了保证在GPU上连续分配
        # 并且针对emb每个通道(di),选取500个像素,及[bs, di=32, ?]-->[1, di=32, 500]
        emb = torch.gather(emb, 2, choose).contiguous()
        #print(emb.shape)

        # [bs, 500, 3]-->[bs,3,500]
        x = x.transpose(2, 1).contiguous()

        # x: [bs, 3, 500],后续通过卷积变成论文中的geometry embeddings
        # emb: [bs, 32, 500],论文中的color embeddings
        #  ap_x[bs, 1408 = 128 + 256 + 1024, 500]
        ap_x = self.feat(x, emb)
        #print('ap_x.shape: {0}', format(ap_x.shape))

        rx = F.relu(self.conv1_r(ap_x))
        tx = F.relu(self.conv1_t(ap_x))
        cx = F.relu(self.conv1_c(ap_x))

        rx = F.relu(self.conv2_r(rx))
        tx = F.relu(self.conv2_t(tx))
        cx = F.relu(self.conv2_c(cx))

        rx = F.relu(self.conv3_r(rx))
        tx = F.relu(self.conv3_t(tx))
        cx = F.relu(self.conv3_c(cx))


        # rx.shape: [bs, num_obj, 4, 500]
        rx = self.conv4_r(rx).view(bs, self.num_obj, 4, self.num_points)
        # tx.shape: [bs, num_obj, 3, 500]
        tx = self.conv4_t(tx).view(bs, self.num_obj, 3, self.num_points)
        # cx.shape: [bs, num_obj, 1, 500]
        cx = torch.sigmoid(self.conv4_c(cx)).view(bs, self.num_obj, 1, self.num_points)
        # print('='*50)
        # print('rx.shape: {0}', format(rx.shape))
        # print('tx.shape: {0}', format(tx.shape))
        # print('cx.shape: {0}', format(cx.shape))

        # 选择预测对应目标内标的矩阵参数
        b = 0

        #[bs, 4, 500]
        out_rx = torch.index_select(rx[b], 0, obj[b])
        #[bs, 3, 500]
        out_tx = torch.index_select(tx[b], 0, obj[b])
        #[bs, 1, 500]
        out_cx = torch.index_select(cx[b], 0, obj[b])
        # print('out_rx.shape: {0}', format(out_rx.shape))
        # print('out_tx.shape: {0}', format(out_tx.shape))
        # print('out_cx.shape: {0}', format(out_cx.shape))

        # [bs, 500, 4]
        out_rx = out_rx.contiguous().transpose(2, 1).contiguous()
        # [bs, 500, 3]
        out_cx = out_cx.contiguous().transpose(2, 1).contiguous()
        # [bs, 500, 1]
        out_tx = out_tx.contiguous().transpose(2, 1).contiguous()

        # detach()表示从图中分离出来,不做反向传播
        return out_rx, out_tx, out_cx, emb.detach()
源码带读
首先我们从class PoseNet(nn.Module)这个类看起。直接进入其def forward(self, img, x, choose, obj)函数,这是网络的前线传播。可以看到如下代码:
	#out_img[bs, 32, h, w]
	out_img = self.cnn(img)
其中的CNN对应该类初始化函数中的:
    # 做过修改的Resnet
    self.cnn = ModifiedResnet()
    summary(self.cnn,(3, 120, 120))
想看网络结构的朋友,把 summary(self.cnn,(3, 120, 120))添加上去,就能看到整个网络的机构了,我这里就不复制了。总的来说,对应论文Figure 2如下部分:
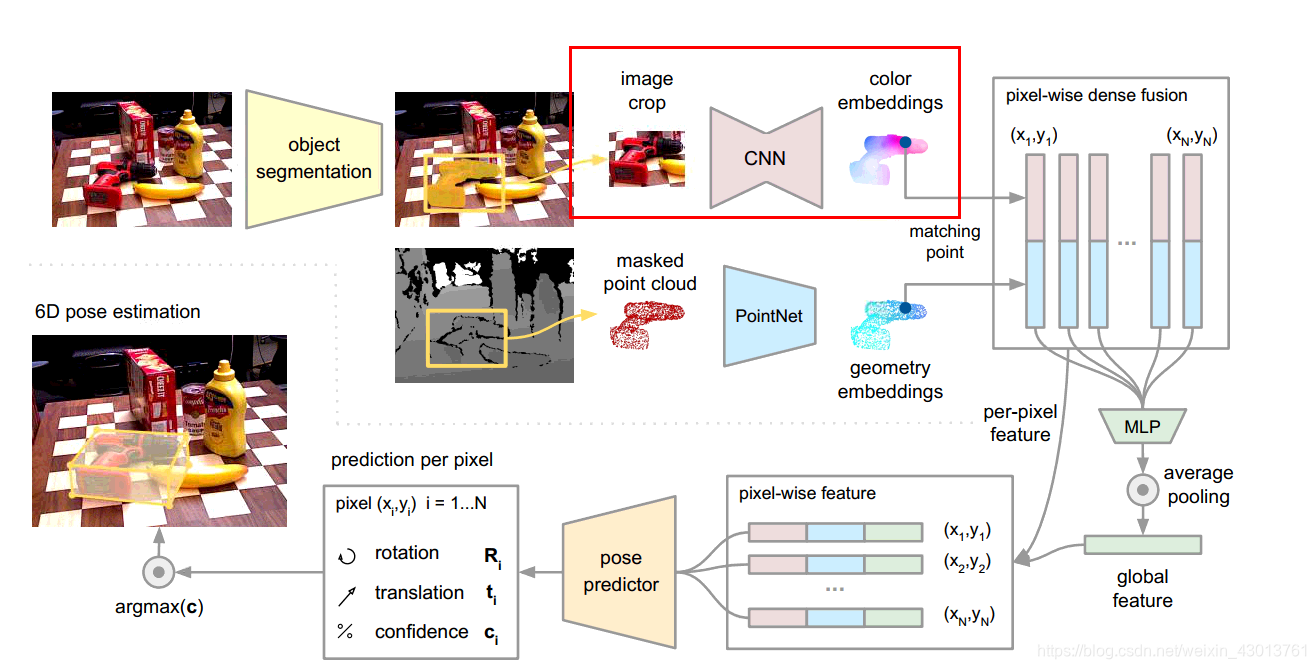
其中的image crop就是forward(self, img, x, choose, obj)参数中的img,self.cnn(img)网络的输出out_img或者后面的emb就图示中的color embeddings。这里呢,大家只要知道网络输入img[bs,3,H,W]然后输出emb[bs,32,H,W],也就是说,每个像素都被抽象成了一个32维度的向量。
然后大家要注意的是forward函数输入x的大小为[bs, 500, 3],也就是说,在数据预处理的时候,我们已经选择了500个点云进来。但是我们图片的特征向量[bs,32,H,W]可是有HxW个像素,论文中说到color embeddings和geometry embeddings要进行稠密(像素级别)的融合,那你也得像素和点云数目一样多,才能融合吧,不然融合个锤锤啊。
所以呢,这里就借助传入的choose参数,选择了和点云对应位置的color embeddings,这样他们的大小都为500了,就能进行融合了。融合呢,融合过程调用如下函数:
    # x: [bs, 3, 500],后续通过卷积变成论文中的geometry embeddings
    # emb: [bs, 32, 500],论文中的color embeddings
    #  ap_x[bs, 1408 = 128 + 256 + 1024, 500]
    ap_x = self.feat(x, emb)
    #print('ap_x.shape: {0}', format(ap_x.shape))
可以知道,这个网络的输入点云x[bs, 3, 500](空间信息)和emb: [bs, 32, 500](颜色信息)。合成之后呢,每个像素与点云都融合成了1408 = 128 + 256 + 1024维度的向量,那么这些都是什么东西?先看self.feat结构的实现
class PoseNetFeat(nn.Module):
    def __init__(self, num_points):
        super(PoseNetFeat, self).__init__()
        self.conv1 = torch.nn.Conv1d(3, 64, 1)
        self.conv2 = torch.nn.Conv1d(64, 128, 1)

        self.e_conv1 = torch.nn.Conv1d(32, 64, 1)
        self.e_conv2 = torch.nn.Conv1d(64, 128, 1)

        self.conv5 = torch.nn.Conv1d(256, 512, 1)
        self.conv6 = torch.nn.Conv1d(512, 1024, 1)

        self.ap1 = torch.nn.AvgPool1d(num_points)
        self.num_points = num_points
    def forward(self, x, emb):
        """
        :param x: [bs, 3, 500],点云数据
        :param emb: [bs, 32, 500],论文中的color embeddings
        """
        # [bs, 3, 500]-->[bs,64,500],可以理解为论文中的论文中的geometry embeddings
        x = F.relu(self.conv1(x))
        # [bs, 32, 500]-->[bs,64,500]
        emb = F.relu(self.e_conv1(emb))
        # [bs,128,500]
        pointfeat_1 = torch.cat((x, emb), dim=1)
        #print('pointfeat_1.shape: {0}', format(pointfeat_1.shape))

        #[bs, 64, 500]-->[bs, 128, 500]
        x = F.relu(self.conv2(x))
        # [bs, 64, 500]-->[bs, 128, 500]
        emb = F.relu(self.e_conv2(emb))
        # [bs, 256, 500]
        pointfeat_2 = torch.cat((x, emb), dim=1)
        #print('pointfeat_2.shape: {0}', format(pointfeat_2.shape))

        # [bs, 256, 500]-->[bs, 512, 500]
        x = F.relu(self.conv5(pointfeat_2))
        # [bs, 512, 500]-->[bs, 1024, 500]
        x = F.relu(self.conv6(x))
        #print('x.shape: {0}', format(x.shape))

        ap_x = self.ap1(x)

        # ap_x[bs, 1024, 500]
        ap_x = ap_x.view(-1, 1024, 1).repeat(1, 1, self.num_points)
        #print('ap_x.shape: {0}', format(ap_x.shape))

        return torch.cat([pointfeat_1, pointfeat_2, ap_x], 1) #128 + 256 + 1024
可以明显的看到,网络的返回注释:
return torch.cat([pointfeat_1, pointfeat_2, ap_x], 1) #128 + 256 + 1024
其500个中的每个128 + 256 + 1024对应分别如下
大家可能奇怪,为什么要使用这样的3段拼接起来,首先我们来看看pointfeat_1:
        # [bs, 3, 500]-->[bs,64,500]
        x = F.relu(self.conv1(x))
        # [bs, 32, 500]-->[bs,64,500]
        emb = F.relu(self.e_conv1(emb))
        # [bs,128,500]
        pointfeat_1 = torch.cat((x, emb), dim=1)
        #print('pointfeat_1.shape: {0}', format(pointfeat_1.shape))
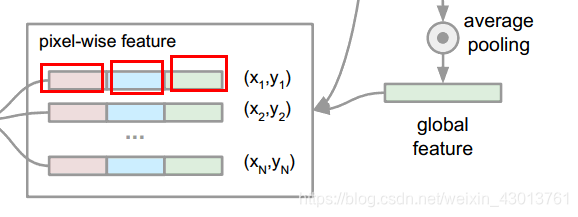
其为论文如下部分:
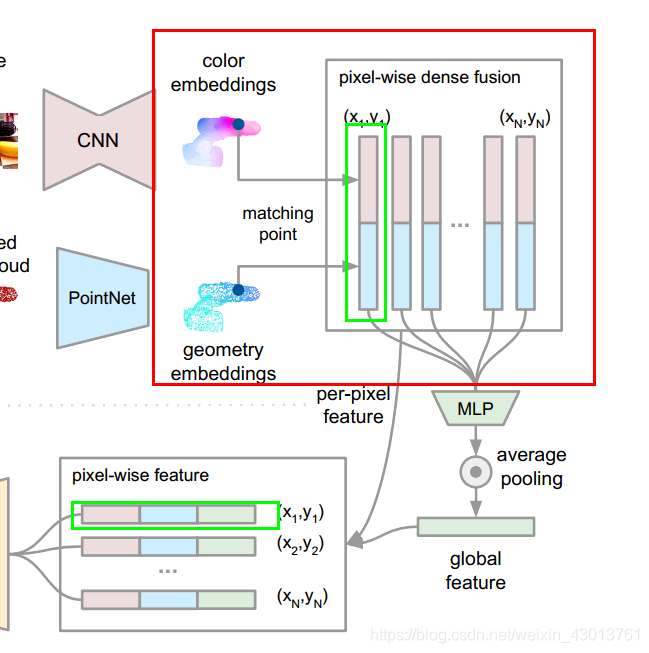
红色框表示他们融合的过程,绿色的框表示如何之后,直接当做pixel-wise feature的一部分。为什么要这么做呢?首先来说,他们是像素级别的融合,融合之后没有做任何出来,也就是说,现在他们保留了每个像素的空间和几何信息。但是这里出现了问题,我们在姿态估算的时候,出来要像素级别的信息,我们应该也还需要全局的信息吧,去结合上下文的联系,所以呢,后面就出现了pointfeat_2,ap_x。他们都是在前面的基础上,进行了特征提取,pointfeat_2属于中间部分,包含的信息应该是点与点之间的联系。ap_x存储的就是全局的信息了。
这样分析下来,是不是所谓的ap_x = self.feat(x, emb)得到的ap_x就很有意义了,其并不是乱七八糟的融合。而是包含了全局,局部,和像素级别的信息。拿到这么完美的一个东西,当然就可以直接做姿态预测了,所以后面再代码中,我们就能看到:
        #[bs, 4, 500]
        out_rx = torch.index_select(rx[b], 0, obj[b])
        #[bs, 3, 500]
        out_tx = torch.index_select(tx[b], 0, obj[b])
        #[bs, 1, 500],置信度
        out_cx = torch.index_select(cx[b], 0, obj[b])
但是这里大家要注意一下,这里预测的是姿态的旋转参数和偏移参数,其中的out_rx并不是偏移矩阵。还有就是out_cx表示的是置信度,以及其中的500,表示的含义是对每个像素都有预测,后面我们就要从这500个预测中,选出最好的一个结果最终的预测结果。
到这里PoseNet的前向传播基本就完成了,下小结我们来看看他的损失函数。
