最近看了一下RabbitMQ的负载均衡策略,对于RabbitMQ集群来说,主要有两类负载均衡,客户端内部的和服务端的,客户端内部主要是采用负载均衡算法,服务端主要是采用代理服务器,这里记录一下,采用尝试HAProxy实现RabbitMQ负载均衡的操作。
安装HAProxy
下载HAProxy相关版本,这里下载haproxy-1.8.12.tar.gz,之后准备安装
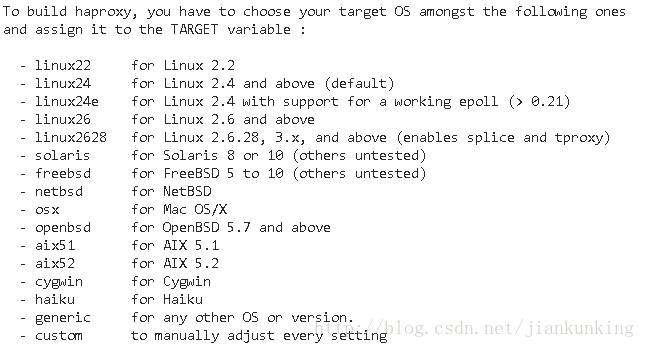
安装之前查看内核版本
uname -r根据内核版本选择编译参数:
解压HAProxy,并安装
tar xf haproxy-1.8.12.tar.gz
cd haproxy-1.7.5
make TARGET=linux2628 PREFIX=/usr/local/haproxy
make install PREFIX=/usr/local/haproxy
安装成功之后,查看版本
/usr/local/haproxy/sbin/haproxy -v配置HAProxy
配置启动文件,复制haproxy文件到/usr/sbin下 ,复制haproxy脚本,到/etc/init.d下
cp /usr/local/haproxy/sbin/haproxy /usr/sbin/
cp ./examples/haproxy.init /etc/init.d/haproxy
chmod 755 /etc/init.d/haproxy
创建系统账号
useradd -r haproxy创建配置文件
mkdir /etc/haproxy
vi /etc/haproxy/haproxy.cfg
更改配置文件
#全局配置
global
    #设置日志
    log 127.0.0.1 local0 info
    #当前工作目录
    chroot /usr/local/haproxy
    #用户与用户组
    user haproxy
    group haproxy
    #运行进程ID
    uid 99
    gid 99
    #守护进程启动
    daemon
    #最大连接数
    maxconn 4096

#默认配置
defaults
    #应用全局的日志配置
    log global
    #默认的模式mode {tcp|http|health}
    #TCP是4层,HTTP是7层,health只返回OK
    mode tcp
    #日志类别tcplog
    option tcplog
    #不记录健康检查日志信息
    option dontlognull
    #3次失败则认为服务不可用
    retries 3
    #每个进程可用的最大连接数
    maxconn 2000
    #连接超时
    timeout connect 5s
    #客户端超时
    timeout client 120s
    #服务端超时
    timeout server 120s

#绑定配置
listen rabbitmq_cluster
        bind 0.0.0.0:5671
        #配置TCP模式
        mode tcp
        #简单的轮询
        balance roundrobin
        #RabbitMQ集群节点配置
        server rmq_node1 10.110.8.34:5672 check inter 5000 rise 2 fall 3 weight 1
        server rmq_node2 10.110.8.38:5672 check inter 5000 rise 2 fall 3 weight 1

#haproxy监控页面地址
listen monitor
        bind 0.0.0.0:8100
        mode http
        option httplog
        stats enable
        stats uri /stats
        stats refresh 5s
启动haproxy
service haproxy start启动成功后,界面如图:
