k-近邻算法(kNN)---它的工作原理是:存在一个样本数据集合,也称做训练样本集,并且样本集中每个数据都存在标签,即我们知道样本集中每个数据与所属分类的对应关系。输入没有标签的新数据后,将新数据的每个特征与样本集中数据对应的特征进行比较,然后算法提取样本集中特征最相似数据(最近邻)的分类标签。一般来说,我们只选择样本数据集中前k个最相似的数据,这就是k-近邻算法中k的出处,通常k是不大于20的整数。最后,选择k个最相似数据中出现次数最多的分类,作为新数据得到分类。
1. 说明一下,文本数据格式:文本名字为:datingTestSet2.txt,该文件我放在项目里面的python文件同级

2. 使用python转化文件
 1 def file2matrix(filename):
 2     """
 3     Cynthia:解析文本数据,将属性数据放在returnMat,将标签放在classLabelVector

 4     导入训练数据
 5     :param filename: 数据文件路径
 6     :return: 数据矩阵returnMat和对应的类别classLabelVector
 7     """
 8     # 打开文件
 9     fr = open(filename, 'r')
10     # 获得文件中的数据行的行数
11     numberOfLines = len(fr.readlines())
12     # 生成对应的空矩阵
13     # 例如:zeros(2,3)就是生成一个 2*3 的矩阵,各个位置上全是 0
14     returnMat = zeros((numberOfLines, 3))  # prepare matrix to return
15     classLabelVector = []  # prepare labels return
16     fr = open(filename, 'r')
17     index = 0
18     for line in fr.readlines():
19         # str.strip([chars]) --返回移除字符串头尾指定的字符生成的新字符串
20         line = line.strip()
21         # 以 '\t' 切割字符串
22         listFromLine = line.split('\t')
23         # 每列的属性数据,即 features
24         returnMat[index] = listFromLine[0: 3]
25         # 每列的类别数据,就是 label 标签数据
26         classLabelVector.append(int(listFromLine[-1]))
27         index += 1
28     # 返回数据矩阵returnMat和对应的类别classLabelVector
29     return returnMat, classLabelVector
扫描二维码关注公众号,回复:
6560469 查看本文章

3. 数据归一化:
 1 def autoNorm(dataSet):
 2     """
 3     Desc:
 4         归一化特征值,消除属性之间量级不同导致的影响
 5     Args:
 6         dataSet -- 需要进行归一化处理的数据集
 7     Returns:
 8         normDataSet -- 归一化处理后得到的数据集
 9         ranges -- 归一化处理的范围
10         minVals -- 最小值
11
12     归一化公式:
13         Y = (X-Xmin)/(Xmax-Xmin)
14         其中的 min 和 max 分别是数据集中的最小特征值和最大特征值。该函数可以自动将数字特征值转化为0到1的区间。
15     """
16     # 计算每种属性的最大值、最小值、范围
17     minVals = dataSet.min(0)
18     maxVals = dataSet.max(0)
19     # 极差
20     ranges = maxVals - minVals
21     normDataSet = (dataSet - minVals) / ranges
22     return normDataSet, ranges, minVals
4. KNN分类的算法核心:
 1 def classify0(inX, dataSet, labels, k):
 2     """
 3     Desc:
 4         kNN 的分类函数
 5     Args:
 6         inX -- 用于分类的输入向量/测试数据
 7         dataSet -- 训练数据集的 features
 8         labels -- 训练数据集的 labels
 9         k -- 选择最近邻的数目
10     Returns:
11         sortedClassCount[0][0] -- 输入向量的预测分类 labels
12
13     注意:labels元素数目和dataSet行数相同;程序使用欧式距离公式.
14
15     预测数据所在分类可在输入下列命令
16     kNN.classify0([0,0], group, labels, 3)
17     """
18
19     # -----------实现 classify0() 方法的第一种方式----------------------------------------------------------------------------------------------------------------------------
20     # 1. 距离计算
21     #shape函数是查看矩阵或者数组的维数
22     dataSetSize = dataSet.shape[0]
23     # tile生成和训练样本对应的矩阵,并与训练样本求差
24     #tile是用于对某个序列进行重复。
25     #示例:tile([1,2],(2,2,3)),输出为array([[[1, 2, 1, 2, 1, 2],[1, 2, 1, 2, 1, 2]]  ,  [[1, 2, 1, 2, 1, 2],[1, 2, 1, 2, 1, 2]]    ])
26     #(1)可以看到是先将[1,2]重复3次得到[1, 2, 1, 2, 1, 2],
27     #(2)再将[1, 2, 1, 2, 1, 2]重复2次得到[[1, 2, 1, 2, 1, 2],[1, 2, 1, 2, 1, 2]],
28     #(3)最后再将[[1, 2, 1, 2, 1, 2],[1, 2, 1, 2, 1, 2]]重复两次[[[1, 2, 1, 2, 1, 2],[1, 2, 1, 2, 1, 2]]  ,  [[1, 2, 1, 2, 1, 2],[1, 2, 1, 2, 1, 2]]]。
29     #总结:从上面的例子可以看出,tile(A,rep)按照rep里面从右到左的序列顺序对A进行重复,每对重复完一次,A就增加一个维度。
30     diffMat = tile(inX, (dataSetSize, 1)) - dataSet
31     #目的是计算出该测试点对训练集中的每个点的距离。
32     """
33     欧氏距离: 点到点之间的距离
34     """
35     # 取平方
36     sqDiffMat = diffMat ** 2
37     # 将矩阵的每一行相加
38     sqDistances = sqDiffMat.sum(axis=1)
39     # 开方
40     distances = sqDistances ** 0.5
41     # 根据距离排序从小到大的排序,返回对应的索引位置
42     # argsort() 是将x中的元素从小到大排列,提取其对应的index(索引),然后输出到y。
43     # print 'distances=', distances
44     sortedDistIndicies = distances.argsort()
45     # print 'distances.argsort()=', sortedDistIndicies
46
47     # 2. 选择距离最小的k个点
48     classCount = {}
49     for i in range(k):
50         # 找到该样本的类型
51         voteIlabel = labels[sortedDistIndicies[i]]
52         # 在字典中将该类型加一
53         # 字典的get方法
54         # 如:list.get(k,d) 其中 get相当于一条if...else...语句,参数k在字典中,字典将返回list[k];如果参数k不在字典中则返回参数d,如果K在字典中则返回k对应的value值
55         # l = {5:2,3:4}
56         # print l.get(3,0)返回的值是4;
57         # Print l.get(1,0)返回值是0;
58         # 感觉像Java中的键值对原理,键是这里的标签类型,值是标签出现的次数
59         classCount[voteIlabel] = classCount.get(voteIlabel, 0) + 1

60     # 3. 排序并返回出现最多的那个类型
61     # 字典的 items() 方法,以列表返回可遍历的(键,值)元组数组。
62     # 例如:dict = {'Name': 'Zara', 'Age': 7}   print "Value : %s" %  dict.items()   Value : [('Age', 7), ('Name', 'Zara')]
63     # sorted 中的第2个参数 key=operator.itemgetter(1) 这个参数的意思是先比较第几个元素
64     # 例如:a=[('b',2),('a',1),('c',0)]  b=sorted(a,key=operator.itemgetter(1)) >>>b=[('c',0),('a',1),('b',2)] 可以看到排序是按照后边的0,1,2进行排序的,而不是a,b,c
65     # b=sorted(a,key=operator.itemgetter(0)) >>>b=[('a',1),('b',2),('c',0)] 这次比较的是前边的a,b,c而不是0,1,2
66     # b=sorted(a,key=opertator.itemgetter(1,0)) >>>b=[('c',0),('a',1),('b',2)] 这个是先比较第2个元素,然后对第一个元素进行排序,形成多级排序。
67     sortedClassCount = sorted(classCount.items(), key=operator.itemgetter(1), reverse=True)
68     return sortedClassCount[0][0]
5. 用约会网站的数据进行训练中的数据标签测试
 1 #分类器针对约会网站的进行测试代码
 2 def datingClassTest():
 3     """
 4     Desc:
 5         对约会网站的测试方法,并将分类错误的数量和分类错误率打印出来
 6     Args:
 7         None
 8     Returns:
 9         None
10     """
11     # 设置测试数据的的一个比例(训练数据集比例=1-hoRatio)
12     hoRatio = 0.1  # 测试范围,一部分测试一部分作为样本
13     # 从文件中加载数据
14     datingDataMat, datingLabels = file2matrix("datingTestSet2.txt")  # load data setfrom file
15     # 归一化数据
16     normMat, ranges, minVals = autoNorm(datingDataMat)
17     # m 表示数据的行数,即矩阵的第一维
18     m = normMat.shape[0]
19     # 设置测试的样本数量, numTestVecs:m表示训练样本的数量
20     numTestVecs = int(m * hoRatio)
21     print('numTestVecs=', numTestVecs)
22     errorCount = 0
23     for i in range(numTestVecs):
24         # 对数据测试
25         classifierResult = classify0(normMat[i], normMat[numTestVecs : m], datingLabels[numTestVecs : m], 3)
26         print("the classifier came back with: %d, the real answer is: %d" % (classifierResult, datingLabels[i]))
27         errorCount += classifierResult != datingLabels[i]
28     print("the total error rate is: %f" % (errorCount / numTestVecs))
29     print(errorCount)
6. 做预测
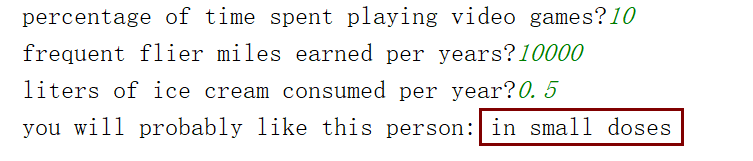
 1 def classifyPerson():
 2     resultList = ['not at all','in small doses', 'in large doses']
 3     percentTats = float(input("percentage of time spent playing video games?"))
 4     ffMiles = float(input("frequent flier miles earned per years?"))
 5     iceCream = float(input("liters of ice cream consumed per year?"))
 6     datingDataMat, datingLabels = file2matrix("datingTestSet2.txt")
 7     normMat, ranges, minVals = autoNorm(datingDataMat)
 8     inArr = array([ffMiles, percentTats, iceCream])
 9     classifierResult = classify0((inArr-minVals)/ranges,normMat,datingLabels,3)
10     print("you will probably like this person:",resultList[classifierResult-1])
注:python3中的控制台交互是input
python2的是raw_input
控制台测试结果:
kNN代码测试已完毕。
本人github代码链接:https://github.com/CynthiaWendy/Machine-Learning-in-Action-KNN