需求分析:
1.采集目标网站:前程无忧 https://www.51job.com/
2.可根据工作关键字采集不同的工作类别。如“工程师”,“教师”
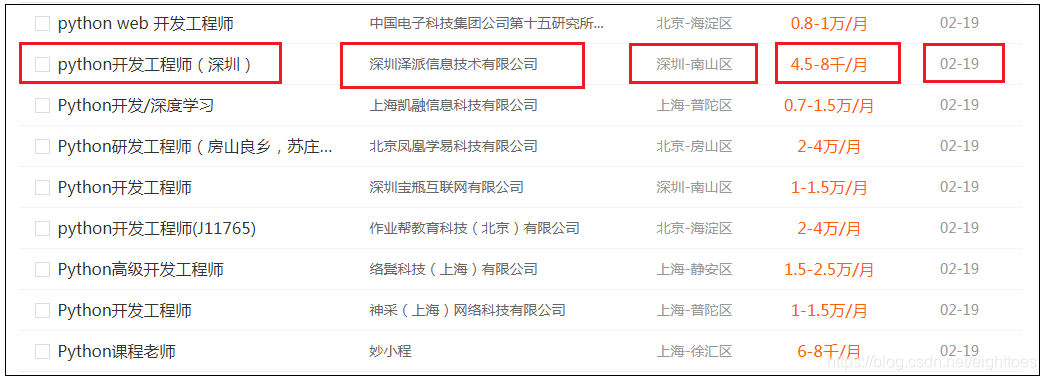
3.采集字段:工作名称(job_name)、公司名称(company)、城市(city)、工资水平(salary)、工作发布日期(date),工作详情链接(link)

实现方案:
首先创建qcwy项目:
>> scrapy startproject qcwy
>> cd qcwy
创建爬虫模板:
>> scrapy genspider spider_qcwy https://search.51job.com/
在 items.py 文件中定义需求字段:
class QcwyItem(scrapy.Item):
	job_name = scrapy.Field()
	company  = scrapy.Field()
	city	 = scrapy.Field()
	salary   = scrapy.Field()
	date	 = scrapy.Field()
	link 	 = scrapy.Field()
在 spider_qcwy.py 中编写爬虫:
import scrapy
from urllib.parse import quote
import urllib
from ..items import QcwyItem


## 在Scrapy中的爬虫类必须是scrapy.Spider的子类
class SpiderQcwySpider(scrapy.Spider):
	name = 'spider_qcwy'

	## key_word为前程无忧上搜索工作的关键字,可根据需要改为“工程师”,“教师”,“会计”等
	key_word = 'python'

	## 该方法的作用是根据搜索工作关键字构造相对应的url
	def url_parse(self, key_word):
		qcwy_quote = quote(key_word)
		qcwy_key_word = qcwy_quote.replace('%', '%25')
		query = {'lang': 'c',
				 'stype': '',
				 'postchannel': '0000',
				 'workyear': '99',
				 'cotype': '99',
				 'degreefrom': '99',
				 'jobterm': '99',
				 'companysize': '99',
				 'providesalary': '99',
				 'lonlat': '0%2C0',
				 'radius': '-1',
				 'ord_field': '0',
				 'confirmdate': '9',
				 'fromType': '',
				 'dibiaoid': '0',
				 'address': '',
				 'line': '',
				 'specialarea': '00',
				 'from': '',
				 'welfare': '',
		}
		params = urllib.parse.urlencode(query)
		url = 'https://search.51job.com/list/000000,000000,0000,00,9,99,%s,2,1.html?%s' % (qcwy_key_word, params)
		return url

	## 根据需要,重写start_requests方法
	def start_requests(self):
		url = self.url_parse(SpiderQcwySpider.key_word)
		yield scrapy.Request(url=url, callback=self.parse)

	def parse(self, response):
		for el in response.xpath('//div[@class="el"]'):
			item = QcwyItem()
			item['job_name'] = el.xpath('./p/span/a/@title').extract_first()
			item['company']  = el.xpath('./span[@class="t2"]/a/@title').extract_first()
			item['city'] 	 = el.xpath('./span[@class="t3"]/text()').extract_first()
			item['salary']   = el.xpath('./span[@class="t4"]/text()').extract_first()
			item['date'] 	 = el.xpath('./span[@class="t5"]/text()').extract_first()
			item['link'] 	 = el.xpath('./p/span/a/@href').extract_first()
			yield item

		## 翻页爬取
		next_page = response.xpath('//li[@class="bk"][last()]/a/@href').extract_first()
		if next_page:
			yield scrapy.Request(next_page, callback=self.parse)
在 pipeline.py 文件中写一个中间件把数据保存在MySQL中,
from_crawler 中的参数crawler表示这个项目本身,通过crawler.settings.get可以读取settings.py文件中的配置信息
open_spider 表示在爬虫开启的时候调用此方法(如开启数据库)
process_item 表示在爬虫的过程中,传入item,并对item作出处理
close_spider 表示在爬虫结束的时候调用此方法(如关闭数据库)
import pymysql

class MysqlPipeline(object):
	def __init__(self, host, user, password, database, table_name):
		self.host 		= host
		self.user 		= user
		self.password 	= password
		self.database 	= database
		self.table_name = table_name

	@classmethod
	def from_crawler(cls, crawler):
		return cls(
			host 	   = crawler.settings.get('MYSQL_HOST'),
			user 	   = crawler.settings.get('MYSQL_USER'),
			password   = crawler.settings.get('MYSQL_PASSWORD'),
			database   = crawler.settings.get('MYSQL_DATABASE'),
			table_name = crawler.settings.get('MYSQL_TABLE_NAME'),
			)

	def open_spider(self, spider_qcwy):
		self.db 	= pymysql.connect(self.host, self.user, self.password, self.database, charset='utf8')
		self.cursor = self.db.cursor()

	def process_item(self, item, spider_qcwy):
		data 		= dict(item)
		table_name 	= self.table_name
		keys 		= ', '.join(data.keys())
		values 		= ', '.join(['%s'] * len(data))
		sql 		= 'insert into %s (%s) values (%s)' % (table_name, keys, values)
		self.cursor.execute(sql, tuple(data.values()))
		self.db.commit()
		return item

	def close_spider(self, spider_qcwy):
		self.db.close()
现在在MySQL中创建一张表:(数据库名为:qcwy,表名为qcwy)
>> mysql -u root - p
>> ******
mysql> CREATE DATABASE qcwy DEFAULT CHARACTER SET utf8 COLLATE utf8_general_ci;
Query OK, 1 row affected (0.00 sec)

mysql> USE qcwy;
Database changed

mysql> CREATE TABLE qcwy (id int AUTO_INCREMENT PRIMARY KEY, job_name VARCHAR(1024) NULL, company VARCHAR(1024) NULL, city VARCHAR(1024) NULL, salary VARCHAR(1024) NULL, date VARCHAR(1024) NULL, link VARCHAR(1024) NULL);
Query OK, 0 row affected (0.03 sec)

mysql> exit;
Bye
最后设置 settings.py 文件:
# 首先把robot禁止掉
# Obey robots.txt rules
ROBOTSTXT_OBEY = False

# 设置User-Agent
# Crawl responsibly by identifying yourself (and your website) on the user-agent
USER_AGENT = 'Mozilla/5.0 (Windows NT 6.1; WOW64) AppleWebKit/537.36 (KHTML, like Gecko) Chrome/72.0.3626.109 Safari/537.36'

# 重写请求头,根据抓包前程无忧来修改
# Override the default request headers:
DEFAULT_REQUEST_HEADERS = {
   'Accept': 'text/html,application/xhtml+xml,application/xml;q=0.9,image/webp,image/apng,*/*;q=0.8',
   'Accept-Language': 'zh-CN,zh;q=0.9',
   'Accept-Encoding': 'gzip, deflate, br',
   'Cache-Control': 'max-age=0',
   'Host': 'search.51job.com',
   'Referer': 'https://www.51job.com/',
   'Upgrade-Insecure-Requests': '1',
}

# 开启刚刚写的MySQl中间件
# Configure item pipelines
# See https://doc.scrapy.org/en/latest/topics/item-pipeline.html
ITEM_PIPELINES = {
    #'qcwy.pipelines.QcwyPipeline': 300,
    'qcwy.pipelines.MysqlPipeline': 200,
}

# 自定义MySQL中的设置
MYSQL_HOST 		 = 'localhost'
MYSQL_USER 		 = 'root'
MYSQL_PASSWORD 	 = '123456'
MYSQL_DATABASE	 = 'qcwy'
MYSQL_TABLE_NAME = 'qcwy'
开启爬虫
>> scrapy crawl spider_qcwy
在MySQL中查看采集到的数据:
>> mysql -u root -p
>> *******
mysql> USE qcwy;
Database changed
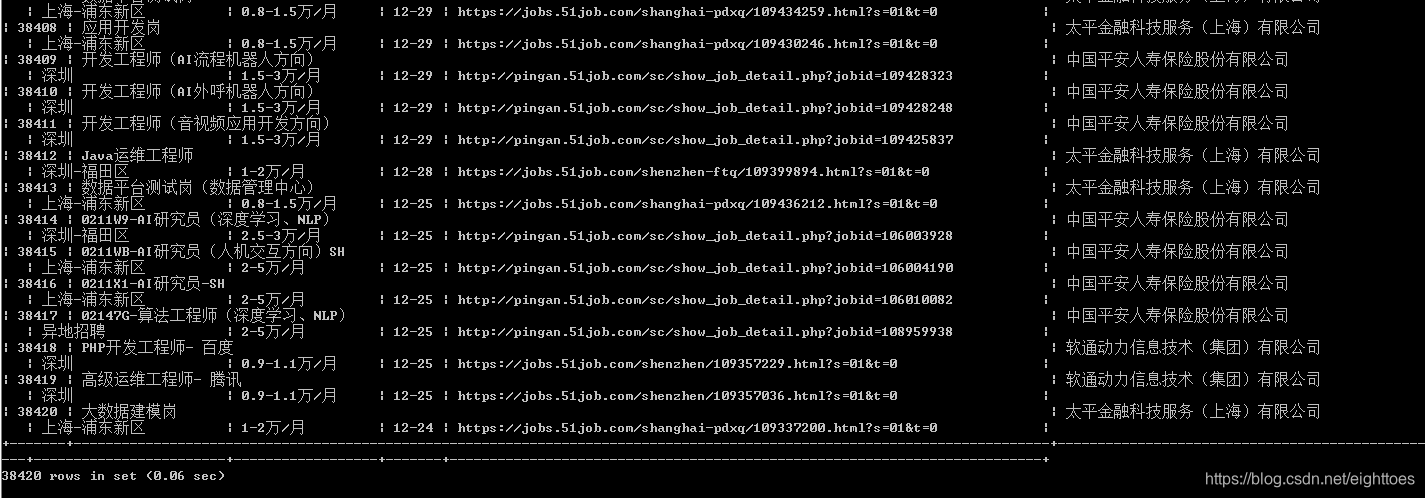
mysql> select * from qcwy;
如下图所示,为采集到的数据
如有需要,可以从MySQL中导出数据为Excel文件,或者在使用Scrapy开启爬虫之前,把MysqlPipeline中间件关闭,直接在启动爬虫时加入 -o 参数
>> scrapy crawl spider_qcwy -o qcwy.csv
扩展
扩展项目需求
假设现在有新的需求,需要采集每一份工作的详细信息,如下图红色方框中所示
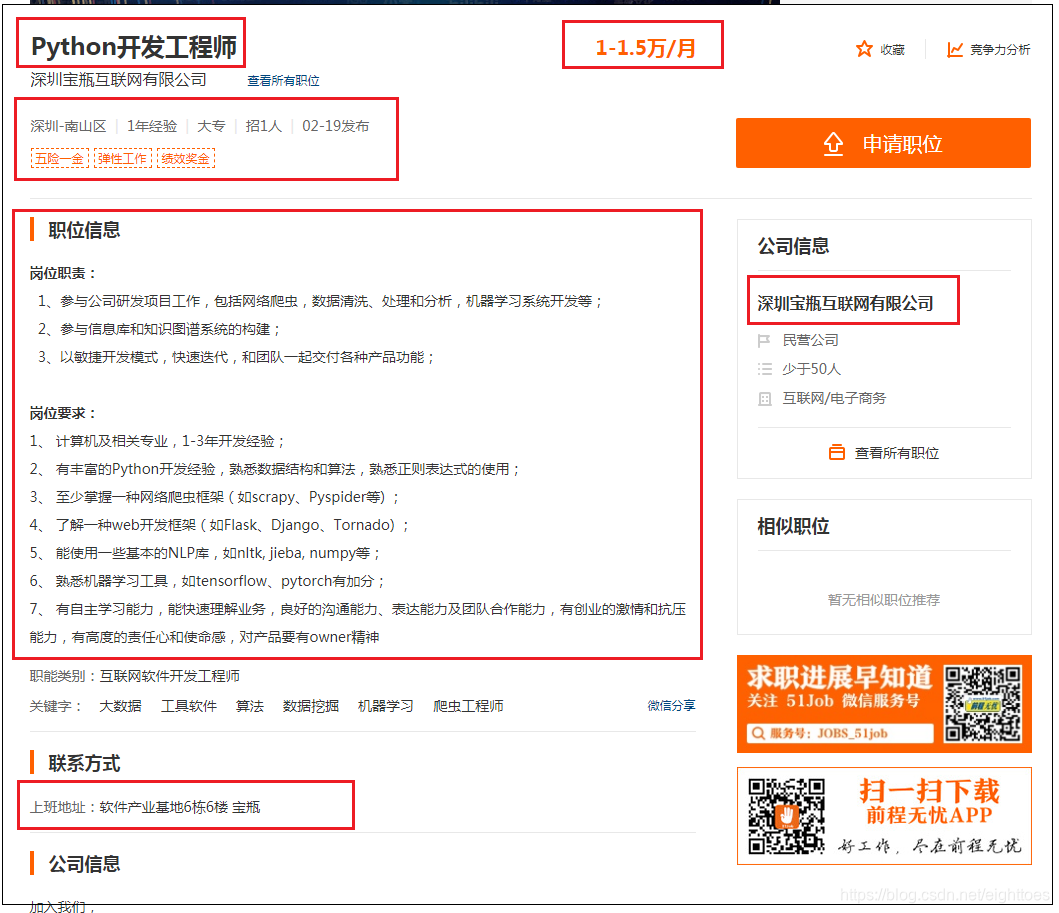
现在需要新增字段:简要工作信息(msg)、职位信息(包括岗位职责与岗位要求 job_msg)、工作详细地址(address)
实现扩展
在 items.py 文件中新增需求字段:
class QcwyItem(scrapy.Item):
	job_name = scrapy.Field()
	company  = scrapy.Field()
	city	 = scrapy.Field()
	salary   = scrapy.Field()
	date	 = scrapy.Field()
	link 	 = scrapy.Field()
	## 新增需求字段
	msg 	 = scrapy.Field()
	job_msg  = scrapy.Field()
	address  = scrapy.Field()
在qcwy/spiders/ 中新增爬虫文件spder_qcwy_with_detail.py,并编辑
备注:key_word不需要再该文件中再重复定义,新爬虫编写好之后,key_word在一个地方修改即可。
import scrapy
from .spider_qcwy import SpiderQcwySpider
from ..items import QcwyItem

## 继承上一个版本的爬虫,可以使用其中的url_parse方法,和start_requests方法
## key_word不需要定义,在SpiderQcwySpider中拿来即用
## 另外因为SpiderQcwySpider已经是scrapy.Spider的子类,所以不需要再继承scrapy.Spider
class SpiderQcwyDetailSpider(SpiderQcwySpider):
	name = 'spider_qcwy_with_detail'

	## 这里直接重写parse方法
	def parse(self, response):
		## 找到工作的详情页地址,传递给回调函数parse_detail解析
		for el in response.xpath('//div[@class="el"]'):
			link = el.xpath('./p/span/a/@href').extract_first()
			if link:
				yield scrapy.Request(link, callback=self.parse_detail)

		## 翻页爬取
		next_page = response.xpath('//li[@class="bk"][last()]/a/@href').extract_first()
		if next_page:
			yield scrapy.Request(next_page, callback=self.parse)

	## 该函数用于提取信息
	def parse_detail(self, response):
		item = QcwyItem()
		item['job_name'] = response.xpath('//div[@class="cn"]/h1/@title').extract_first()
		item['company'] = response.xpath('//div[@class="com_msg"]/a/p/@title').extract_first()
		## address字段代替city字段,address的地址更详细,所有就不要city字段了
		item['address'] = response.xpath('//p[@class="fp"][last()]/text()').extract()
		item['salary'] = response.xpath('//div[@class="cn"]/strong/text()').extract_first()
		item['msg'] = response.xpath('//p[contains(@class, "msg")]/text()').extract()
		item['job_msg'] = response.xpath('//div[contains(@class, "job_msg")]//text()').extract()
		item['link'] = response.url
		yield item
新提取的信息,有非常多的空格和空行,需要再写一个中间件StripPipeline来清洗。
class StripPipeline(object):
	## 记得把spider参数改为相应的爬虫名 qcwy_with_detail
	def process_item(self, item, spider_qcwy_with_detail):
		item['job_name'] = ''.join(item['job_name']).strip()
		item['company'] = ''.join(item['company']).strip()
		item['address'] = ''.join(item['address']).strip()
		item['salary'] = ''.join(item['salary']).strip()
		item['msg'] 	= ''.join([i.strip() for i in item['msg']]).strip()
		item['job_msg'] = ''.join([i.strip() for i in item['job_msg']]).strip()
		return item
同样的,在MySQL中创建一张新表,保存扩展后的数据:(数据库名为:qcwy,表名为qcwy_with_detail)
>> mysql -u root - p
>> ******

mysql> USE qcwy;
Database changed

mysql> CREATE TABLE qcwy_with_detail (id int AUTO_INCREMENT PRIMARY KEY, job_name VARCHAR(1024) NULL, company VARCHAR(1024) NULL, address VARCHAR(2048) NULL, salary VARCHAR(1024) NULL, msg VARCHAR(10240) NULL, job_msg VARCHAR(10240) NULL, link VARCHAR(1024) NULL);
Query OK, 0 row affected (0.02 sec)

mysql> exit;
Bye
设置 settings.py 文件:
# 开启MySQl中间件和StripPipeline
# Configure item pipelines
# See https://doc.scrapy.org/en/latest/topics/item-pipeline.html
ITEM_PIPELINES = {
    #'qcwy.pipelines.QcwyPipeline': 300,
    'qcwy.pipelines.MysqlPipeline': 200,
    'qcwy.pipelines.StripPipeline': 199,
}

# 自定义MySQL中的设置,把旧的mysql_table_name注释掉,换上新的数据库表名
MYSQL_HOST 		 = 'localhost'
MYSQL_USER 		 = 'root'
MYSQL_PASSWORD 	 = '123456'
MYSQL_DATABASE	 = 'qcwy'
#MYSQL_TABLE_NAME = 'qcwy'
MYSQL_TABLE_NAME = 'qcwy_with_detail'
开启爬虫(这次把key_word改成“电子竞技”,看看这个新兴行业的招聘信息)
scrapy crawl spider_qcwy_with_detail

备注:
可以看到,msg和job_msg字段的信息有些杂乱,如果有需要可以再写多个Item Pipeline以用于清洗数据,如果数据已经采集下来了,后续可以使用pandas来操作,本文重点在于Scrapy框架,后续的操作就不展开了。