Residual Dense Network for Image Super-Resolution
-
以下是 RND论文Tensorflow版本实现的源码解析,我假设你已经了解Python的基本语法,和Tensorflow的基本用法,如果你对它们不是很熟悉,请到它们的官网查阅tutorial。
-
以下所有代码你都可以在我的仓库找到,
chinese_annotation文件夹下是我添加中文注释后的版本,在main.py里面我做了一些修改,Feel free to tune the hyperparameters in it~ -
repo的readme.md说明了如何运行程序。
如果有不对的地方,还请大家指正!
Notice
使用TensorFlow搭建模型时,我们一般先将模型按照神经网络的结构搭建起来,这时TensorFlow只会创建好computation graph,实际的数据还需要等运行的时候feed in.
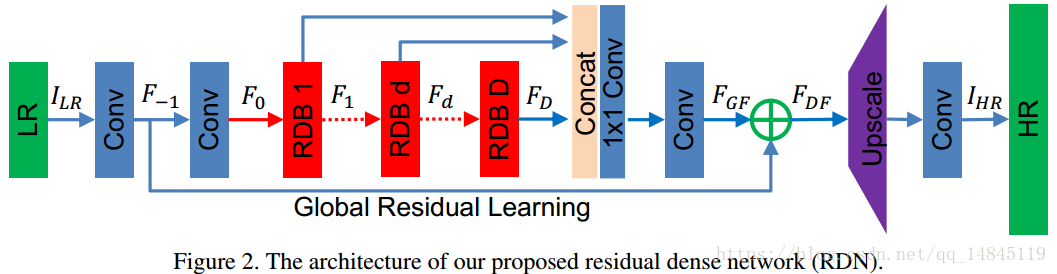
overview of the RDN model.
So,let’s get started from the model.py
这里主要负责一些初始化工作:
- sess用来传递一个TensorFlow会话(不懂也没关系)
- is_train和is_eval用来控制训练还是测试,img_size是输入图片大小
- c_dim是图片通道数,用的是RGB图所以
c_dim=3 - scale是超分辨放大的规模 x2或x3或x4,batch_size
- batch_size就是batch_size了,哈哈
- D是模型中Residual Dense Block块的个数
- C是每个Residual Dense Block块中conv层数量
- 模型中所有层输出的feature maps不是 就是 ,详细见论文
- kernel_size是卷积核的大小
class RDN(object):

	def __init__(self,
				 sess,
				 is_train,
				 is_eval,
				 image_size,
				 c_dim,
				 scale,
				 batch_size,
				 D,
				 C,
				 G,
				 G0,
				 kernel_size ):

		self.sess = sess
		self.is_train = is_train
		self.is_eval = is_eval
		self.image_size = image_size
		self.c_dim = c_dim
		self.scale = scale
		self.batch_size = batch_size
		self.D = D
		self.C = C
		self.G = G
		self.G0 = G0
		self.kernel_size = kernel_size
Shallow Feature Extraction Net
浅层特征提取部分,见网络的前两个蓝色部分块,两个conv层,产生F_-1和F_0,最后输出有G个feature maps。
卷积核是一个四维的tensor -->(ks, ks, self.c_dim, G0)
- 前两个参数是卷积核kernel的size
- 第三个是输入tensor的通道数
- 第四个是输出tensor的通道数
偏置单元和输出通道数保持一致
def SFEParams(self):
    """
    浅层特征提取部分(两个conv层,产生F_-1和F_0)
    最后输出有G个feature maps
    :return:
    """
    G = self.G
    G0 = self.G0
    ks = self.kernel_size
    weightsS = {
        'w_S_1': tf.Variable(tf.random_normal([ks, ks, self.c_dim, G0], stddev=0.01), name='w_S_1'),
        'w_S_2': tf.Variable(tf.random_normal([ks, ks, G0, G], stddev=0.01), name='w_S_2')
    }
    biasesS = {
        'b_S_1': tf.Variable(tf.zeros([G0], name='b_S_1')),
        'b_S_2': tf.Variable(tf.zeros([G], name='b_S_2'))
    }

    return weightsS, biasesS
RDB Block
residual dense block,也就是网络中3个红色块部分,每个RDB中细节见下图。
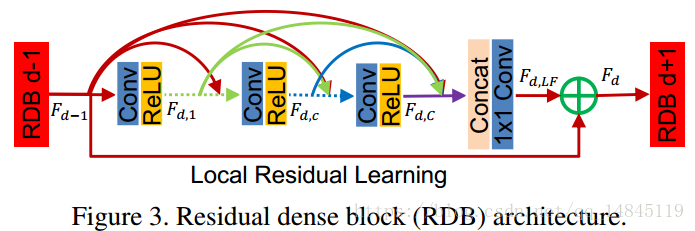
第i个RDB块接受第i-1个RDB块传来的输出作为输入,在每个RDB块中,每一层的输出都会送个它的后面所有层。第D个RDB块的第c层输出的公式如下:
$F_{d,c}=\sigma(W_{d,c}[F_{d-1},F_{d,1},F_{d,2}…F_{d,c-1}]) $
其中 就是将它们concat在一起,也即包含 个feature maps。
每个RDB块由以下模块装成(conv1 -> relu1 -> conv2 -> relu2 … -> convC ->reluC -> concatnation -> 1*1 conv -> local residual)
def RDBParams(self):
    """
    RDB部分

    中间一个RDB块(conv1 -> relu1 -> conv2 -> relu2 .... -> convC ->reluC
            -> concatnation -> 1*1 conv -> local residual)
    :return:
    """
    weightsR = {}
    biasesR = {}

    D = self.D
    C = self.C
    G = self.G
    G0 = self.G0
    ks = self.kernel_size

    for i in range(1, D + 1):
        for j in range(1, C + 1):
            # dense conv layers in i-th dense block
            weightsR.update({'w_R_%d_%d' % (i, j): tf.Variable(tf.random_normal([ks, ks, G * j, G], stddev=0.01),
                                                               name='w_R_%d_%d' % (i, j))})
            biasesR.update({'b_R_%d_%d' % (i, j): tf.Variable(tf.zeros([G], name='b_R_%d_%d' % (i, j)))})
        # local feature fusion in i-th dense block
        weightsR.update({'w_R_%d_%d' % (i, C + 1): tf.Variable(
            tf.random_normal([1, 1, G * (C + 1), G], stddev=0.01), name='w_R_%d_%d' % (i, C + 1))})
        biasesR.update({'b_R_%d_%d' % (i, C + 1): tf.Variable(tf.zeros([G], name='b_R_%d_%d' % (i, C + 1)))})

    return weightsR, biasesR

def RDBs(self, input_layer):
    rdb_concat = list()
    rdb_in = input_layer
    for i in range(1, self.D + 1):
        x = rdb_in
        for j in range(1, self.C + 1):
            tmp = tf.nn.conv2d(x, self.weightsR['w_R_%d_%d' % (i, j)], strides=[1, 1, 1, 1], padding='SAME') + \
                  self.biasesR['b_R_%d_%d' % (i, j)]
            tmp = tf.nn.relu(tmp)
            # 在最后一个维度做concat操作
            x = tf.concat([x, tmp], axis=3)

        # local feature fusion
        x = tf.nn.conv2d(x, self.weightsR['w_R_%d_%d' % (i, self.C + 1)], strides=[1, 1, 1, 1], padding='SAME') + \
            self.biasesR['b_R_%d_%d' % (i, self.C + 1)]
        # local residual learning
        rdb_in = tf.add(x, rdb_in)
        # 为global feature fusion做准备
        rdb_concat.append(rdb_in)
    # 在最后一个维度做concat
    return tf.concat(rdb_concat, axis=3)
Dense Feature Fusion
这一部分主要是将前面所有RDB的结果进行一个特征融合,方法和RDB块中最后的concat操作类似,就不再赘述了,参阅模型整体图的三个红色块后面的concat操作,然后对concated tensor做 卷积到G个feature maps,再进行 3*3 卷积准备进行Global residual learning。公式如下:
def DFFParams(self):
    """
    dense feature fusion part
    :return:
    """
    D = self.D
    C = self.C
    G = self.G
    G0 = self.G0
    ks = self.kernel_size
    weightsD = {
        'w_D_1': tf.Variable(tf.random_normal([1, 1, G * D, G0], stddev=0.01), name='w_D_1'),
        'w_D_2': tf.Variable(tf.random_normal([ks, ks, G0, G0], stddev=0.01), name='w_D_2')
    }
    biasesD = {
        'b_D_1': tf.Variable(tf.zeros([G0], name='b_D_1')),
        'b_D_2': tf.Variable(tf.zeros([G0], name='b_D_2'))
    }

    return weightsD, biasesD
Upscale部分
这算是论文中的亮点之一了,RDN和以前的一些方法不一样,以前许多模型都是先对低分辨率的图像先进行upscale(如bicubic放大)到高分辨率的图像,然后再输入到神经网络进行计算;而RDN借鉴了ESPNN论文中提出的sub-pixel convolution方法,先将低分辨率的图像输入到神经网络进行计算,最后进行所谓的亚像素卷积。
亚像素卷积就是形如以下所示:
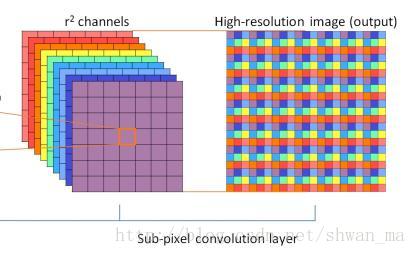
本质上就是将低分辨率特征,按照特定位置,周期性的插入到高分辨率图像中,可以通过颜色观测到上图的插入方式。
为了更好的理解,你可以这样想象,假设最开始输入的低分辨率图片是(Hight,Width,3)的向量,然后一系列操作之后,神经网络输出的(Hight,Width,9) 的低分辨特征,因为我们想放大3倍,所以最后一个维度就是放大的scale乘上想要输出的channel,根据颜色你可以清楚的看到是怎么将亚像素进行“组装”的。来个代码演示一下,你可以运行玩玩
# upsacale 测试代码
import numpy as np

a = np.ones(shape=[4, 4, 3 * 3])
for i in range(9):
	a[:, :, i] = a[:, :, i] * (i + 1)
print(a)
a = np.reshape(a, newshape=(4, 4, 3, 3))
print(a.shape)

# 将a分为4个,在第0个asix上切分
a = np.split(a, 4, 0) #  4,[1,4,3,3]
a = np.concatenate([np.squeeze(x) for x in a], 1) # [4,3*4,3]

# 重复一次以上操作
a = np.split(a, 4, 0) # 4,[1,3*4,3]
a = np.concatenate([np.squeeze(x) for x in a], 1) # [3*4,3*4]

print(a)
print(a.shape)
[[[1. 2. 3. 4. 5. 6. 7. 8. 9.]
  [1. 2. 3. 4. 5. 6. 7. 8. 9.]
  [1. 2. 3. 4. 5. 6. 7. 8. 9.]
  [1. 2. 3. 4. 5. 6. 7. 8. 9.]]

 [[1. 2. 3. 4. 5. 6. 7. 8. 9.]
  [1. 2. 3. 4. 5. 6. 7. 8. 9.]
  [1. 2. 3. 4. 5. 6. 7. 8. 9.]
  [1. 2. 3. 4. 5. 6. 7. 8. 9.]]

 [[1. 2. 3. 4. 5. 6. 7. 8. 9.]
  [1. 2. 3. 4. 5. 6. 7. 8. 9.]
  [1. 2. 3. 4. 5. 6. 7. 8. 9.]
  [1. 2. 3. 4. 5. 6. 7. 8. 9.]]

 [[1. 2. 3. 4. 5. 6. 7. 8. 9.]
  [1. 2. 3. 4. 5. 6. 7. 8. 9.]
  [1. 2. 3. 4. 5. 6. 7. 8. 9.]
  [1. 2. 3. 4. 5. 6. 7. 8. 9.]]]
(4, 4, 3, 3)
[[1. 2. 3. 1. 2. 3. 1. 2. 3. 1. 2. 3.]
 [4. 5. 6. 4. 5. 6. 4. 5. 6. 4. 5. 6.]
 [7. 8. 9. 7. 8. 9. 7. 8. 9. 7. 8. 9.]
 [1. 2. 3. 1. 2. 3. 1. 2. 3. 1. 2. 3.]
 [4. 5. 6. 4. 5. 6. 4. 5. 6. 4. 5. 6.]
 [7. 8. 9. 7. 8. 9. 7. 8. 9. 7. 8. 9.]
 [1. 2. 3. 1. 2. 3. 1. 2. 3. 1. 2. 3.]
 [4. 5. 6. 4. 5. 6. 4. 5. 6. 4. 5. 6.]
 [7. 8. 9. 7. 8. 9. 7. 8. 9. 7. 8. 9.]
 [1. 2. 3. 1. 2. 3. 1. 2. 3. 1. 2. 3.]
 [4. 5. 6. 4. 5. 6. 4. 5. 6. 4. 5. 6.]
 [7. 8. 9. 7. 8. 9. 7. 8. 9. 7. 8. 9.]]
(12, 12)
def UPNParams(self):
    # upscale part
    G0 = self.G0
    weightsU = {
        'w_U_1': tf.Variable(tf.random_normal([5, 5, G0, 64], stddev=0.01), name='w_U_1'),
        'w_U_2': tf.Variable(tf.random_normal([3, 3, 64, 32], stddev=0.01), name='w_U_2'),
        'w_U_3': tf.Variable(
            tf.random_normal([3, 3, 32, self.c_dim * self.scale * self.scale], stddev=np.sqrt(2.0 / 9 / 32)),
            name='w_U_3')
    }
    biasesU = {
        'b_U_1': tf.Variable(tf.zeros([64], name='b_U_1')),
        'b_U_2': tf.Variable(tf.zeros([32], name='b_U_2')),
        'b_U_3': tf.Variable(tf.zeros([self.c_dim * self.scale * self.scale], name='b_U_3'))
    }

    return weightsU, biasesU

def UPN(self, input_layer):
    # 输出为 64 feature maps
    x = tf.nn.conv2d(input_layer, self.weightsU['w_U_1'], strides=[1, 1, 1, 1], padding='SAME') + self.biasesU[
        'b_U_1']
    x = tf.nn.relu(x)
    # 输出为 32 feature maps
    x = tf.nn.conv2d(x, self.weightsU['w_U_2'], strides=[1, 1, 1, 1], padding='SAME') + self.biasesU['b_U_2']
    x = tf.nn.relu(x)
    # 输出为 self.c_dim (3)* self.scale * self.scale 个 feature maps ,即低分辨率特征
    x = tf.nn.conv2d(x, self.weightsU['w_U_3'], strides=[1, 1, 1, 1], padding='SAME') + self.biasesU['b_U_3']
    # 将height和width放大
    x = self.PS(x, self.scale)

    return x


def PS(self, X, r):
    # Main OP that you can arbitrarily use in you tensorflow code
    # 在feature maps维上,分成3个Tensor,每个的shape应该是(batch_size,H,W, self.scale * self.scale)
    Xc = tf.split(X, 3, 3)
    if self.is_train:
        X = tf.concat([self._phase_shift(x, r) for x in Xc], 3)  # Do the concat RGB
    else:
        X = tf.concat([self._phase_shift_test(x, r) for x in Xc], 3)  # Do the concat RGB
    return X

# NOTE: train with batch size
def _phase_shift(self, I, r):
    """
    把最后一位放大的scale转到Height和weight上
    :param I:
    :param r:放大因子
    :return:
    """
    # Helper function with main phase shift operation
    bsize, a, b, c = I.get_shape().as_list()
    X = tf.reshape(I, (self.batch_size, a, b, r, r))
    X = tf.split(X, a, 1)  # a, [bsize, b, r, r]
    X = tf.concat([tf.squeeze(x) for x in X], 2)  # bsize, b, a*r, r
    X = tf.split(X, b, 1)  # b, [bsize, a*r, r]
    X = tf.concat([tf.squeeze(x) for x in X], 2)  # bsize, a*r, b*r
    return tf.reshape(X, (self.batch_size, a * r, b * r, 1))

# NOTE: test without batchsize
def _phase_shift_test(self, I, r):
    bsize, a, b, c = I.get_shape().as_list()
    X = tf.reshape(I, (1, a, b, r, r))
    X = tf.split(X, a, 1)  # a, [bsize, b, r, r]
    X = tf.concat([tf.squeeze(x) for x in X], 1)  # bsize, b, a*r, r
    X = tf.split(X, b, 0)  # b, [bsize, a*r, r]
    X = tf.concat([tf.squeeze(x) for x in X], 1)  # bsize, a*r, b*r
    return tf.reshape(X, (1, a * r, b * r, 1))
Build all the blocks above together !
有了上面的模块,现在就可以将模型“堆起来“了!依次是四大部分(SFE,RDBs,DFF,UPN)
def build_model(self, images_shape, labels_shape):
    self.images = tf.placeholder(tf.float32, images_shape, name='images')
    # label是ground truth
    self.labels = tf.placeholder(tf.float32, labels_shape, name='labels')

    self.weightsS, self.biasesS = self.SFEParams()
    self.weightsR, self.biasesR = self.RDBParams()
    self.weightsD, self.biasesD = self.DFFParams()
    self.weightsU, self.biasesU = self.UPNParams()
    # 最后一个conv层,输入是upscale后的RGB图
    self.weight_final = tf.Variable(
        tf.random_normal([self.kernel_size, self.kernel_size, self.c_dim, self.c_dim], stddev=np.sqrt(2.0 / 9 / 3)),
        name='w_f')
    self.bias_final = tf.Variable(tf.zeros([self.c_dim], name='b_f')),

    self.pred = self.model()
    # MSE 均方误差损失函数
    self.loss = tf.reduce_mean(tf.square(self.labels - self.pred))
    self.summary = tf.summary.scalar('loss', self.loss)
    self.saver = tf.train.Saver()
def model(self):
    # SFE部分
    F_1 = tf.nn.conv2d(self.images, self.weightsS['w_S_1'], strides=[1, 1, 1, 1], padding='SAME') + self.biasesS[
        'b_S_1']
    F0 = tf.nn.conv2d(F_1, self.weightsS['w_S_2'], strides=[1, 1, 1, 1], padding='SAME') + self.biasesS['b_S_2']

    # RDBs部分
    FD = self.RDBs(F0)

    # DFF部分,1*1卷积再3*3卷积
    FGF1 = tf.nn.conv2d(FD, self.weightsD['w_D_1'], strides=[1, 1, 1, 1], padding='SAME') + self.biasesD['b_D_1']
    FGF2 = tf.nn.conv2d(FGF1, self.weightsD['w_D_2'], strides=[1, 1, 1, 1], padding='SAME') + self.biasesD['b_D_2']

    # Global Residual Learning部分
    FDF = tf.add(FGF2, F_1)

    # UPscale部分
    FU = self.UPN(FDF)

    # 最后一个卷积操作后的到高分辨率图片
    IHR = tf.nn.conv2d(FU, self.weight_final, strides=[1, 1, 1, 1], padding='SAME') + self.bias_final

    return IHR
Train
下面会用到一些辅助函数,在utils.py文件中
def train(self, config):
    print("\nPrepare Data...\n")
    # 保存数据为.h5格式
    input_setup(config)
    data_dir = get_data_dir(config.checkpoint_dir, config.is_train)
    # 训练样本数
    data_num = get_data_num(data_dir)

    images_shape = [None, self.image_size, self.image_size, self.c_dim]
    labels_shape = [None, self.image_size * self.scale, self.image_size * self.scale, self.c_dim]
    self.build_model(images_shape, labels_shape)
    # adam 加速
    self.train_op = tf.train.AdamOptimizer(learning_rate=config.learning_rate).minimize(self.loss)
    tf.global_variables_initializer().run(session=self.sess)
    # merged_summary_op = tf.summary.merge_all()
    # 保存计算图到文件(用于tensorboard可视化)
    # summary_writer = tf.summary.FileWriter(config.checkpoint_dir, self.sess.graph)

    # 继续模型之前的计算
    counter = self.load(config.checkpoint_dir)
    time_ = time.time()
    print("\nNow Start Training...\n")
    for ep in range(config.epoch):
        # Run by batch images
        # 根据batch_size将数据分组
        batch_idxs = data_num // config.batch_size
        for idx in range(0, batch_idxs):

            #with tf.device("/gpu:0"):
            batch_images, batch_labels = get_batch(data_dir, data_num, config.batch_size)
            # 每一个batch counter加一,也就是平常我们说的iteration
            counter += 1

            _, err = self.sess.run([self.train_op, self.loss],
                                   feed_dict={self.images: batch_images, self.labels: batch_labels})

            if counter % 10 == 0:
                print("Epoch: [%2d], batch: [%2d/%2d], step: [%2d], time: [%4.4f], loss: [%.8f]" % (
                    (ep + 1), idx, batch_idxs, counter, time.time() - time_, err))

            # 每100个batch就保存一次模型
            if counter % 100 == 0:
                self.save(config.checkpoint_dir, counter)

            # summary_str = self.sess.run(merged_summary_op)
            # summary_writer.add_summary(summary_str, counter)

            if counter > 0 and counter == batch_idxs * config.epoch:
                return

def load(self, checkpoint_dir):
    """
    从指定目录加载模型已经计算的部分,并接着计算
    :param checkpoint_dir:
    :return:
    """
    print("\nReading Checkpoints.....\n")
    model_dir = "%s_%s_%s_%s_x%s" % ("rdn", self.D, self.C, self.G, self.scale)
    checkpoint_dir = os.path.join(checkpoint_dir, model_dir)
    """
    关于tf.train.get_checkpoint_state(checkpoint_dir,latest_filename=None):
        返回:checkpoint文件CheckpointState proto类型的内容,
            其中有model_checkpoint_path和all_model_checkpoint_paths两个属性。

            model_checkpoint_path:保存了最新的tensorflow模型文件的文件名,
            all_model_checkpoint_paths:则有未被删除的所有tensorflow模型文件的文件名。
    """
    ckpt = tf.train.get_checkpoint_state(checkpoint_dir)

    if ckpt and ckpt.model_checkpoint_path:
        ckpt_path = str(ckpt.model_checkpoint_path)
        self.saver.restore(self.sess, os.path.join(os.getcwd(), ckpt_path))
        step = int(os.path.basename(ckpt_path).split('-')[1])
        print("\nCheckpoint Loading Success! %s\n" % ckpt_path)
    else:
        step = 0
        print("\nCheckpoint Loading Failed! \n")

    return step

def save(self, checkpoint_dir, step):
    model_name = "RDN.model"
    model_dir = "%s_%s_%s_%s_x%s" % ("rdn", self.D, self.C, self.G, self.scale)
    checkpoint_dir = os.path.join(checkpoint_dir, model_dir)

    if not os.path.exists(checkpoint_dir):
        os.makedirs(checkpoint_dir)

    self.saver.save(self.sess,
                    os.path.join(checkpoint_dir, model_name),
                    global_step=step)
下面是utils.py中的一些辅助函数
这部分代码有点多,大家如果看不明白可以暂时跳过。: )
71-77行代码我也没看明白是做了一个什么操作,如果有知道的,请指教,谢谢!
def input_setup(config):
	"""
		Read image files and make their sub-images and saved them as a h5 file format
	"""
	# data为所有图片路径组成的列表
	data = prepare_data(config)
	make_sub_data(data, config)


def prepare_data(config):
	"""
	根据config.isTrain属性返回包含训练集或测试集的图片路径
	:param config:
	:return: 所有图片路径组成的列表
	"""
	if config.is_train:
		data_dir = os.path.join(os.path.join(os.getcwd(), "Train"), config.train_set)
		# 获取当前路径下的所有png图片
		data = glob.glob(os.path.join(data_dir, "*.png"))
	else:
		if config.test_img != "":
			data = [os.path.join(os.getcwd(), config.test_img)]
		else:
			data_dir = os.path.join(os.path.join(os.getcwd(), "Test"), config.test_set)
			data = glob.glob(os.path.join(data_dir, "*.bmp"))
	return data

def make_sub_data(data, config):
	"""
	取样产生更多样本数据
	:param data: 源数据路径
	:param config:
	:return:
	"""
	# 是否使用MATLAB中的bicubic
	if config.matlab_bicubic:
		import matlab.engine
		eng = matlab.engine.start_matlab()
		mdouble = matlab.double
	else:
		eng = None
		mdouble = None

	times = 0
	for i in range(len(data)):
        # 对图片进行预处理
		input_, label_, = preprocess(data[i], config.scale, eng, mdouble)
		if len(input_.shape) == 3:
			h, w, c = input_.shape
		else:
			h, w = input_.shape
		# 如果不是训练过程
		if not config.is_train:
			input_ = input_ / 255.0
			label_ = label_ / 255.0
			make_data_hf(input_, label_, config, times)
			return data

		for x in range(0, h * config.scale - config.image_size * config.scale + 1, config.stride * config.scale):
			for y in range(0, w * config.scale - config.image_size * config.scale + 1, config.stride * config.scale):
				# 滑动窗口取样数据(data augmentation)
				sub_label = label_[x: x + config.image_size * config.scale, y: y + config.image_size * config.scale]

				sub_label = sub_label.reshape(
					[config.image_size * config.scale, config.image_size * config.scale, config.c_dim])

				# 将取样的ground truth RGB图片转到YCrCb颜色域下
				t = cv2.cvtColor(sub_label, cv2.COLOR_BGR2YCR_CB)

                # 这里做了一个判断,暂时没搞明白
				t = t[:, :, 0]
				gx = t[1:, 0:-1] - t[0:-1, 0:-1]
				gy = t[0:-1, 1:] - t[0:-1, 0:-1]
				Gxy = (gx ** 2 + gy ** 2) ** 0.5
				r_gxy = float((Gxy > 10).sum()) / ((config.image_size * config.scale) ** 2) * 100
				if r_gxy < 10:
					continue

				sub_label = sub_label / 255.0

				# 取样的ground truth RGB图片对应的低分辨率图像
				x_i = x // config.scale
				y_i = y // config.scale
				sub_input = input_[x_i: x_i + config.image_size, y_i: y_i + config.image_size]
				sub_input = sub_input.reshape([config.image_size, config.image_size, config.c_dim])
				sub_input = sub_input / 255.0

				# checkimage(sub_input)
				# checkimage(sub_label)

				# 将取样的低分辨率图像和ground truth图像保存为.h5格式
				save_flag = make_data_hf(sub_input, sub_label, config, times)
				# 一旦保存为.h5文件失败,就停止对数据集的取样操作
				if not save_flag:
					return data
				times += 1

		print("image: [%2d], total: [%2d]" % (i, len(data)))

	if config.matlab_bicubic:
		eng.quit()

	return data


def preprocess(path, scale=3, eng=None, mdouble=None):
	"""
	对单张图片预处理
	:param path: 图片地址
	:param scale: 缩放规模
	:param eng: MATLAB调用引擎
	:param mdouble: MATLAB double
	:return: (处理后(缩小后)的图片,ground truth的图片)  tuple
	"""
	img = imread(path)
	# 裁剪,使得图片的长宽可以整除scale
	label_ = modcrop(img, scale)
	# eng是MATLAB调用引擎,如果没有安装MATLAB的python支持库,则调用cv2中的bicubic
	if eng is None:
		input_ = cv2.resize(label_, None, fx=1.0 / scale, fy=1.0 / scale, interpolation=cv2.INTER_CUBIC)
	else:
		input_ = np.asarray(eng.imresize(mdouble(label_.tolist()), 1.0 / scale, 'bicubic'))

	# 最后一维翻转(因为OpenCV中的imread()读取图片的顺序不是R、G、B三个次序,而是R、B、G)
	input_ = input_[:, :, ::-1]
	label_ = label_[:, :, ::-1]

	return input_, label_


def modcrop(img, scale=3):
	"""
	将原图像的长宽都改变成scale的参数,以便于取样
	:param img:
	:param scale:
	:return:
	"""
	if len(img.shape) == 3:
		h, w, _ = img.shape
		h = (h // scale) * scale
		w = (w // scale) * scale
		img = img[0:h, 0:w, :]
	else:
		h, w = img.shape
		h = (h // scale) * scale
		w = (w // scale) * scale
		img = img[0:h, 0:w]
	return img


def make_data_hf(input_, label_, config, times):
	"""
	将低分辨率图片和ground truth图片保存为.h5格式
	hf means hfive  ooops.. :)
	:param input_:
	:param label_:
	:param config:
	:param times:
	:return: bool
	"""
	if not os.path.isdir(os.path.join(os.getcwd(), config.checkpoint_dir)):
		os.makedirs(os.path.join(os.getcwd(), config.checkpoint_dir))

	if config.is_train:
		savepath = os.path.join(os.path.join(os.getcwd(), config.checkpoint_dir), 'train.h5')
	else:
		savepath = os.path.join(os.path.join(os.getcwd(), config.checkpoint_dir), 'test.h5')
	# 第一次保存到.h5时,以“w”模式打开
	if times == 0:
		if os.path.exists(savepath):
			print("\n%s have existed!\n" % (savepath))
			return False
		else:
			hf = h5py.File(savepath, 'w')

			# 训练
			if config.is_train:
				# chunck 分块存储
				input_h5 = hf.create_dataset("input", (1, config.image_size, config.image_size, config.c_dim),
											 maxshape=(None, config.image_size, config.image_size, config.c_dim),
											 chunks=(1, config.image_size, config.image_size, config.c_dim),
											 dtype='float32')
				label_h5 = hf.create_dataset("label", (1, config.image_size * config.scale, config.image_size * config.scale, config.c_dim),
											 maxshape=( None, config.image_size * config.scale,config.image_size * config.scale,config.c_dim),
											 chunks=(1, config.image_size * config.scale, config.image_size * config.scale,config.c_dim), dtype='float32')
			# 测试
			else:
				input_h5 = hf.create_dataset("input", (1, input_.shape[0], input_.shape[1], input_.shape[2]),
											 maxshape=(None, input_.shape[0], input_.shape[1], input_.shape[2]),
											 chunks=(1, input_.shape[0], input_.shape[1], input_.shape[2]),
											 dtype='float32')
				label_h5 = hf.create_dataset("label", (1, label_.shape[0], label_.shape[1], label_.shape[2]),
											 maxshape=(None, label_.shape[0], label_.shape[1], label_.shape[2]),
											 chunks=(1, label_.shape[0], label_.shape[1], label_.shape[2]),
											 dtype='float32')
	# 其它形式下,用“a”模式打开
	else:
		hf = h5py.File(savepath, 'a')
		input_h5 = hf["input"]
		label_h5 = hf["label"]

	if config.is_train:
		input_h5.resize([times + 1, config.image_size, config.image_size, config.c_dim])
		input_h5[times: times + 1] = input_
		label_h5.resize([times + 1, config.image_size * config.scale, config.image_size * config.scale, config.c_dim])
		label_h5[times: times + 1] = label_
	else:
		input_h5.resize([times + 1, input_.shape[0], input_.shape[1], input_.shape[2]])
		input_h5[times: times + 1] = input_
		label_h5.resize([times + 1, label_.shape[0], label_.shape[1], label_.shape[2]])
		label_h5[times: times + 1] = label_

	hf.close()
	return True

def get_data_dir(checkpoint_dir, is_train):
	"""
	获取数据集的目录(训练和测试模式)
	:param checkpoint_dir:
	:param is_train:
	:return: 对应的.h5文件
	"""
	if is_train:
		return os.path.join(os.path.join(os.getcwd(), checkpoint_dir), 'train.h5')
	else:
		return os.path.join(os.path.join(os.getcwd(), checkpoint_dir), 'test.h5')


def get_data_num(path):
	"""
	获取.h5文件的input数据集中样本个数
	:param path:
	:return:
	"""
	with h5py.File(path, 'r') as hf:
		input_ = hf['input']
		return input_.shape[0]

def get_batch(path, data_num, batch_size):
	"""
	获取batch_size个样本
	:param path: 数据集地址
	:param data_num: 数据集总数
	:param batch_size: batch大小
	:return:数据增强后的数据集合  (batch_size,H,W,3)
	"""
	with h5py.File(path, 'r') as hf:
		input_ = hf['input']
		label_ = hf['label']
		# batch size
		random_batch = np.random.rand(batch_size) * (data_num - 1)  # batch size 个样本数据的下标
		batch_images = np.zeros([batch_size, input_[0].shape[0], input_[0].shape[1], input_[0].shape[2]])
		batch_labels = np.zeros([batch_size, label_[0].shape[0], label_[0].shape[1], label_[0].shape[2]])
		for i in range(batch_size):
			batch_images[i, :, :, :] = np.asarray(input_[int(random_batch[i])])
			batch_labels[i, :, :, :] = np.asarray(label_[int(random_batch[i])])
		# data augmentation
		random_aug = np.random.rand(2)
		# 翻转或旋转
		batch_images = augmentation(batch_images, random_aug)
		batch_labels = augmentation(batch_labels, random_aug)
		return batch_images, batch_labels

def augmentation(batch, random):
	if random[0] < 0.3:
		# 在batch的第shape[1]上,上下翻转
		batch_flip = np.flip(batch, 1)
	elif random[0] > 0.7:
		# 在batch的第shape[2]上,左右翻转
		batch_flip = np.flip(batch, 2)
	else:
		# 不翻转
		batch_flip = batch

	# 在翻转的基础上旋转
	if random[1] < 0.5:
		# 逆时针旋转90度
		batch_rot = np.rot90(batch_flip, 1, [1, 2])
	else:
		batch_rot = batch_flip
Evaluation & Test
def eval(self, config):
    print("\nPrepare Data...\n")
    paths = prepare_data(config)
    data_num = len(paths)

    avg_time = 0
    avg_pasn = 0
    print("\nNow Start Testing...\n")
    for idx in range(data_num):
        input_, label_ = get_image(paths[idx], config.scale, config.matlab_bicubic)

        images_shape = input_.shape
        labels_shape = label_.shape
        self.build_model(images_shape, labels_shape)
        tf.global_variables_initializer().run(session=self.sess)

        self.load(config.checkpoint_dir)

        time_ = time.time()
        result = self.sess.run([self.pred], feed_dict={self.images: input_ / 255.0})
        avg_time += time.time() - time_

        # import matlab.engine
        # eng = matlab.engine.start_matlab()
        # time_ = time.time()
        # result = np.asarray(eng.imresize(matlab.double((input_[0, :] / 255.0).tolist()), config.scale, 'bicubic'))
        # avg_time += time.time() - time_

        self.sess.close()
        tf.reset_default_graph()
        self.sess = tf.Session()

        x = np.squeeze(result) * 255.0
        x = np.clip(x, 0, 255)
        psnr = PSNR(x, label_[0], config.scale)
        avg_pasn += psnr

        print("image: %d/%d, time: %.4f, psnr: %.4f" % (idx, data_num, time.time() - time_, psnr))

        if not os.path.isdir(os.path.join(os.getcwd(), config.result_dir)):
            os.makedirs(os.path.join(os.getcwd(), config.result_dir))
        imsave(x[:, :, ::-1], config.result_dir + '/%d.png' % idx)

    print("Avg. Time:", avg_time / data_num)
    print("Avg. PSNR:", avg_pasn / data_num)

def test(self, config):
    print("\nPrepare Data...\n")
    paths = prepare_data(config)
    data_num = len(paths)

    avg_time = 0
    print("\nNow Start Testing...\n")
    for idx in range(data_num):
        input_ = imread(paths[idx])
        input_ = input_[:, :, ::-1]
        input_ = input_[np.newaxis, :]

        images_shape = input_.shape
        labels_shape = input_.shape * np.asarray([1, self.scale, self.scale, 1])
        self.build_model(images_shape, labels_shape)
        tf.global_variables_initializer().run(session=self.sess)

        self.load(config.checkpoint_dir)

        time_ = time.time()
        result = self.sess.run([self.pred], feed_dict={self.images: input_ / 255.0})
        avg_time += time.time() - time_

        self.sess.close()
        tf.reset_default_graph()
        self.sess = tf.Session()

        x = np.squeeze(result) * 255.0
        x = np.clip(x, 0, 255)
        x = x[:, :, ::-1]
        checkimage(np.uint8(x))

        if not os.path.isdir(os.path.join(os.getcwd(), config.result_dir)):
            os.makedirs(os.path.join(os.getcwd(), config.result_dir))
        imsave(x, config.result_dir + '/%d.png' % idx)

    print("Avg. Time:", avg_time / data_num)


def rgb2ycbcr(img):
	"""
	将RGB图转化为YCbCr颜色格式的图片

	:param img: RGB图,(H,W,3)
	:return: (H,W)
	"""
	y = 16 + (65.481 * img[:, :, 0]) \
		+ (128.553 * img[:, :, 1]) \
		+ (24.966 * img[:, :, 2])
	return y / 255


def PSNR(target, ref, scale):
	"""
	图像质量指标函数,PSNR指标
	PSNR=-10*LOG(MSE/255**2)
	MSE denotes mean square entropy

	:param target: 目标图
	:param ref:  待比较的图片
	:param scale:
	:return: scalar
	"""
	target_data = np.array(target, dtype=np.float32)
	ref_data = np.array(ref, dtype=np.float32)

	# 将RGB图转化为YCbCr颜色格式再求PSNR
	target_y = rgb2ycbcr(target_data)
	ref_y = rgb2ycbcr(ref_data)
	diff = ref_y - target_y

	shave = scale
	diff = diff[shave:-shave, shave:-shave]

	mse = np.mean((diff / 255) ** 2)
	if mse == 0:
		return 100

	return -10 * math.log10(mse)