原文出自这里 原文出处
这篇文章主要介绍的是Siamese Neural Network经典论文: Gregory Koch, et al., Siamese Neural Networks for One-shot Image Recognition. ICML 2015。
神经网络能够取得非常好的效果得益于使用大量的带标签数据进行有监督学习训练。但是这样的训练方法面临两个难题:
- 有些情况下我们无法采集到大量数据;
- 给数据打标签需要消耗大量人力财力。
当我们只有少量带标签的数据时如何训练出一个泛化性很好的模型呢?因此,few-shot learning问题应用而生。Few-shot learning仅需要每个类别含有少量带标签数据就可以对样本进行分类。
Gregory Koch等人提出了一种新的机器学习框架,当每个待测类别仅有1个样本的时候也能取得超过90%的识别准确率。
1. Omniglot数据集
《Siamese Neural Networks for One-shot Image Recognition》论文中使用了Omniglot数据集。Omniglot数据集是Few-shot Learning中常用的数据集,它采集了来自50个字母表的1623个手写字符。每一个字符仅仅包含20个样本,每一个样本都是来自于不同人的手写笔迹。样本图片的分辨率为105x105。
这面展示几个手写字符:
Omniglot数据集的下载方法:
`git clone https://github.com/brendenlake/omniglot.git
cd omniglot/python
unzip images_evaluation.zip
unzip images_background.zip
cd ../..

mkdir models`
Omniglot数据集通常被划分为30个训练字母表(background),20个测试字母表(evaluation)。这30个训练样本和20个测试样本是完全没有交际的,也就是说测试样本集中的类别完全是一个新的类别。这也是few-shot learning和传统的supervised learning不同的地方。
2. A one-shot learning baseline / 1 nearest neighbor
对于 n n n-way 1 1 1-shot问题,由于我们手中只有一个样本,所以没有办法训练得到一个泛化性很好的神经网络模型。最简单的方法是K-nearest neighbours,只需计算测试样本到训练样本的欧式距离,然后选择最近的一个作为预测标签:
C ( x ^ ) = argmin ∣ ∣ x ^ − x c ∣ ∣ C(\hat{x})=\text{argmin}||\hat{x}-x_c|| C(x)=argmin∣∣x−xc∣∣
论文中显示,1-nn在 20 20 20-way 1 1 1-shot任务上的准确率为28%,而盲猜的正确率只有5%。因此,1-nn对于解决one-shot问题还是有用的,但是效果并不理想,但可以作为一个baseline。
3. Siamese Neural Networks
由于训练样本太少,用它来训练网络肯定会造成过拟合,所以我们不能像传统的有监督学习那样其训练分类模型,而是要让模型如何区分不同。
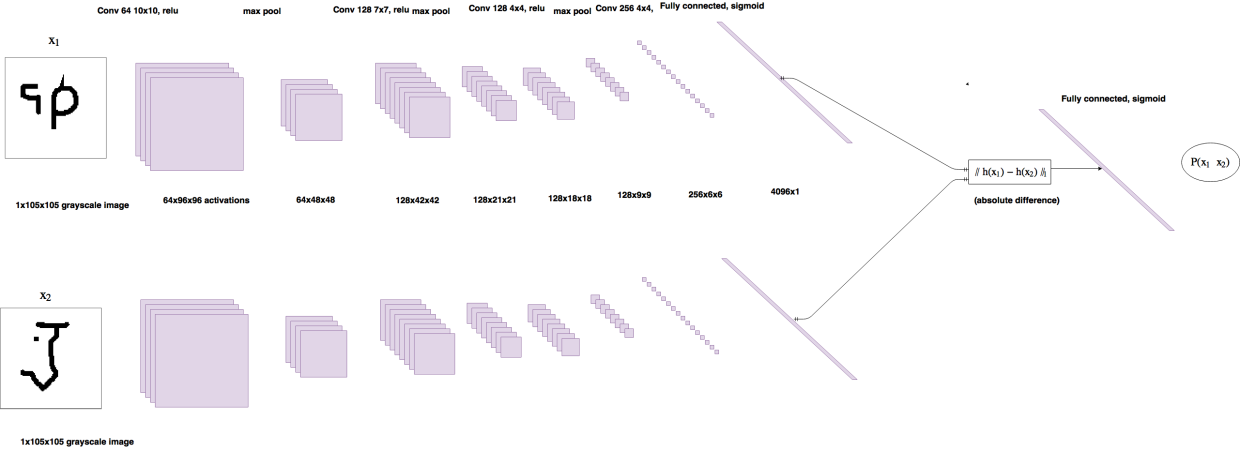
Siamese Networks即孪生网络,他们共享一部分网络结构。将两张图片输入到网络中得到两个特在向量。我们用向量的绝对差值度量两张图片的相似性。Siamese网络的结构图如下所示:
[图片上传失败…(image-275fb8-1679970385410)]
Siamese网络使用相同的特征提取网络提取特在得到两个向量,然后训练步骤为:
- 将两个样本分别输入到两个网络中,得到两个特征向量
x1和x2; - 计算向量的L1距离,
dis = np.abs(x1 - x2); - 将距离
dis输入到一个全连接网络中,全连接网络的神经元个数是1; - 经过Sigmoid函数得到预测输出,介于0-1之间。0表示两个样本属于不同类别,1表示两个样本属于同一类别。
- 使用二元交叉熵损失函数计算loss,反向传播更新参数。
对于 k k k-way 1 1 1-shot问题,我们需要比较querry set样本与 k k k个support sample的score,选择score最大的support sample作为标签。例如下图的 25 25 25-way 1 1 1-shot问题,相似度越高,Siamese 网络的输出值越大,因此可以确定query sample 的类别。
论文中模型的一般部署方法在Pytorch中的实现如下(参考4):
`import torch.nn as nn
class Siamese(nn.Module):
def __init__(self):
super(Siamese, self).__init__()
self.conv = nn.Sequential(
nn.Conv2d(1, 64, 10),
nn.ReLU(inplace=True),
nn.MaxPool2d(2),
nn.Conv2d(64, 128, 7),
nn.ReLU(),
nn.MaxPool2d(2),
nn.Conv2d(128, 128, 4),
nn.ReLU(),
nn.MaxPool2d(2),
nn.Conv2d(128, 256, 4),
nn.ReLU(),
)
self.liner = nn.Sequential(nn.Linear(9216, 4096), nn.Sigmoid())
self.out = nn.Linear(4096, 1)
def forward_one(self, x):
x = self.conv(x)
x = x.view(x.size()[0], -1)
x = self.liner(x)
return x
def forward(self, x1, x2):
out1 = self.forward_one(x1)
out2 = self.forward_one(x2)
dis = torch.abs(out1 - out2)
out = self.out(dis)
return out`

损失函数使用torch.nn.BCEWithLogitsLoss(size_average=True)函数。torch.nn.BCELoss函数,如果输出经过了nn.Sigmoid(),则损失函数就用torch.nn.BCELoss。
`loss_fn  =  torch.nn.BCEWithLogitsLoss(size_average=True)
net = Siamese()
optimizer.zero_grad()
output = net.forward(img1, img2)
loss = loss_fn(output, label)
loss_val += loss.item()
loss.backward()
optimizer.step()`
4. Few-shot task
4.1 Training tasks
Few-shot learnig的难点在于如何生成training tasks和test tasks, 这里我参考文献4的方法:
`class OmniglotTrain(Dataset):
def __init__(self, dataPath, transform=None):
super(OmniglotTrain, self).__init__()
np.random.seed(0)
self.transform = transform
self.datas, self.num_classes = self.loadToMem(dataPath)
def loadToMem(self, dataPath):
print("begin loading training dataset to memory")
datas = {}
agrees = [0, 90, 180, 270]
idx = 0
for agree in agrees:
for alphaPath in os.listdir(dataPath):
for charPath in os.listdir(os.path.join(dataPath, alphaPath)):
datas[idx] = []
for samplePath in os.listdir(os.path.join(dataPath, alphaPath, charPath)):
filePath = os.path.join(dataPath, alphaPath, charPath, samplePath)
datas[idx].append(Image.open(filePath).rotate(agree).convert('L'))
idx += 1
print("finish loading training dataset to memory")
return datas,idx
def __len__(self):
return 21000000
def __getitem__(self, index):
label = None
img1 = None
img2 = None
if index % 2 == 1:
label = 1.0
idx1 = random.randint(0, self.num_classes - 1)
image1 = random.choice(self.datas[idx1])
image2 = random.choice(self.datas[idx1])
else:
label = 0.0
idx1 = random.randint(0, self.num_classes - 1)
idx2 = random.randint(0, self.num_classes - 1)
while idx1 == idx2:
idx2 = random.randint(0, self.num_classes - 1)
image1 = random.choice(self.datas[idx1])
image2 = random.choice(self.datas[idx2])
if self.transform:
image1 = self.transform(image1)
image2 = self.transform(image2)
return image1, image2, torch.from_numpy(np.array([label], dtype=np.float32))`

这个方法方法比较常规,就是随即产生image pair,属于统一个字符标签为1,不属于标签为0。
然后使用
`trainSet = OmniglotTrain(train_path, transform=data_transforms)
trainLoader = DataLoader(trainSet, batch_size=batch_size, shuffle=False, num_workers=workers)`
调用即可。
4.2 Test tasks
需要着重注意的是测试集任务:
`class OmniglotTest(Dataset):
def __init__(self, dataPath, transform=None, times=200, way=20):
np.random.seed(1)
super(OmniglotTest, self).__init__()
self.transform = transform
self.times = times
self.way = way
self.img1 = None
self.c1 = None
self.datas, self.num_classes = self.loadToMem(dataPath)
def loadToMem(self, dataPath):
print("begin loading test dataset to memory")
datas = {}
idx = 0
for alphaPath in os.listdir(dataPath):
for charPath in os.listdir(os.path.join(dataPath, alphaPath)):
datas[idx] = []
for samplePath in os.listdir(os.path.join(dataPath, alphaPath, charPath)):
filePath = os.path.join(dataPath, alphaPath, charPath, samplePath)
datas[idx].append(Image.open(filePath).convert('L'))
idx += 1
print("finish loading test dataset to memory")
return datas, idx
def __len__(self):
return self.times * self.way
def __getitem__(self, index):
idx = index % self.way
label = None
if idx == 0:
self.c1 = random.randint(0, self.num_classes - 1)
self.img1 = random.choice(self.datas[self.c1])
img2 = random.choice(self.datas[self.c1])
else:
c2 = random.randint(0, self.num_classes - 1)
while self.c1 == c2:
c2 = random.randint(0, self.num_classes - 1)
img2 = random.choice(self.datas[c2])
if self.transform:
img1 = self.transform(self.img1)
img2 = self.transform(img2)
return img1, img2`

这里需要提前了解到的一个前提是:
`testSet = OmniglotTest(Flags.test_path, transform=transforms.ToTensor(), times = times, way = way)
testLoader = DataLoader(testSet, batch_size=way, shuffle=False, num_workers=workers)`
这里loadToMem函数是往每一个character的往容器中存放数据,而每一个character有20个样本,所以self.datas中每20个样本为一个character,整个测试集evaluation数据集有659个character,每个chatacter共有20个样本,所以共有659*20=13180个样本。
这里要注意的是testLoader的shuffle的参数False,也就是说测试集是从第0个索引开始一个一个读取的。所以每一个epoch刚好是读取了一个类别的20个样本,也就是每次只判断一个类别预测结果的对错。
好了,现在我们来看看__getitem__函数。由于索引是从0开始,一次20个,所以第一个batch的索引为0-20,从0开始一次读取image。因此,必然会经过if idx == 0判断条件。运行步骤为:
- index = 0
- idx = index % 20 = 0
- if idx == 0成立,从所有类别中随即选择一个类别,在该类别下随机选择两张图片img1, img2
- index = 1,2,3,4,…,19
- idx = index % 20 = 1,2,3,4,…,19
- if idx == 0不成立,进入else语句,随即选择两个不同类别的图片img1, img2
- 第一个batch完成,判断batch是否读取完成,若是则退出循环,否则index+1,返回步骤2
这里测试的代码为:
`for _, (test1, test2) in enumerate(testLoader, 1):
	test1, test2 = test1.cuda(), test2.cuda()
	test1, test2 = Variable(test1), Variable(test2)

	output = net.forward(test1, test2).data.cpu().numpy()
	pred = np.argmax(output)
	if  pred  ==  0:
		right  +=  1
	else: error  +=  1`
因为每个batch只有第一个img pair是相同的,如果预测正确,np.argmax(output)是0
本文原载于我的简书