复现End-to-End Referring Video Object Segmentation with Multimodal Transformers
论文链接End-to-End Referring Video Object Segmentation with Multimodal Transformers
CVPR2022链接CVPR2022 End-to-End Referring Video Object Segmentation with Multimodal Transformers
源代码链接https://github.com/mttr2021/MTTR
以下演示均基于Ubuntu 18.04的服务器
1.环境准备
如果是服务器的话,可以参考https://blog.csdn.net/xsh_roy/article/details/127402400进行vscode和服务器的连接配置
首先环境需要安装miniconda
https://blog.csdn.net/qq_42951560/article/details/109152114
wget https://mirrors.tuna.tsinghua.edu.cn/anaconda/miniconda/Miniconda3-py39_4.12.0-Linux-x86_64.sh --no-check-certificate

bash Miniconda3-py39_4.12.0-Linux-x86_64.sh
1.1 CUDA版本与Pytorch版本
watch -n 1 nvidia-smi
看一下自己的cuda版本

如果你是CUDA12.0,pytorch官网上目前只给出了11.8的Cuda支持,但是社区明确表明了兼容高版本Cuda(同理如果你是CUDA11.4,也可以用支持CUDA11.3的版本)
如果是更老的版本,参考https://pytorch.org/get-started/previous-versions/
我这里是CUDA 12.0,因为pytorch能向下兼容,所以直接上最新版本
conda install pytorch==2.0.0 torchvision==0.15.0 torchaudio==2.0.0 pytorch-cuda=11.8 -c pytorch -c nvidia
有可能还要再安装对应的cudatoolkit

CUDA 11.4:
conda install pytorch==1.12.1 torchvision==0.13.1 torchaudio==0.12.1 cudatoolkit=11.3 -c pytorch
检测一下安装的torch和CUDA版本,看看torch能不能检测到CUDA
python -c "import torch; print(torch.__version__); print(torch.version.cuda)"
python -c "import torch;print(torch.cuda.is_available())"


1.2 构建 pycocotools的错误
构建 pycocotools,发生错误
ERROR: Could not build wheels for pycocotools, which is required to install pyproject.toml-based projects
注意环境要安装gcc和cython
先检查一下有没有安装gcc,没有就安装
gcc -v
sudo apt-get install gcc
记得conda install -c conda-forge pandas matplotlib cython scipy cupy要在pip install -U 'git+https://gitee.com/fengyouliang/cocoapi_cocodataset.git#subdirectory=PythonAPI'之前执行,就有cython了
或者先单独安装cython
pip install cython
1.3 git clone github失败,怎么办
如果github的源安装失败,可以使用gitee的
pip install -U 'git+https://gitee.com/fengyouliang/cocoapi_cocodataset.git#subdirectory=PythonAPI'
甚至项目本身也有gitee那边的镜像版本https://gitee.com/alfheim1993/MTTR
2.数据集准备
自行下载数据集过于麻烦了,这里提供一些解决方案,主要参考的是https://github.com/JerryX1110/awesome-rvos/blob/main/
2.0 vscode如何上传文件到远程服务器或者从远程服务器下载文件
上传
-
下载sftp插件
-
打开工作文件夹(也就是放着你需要上传的文件的文件夹)
-
ctrl+shift+p ,找到SFTP:Config

-
点击之后就会在本地的.vscode文件夹创建一个sftp.json文件
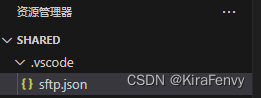
-
输入一些配置,重点是host,port,username和passport以及remotePath改成你的,其他参考就行
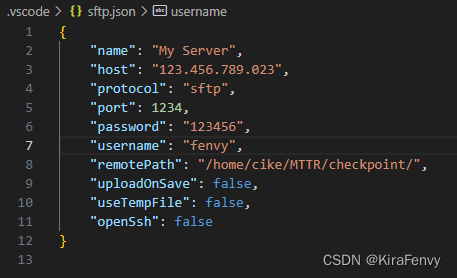
- 保存以后,资源管理器右键文件或文件夹选择upload就行
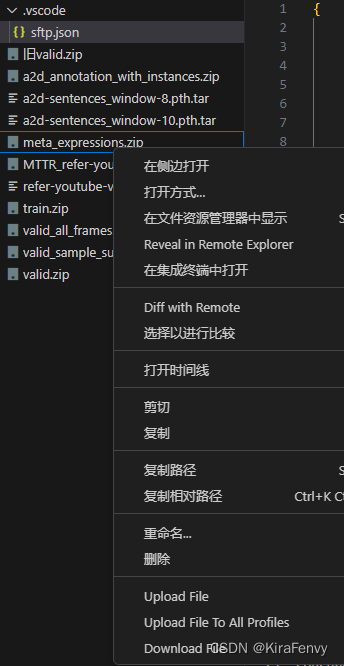
下载
sftp.json配置同上,先download Folder,然后Sync Remote -> Local
2.1 a2d_sentences数据集
目录结构需要满足
MTTR/
└── a2d_sentences/
    ├── Release/
    │   ├── videoset.csv  (videos metadata file)
    │   └── CLIPS320/
    │       └── *.mp4     (video files)
    └── text_annotations/
        ├── a2d_annotation.txt  (actual text annotations)
        ├── a2d_missed_videos.txt
        └── a2d_annotation_with_instances/
            └── */ (video folders)
                └── *.h5 (annotations files)
开始准备
  mkdir a2d_sentences
  cd a2d_sentences
    wget https://web.eecs.umich.edu/~jjcorso/bigshare/A2D_main_1_0.tar.bz
    tar jxvf A2D_main_1_0.tar.bz
    mkdir text_annotations
    cd text_annotations
      wget https://kgavrilyuk.github.io/actor_action/a2d_annotation.txt
      wget https://kgavrilyuk.github.io/actor_action/a2d_missed_videos.txt
    cd ..
  cd ..
然后手动下载数据集到本地,数据集链接
如没有安装unzip就需要安装apt-get install unzip,如果你不是管理员用户不能使用apt-get install,也可以直接conda install unzip(建议)
另外一种解决方法是参考https://www.jianshu.com/p/2664973470aa
在这个教程中要注意的是
DIR = `pwd`
echo "export PATH=${DIR}:$PATH" >> ~/.bashrc
比较难以理解,但其实就是引用了变量,这个DIR就是你的unzip解压的文件夹
echo "export PATH="/home/aaa/unzip-5.52:$PATH" >> ~/.bashrc
跑题了,所以接下来的操作:(注释掉的是一些可能需要的操作)
	  #mv a2d_annotation_with_instances.zip ./a2d_sentences/text_annotations
	  #cd a2d_sentences
	  #cd text_annotations
	  #conda install unzip
      unzip a2d_annotation_with_instances.zip
      #rm a2d_annotation_with_instances.zip
2.2 JHMDB-Sentences数据集
目录结构:
MTTR/
└── jhmdb_sentences/
    ├── Rename_Images/  (frame images)
    │   └── */ (action dirs)
    ├── puppet_mask/  (mask annotations)
    │   └── */ (action dirs)
    └── jhmdb_annotation.txt  (text annotations)
  mkdir jhmdb_sentences
  cd jhmdb_sentences
    wget http://files.is.tue.mpg.de/jhmdb/Rename_Images.tar.gz
    wget https://kgavrilyuk.github.io/actor_action/jhmdb_annotation.txt
    wget http://files.is.tue.mpg.de/jhmdb/puppet_mask.zip
    tar -xzvf  Rename_Images.tar.gz
    unzip puppet_mask.zip
  cd ..
cd ..
2.3 Refer-YouTube-VOS数据集
目录结构
MTTR/
└── refer_youtube_vos/
    ├── train/
    │   ├── JPEGImages/
    │   │   └── */ (video folders)
    │   │       └── *.jpg (frame image files)
    │   └── Annotations/
    │       └── */ (video folders)
    │           └── *.png (mask annotation files)
    ├── valid/
    │   └── JPEGImages/
    │       └── */ (video folders)
    │           └── *.jpg (frame image files)
    └── meta_expressions/
        ├── train/
        │   └── meta_expressions.json  (text annotations)
        └── valid/
            └── meta_expressions.json  (text annotations)
  mkdir refer_youtube_vos
  cd refer_youtube_vos
去一个比赛的地址获取https://competitions.codalab.org/competitions/29139#participate-get_data
或者直接baiduyun
验证集:提取码qunr
训练集:提取码uu4q
如果有重复文件,以第一个链接为准
里面文件有很多,仅需要train、valid_all_frames(解压后目录记得重命名为valid mv valid_all_frames valid)以及meta_expressions
3.使用checkpoint Evaluation
3.1 a2d_sentences
首先要下载checkpoint文件并传到指定位置,我们这里是MTTR下新建了一个checkpoint目录,把checkpoint文件放在这里
python main.py -rm eval -c configs/a2d_sentences.yaml -ws 8 -bs 3 -ckpt ./checkpoint/a2d-sentences_window-8.pth.tar -ng 2
python main.py -rm eval -c configs/a2d_sentences.yaml -ws 10 -bs 3 -ckpt ./checkpoint/a2d-sentences_window-10.pth.tar -ng 2
该命令的含义如下:
- -rm eval: 使用eval模式,即评估模式。这可能会执行与模型评估相关的操作。
- -c configs/a2d_sentences.yaml: 指定配置文件的路径为configs/a2d_sentences.yaml。该配置文件可能包含用于配置模型、数据集和训练参数的信息。
- -ws 8: 设置窗口大小为8。这可能是与模型或数据处理相关的参数,具体含义取决于代码实现。
- -bs 2: 设置批量大小为2。这是训练时每个训练步骤中输入的样本数量。
- -ckpt ./checkpoint/a2d-sentences_window-8.pth.tar: 指定检查点文件的路径为./checkpoint/a2d-sentences_window-8.pth.tar。检查点文件通常包含了训练模型的权重和其他相关信息,以便在需要时恢复模型状态。
- -ng 2: 设置使用的GPU数量为2。这是指定在训练或评估过程中使用的GPU设备数量。
Command Description
-c path to dataset configuration file
-rm running mode (train/eval)
-ws window size
-bs training batch size per GPU
-ebs eval batch size per GPU (if not provided, training batch size is used)
-ng number of GPUs to run on
如果希望指定GPU编号,这里假设是0,4,直接
CUDA_VISIBLE_DEVICES=0,4 python main.py -rm eval -c configs/a2d_sentences.yaml -ws 8 -bs 3 -ckpt ./checkpoint/a2d-sentences_window-8.pth.tar -ng 2
CUDA_VISIBLE_DEVICES=0,4 python main.py -rm eval -c configs/a2d_sentences.yaml -ws 10 -bs 3 -ckpt ./checkpoint/a2d-sentences_window-10.pth.tar -ng 2
坑1:numpy
AttributeError: module 'numpy' has no attribute 'float'.
`np.float` was a deprecated alias for the builtin `float`. To avoid this error in existing code, use `float` by itself. Doing this will not modify any behavior and is safe. If you specifically wanted the numpy scalar type, use `np.float64` here.
The aliases was originally deprecated in NumPy 1.20; for more details and guidance see the original release note at:
    https://numpy.org/devdocs/release/1.20.0-notes.html#deprecations
就是说文件a2d_sentences_dataset.py的第128行,其中使用了np.float。
根据错误信息中提供的建议,在numpy 1.20以后np.float是一个已被弃用的别名,您可以将np.float替换为np.float64
查看当前numpy版本
conda list numpy
pip show numpy
注意,conda有版本控制的操作,不过还是要及时备份环境
conda list --revisions
conda install --revision 2
坑2:内存
内存不够会被Linux内核Killed,

有可能进程终止后,内存没有被操作系统释放
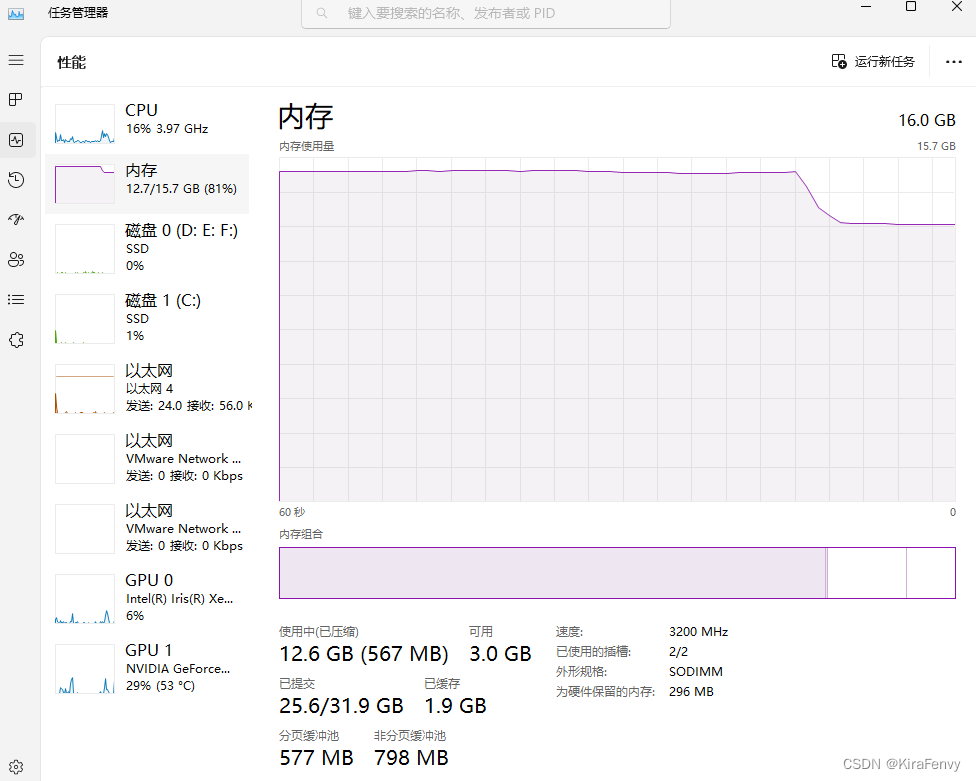
需要等待一段时间才会释放
坑3:网络
也有可能提示网络差
ValueError: Connection error, and we cannot find the requested files in the cached path. Please try again or make sure your Internet connection is on.
稍后再试即可
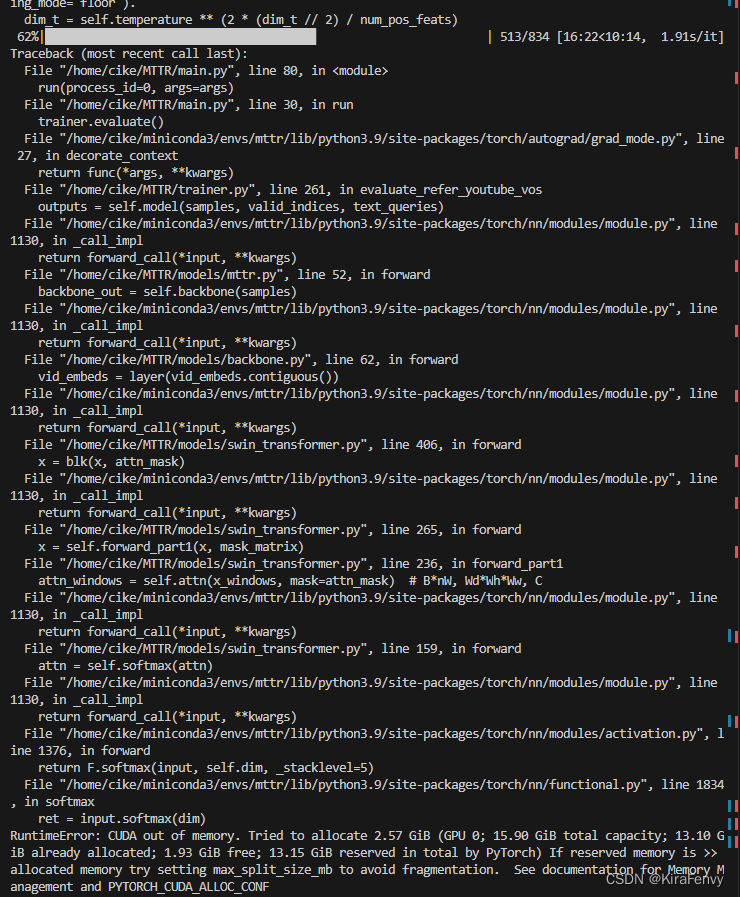
坑4:显存
torch.cuda.OutOfMemoryError: CUDA out of memory. Tried to allocate 1.73 GiB (GPU 0; 10.75 GiB total capacity; 6.06 GiB already allocated; 1.40 GiB free; 8.34 GiB reserved in total by PyTorch) If reserved memory is >> allocated memory try setting max_split_size_mb to avoid fragmentation. See documentation for Memory Management and PYTORCH_CUDA_ALLOC_CONF
考虑显式释放显存
python -c "import torch;torch.cuda.empty_cache()"
似乎没用,还是乖乖把batchsize调小吧
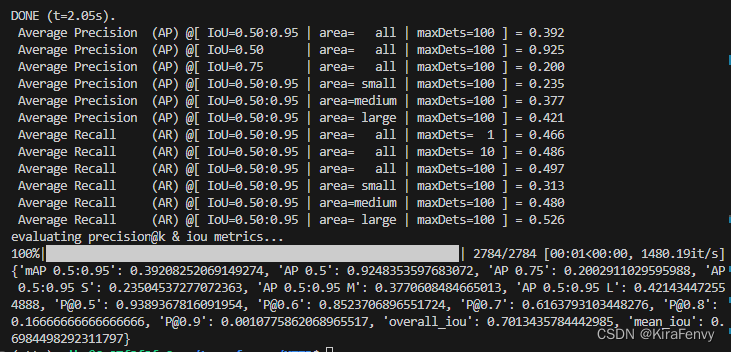
运行过程:
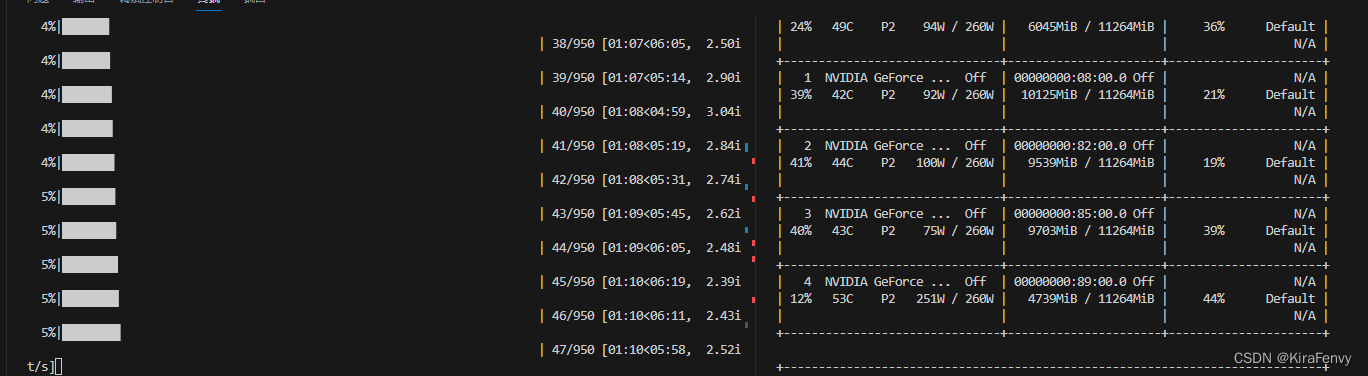
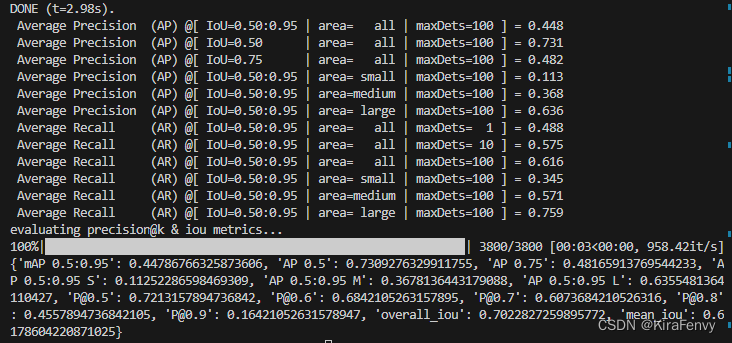
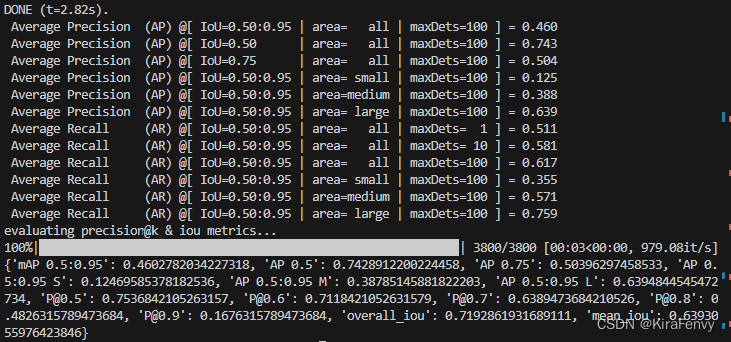
复现结果
窗口大小为8时
窗口大小为10时
3.2 JHMDB-Sentences
以下命令在 JHMDB-Sentences 上评估我们的 A2D-Sentences-pretrained 模型,无需额外训练。
为此,如我们的论文所述,我们从每个视频中统一采样三个帧。为了确保在其他机器上正确再现我们的结果,我们将采样帧的元数据包含在 datasets/jhmdb_sentences/jhmdb_sentences_samples_metadata.json 下。该文件在评估过程中使用以下命令自动加载。
为避免使用此文件并强制对不同的帧进行采样,请更改 MTTR/configs/jhmdb_sentences.yaml 下的 seed 和 generate_new_samples_metadata 参数。
python main.py -rm eval -c configs/jhmdb_sentences.yaml -ws 8 -bs 3 -ckpt ./checkpoint/a2d-sentences_window-8.pth.tar -ng 2
python main.py -rm eval -c configs/jhmdb_sentences.yaml -ws 10 -bs 3 -ckpt ./checkpoint/a2d-sentences_window-10.pth.tar -ng 2
如果希望指定GPU编号,这里假设是0,4,直接
CUDA_VISIBLE_DEVICES=0,4 python main.py -rm eval -c configs/jhmdb_sentences.yaml -ws 8 -bs 3 -ckpt ./checkpoint/a2d-sentences_window-8.pth.tar -ng 2
CUDA_VISIBLE_DEVICES=0,4 python main.py -rm eval -c configs/jhmdb_sentences.yaml -ws 10 -bs 3 -ckpt ./checkpoint/a2d-sentences_window-10.pth.tar -ng 2
window size为8时,结果:
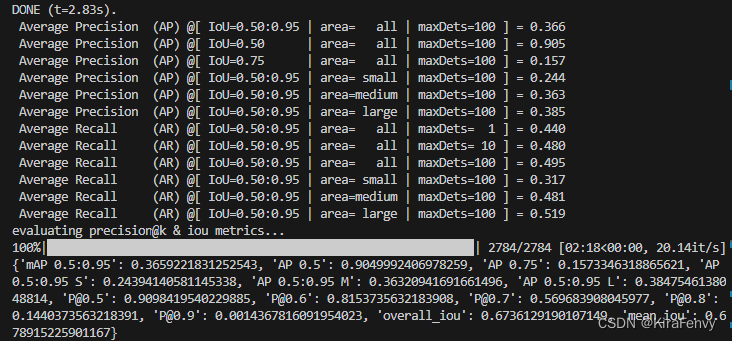
window size为10时,结果:
后台运行&日志存储
如果有需要把终端内容输出到日志并且后台运行,可以
运行命令:
nohup python -u run.py > test.log 2>&1 &
后台运行run.py,不在终端显示,并且将运行结果保存到test.log中
最后的 & 表示在后台运行
2 表示输出错误信息到提示符窗口
1 表示输出信息到提示符窗口,1前面的&要注意添加,否则还会创建一个名为 1 的文件
也可以使用tee命令
python -u main.py |& tee log.txt 2>&1
|& 是 2>&1 | 的简写
查看日志文件中最后几行结果:
tail -f test.log
查看整个日志文件:
cat test.log
3.3 Refer-YouTube-VOS
The following command evaluates our model on the public validation subset of Refer-YouTube-VOS dataset. Since annotations are not publicly available for this subset, our code generates a zip file with the predicted masks under MTTR/runs/[RUN_DATE_TIME]/validation_outputs/submission_epoch_0.zip. This zip needs to be uploaded to the competition server for evaluation. For your convenience we supply this zip file here as well.
python main.py -rm eval -c configs/refer_youtube_vos.yaml -ws 12 -bs 1 -ckpt CHECKPOINT_PATH -ng 8
如果只有2个GPU且希望指定GPU编号,这里假设是0,4,直接
CUDA_VISIBLE_DEVICES=0,4 python main.py -rm eval -c configs/refer_youtube_vos.yaml -ws 12 -bs 1 -ckpt ./checkpoint/refer-youtube-vos_window-12.pth.tar -ng 2
坑:显存
如果爆显存了,可以尝试
export 'PYTORCH_CUDA_ALLOC_CONF=max_split_size_mb:21'
如果不行那就算了,16GB显存实测不够用
4.训练模型
swin-transformer预训练模型 - drive.google
建议先把之前的MTTR文件夹备份一下
然后
python main.py -rm train -c configs/a2d_sentences.yaml -ws 8 -bs 2 -ng 3
本人的操作是
CUDA_VISIBLE_DEVICES=4 python main.py -rm train -c configs/a2d_sentences.yaml -ws 8 -bs 2 -ng 1 > train1.log 2>&1 &
注意算力要够,3个3090要跑31小时(70epochs)