初识python_scrapy爬虫
Scrapy是一个为了爬取网站数据,提取结构性数据而编写的应用框架。 可以应用在包括数据挖掘,信息处理或存储历史数据等一系列的程序中.
当前教程默认读者已安装python环境
安装scrapy
pip install Scrapy
创建爬虫项目
通过命令方式进行创建爬虫项目
scrapy startproject studyscrapypro

项目结构
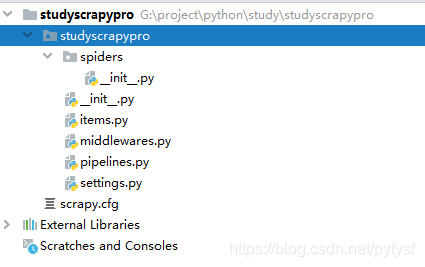
spiders:项目中的模块,通常在该模块下编写python代码,爬虫的逻辑代码等。
items.py:项目中用到的实体类,需要开发者自己定义。
pipelines.py:处理爬虫爬到的数据,数据处理器。
settings.py:项目的配置文件,在该文件中可以对项目进行基本的设置。
scrapy.cfg:项目的顶级配置文件,基本上无需默认修改。
Scrapy的开发步骤
- 创建项目
- 编写item实体类
- 创建爬虫类(Spider) 编写爬虫的逻辑
- 编写爬虫结果数据处理类(Pipeline)
- 启动项目
当前案例以爬取博客数据为例
目标网址:
https://www.cnblogs.com/
需求:
获取首页的博客数据。
- 定义博客item类
import scrapy
class StudyscrapyproItem(scrapy.Item):
        #当前类继承scrapy.Item
        # define the fields for your item here like:
        # name = scrapy.Field()

    title = scrapy.Field()
    author = scrapy.Field()
    comm = scrapy.Field()
    scan = scrapy.Field()
    desc = scrapy.Field()
    date = scrapy.Field()
- 使用通用模板创建Spider爬虫类
scrapy genspider cn_blogs_splider "www.cnblogs.com"
我们会在spiders文件夹中看到我们新创建的类 cn_blogs_splider
- 编写爬虫逻辑
自定义的Spider继承scrapy.Spider类,name属性必须有且唯一不重复。allowed_domains定义了被爬取的网站域名
实现了其parse方法。response参数就是scrapy请求网络返回的数据。
通过编写parse方法实现提取数据的过程,这里使用到了xpath语法。也可以使用正则表达式进行匹配。推荐使用Xpath语法。
XPATH语法学习推荐:https://www.w3school.com.cn/xpath/xpath_syntax.asp
import scrapy
from studyscrapypro.items import StudyscrapyproItem

class CnBlogsSpliderSpider(scrapy.Spider):
    name = 'cn_blogs_splider'
    allowed_domains = ['www.cnblogs.com']
    start_urls = ['http://www.cnblogs.com/']

    def parse(self, response):
        post_list = response.xpath("//div[@class='post_item']")

        for post in post_list:
            title = post.xpath(".//a[@class='titlelnk']/text()").extract_first()
            author = post.xpath(".//a[@class='lightblue']/text()").extract_first()
            comm_scan = post.xpath(".//a[@class='gray']/text()").getall()
            comm = int(str(comm_scan[0]).strip()[3:-1])
            scan = int(str(comm_scan[1]).strip()[3:-1])

            date_str = post.xpath(".//div[@class='post_item_foot']/text()").getall()
            date_str = str(date_str[1]).strip()[4:]

            # date = time.strptime(date_str, "%Y-%m-%d %H:%M")
            all_desc = post.xpath(".//p[@class='post_item_summary']/text()").getall()

            if len(all_desc) < 2:
                continue

            desc = str(all_desc[1]).strip()

            item = StudyscrapyproItem()
            item["title"] = title
            item["author"] = author
            item["comm"] = comm
            item["scan"] = scan
            item["desc"] = desc
            item["date"] = date_str

            yield item
- 编写最终处理数据的类(Pipeline)
这里示例转为json存文件,存数据库方式
安装MySQL模块
pip install mysql
数据库表
CREATE TABLE `item` (
  `id` int(10) NOT NULL AUTO_INCREMENT,
  `title` char(100) DEFAULT NULL,
  `desc` char(100) DEFAULT NULL,
  `date` timestamp NOT NULL DEFAULT CURRENT_TIMESTAMP ON UPDATE CURRENT_TIMESTAMP,
  `author` char(20) DEFAULT NULL,
  `comm` int(10) DEFAULT NULL,
  `scan` int(10) DEFAULT NULL,
  PRIMARY KEY (`id`)
) ENGINE=InnoDB AUTO_INCREMENT=588 DEFAULT CHARSET=utf8mb4
Pipeline.py
import MySQLdb
import json


class StudyscrapyproPipeline(object):

    # 初始化方法
    def __init__(self):
        self.connect = MySQLdb.connect(host='localhost', port=3306, user='root', passwd='root', db='cn_blog',
                                       charset='utf8')
        self.connect.autocommit(on=False)
        self.cursor = self.connect.cursor()

        pass
        # self.file = open("result.json", 'w+')
        # self.file.write('[')

    def write_item(self, item):
        json_str = json.dumps(dict(item))
        self.file.write(json_str + ",\n")
        print(json_str)
        pass

    def insert_mysql(self, item):
        # self.cursor.execute("""
        # INSERT INTO `cn_blog`.`item` (`title`,`desc`,`author`, `comm`,`scan`)VALUES(%s,%s,%s,%s,%s);
        # """, (item['title'], 'desc', 'author', 1, 1))
        self.cursor.execute("""
            INSERT INTO `cn_blog`.`item` (`title`,`desc`,`author`, `comm`,`scan`,`date`)VALUES(%s,%s,%s,%s,%s,%s);
            """, (item['title'], item['desc'][0:100], item['author'], item['comm'], item['scan'], item['date']))

    # 解析的方法
    def process_item(self, item, spider):
        # self.write_item(item)
        self.insert_mysql(item)

        return item

    # 关闭的方法 善后
    def close_spider(self, spider):
        # self.file.write("]")
        # self.file.close()

        self.connect.commit()
        self.cursor.close()
        self.connect.close()
修改配置文件settings.py
# 关闭遵循目标网站提供的防爬虫文件
ROBOTSTXT_OBEY = False

# 添加User-Agent
DEFAULT_REQUEST_HEADERS = {
    'Accept': 'text/html,application/xhtml+xml,application/xml;q=0.9,*/*;q=0.8',
    'User-Agent':'Mozilla/5.0 (Windows NT 10.0; WOW64) AppleWebKit/537.36 (KHTML, like Gecko) Chrome/77.0.3865.90 Safari/537.36',
    # 'Accept-Language': 'en',
}


#开启Pipelines处理数据
ITEM_PIPELINES = {
   'studyscrapypro.pipelines.StudyscrapyproPipeline': 300,
}
项目源码
https://github.com/upuptop/studyscrapypro
官方文档:
https://scrapy-chs.readthedocs.io/zh_CN/0.24/intro/overview.html