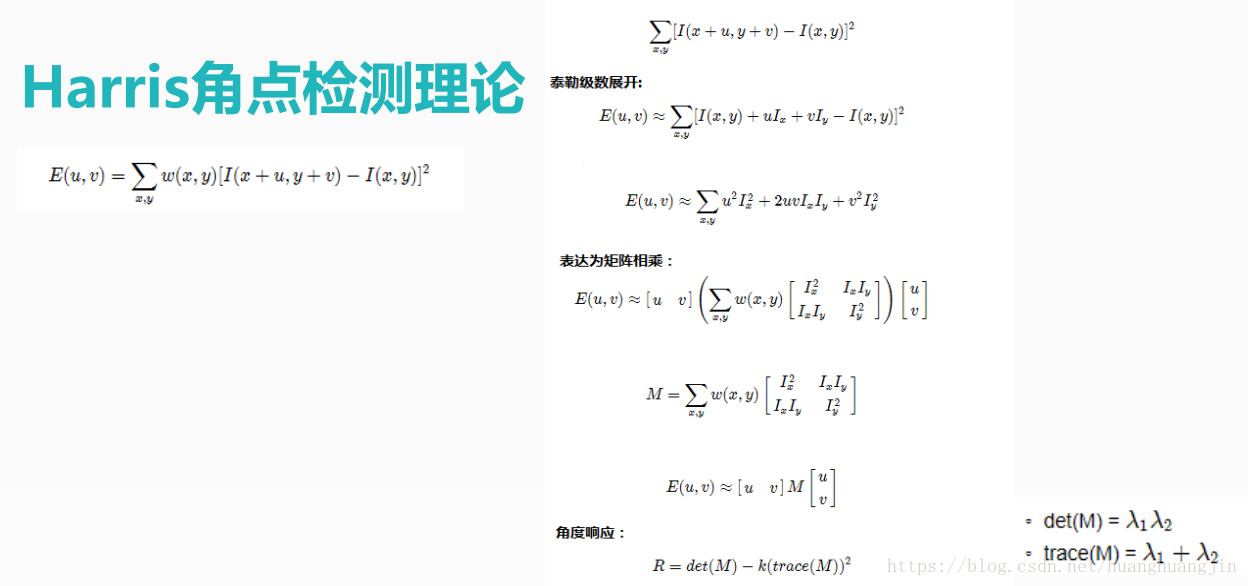
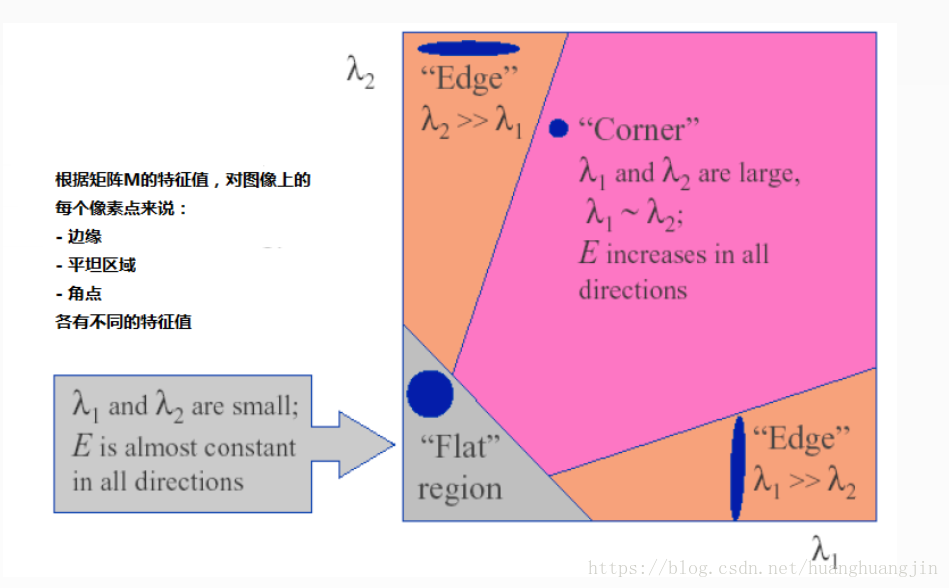
根据矩阵M的特征值,对于图像上的每个像素点来说, 边缘  平坦区域  角点 各有不同的特征值
    每个像素点不是边缘就是平坦区域或角点
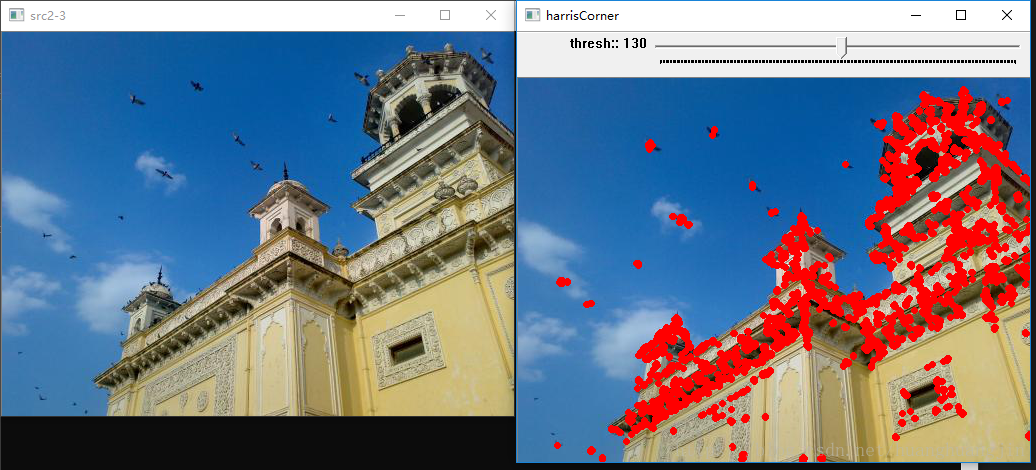
void cornerHarris ( // harris角点检测
    InputArray src, // 彩色图与灰度图都可以,最好是灰度图
    OutputArray dst, // 输出图像,计算出来的值可能正负,可能有小数,所以输入图像深度最好为 CV_32F,输出图形深度与输入一致
    int blockSize, // -blockSize – 计算 λ1 λ2 时候的矩阵大小   2
    int ksize, // -Ksize 窗口大小
    double k, // -K表示计算角度响应时候的参数大小 默认在0.04~0.06
    int borderType = BORDER_DEFAULT
);
代码
    #include "../common/common.hpp"

    static Mat src, gray;
    static const char title[] = "harrisCorner";
    static int thresh_v = 130;
    static int thresh_max = 255;

    static void m_harris(int, void*);

    void main(int argc, char** argv)
    {
        src = imread(getCVImagesPath("images/home.jpg"), IMREAD_COLOR);
        imshow("src2-3", src);

        cvtColor(src, gray, CV_BGR2GRAY);
        namedWindow(title, CV_WINDOW_AUTOSIZE);
        createTrackbar("thresh:", title, &thresh_v, thresh_max, m_harris);
        m_harris(0, 0);

        waitKey(0);
    }

    void m_harris(int, void*)
    {
        Mat dst, norm, scaleDst;
        dst = Mat::zeros(gray.size(), CV_32FC1);

        int blockSize = 2;
        int ksize = 3;
        double k = 0.04;
        cornerHarris(gray, dst, blockSize, ksize, k, BORDER_DEFAULT); // 角点检测
        printf("dst depth=%d, type=%d\n", dst.depth(), dst.type()); // dst depth=5, type=5  CV_32F
        for (int row = 0; row < dst.rows; row++)
        {
            for (int col = 0; col < dst.cols; col++)
            {
                printf("%f, ", dst.at<float>(row, col)); // 值很微小,小数点后有几个0
            }
        }
        normalize(dst, norm, 0, 255, NORM_MINMAX, CV_32FC1, Mat()); // 检测出的元素值范围不确定,而且有正有负,归一化一下
        printf("norm depth=%d, type=%d\n", norm.depth(), norm.type()); // norm depth=5, type=5  CV_32F
        convertScaleAbs(norm, scaleDst, 1, 0); // 将元素值取绝对值,且将输出图像深度变为 CV_8U    公式:dst(I)=abs(src(I)*scale + shift)
        printf("scaleDst depth=%d, type=%d\n", scaleDst.depth(), scaleDst.type()); // scaleDst depth=0, type=0  CV_8U

        Mat retImg = src.clone(); // 深拷贝
        for (int row = 0; row < retImg.rows; row++)
        {
            uchar * curRow = scaleDst.ptr(row);
            for (int col = 0; col < retImg.cols; col++)
            {
                int value = (int)*curRow;
                if (value > thresh_v) // 过滤,角点响应值 大于 阈值才显示
                {
                    circle(retImg, Point(col, row), 2, Scalar(0, 0, 255), 2, 8, 0);
                }
                curRow++; // scaleDst的深度是CV_8U , 所以用 ++ 指针步长没有问题
            }
        }

        imshow(title, retImg);
    }
效果图