ROS2学习笔记
-----------------------------------------------学习ing----------------------------------
参考网址
ROS2 humble官方教程网址
【鱼香ROS】动手学ROS2|ROS2基础入门到实践教程|小鱼带你手把手学习ROS2
目录
ROS2基础知识内容
一、设置环境
先决条件
需要按照安装教程安装,如果直接采用从源代码进行安装,将无法使用sudo apt install ros-<distro>-<package>指令。
Linux环境
1.设置配置文件
source /opt/ros/humble/setup.bash
Note: 文件来源取决于你安装ROS2的地址
2.添加到shell脚本文件当中(跳过步骤1)
echo "source /opt/ros/humble/setup.bash" >> ~/.bashrc
3.检查环境变量
当你添加了ROS2设置文件到环境中,使用以下代码来检查你是否设置成功
printenv | grep -i ROS
检查打印的信息中关于ROS2版本和python版本是否符合你安装的时候的要求
ROS_VERSION=2
ROS_PYTHON_VERSION=3
ROS_DISTRO=humble
Domain ID
在ROS2中,在默认中间层是使用的DDS进行通信,而在DDS中,使不同逻辑网络共享物理网络的主要机制称为域ID(Domain ID),ROS2的各个节点,在相同域下可以自由互相收发信息。在不同域下是不行的。所有的ROS2使用0作为默认域ID,为了避免在同一个网络下不同电脑运行ROS2系统的干扰,不同组应该具有不同的域ID。
一般域ID从0—101中进行选择。
扫描二维码关注公众号,回复: 14656502 查看本文章
由于DDS其实通过UDP端口号进行计算的,而UDP端口号是使用的unsigned 16bit类型,因此最大的端口号可以到65535,而通过两者的换算公式,我们可以算出Domain ID可以从0-232
在Linux系统中,由于Linux内核使用了32768-60999作为临时端口,因此Domain ID从0-101和215-232是不会和临时端口互相冲突的。可在
/proc/sys/net/ipv4/ip_local_port_range中设置Linux内核的临时端口。
设置Domain ID
export ROS_DOMAIN_ID=<your_domain_id>
将设置Domain ID到默认bash开机脚本中,减少二次设置
echo "export ROS_DOMAIN_ID=<your_domain_id>" >> ~/.bashrc
二、使用turtlesim和rqt
介绍
Turtlesim是一个学习ROS2的轻量级模拟器,能告诉你ROS2一些基本操作。
rqt是一个ROS2的GUI工具,更好的用户主机协同软件
1.Install turtlesim
# start setup files
sudo apt update

sudo apt install ros-humble-turtlesim

#检查安装包
ros2 pkg executables turtlesim

#应返回
turtlesim draw_square
turtlesim mimic
turtlesim turtle_teleop_key
turtlesim turtlesim_node
2. Start and use turtlesim
# start
ros2 run turtlesim turtlesim_node
应该返回蓝色界面,中间有一只海龟
打开另一个终端,进行海龟的操控
ros2 run turtlesim turtle_teleop_key
3. Install rqt
安装rqt
sudo apt update

sudo apt install ~nros-humble-rqt*
运行 rqt
rqt
4. Use rqt
- 下面操作需要开启前面的turtlesim
在运行的rqt后,在Plugins -> Services -> Service Caller选择需要的服务
spawn service
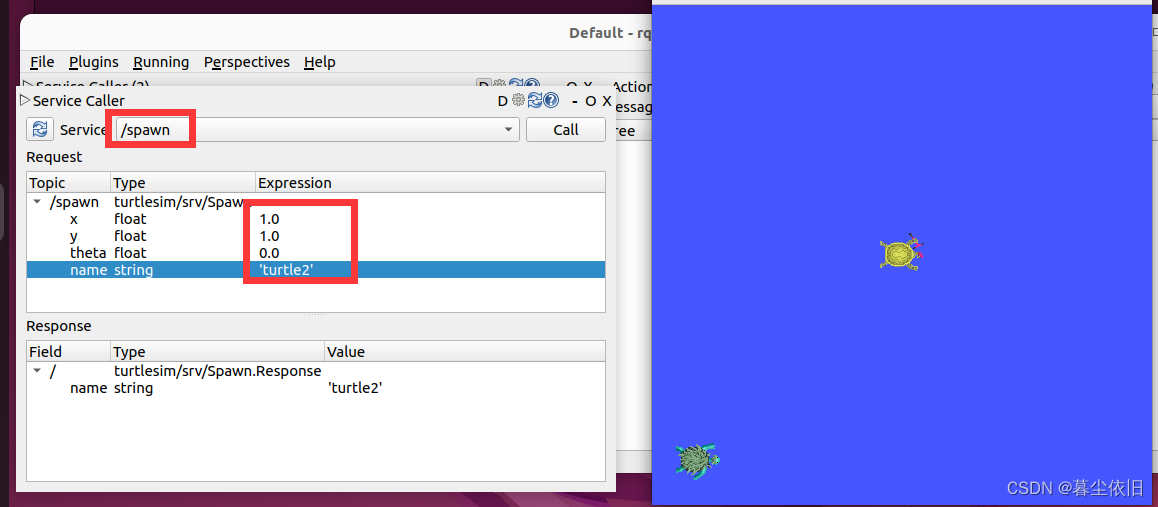
如图,在service caller中选择选择spawn,并且选择生成坐标+新乌龟名字,再点击call,就可以生成新的乌龟了。
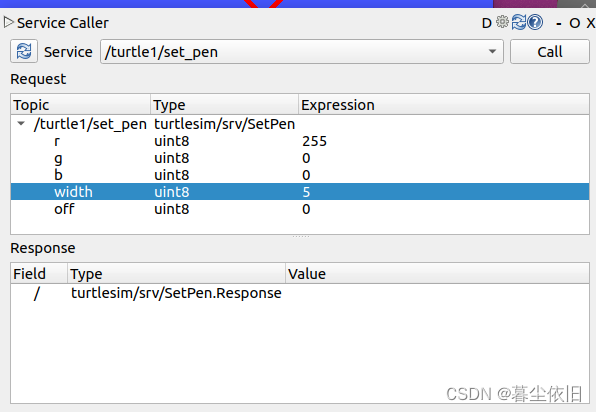
set_pen service
重映射
ros2 run turtlesim turtle_teleop_key --ros-args --remap turtle1/cmd_vel:=turtle2/cmd_vel
重映射可以将默认的节点名字修改为自定义值
三、Node
ROS中每个节点都应负责一个单一的模块用途,比如一个节点控制电机,一个节点控制激光测距。每个节点可以通过topics, services, action or parameters来发送或者接受信息。
一个完整的机器人系统应该由许多中心的节点组成,在ROS2中,一个单独的进程(C++或者python程序)可以包含一个或多个节点。
运行节点和查看节点
可以使用ros2 run来运行可执行包
ros2 run <package_name> <executable_name>
可以使用以下指令查看运行节点
ros2 node list
使用下面的指令查看啊你的节点的更多详细信息
ros2 node info <node_name>
四、Topic
- Topic是ROS2中最重要的用来交换信息的总线,一个节点可以发布任何数量的信息到topics,也可以从topics收取任何数量的信息
- topic分为发布者和接收者
- 话题名字是关键,发布订阅接口要相同。
- 同一个话题可以有多个发布者
Topics相关指令
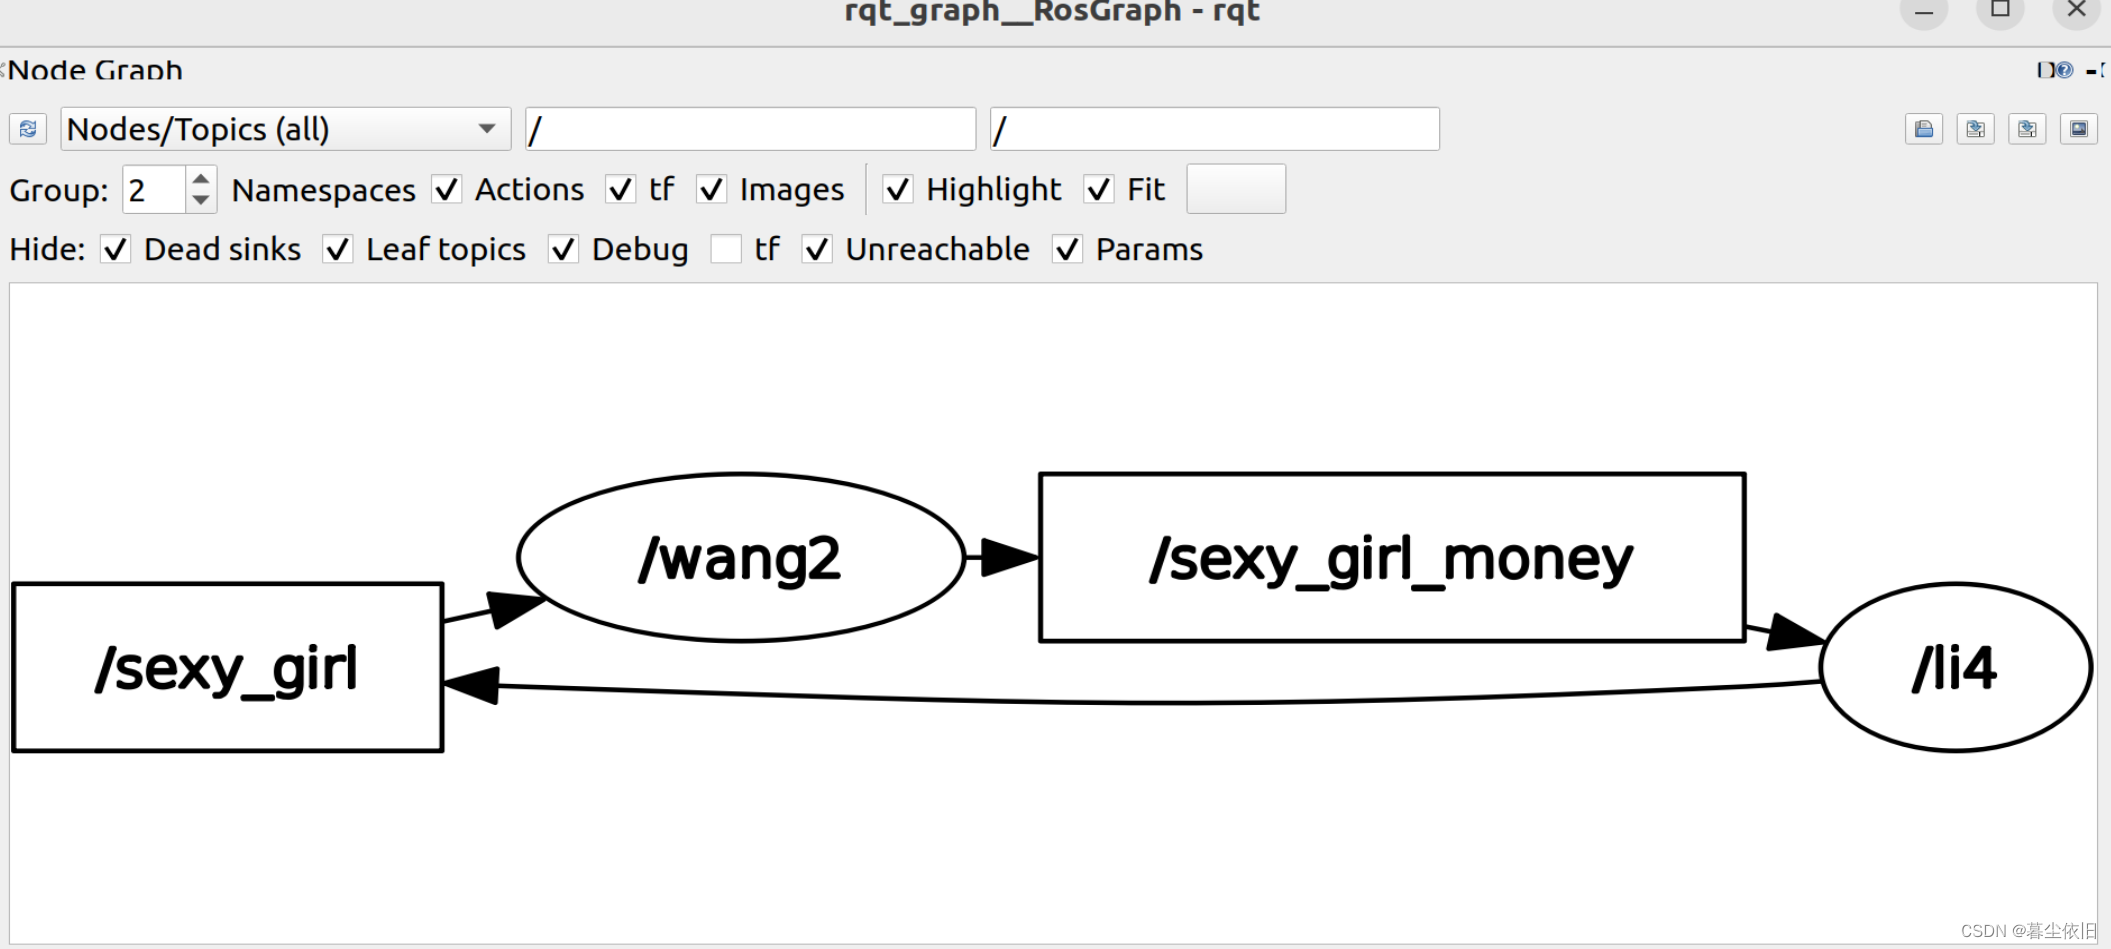
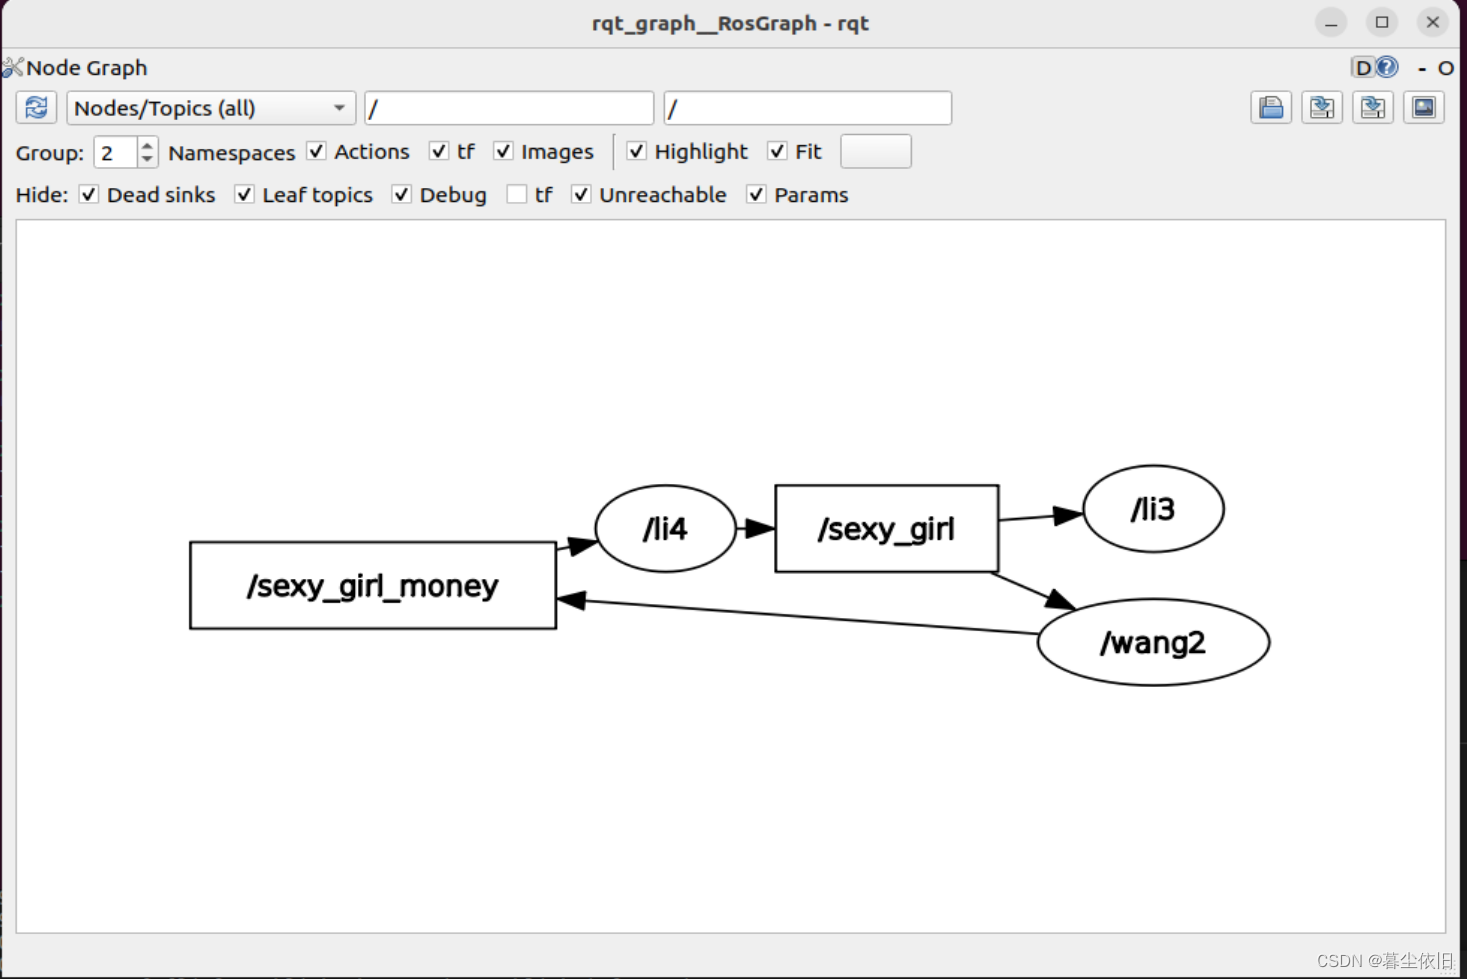
查看节点的连接方式和Topics,rqt_graph是非常重要的一个工具
rqt_graph
topic相关指令
# 查看所有topic
ros2 topic list

# 查看topic的发布的数据类型
ros2 topic list -t

# 查看topic传输的信息
ros2 topic echo <topic_name>

# 查看topic发送信息和接受信息的topic的数量
ros2 topic info <topic_name>
查看话题的消息类型
ros2 interface show <topic_type>

# 例如 ros2 interface show geometry_msgs/msg/Twist
# 返回以下信息
# This expresses velocity in free space broken into its linear and angular parts.

    Vector3  linear
            float64 x
            float64 y
            float64 z
    Vector3  angular
            float64 x
            float64 y
            float64 z

# 以上信息代表着这一个topic有两个变量,一个变量的名字是linear一个变量的名字是angular,每个变量有三个参数,以及每个参数的参数类型
在我们知道了变量的名字之后,我们就可以直接发布信息到我们需要的topic当中,格式如下:
ros2 topic pub <topic_name> <msg_type> '<args>'
-
<args>代表了你需要发给topic的实际信息 -
可以添加参数
--once,不然会一直发送消息,并且会返回给你是否发送成功的消息 -
可以添加参数
--rate 1,代表着以1Hz的速度发送消息给topic
查看topic接受和发布信息的频率
ros2 topic hz /turtle1/pose
五、Service
service是在ROS节点通信系统中的另一种通信方式,这是一种基于呼叫—回复的模型,和topic的订阅—发布的模型是不一样的
service仅仅会在他们被client委托时才会提供数据。service的client可以有很多个,但是在某个时间内只能有一个客户来获取服务
服务是双向的,客户端发送请求,服务端响应请求
话题是单向的,没有返回的,适用于大量的或单向的数据传输
- 同一个服务(名称相同)有且只能有一个节点来提供
- 同一个服务器可以被多个客户端调用
例子:
# 运行服务
ros2 run examples_rclpy_minimal_service service

# ctrl + shift + T切分终端 像服务发送委托
ros2 service call /add_two_ints example_interfaces/srv/AddTwoInts "{a: 1, b: 5}"

# 返回以下信息
requester: making request: example_interfaces.srv.AddTwoInts_Request(a=1, b=5)

response:
example_interfaces.srv.AddTwoInts_Response(sum=6)

# 或者我们可以使用rqt里面进行图形化调用服务
rqt
相关指令
# 查看所有的服务
ros2 service list

# 查看服务的类型
ros2 service type <service_name>
# e.g. 查看/clear服务
ros2 service type /clear
# return
std_srvs/srv/Empty
# Empty意味着这个服务在做出请求的时候不会发送任何数据,也不会在收到回复的时候得到任何数据

# 查看所有服务及其类型
ros2 service list -t

# 寻找某种接口类型的服务
ros2 service find <type_name>

# 查看服务的接口类型
ros2 interface show <type_name>

# 启动服务
ros2 service call <service_name> <service_type> <arguments>
# e.g. 清除海龟的运动轨迹
ros2 service call /clear std_srvs/srv/Empty
六、Param
参数就是节点的设置参数,一个节点可以有很多的参数,从整型,浮点,布尔值,字符串和lists都是可以的。在ROS2中,每个节点维护他们自己的参数。
参数和他本身的含义是一样的,我们可以在节点运行起来之后,动态进行改变参数。
相关指令
# 列举所有节点的参数
ros2 param list
在所有的参数中,都有一个参数类型叫
use_sim_time
# 获取参数类型
ros2 param get <node_name> <parameter_name>

# 设置参数
ros2 param set <node_name> <parameter_name> <value>
# 改变参数是一次性的 而不是每次修改默认值

# 保存参数到指定文件 默认保存到shell处于的文件路径之下
ros2 param dump /turtlesim > turtlesim.yaml

# 在保存了参数文件之后,下次启动就可以直接加载参数了
ros2 param load <node_name> <parameter_file>
只读参数只能在启动时修改,之后不能修改,这就是“qos_overrides”参数出现警告的原因。
七、Action
Actions是ROS2中的一种交流形式,他们通常由三个部分构成,goal feedback result, 动作是建立在topic和service之上,它的功能和service类似的,但是动作是可以被取消的,他们也同样会提供持续回复,而service只会提供单独的回复。
Actions是使用的客户机——服务器机制,一个action客户机节点会发送一个需求给action服务器,然后服务器会返回一个流反馈和结果给客户机
相关指令
# 查看/turtlesim节点的action 可以查看订阅者,发布者,服务,动作的客户机和服务机
ros2 node info /turtlesim

# 查看所有action
ros2 action list

# 查看所有action及其类型
ros2 action list -t

# 直接发送action目标
ros2 action send_goal <action_name> <action_type> <values>
一个机器人系统是可以根据action来进行导航的
八、rqt_console查看日志
rqt_consle是一个管理日志的ROS2的GUI工具。
相关指令
# 开启 rqt_console
ros2 run rqt_console rqt_console
ROS2的日志等级按照严重程度分成了以下几点
Fatal 系统为了自我保护而自动终止
Error 不会严重损耗系统,但还是会阻止其运行
Warn 不会损害功能 但是是意外消息或者非理想结果
Info 指示事件或状态更新
Debug 详细表述系统执行过程
Info是默认的信息等级,在正常情况下debug消息是不会显示的
# 设置默认节点日志等级
ros2 run turtlesim turtlesim_node --ros-args --log-level WARN
九、一次性启动多个节点
为了避免开启多个终端,一个一个启动节点,我们可以使用启动文件来一次性启动多个节点。
ros2 launch turtlesim <launch file>
可以使用Python XML YAML来启动文件,文件编写格式在后面写
十、ROS2 bag
ros2 bag是一个命令行工具,用于记录topic发布的消息,并且可以存储到数据库中,在实验中之后可以复现这些实验数据。
相关指令
ros2 bag只能记录topics发布的数据
# 查看系统运行的topics
ros2 topic list

# 记录topic发布的信息 保存信息会在你运行ros2 bag的路径下
ros2 bag record <topic_name>

# 记录多个topic  设置log的名字
# -o参数 代表着选择保存后的文件名字
# -a参数 记录系统中的所有topic
ros2 bag record -o subset /turtle1/cmd_vel /turtle1/pose

# 查看录制过程后的文件详细消息 包括起始终止时间
ros2 bag info <bag_file_name>

# Ctrl+C 取消log录制,如果要重现实验室据
ros2 bag play subset
十一、colcon构建
安装colcon
sudo apt install python3-colcon-common-extensions
ROS工作空间是一个目录,通常会有一个src子目录,子目录中ROS包的源代码。因此我们创建工作区的方法就是创建新的文件夹。
在colcon下没有源代码构建,默认情况下,创建以下目录作为目录的对等点src。colcon可以被理解为一个编译器
- 在
build目录下,储存中间文件的位置,对于每个包都将创建一个子文件夹,例如调用CMake - 在
install目录下,每个软件包安装的位置。默认情况下,每个包都将安装到一个单独的子目录中 - 在
log目录下包含有关每个colcon调用的各种日志记录信息
ROS2工作区及工作包
一、工作区相关操作
创建工作区目录
首先创建一个目录包含我们工作区
mkdir -p ~/ros2_ws/src
cd ~/ros2_ws
解决依赖关系
在根目录下运行以下指令
# cd if you're still in the ``src`` directory with the ``ros_tutorials`` clone
cd ..
rosdep install -i --from-path src --rosdistro humble -y
构建工作区
编译,如果我们使用colcon build,这个编译指令是不支持devel空间并且要求所有包都已安装,但是我们可以使用--symlink-install,这个允许编译中包含改变了的文件
--packages-up-to构建您想要的包,以及它的所有依赖项,但不是整个工作区(节省时间)--symlink-install每次调整 python 脚本时都不必重新构建--event-handlers console_direct+在构建时显示控制台输出(可以在log目录中找到)
colcon build --symlink-install

#或者
colcon build
引用覆盖层
选一个新的终端,重新初始化终端参数
source /opt/ros/humble/setup.bash
引用环境
当colcon完全编译完了之后,输出会在install目录之下,在你使用任何的包或者库之前,你需要增加路径到你的path和library paths下,colcon将在install目录下生成bash/bat文件来帮助设置环境,这些文件会将必要元素添加到路径和库路劲中。
. install/setup.bash
二、创建ROS2工作包
工作包可以被认为是你的ROS2代码的容器,如果你想安装你的代码并分享给别人,就需要将其全部打包,工作包在ROS2下使用ament作为编译系统,使用colcon作为其编译工具。可以用Cmake和Python来安装包。
Cmake制作工作包
package.xmlfile containing meta information about the package
CMakeLists.txtfile that describes how to build the code within the package# 包的结构 my_package/ CMakeLists.txt package.xml
Python制作工作包
package.xmlfile containing meta information about the package
setup.pycontaining instructions for how to install the package
setup.cfgis required when a package has executables, soros2 runcan find them
/<package_name>- a directory with the same name as your package, used by ROS 2 tools to find your package, contains__init__.py# 包的结构 my_package/ setup.py package.xml resource/my_package
一个工作区可以包含任意数量你想要的工作包,每个包都在自己的文件夹下,可以混合编译包。不能有嵌套包。
创建包操作
-
创建工作区 并进入
src目录下 -
创建新的工作包
# python ros2 pkg create --build-type ament_python <package_name> # CMake ros2 pkg create --build-type ament_cmake <package_name> -
在工作区主目录下就进行编译
cd ~/ros2_ws colcon build # 如果只编译my_package 只需要run colcon build --packages-select my_package -
打开新的终端,初始化配置文件,将自己的包放入到path路径下
. install/local_setup.bash -
使用工作包
ros2 run my_package my_node -
自定义package.xml,为了避免出现警告信息,修改为下列文件,包含
<description>和<license>这两行信息<?xml version="1.0"?> <?xml-model href="http://download.ros.org/schema/package_format3.xsd" schematypens="http://www.w3.org/2001/XMLSchema"?> <package format="3"> <name>my_package</name> <version>0.0.0</version> <description>Beginner client libraries tutorials practice package</description> <maintainer email="[email protected]">user</maintainer> <license>Apache License 2.0</license> <buildtool_depend>ament_cmake</buildtool_depend> <test_depend>ament_lint_auto</test_depend> <test_depend>ament_lint_common</test_depend> <export> <build_type>ament_cmake</build_type> </export> </package>
手撸ROS2节点
一、使用python手撸一个节点
编写ROS2节点的一般步骤
- 导入库文件
- 初始化客户端库
- 新建节点
- spin循环节点
- 关闭客户端库
1.1.编写节点(基于面向过程)
1.新建功能包
mkdir -p ~/town_ws/src
cd ~/town_ws/src
需要在工作区/src下建立
dependencies指该功能包的依赖
ros2 pkg create village_li --build-type ament_python --dependencies rclpy
2.编写代码
from ast import arg
import rclpy
from rclpy.node import Node

def main(args=None):
    # init client
    rclpy.init(args=args)
    # build a new node and name it "li4"
    li4_node = Node("li4")
    # print information and set the level in info
    li4_node.get_logger().info("hello, my name is li4")
    # loop node with spin
    rclpy.spin(li4_node)
    # shutdown client
    rclpy.shutdown()
3.修改setup.py
在setup.py中的entry_points写下新的节点的名字及其入口函数的位置
节点:li4_mode 入口函数的位置:工作包village_li->li4.py->main函数
entry_points={


        'console_scripts': [
            "li4_node=village_li.li4:main"        # where you can find li4_node entrance
        ],
    },
4.编译并添加到系统环境
# 编译节点
colcon build
# 添加新的工作包到系统中
source install/setup.bash
# 查看工作包是否存在,使用| grep <word> 可以过滤出你想要的信息
ros2 pkg list | grep village
# 运行节点 ros2 run <可执行包> <可执行节点>
ros2 run village_li li4_node
# 在运行节点之后 可以查看当前运行的节点
ros2 node list
1.2.OOP(面向对象编程思想)
三种常用编程思想
-
面向过程编程思想:POP——分析问题需要的步骤,然后分别实现每一步,再一步步执行。比如将大象装进冰箱,我们需要的编程操作是:
打开冰箱门->把大象装进去->将冰箱门关上
-
面向对象编程思想:OOP——我们需要探究的事物都可以当作一个对象。对象 = 属性 + 行为。行为就是对对象属性的操作。这时候再把大象装进冰箱编程操作就变成了:
1.调用:冰箱->打开冰箱门(对其属性进行操作即行为)
2.调用:冰箱->装东西(行为)
3.调用:冰箱->关闭门(行为)
整个过程是与冰箱这个对象进行交互式操作完成的。
3.函数式思想:FP
1.3.编写节点(基于面向对象)
修改一下代码 用面向对象的方法来进行编辑
import rclpy
from rclpy.node import Node

class WriterNode(Node): # 继承Node类
    def __init__(self,name):
        super().__init__(name) # 自动查找父类,并进行初始化
        self.get_logger().info("hello, my name is %s." % name)


def main(args=None):
    # init client
    rclpy.init(args=args)
    # build a new node and name it "li4"
    li4_node = WriterNode("li4")
    # loop node with spin
    rclpy.spin(li4_node)
    # shutdown client
    rclpy.shutdown()
二、使用C++手撸节点
2.1.编写节点(基于面向过程)
1.新建功能包
ros2 pkg create village_wang --dependencies rclcpp
2.编写代码
这里我们如果使用的是
vscode的话需要告诉编译器rclcpp/rclcpp.hpp在哪个位置,这个文件位置都在/opt/ros/humble/include/rclcpp下在include path中添加以下即可
/opt/ros/humble/include/**
#include "rclcpp/rclcpp.hpp"

using namespace std;
int main(int argc, char ** argv)
{
    rclcpp::init(argc,argv); // Init
    // create auto pointer and Node, name it with "wang2"
    auto node = std::make_shared<rclcpp::Node>("wang2");
    //print infomation
    RCLCPP_INFO(node->get_logger(),"hello, my name is wang2");
    // loop node
    rclcpp::spin(node);
    //shutdown node
    rclcpp::shutdown();
}
3.添加入口函数指令到CMake文件
# 在CMakelist.txt中的最后一行添加以下指令

add_executable(wang2_node src/wang2.cpp) #增加可执行工作包
ament_target_dependencies(wang2_node rclcpp) # 增加wang2节点 并告诉其依赖的库为rclcpp

install(TARGETS # 编译相关文件
  wang2_node
  DESTINATION lib/${PROJECT_NAME}
  )
4.编译并添加到系统中
colcon build --packages-select village_wang # 编译文件

source install/setup.bash # 添加环境到系统中,告诉bash我增加了新节点

ros2 pkg list | grep village # 查看环境中是否有节点

ros2 run village_wang wang2_node
2.2.编写节点(基于面向对象)
#include "rclcpp/rclcpp.hpp"

using namespace std;

class singledog: public rclcpp::Node
{
    public:
    singledog(std::string name):Node(name)
    {
            RCLCPP_INFO(this->get_logger(),"hello, my name is wang2");
    }


};

int main(int argc, char ** argv)
{
    rclcpp::init(argc,argv); // Init
    // create auto pointer and Node, name it with "wang2"
    auto node = std::make_shared<singledog>("wang2");
    // loop node
    rclcpp::spin(node);
    //shutdown node
    rclcpp::shutdown();
}
手撸ROS2话题
publisher的编写逻辑
- 导入消息类型
- 声明并创建发布者(publisher)
- 创建回调函数并编写回调处理逻辑(调用发布者之后的处理过程)
一、使用python编写话题
1、编写发布者(publisher)
我们使用python编写一个发布者,并且每隔5s发布一次信息
import rclpy
from rclpy.node import Node
from std_msgs.msg import String

class WriterNode(Node):
    def __init__(self,name):
        super().__init__(name)
        self.get_logger().info("hello, my name is %s." % name)
        self.pub_novel = self.create_publisher(String,"sexy_girl",10)

        self.count = 0
        self.timer_period = 5.0
        self.timer = self.create_timer(self.timer_period,self.timer_callback)

    def timer_callback(self):
        msg = String()
        msg.data = "the %d time publish information" % (self.count)
        self.pub_novel.publish(msg)
        self.get_logger().info("publish %s" % msg.data)
        self.count += 1

def main(args=None):
    # init client
    rclpy.init(args=args)
    # build a new node and name it "li4"
    li4_node = WriterNode("li4")
    # loop node with spin
    rclpy.spin(li4_node)
    # shutdown client
    rclpy.shutdown()
编译并运行:
colcon build --packages-select village_li

ros2 run village_li li4_node
2、编写订阅者(subscription)
使用python在发布者的基础上编写一个订阅者,当订阅者收到其他地方传来的信息的时候,就不断的将收到的data与自己的account相加然后打印出来,并且自己也在每隔1s发布消息
import rclpy
from rclpy.node import Node
from std_msgs.msg import String,UInt32

class WriterNode(Node):

    def __init__(self,name):
        super().__init__(name)
        self.get_logger().info("hello, my name is %s." % name)
        self.pub_novel = self.create_publisher(String,"sexy_girl",10)

        self.count = 0
        self.timer_period = 5
        self.timer = self.create_timer(self.timer_period,self.timer_callback)

        self.account = 50
        self.sub_money = self.create_subscription(UInt32, "sexy_girl_money", self.recv_money_callback, 10)

    def recv_money_callback(self,money):
        self.account += money.data # The type of Uint32 is uint32 data, so when we send info to subscription
        # we also should use the same type to recv data.
        self.get_logger().info("get %d money, all moeny is %d " % (money.data,self.account))


    def timer_callback(self):
        msg = String()
        msg.data = "the %d time publish information" % (self.count)
        self.pub_novel.publish(msg)
        self.get_logger().info("publish %s" % msg.data)
        self.count += 1

def main(args=None):
    # init client
    rclpy.init(args=args)
    # build a new node and name it "li4"
    li4_node = WriterNode("li4")
    # loop node with spin
    rclpy.spin(li4_node)
    # shutdown client
    rclpy.shutdown()
在我们编写订阅者的时候,我们订阅者接收到的信息是 std_msgs/msg/UInt32这个类型,因此我们发布的时候要同样使用这样的一个类型。使用以下指令查看UInt32的具体类型
ros2 interface show std_msgs/msg/UInt32

# 返回以下信息
# This was originally provided as an example message.
# It is deprecated as of Foxy
# It is recommended to create your own semantically meaningful message.
# However if you would like to continue using this please use the equivalent in example_msgs.

uint32 data
因此我们在接收的时候要使用money.data即同为data类型来进行接收
编译并运行代码
colcon build --packages-select village_li

ros2 run village_li li4_node
新建终端
ros2 topic list # 查看当前话题数量
发布给订阅者
ros2 topic pub /sexy_girl_money std_msgs/msg/UInt32 "{data: 10}" -1
# -1指只发送一次
返回信息
[INFO] [1664007969.607674638] [li4]: get 10 money, all moeny is 60
二、使用C++编写话题
1.编写订阅者(subscription)
由于我们在之前的python代码中已经建立了一个发布者和一个订阅者,我们利用C++编写一个订阅者来接收python发布者发出的信息,并实时进行打印。
#include "rclcpp/rclcpp.hpp"
#include "std_msgs/msg/string.hpp"

using std::placeholders::_1;
using std::placeholders::_2;

class SingleDogNode: public rclcpp::Node
{
    private:

    rclcpp::Subscription<std_msgs::msg::String>::SharedPtr sub_novel;

    //creating callback function
    void novel_callback(const std_msgs::msg::String::SharedPtr novels)
    {
        RCLCPP_INFO(this->get_logger(), "I get %s !", novels->data.c_str());
    }

    public:

        SingleDogNode(std::string name):Node(name)
        {
            RCLCPP_INFO(this->get_logger(),"hello, my name is wang2");
            //create subscription
            sub_novel = this->create_subscription<std_msgs::msg::String>("sexy_girl", 10, std::bind(&SingleDogNode::novel_callback, this, _1));
            // C++ 11.0 new.
            //std::bind use other function as the callback function, the 2nd param is use who's function
            // the 3rd param is how many param should be passed to the callback function.
        }

};

int main(int argc, char ** argv)
{
    rclcpp::init(argc,argv); // Init
    // create auto pointer and Node, name it with "wang2"
    auto node = std::make_shared<SingleDogNode>("wang2");
    // loop node
    rclcpp::spin(node);
    //shutdown node
    rclcpp::shutdown();
}
在Cmakelist中添加新的依赖环境std_msgs
ament_target_dependencies(wang2_node rclcpp std_msgs)
然后进行编译并source一下
# 编译
colcon build
# source
source install/setup.bash
# run
ros2 run village_wang wang2_node
# 新建终端
source install/setup.bash
ros2 run village_li li4_node
两个终端分别打印
# wang2节点终端打印
[INFO] [1664265333.696980235] [wang2]: hello, my name is wang2
[INFO] [1664265360.247198785] [wang2]: I get the 0 time publish information !
[INFO] [1664265365.244987227] [wang2]: I get the 1 time publish information !
[INFO] [1664265370.244342702] [wang2]: I get the 2 time publish information !

# li4节点终端打印
[INFO] [1664265355.237506011] [li4]: hello, my name is li4.
[INFO] [1664265360.248356353] [li4]: publish the 0 time publish information
[INFO] [1664265365.245604746] [li4]: publish the 1 time publish information
[INFO] [1664265370.244890776] [li4]: publish the 2 time publish information
2.编写发布者(publisher)
创建发布者,向python编写的li4_node发布money信息,让python接收并进行打印
#include "rclcpp/rclcpp.hpp"
#include "std_msgs/msg/string.hpp"
#include "std_msgs/msg/u_int32.hpp"

using std::placeholders::_1;
using std::placeholders::_2;

class SingleDogNode: public rclcpp::Node
{
    private:
    // declare subscription
    rclcpp::Subscription<std_msgs::msg::String>::SharedPtr sub_novel;
    // declare publisher
    rclcpp::Publisher<std_msgs::msg::UInt32>::SharedPtr pub_money;

    //creating callback function
    void novel_callback(const std_msgs::msg::String::SharedPtr novels)
    {
        //publish money info
        std_msgs::msg::UInt32 money;
        money.data = 10;
        pub_money->publish(money);

        //create callback funtion logic
        RCLCPP_INFO(this->get_logger(), "I get %s !", novels->data.c_str());
    }


    public:

        SingleDogNode(std::string name):Node(name)
        {
            RCLCPP_INFO(this->get_logger(),"hello, my name is wang2");

            // creating subscription
            sub_novel = this->create_subscription<std_msgs::msg::String>("sexy_girl", 10, std::bind(&SingleDogNode::novel_callback, this, _1));
            // C++ 11.0 new.
            //std::bind use other function as the callback function, the 2nd param is use who's function
            // the 3rd param is how many param should be passed to the callback function.

            // creating publihser
            pub_money = this->create_publisher<std_msgs::msg::UInt32>("sexy_girl_money", 10);
        }

};

int main(int argc, char ** argv)
{
    rclcpp::init(argc,argv); // Init
    // create auto pointer and Node, name it with "wang2"
    auto node = std::make_shared<SingleDogNode>("wang2");
    // loop node
    rclcpp::spin(node);
    //shutdown node
    rclcpp::shutdown();
}
编译运行后,能看到双方互相链接了
# wang2_Node
[INFO] [1664268228.038600944] [wang2]: I get the 51 time publish information !
[INFO] [1664268233.037715674] [wang2]: I get the 52 time publish information !
# Li4_Node
[INFO] [1664268228.039104545] [li4]: publish the 51 time publish information
[INFO] [1664268228.041121171] [li4]: get 10 money, all moeny is 350
[INFO] [1664268233.038338689] [li4]: publish the 52 time publish information
[INFO] [1664268233.040252597] [li4]: get 10 money, all moeny is 360
查看计算图
我们可以用计算图来查看两个节点之间的连接关系
ROS2接口说明
接口其实是一种协议,来进行更好的适配。我们不同的语言或者设备,只需要将最终的传输数据进行统一,就可以非常快捷方便的进行数据传输。
查看某一接口下的所有接口
ros2 interface package onepackage_msgs
一、自定义接口
为了能够让接口更加符合我们的需要,因此我们可以自定义接口。
ROS2提供的四种通信方式
- 话题 - Topics
- 服务 - Services
- 动作 - Action
- 参数 - Parameters
除了参数之外,其他都支持自定义接口,每一种方式适用的场景也各不相同,所定义的接口也分为话题接口、服务接口、动作接口三种
话题接口格式:xxx.msg
int64 num
服务接口格式:xxx.srv
int64 a
int64 b
int64 c
---
int64 sum
动作接口格式:xxx.action
int32 order

int32[] sequence
---
int32[] partial_sequence
接口转换过程——我们写了变量类型和名称之后,在程序中调用只需要调用头文件即可,具体过程如下
就是以上的接口,会通过ROS2的IDL接口转换成头文件直接调用使用
二、ROS2接口常用CLI命令
查看接口列表
ros2 interface list
查看所有接口包
ros2 interface packages
查看某一个包下的所有接口
ros2 interface packages std_msgs
查看某一个接口详细的内容
ros2 interface show std_msgs/msg/String
查看某一个接口的所有属性
ros2 interface proto sensor_msgs/msg/Image
三、自定义ROS2话题接口
如何自定义话题接口
在实际过程中,为了减包相互之间的依赖,通常将接口定义在一个独立的功能包中,所以一般会新建一个独立的功能包,并把我们需要的自定义接口放到这个独立的功能包里面,有了功能包我们就能自定义话题接口了。具体方法如下:
话题的接口是xxx.msg
- 新建msg文件夹,并在文件夹下新建
xxx.msg - 在
xxx.msg下编写消息内容并保存 - 在
CmakeList.txt添加依赖和msg文件目录 - 在
package.xml中添加xxx.msg所需的依赖 - 编译功能包即可生成python和C++头文件
3.1.新建工作空间
自定义功能包编译方式使用
ament_cmake方式
cd town_ws/src
ros2 pkg create village_interfaces --build-type ament_cmake
3.2.新建msg文件夹和Novel.msg文件
cd village_interfaces
mkdir msg
cd msg
touch Novel.msg # create a new blank file
3.3.编写Novel.msg内容
首先来确定一下ros2下的原始数据类型
- bool
- byte
- char
- float32, float64
- int8, uint8
- int16, uint16
- int32, uint32
- int64, uint64
- string
也就是说ROS2下的所有接口的最终数据类型都是按照上面的9种数据类型来定义的
于是我们想自定义一个数据类型,里面自定义了一个图片数据,数据结构图如下(这里我们添加的图片信息调用了sensor_msgs包下的Image数据)
# 编写内容
# original data
string content
# use other package's data
sensor_msgs/Image image
3.4.修改CMakeLists.txt
然后我们要给编译文件说明我们需要把Novel.msg修改为头文件
增加下列代码
# 添加所需要的依赖包
find_package(sensor_msgs REQUIRED)
find_package(rosidl_default_generators REQUIRED)

# 添加需要的话题
rosidl_generate_interfaces(${PROJECT_NAME}
  "msg/Novel.msg"
  DEPENDENCIES sensor_msgs
  )
3.5.修改package.xml文件
这里修改的原因是为了能够检查依赖
  <build_depend>sensor_msgs</build_depend>
  <build_depend>rosidl_default_generators</build_depend>
  <exec_depend>rosidl_default_runtime</exec_depend>
  <member_of_group>rosidl_interface_packages</member_of_group>
3.6.编译并验证
返回到最上层的工作空间下
colcon build --packages-select village_interfaces

source install/setup.bash
查看自定义接口类型
ros2 interface package village_interfaces
查看接口具体数据类型
ros2 interface show village_interfaces/msg/Novel
手撸ROS2服务
创建ROS2服务端基本步骤如下:
- 导入服务接口
- 创建服务端回调函数
- 声明并创建服务端
- 编写回调函数逻辑处理请求
创建ROS2客户端基本步骤如下:
- 导入服务接口
- 创建请求结果接收回调函数
- 声明并创建客户端
- 编写结果接收逻辑
- 调用客户端发送请求
服务的接口类型如前文写到的一样,如下图
int64 a
int64 b
---
int64 sum
三个斜杠前面的代表客户端请求的数据需要是类型,三个斜杠的后面代表的返回客户端的数据是什么样的类型
具体操作步骤
- 新建srv文件夹,并在文件夹下新建
xxx.srv - 在
xxx.srv下编写服务接口内容并保存 - 在
CMakeLists.txt添加依赖和srv文件目录 - 在
package.xml中添加xxx.srv所需的依赖 - 编译功能包即可生成python与C++头文件
一、创建“借钱”服务接口
还是在前一章节的village_interfaces下创建服务接口,服务的接口是xxx.srv
1.1确认数据结构
我们需要进行的逻辑就是,我们要去找李四借钱。借钱的人的信息有:
- 借钱者名字:string
- 金额:uint32
李四返回的数据会有:
- 是否出借:bool
- 出借金额:uint32,借钱失败为0
1.2创建srv文件夹及BorrowMoney.srv消息文件
创建文件
cd src/village_interfaces
mkdir srv && cd srv
touch BorrowMoney.srv  # build file
编辑BorrowMoney.srv
# request
string name
uint32 money
---
# response
bool succeed
uint32 money
1.3修改CMakeLists.txt
由于前面我们已经添加了依赖库,因此后续我们只需要增加我们需要的服务即可
rosidl_generate_interfaces(${PROJECT_NAME}
  "msg/Novel.msg"
  "srv/BorrowMoney.srv"
  DEPENDENCIES sensor_msgs
  )
package.xml也不需要修改,因为我们没有增加别的依赖了
1.4编译并验证
返回到最上层的工作空间下
colcon build --packages-select village_interfaces

source install/setup.bash
查看是否存在我们添加的服务
ros2 interface list | grep village
查看接口具体数据类型
ros2 interface show village_interfaces/srv/BorrowMoney.srv
二、创建“买书“服务接口
和上一章做法基本上一样,只是换了一个srv文件罢了,创建一个SellNovel.srv,接口数据类型按照下列文件
uint32 money
---
string[] novels
CmakeList里面也要加入在添加的话题数据类型里面加入"srv/SellNovel.srv"
三、使用python实现服务通信
3.1服务端编写
3.1.1导入服务接口
在village_li下的package.xml添加我们自定义的包的依赖
  <depend>rcply</depend>
  <depend>village_interfaces</depend> #在rcply的基础上添加village_interfaces的包
3.1.2编写python代码
li4.py代码如下
import rclpy
from rclpy.node import Node
from std_msgs.msg import String,UInt32
# import our own interfaces package
from village_interfaces.srv import BorrowMoney


class WriterNode(Node):

    def __init__(self,name):
        super().__init__(name)
        self.get_logger().info("hello, my name is %s." % name)
        self.pub_novel = self.create_publisher(String,"sexy_girl",10)

        self.count = 0
        self.timer_period = 5.0
        self.timer = self.create_timer(self.timer_period,self.timer_callback)

        self.account = 50
        self.sub_money = self.create_subscription(UInt32, "sexy_girl_money", self.recv_money_callback, 10)

        # declare and create service
        self.borrow_money_server = self.create_service(BorrowMoney,"borrow_money", self.borrow_money_callback)

    def recv_money_callback(self,money):
        self.account += money.data # The type of Uint32 is uint32 data, so when we send info to subscription
        # we also should use the same type to recv data.
        self.get_logger().info("get %d money, all moeny is %d " % (money.data,self.account))

    def borrow_money_callback(self, request, respose):
        self.get_logger().info("get money from %s's request, now the account have total money is %s" % (request.name, self.account))
        if request.money <= self.account*0.1:
            respose.succeed = True
            respose.money = self.account - request.money
            self.get_logger().info("Borrow your %s money, and now the account total money is %s" %(respose.money, self.account))
        else:
            respose.succeed = False
            respose.money = 0
            self.get_logger().info("sorry, my money is not enough")
        return respose

    def timer_callback(self):
        msg = String()
        msg.data = "the %d time publish information" % (self.count)
        self.pub_novel.publish(msg)
        self.get_logger().info("publish %s" % msg.data)
        self.count += 1

def main(args=None):
    # init client
    rclpy.init(args=args)
    # build a new node and name it "li4"
    li4_node = WriterNode("li4")
    # loop node with spin
    rclpy.spin(li4_node)
    # shutdown client
    rclpy.shutdown()
3.1.3编译并运行
colcon build
source install/setup.bash
ros2 run village_li li4_node
# 分一个终端出来
ros2 service call /borrwo_money village_interfaces/srv/BorrowMoney "{name: "zhang3", money: 5}"

# return info
requester: making request: village_interfaces.srv.BorrowMoney_Request(name='zhang3', money=5)

response:
village_interfaces.srv.BorrowMoney_Response(succeed=True, money=45)
3.2客户端编写
3.2.1创建新的节点并导入服务接口
li3.py和li4.py放在同一个目录下即可,因此不需要对依赖文件进行修改
但需要对setup.py进行修改
entry_points={


        'console_scripts': [
            "li4_node=village_li.li4:main",
            "li3_node=village_li.li3:main"
        ],
主函数代码如下:
from unittest import result
from urllib import request
import rclpy
from rclpy.node import Node
from std_msgs.msg import String
# 1.import our own interfaces
from village_interfaces.srv import BorrowMoney

class BaiPiaoNode(Node): # 继承Node类
    def __init__(self,name):
        super().__init__(name) # 自动查找父类,并进行初始化
        self.get_logger().info("hello, my name is %s." % name)
        self.sub_ = self.create_subscription(String, "sexy_girl", self.recv_callback, 10)
        #3.declare and create client
        self.borrow_cilent = self.create_client(BorrowMoney, "borrow_money")


    def recv_callback(self, novel):
        self.get_logger().info('li3: I have recieved: %s' % novel.data)

    # 2.create response callback function
    def borrow_response_callback(self,response):
        result = response.result() # pay attention, we should use response.result() that can get
        # the same param type in BorrowMoney.srv file
        # 4.code the callback logic
        if result.succeed:
            self.get_logger().info("I borrow %d money, I can eat something. yeh!" %result.money)
        else:
            self.get_logger().info("I get nothing, wu wu wu")

    def borrow_money2eat(self,money=10):
        #5.call client and sent request
        self.get_logger().info("I want to borrow %s Yuan to eat" % money)
        # Judge the whether the service is online
        while not self.borrow_cilent.wait_for_service(1.0):
            self.get_logger().warn("The service is not online, waiting...")

        # build the content of request
        request = BorrowMoney.Request()
        request.name = self.get_name()
        request.money = money
        # send request
        self.borrow_cilent.call_async(request).add_done_callback(self.borrow_response_callback)


def main(args=None):
    rclpy.init(args=args)
    li3_node = BaiPiaoNode("li3")
    li3_node.borrow_money2eat()
    rclpy.spin(li3_node)
    rclpy.shutdown()
3.2.2编译并运行
首先我们需要先启动li3和li4两个节点,当先启动li3节点的时候,我们会发现其会等待li4中的服务上线,刚上线的时候,由于li4的钱不够,会出现借钱失败的情况。这个时候我们先启动wang2节点,让li4的钱先变多,再重新启动li3节点,就可以发现借钱成功了。
四、使用C++实现服务通信
4.1.1导入服务接口
在village_wang下的package.xml添加我们自定义的包的依赖
<depend>village_interfaces</depend>
和python不一样的是,C++还需要在CMakeLists.txt里面添加包,修改为以下内容
cmake_minimum_required(VERSION 3.8)
project(village_wang)

if(CMAKE_COMPILER_IS_GNUCXX OR CMAKE_CXX_COMPILER_ID MATCHES "Clang")
  add_compile_options(-Wall -Wextra -Wpedantic)
endif()

# find dependencies
find_package(ament_cmake REQUIRED)
find_package(rclcpp REQUIRED)
find_package(village_interfaces REQUIRED)

if(BUILD_TESTING)
  find_package(ament_lint_auto REQUIRED)
  # the following line skips the linter which checks for copyrights
  # comment the line when a copyright and license is added to all source files
  set(ament_cmake_copyright_FOUND TRUE)
  # the following line skips cpplint (only works in a git repo)
  # comment the line when this package is in a git repo and when
  # a copyright and license is added to all source files
  set(ament_cmake_cpplint_FOUND TRUE)
  ament_lint_auto_find_test_dependencies()
endif()

add_executable(wang2_node src/wang2.cpp) #增加可执行工作包
ament_target_dependencies(
  wang2_node
  rclcpp
  std_msgs
  village_interfaces
  )
install(TARGETS # 编译相关文件
  wang2_node
  DESTINATION lib/${PROJECT_NAME}
  )
ament_package()
…
这部分卡住了 后续再看
ROS2常用工具
一、launch文件
由于
- 节点之间一般会存在相互依赖关系
- 一次启动多个节点会比较麻烦
launch文件就诞生了。它允许我们可以同时和配置多个包含ROS2节点的可执行文件,在ROS2中可以使用python来写launch文件
编写ROS2的launch文件
编写launch文件可以有三种方式,python、yaml、xml这三种方式,但是官方推荐的是使用python格式,因为python是一种编程语言,可以使用python的一些库来进行一些工作