为了快速浏览教程,先从ArbotiX虚拟器开始。具体代码看ros-by-example 1,主要讲述实现过程。
首先要启动一个虚拟的Turtlebot
$ roslaunch rbx1_bringup fake_turtlebot.launch另一个终端,打开RViz可视化机器人运动
$ rosrun rviz rviz -d `rospack find rbx1_nav`/sim.rviz一、控制底座
1、直接发布命令
先来看下现有的话题

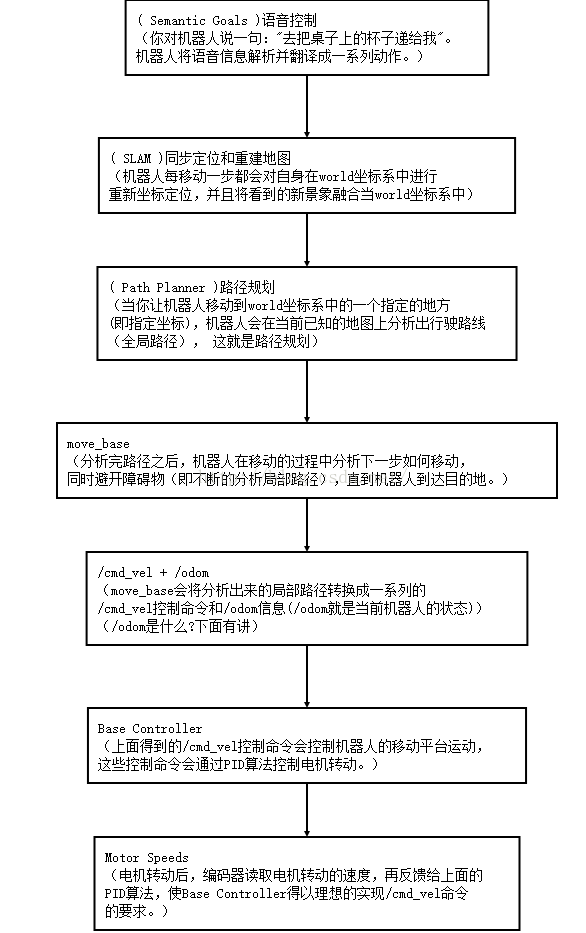
基控制器节点订阅/cmd_vel话题,类型是geometry_msgs/Twist

然后把Twist消息翻译成发动机信号,使轮子转动。二维平面差速驱动机器人只用到了线速度x和角速度z部分。
$ rostopic pub -r 10 /cmd_vel geometry_msgs/Twist '{linear: {x: 0.1, y:
0, z: 0}, angular: {x: 0, y: 0, z: -0.5}}'
想要机器人停下来,发布空消息即可
$ rostopic pub -1 /cmd_vel geometry_msgs/Twist '{}'2、从ROS节点发布Twist消息
任务:定时的Twist命令让机器人向前移动1.0m,旋转180度,然后返回原位置。
在启动虚拟Turtlebot和RViz基础上,直接运行写好的节点
$ rosrun rbx1_nav timed_out_and_back.py
3、使用测程法前进
$ rosrun rbx1_nav odom_out_and_back.py存储内部位置数据的消息类型是nav_msgs/Odometry
基框架为/odom,测量框架为/base_footprint即现实中的机器人。
tf库来监听框架/odom和框架/base_footprint之间的转换。
接下来导航、路径规划、SLAM,主要涉及三个包
- 让机器人移动到指定目标位置,运用了路径规划和障碍物躲避的move_base包
- 用深度相机、激光扫描仪绘制地图的gmapping包
- 在现有地图下定位的acml包
二、导航、路径规划、SLAM
move_base
定义该节点需要四个配置文件,越过障碍物的代价、机器人半径、路径规划时考虑未来多长的路、移动速度等。在rbx1包的config子目录可以找到:
base_local_planner_params.yaml
costmap_common_params.yaml
global_costmap_params.yaml
local_costmap_params.yaml
发布命令测试move_base
roslaunch rbx1_bringup fake_turtlebot.launch
roslaunch rbx1_nav fake_move_base_blank_map.launch
rosrun rviz rviz -d rospack find rbx1_nav/nav.rviz
rostopic pub /move_base_simple/goal geometry_msgs/PoseStamped ‘{ header: { frame_id: “map” }, pose: { position: { x: 1, y: 0, z: 0 }, orientation: { x: 0, y: 0, z: 0, w: 1 } } }’
空白地图的启动节点是fake_move_base_blank_map.launch
<launch>
 <!-- 启动空白地图。节点包、节点名称、执行文件:map_server,地图位置args -->
 <node name="map_server" pkg="map_server" type="map_server"
 args="$(findrbx1_nav)/maps/blank_map.yaml"/>

 <!-- 发布move_base节点,载入所有参数(引用fake_move_base.launch文件) -->
 <include file="$(find rbx1_nav)/launch/fake_move_base.launch" />

 <!-- 静态变换绑定 /odom and /map 框架。节点包:tf-->
 <node pkg="tf" type="static_transform_publisher" name="odom_map_broadcaster"
 args="0 0 0 0 0 0 /odom /map 100" />
</launch>
其中引用了 fake_move_base.launch文件
<launch>
 <!-- 节点包move_base -->
 <node pkg="move_base" type="move_base" respawn="false" name="move_base"
 output="screen">

 <!-- 启动调用rosparam file五次,载入之前提到的参数,并启动节点。区分全局和局部地图-->
 <rosparam file="$(find rbx1_nav)/config/fake/costmap_common_params.yaml"
 command="load" ns="global_costmap" />
 <rosparam file="$(find rbx1_nav)/config/fake/costmap_common_params.yaml"
 command="load" ns="local_costmap" />
 <rosparam file="$(find rbx1_nav)/config/fake/local_costmap_params.yaml"
 command="load" />
 <rosparam file="$(find rbx1_nav)/config/fake/global_costmap_params.yaml"
 command="load" />
 <rosparam file="$(find rbx1_nav)/config/fake/base_local_planner_params.yaml"
 command="load" />
 </node>
</launch>
move_base走正方形
roslaunch rbx1_bringup fake_turtlebot.launch
roslaunch rbx1_nav fake_move_base_blank_map.launch
rosrun rviz rviz -d rospack find rbx1_nav/nav.rviz
rosrun rbx1_nav move_base_square.py
move_base避开障碍物
roslaunch rbx1_bringup fake_turtlebot.launch
rosparam delete /move_base
roslaunch rbx1_nav fake_move_base_map_with_obstacles.launch
rosrun rviz rviz -d rospack find rbx1_nav/nav_obstacles.rviz
rosrun rbx1_nav move_base_square.py
gmapping和acml导航、定位
roslaunch rbx1_bringup fake_turtlebot.launch
roslaunch rbx1_nav fake_amcl.launch map:=test_map.yaml
rosrun rviz rviz -d rospack find rbx1_nav/amcl.rviz