版权声明:本文为博主原创文章,未经博主允许不得转载 https://blog.csdn.net/qit1314/article/details/83859436
基本概念已经掌握,下面直接运行代码,跑跑demo,看看效果
1 下载依赖包,100多MB,你咋这么大!
sudo apt-get install ros-indigo-turtlebot-bringup \
ros-indigo-turtlebot-create-desktop ros-indigo-openni-* \
ros-indigo-openni2-* ros-indigo-freenect-* ros-indigo-usb-cam \
ros-indigo-laser-* ros-indigo-hokuyo-node \
ros-indigo-audio-common gstreamer0.10-pocketsphinx \
ros-indigo-pocketsphinx ros-indigo-slam-gmapping \
ros-indigo-joystick-drivers python-rosinstall \
ros-indigo-orocos-kdl ros-indigo-python-orocos-kdl \
python-setuptools ros-indigo-dynamixel-motor-* \
libopencv-dev python-opencv ros-indigo-vision-opencv \
ros-indigo-depthimage-to-laserscan ros-indigo-arbotix-* \
ros-indigo-turtlebot-teleop ros-indigo-move-base \
ros-indigo-map-server ros-indigo-fake-localization \
ros-indigo-amcl git subversion mercurial
2 克隆代码
cd ~/catkin_ws/src
git clone https://github.com/pirobot/rbx1.git
cd rbx1
git checkout indigo-devel
cd ~/catkin_ws
catkin_make
source ~/catkin_ws/devel/setup.bash
rospack profile
3 安装模拟器ARBITIX
sudo apt-get install ros-indigo-arbotix-*
4 测试模拟器
roslaunch rbx1_bringup fake_turtlebot.launch
rosrun rviz rviz -d `rospack find rbx1_nav`/sim.rviz
这里要注意,包围rospack find 的符号为`(1旁边的那个符号,叫做反引号,不是单引号’)
launch文件的内容为:
<launch>
  <param name="/use_sim_time" value="false" />

  <!-- Load the URDF/Xacro model of our robot -->
  <arg name="urdf_file" default="$(find xacro)/xacro.py '$(find rbx1_description)/urdf/turtlebot.urdf.xacro'" />

  <param name="robot_description" command="$(arg urdf_file)" />

  <node name="arbotix" pkg="arbotix_python" type="arbotix_driver" output="screen" clear_params="true">
      <rosparam file="$(find rbx1_bringup)/config/fake_turtlebot_arbotix.yaml" command="load" />
      <param name="sim" value="true"/>
  </node>

  <node name="robot_state_publisher" pkg="robot_state_publisher" type="state_publisher">
      <param name="publish_frequency" type="double" value="20.0" />
  </node>

</launch>
5 测试
rostopic pub -r 10 /cmd_vel geometry_msgs/Twist '{linear: {x: 0.2, y:
0, z: 0}, angular: {x: 0, y: 0, z: 0.5}}'
停止:
rostopic pub -1 /cmd_vel geometry_msgs/Twist '{}'
注意,这里的x:【空格】0.2,如果没有空格会报错
导航架构,这个图大致说明了一下导航架构
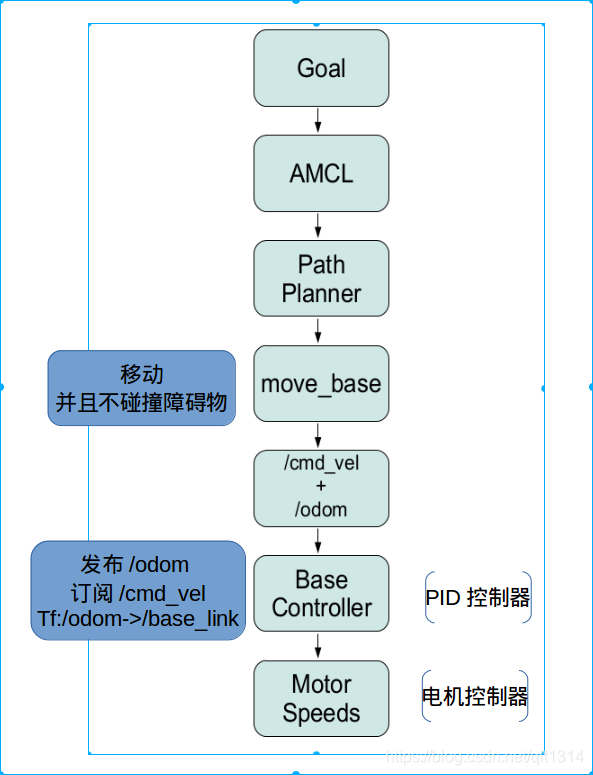
6 move_base
move_base实现了一个ros action,用于到达目标点。move_base需要配置四个文件。
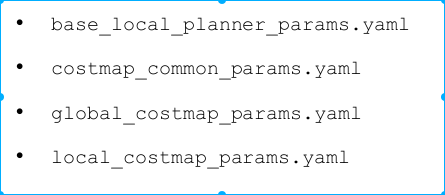
base_local_planner_params.yaml
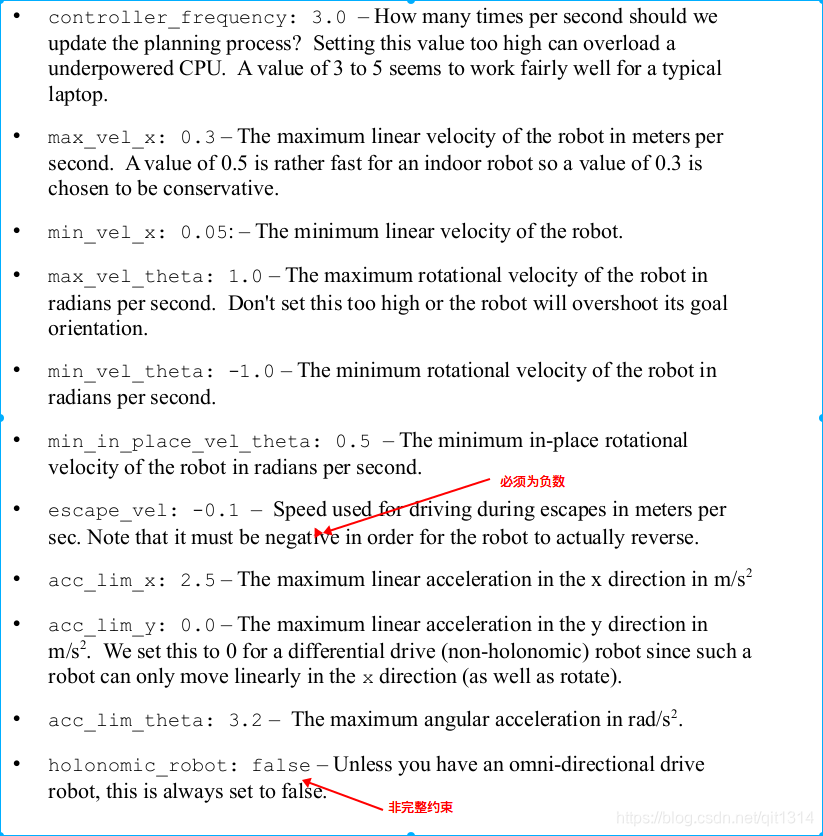
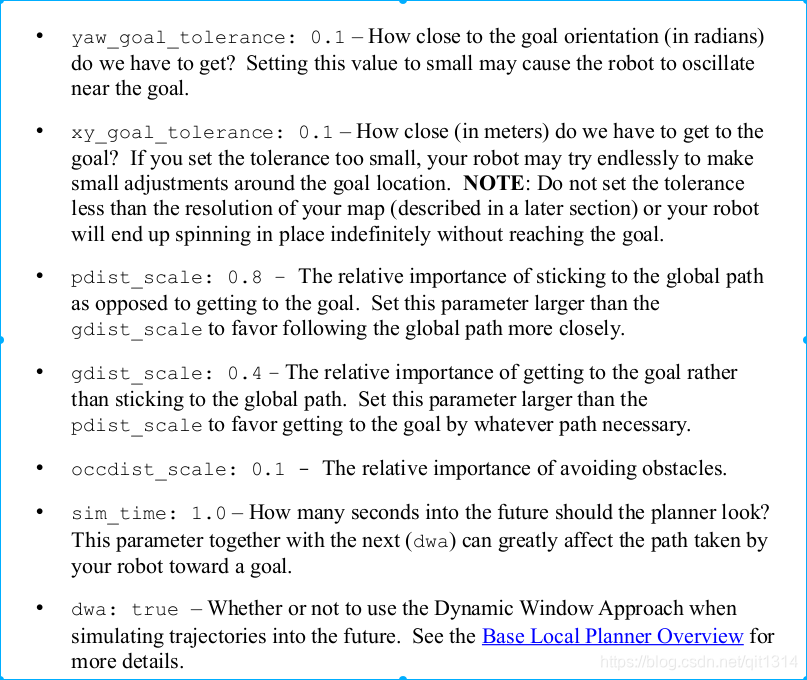
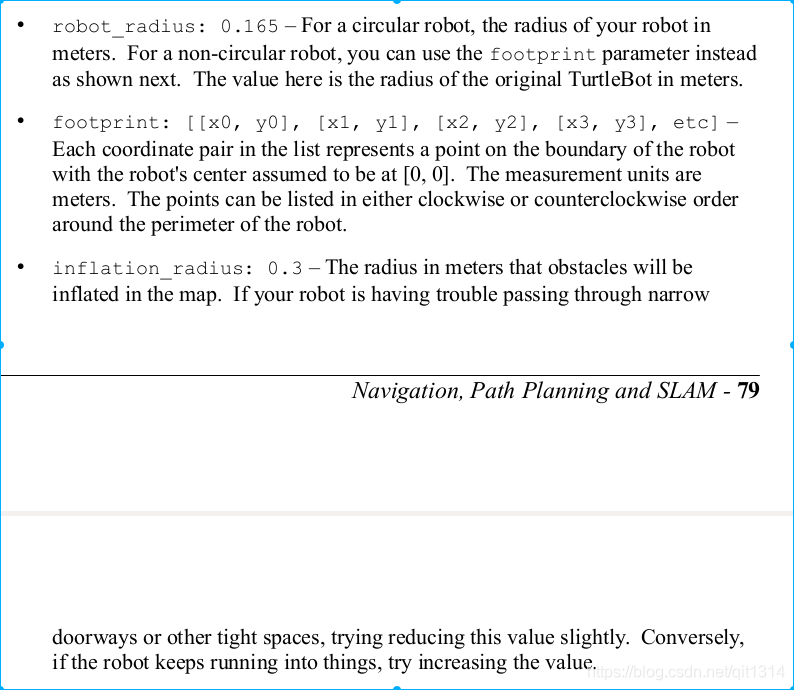
这些参数没啥好说的
costmap_common_params.yaml
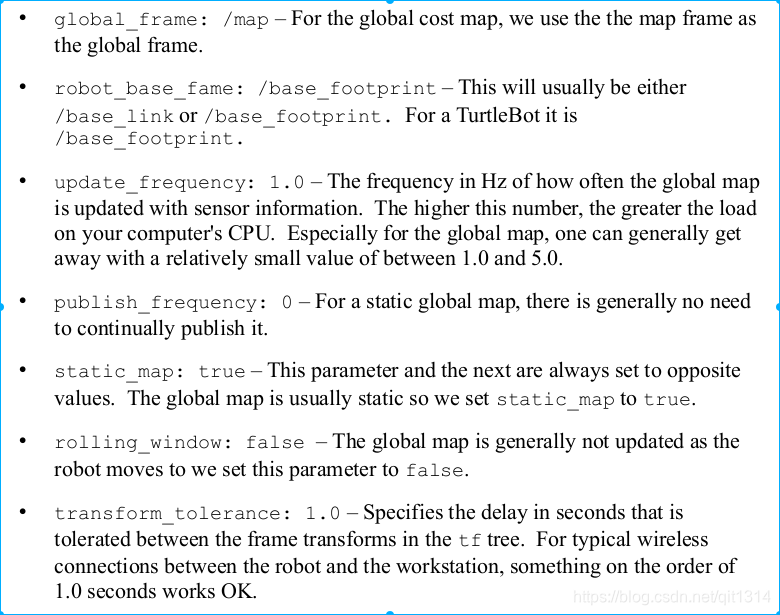
global_costmap_params.yaml
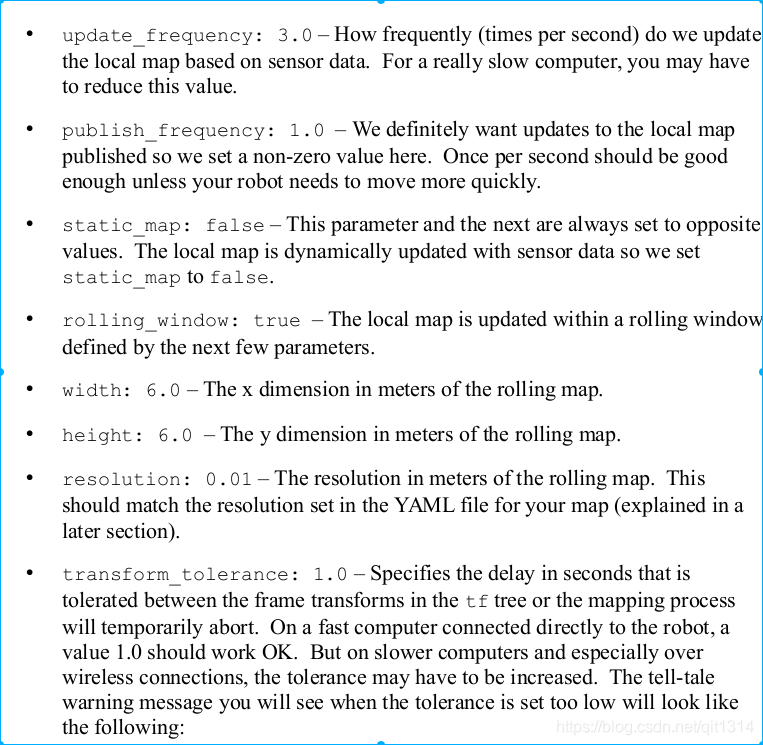
local_costmap_params.yaml

7 测试move_base
launch文件
<launch>
<!-- Run the map server with a blank map -->
<node name="map_server" pkg="map_server" type="map_server" args="$(find
rbx1_nav)/maps/blank_map.yaml"/>
<!-- Launch move_base and load all navigation parameters -->
<include file="$(find rbx1_nav)/launch/fake_move_base.launch" />
<!-- Run a static transform between /odom and /map -->
<node pkg="tf" type="static_transform_publisher" name="odom_map_broadcaster"
args="0 0 0 0 0 0 /odom /map 100" />
</launch>
<launch>
<node pkg="move_base" type="move_base" respawn="false" name="move_base"
output="screen">
<rosparam file="$(find rbx1_nav)/config/fake/costmap_common_params.yaml"
command="load" ns="global_costmap" />
<rosparam file="$(find rbx1_nav)/config/fake/costmap_common_params.yaml"
command="load" ns="local_costmap" />
<rosparam file="$(find rbx1_nav)/config/fake/local_costmap_params.yaml"
command="load" />
<rosparam file="$(find rbx1_nav)/config/fake/global_costmap_params.yaml"
command="load" />
<rosparam file="$(find rbx1_nav)/config/fake/base_local_planner_params.yaml"
command="load" />
</node>
</launch>
指令
roslaunch rbx1_bringup fake_turtlebot.launch
roslaunch rbx1_nav fake_move_base_blank_map.launch
rosrun rviz rviz -d `rospack find rbx1_nav`/nav.rviz
rostopic pub /move_base_simple/goal geometry_msgs/PoseStamped \
'{ header: { frame_id: "map" }, pose: { position: { x: 1.0, y: 0, z:
0 }, orientation: { x: 0, y: 0, z: 0, w: 1 } } }'
这里需要注意的是,机器人的轨迹走的是圆弧,并且距离原来的直线较远,这是因为,地图中没有障碍物,所以机器人选择了一条平滑的轨迹
可以重写配置其他参数,来看看效果
rosrun rqt_reconfigure rqt_reconfigure
剩下的只记录一些关键的东西
gmapping建图完事,保存地图
rosrun map_server map_saver -f my_map
记录下来的文件包括:
my_map.pgm 和my_map.yaml
可以用eog viewer (“eye of Gnome”) 查看图像
eog my_map.pgm