创建项目
1. 在命令行创建基于vite+vue的项目
![]()
yarn create v1.22.19
[1/4] Resolving packages...
[2/4] Fetching packages...
[3/4] Linking dependencies...
[4/4] Building fresh packages...
success Installed "[email protected]" with binaries:
- create-vite
- cva
[##] 2/2? Select a framework: » - Use arrow-keys. Return to submit
√ Select a framework: » Vue
√ Select a variant: » JavaScript

Done. Now run:
cd vue-vite-template
yarn
yarn dev
Done in 145.86s.
2. 安装依赖
> yarn3. 启动项目
yarn dev项目初始目录结构
项目初始结构
├─public 静态资源目录
├─src 源代码目录
│ ├─assets 静态资源目录
│ ├─components 组件目录
│ └─main.js 入口文件
├─node_modules
├─index.html 挂载文件
├─package.json 主要用来定义项目中需要依赖的包
├─vite.config.js 项目主配置文件
└─yarn.lock 项目每个依赖项的确切版本的信息以及代码的校验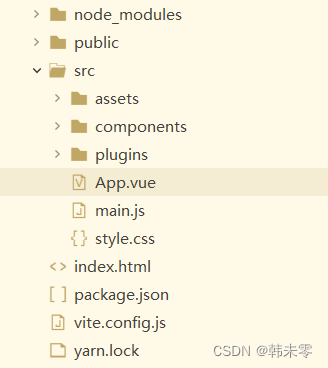
vue是什么文件?
vue项目的单文件组件
项目加载过程
在vue+vite管理的项目中,并不是由独立的 html 文件组成,而是 vue 文件,这些vue文件将由vite进行编译打包成浏览器能识别的格式(html/css/js/jpg....)。
package.json
{
"name": "vue-vite-template",
"private": true,
"version": "0.0.0",
"type": "module",
"scripts": {
"dev": "vite",
"build": "vite build",
"preview": "vite preview"
},
"dependencies": {
"@nutui/nutui": "^4.1.6",
"consola": "^3.2.3",
"vant": "^4.7.0",
"vite-plugin-style-import": "^2.0.0",
"vue": "^3.3.4"
},
"devDependencies": {
"@vitejs/plugin-vue": "^4.2.3",
"unplugin-vue-components": "^0.25.2",
"vite": "^4.4.5"
}
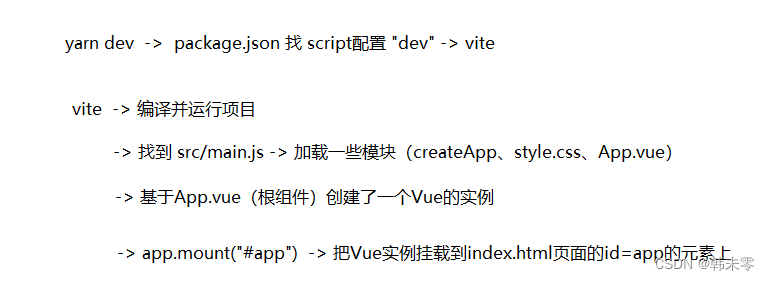
}当使用yarn dev 运行项目时,它会读取package.json文件中的 scripts 定义的命令去调用对应的指令
  "scripts": {
    "dev": "vite",
    "build": "vite build",
    "preview": "vite preview"
  }
然后会读取入口文件: src/main.js
- 导入vue及自定义组件
- 实例化一个Vue,并挂载app到 index.html 文件的id=app的元素上
// import -> 从vue中导入createApp的函数
import { createApp } from 'vue'

// 导入了一个css文件
//如果在main.js中导入,全局生效
import './assets/sytle.css'

// 导入一个App.vue文件
import App from './App.vue'

//基于App.vue(根组件)创建一个vue实例
const app = createApp(App)

//把vue实例挂载到index.html --> #app
app.mount('#app')
默认根组件文件: src/App.vue
功能说明:
- 加载HelloWorld.vue
- 将HelloWorld组件加载到template中id为app元素
组件的组织
通常一个应用会以一棵嵌套的组件树的形式来组织:
 例如,你可能会有页头、侧边栏、内容区等组件,每个组件又包含了其它的像导航链接、博文之类的组件。
项目初始化
在src下创建基础文件夹
- views 文件夹存放界面
- components 文件夹存放界面中局部组件
- config 文件夹存放各种全局配置
- router 文件夹存放路由
- api文件夹存放自定义的api请求函数
- store 文件夹存放vuex相关文件
- plugins 文件夹存放各种插件
- utils 文件夹存放全局工具集(自定义封装的一些函数)
修改根组件内容
src/App.vue
<script setup>
// import HelloWorld from './components/HelloWorld.vue'
</script>
<template>
<h1>这是根组件</h1>
</template>
<style scoped>
</style>
修改index.html
- App.vue是挂载到index.html文件上
- 在index.html中配置有整站的基本信息,因此可以通过配置index.html的内容来对自己的项目做定制
修改页面标题(title)
<!DOCTYPE html>
<html lang="en">
	<head>
		<meta charset="UTF-8" />
		<link rel="icon" type="image/svg+xml" href="/vite.svg" />
		<meta name="viewport" content="width=device-width, initial-scale=1.0" />
		<title>My Demo</title>
	</head>
	<body>
		<div id="app"></div>
		<script type="module" src="/src/main.js"></script>
	</body>
</html>
集成UI组件库Vant
安装模块
// 安装vant
yarn add vant

// 按需加载模块
yarn add unplugin-vue-components -D
配置按需加载: vite.config.js
import {
	defineConfig
} from 'vite'
import vue from '@vitejs/plugin-vue'
import Components from 'unplugin-vue-components/vite'
import {
	VantResolver
} from 'unplugin-vue-components/resolvers'
export default defineConfig({
	plugins: [
		vue(),
		Components({
			resolvers: [VantResolver()],
		}),
	],
});
使用组件
完成以上两步,就可以直接在模板中使用 Vant 组件了, unplugin-vue-components 会解析模板并自动注册对应的组件。
创建组件: src/App.vue ,在template标签中添加
<van-button type="primary">按钮</van-button>引入函数组件的样式
Vant 中有个别组件是以函数的形式提供的,包括 Toast , Dialog , Notify 和 ImagePreview 组件。
在使用函数组件时, unplugin-vue-components 无法自动引入对应的样式,因此需要手动引入样式。
你可以在项目的入口文件或公共模块中引入以上组件的样式,这样在业务代码中使用组件时,便不再需要重复引入样式了。
在需要的位置导入并使用即可
// Toast
import { showToast } from 'vant';
import 'vant/es/toast/style';
// Dialog
import { Dialog } from 'vant';
import 'vant/es/dialog/style';
// Notify
import { Notify } from 'vant';
import 'vant/es/notify/style';
// ImagePreview
import { ImagePreview } from 'vant';
import 'vant/es/image-preview/style';
集成UI组件库NutUI
安装nutui
yarn add @nutui/nutui安装插件Nutui样式按需加载插件
yarn add consola
yarn add vite-plugin-style-import
配置Nutui样式按需加载
import {
	defineConfig
} from 'vite'
import vue from '@vitejs/plugin-vue';
import Components from 'unplugin-vue-components/vite';
import {
	VantResolver
} from 'unplugin-vue-components/resolvers';
// add here
import {
	createStyleImportPlugin
} from 'vite-plugin-style-import'
export default defineConfig({
	plugins: [
		vue(),
		Components({
			resolvers: [VantResolver()],
		}),
		// add here
		createStyleImportPlugin({
			resolves: [{
				libraryName: '@nutui/nutui',
				libraryNameChangeCase: 'pascalCase',
				resolveStyle: (name) => {
					return `@nutui/nutui/dist/packages/${name.toLowerCase()}/index.scss`
				},
			}]
		}),
	],
	// add here
	css: {
		preprocessorOptions: {
			scss: {
				// 配置 nutui 全局 scss 变量
				additionalData: `@import "@nutui/nutui/dist/styles/variables.scss";`
			}
		}
	}
});
使用组件
完成以上两步,就可以使用 NutUI组件了,NutUI不会像Vant一样自动导入,nutUI的按需自动加载只有样式文件,所以需要我们手动导入。
使用组件定义要加载的组件: src/plugins/nutUI.js
- 以后需要新增加组件只需要在该文件中添加即可
// nutui按需加载
import {
    Button,
} from '@nutui/nutui';

export const nutUiComponents = [
    Button
];
在入口文件中导入: src/main.js
- 在app.mount前加载内容
// modify here
import { nutUiComponents } from './plugins/nutUI';
const app = createApp(App)

// nutUi按需加载
nutUiComponents.forEach((item) => {
    app.use(item);
});

app.mount('#app')
在组件中测试: src/App.vue , 在template标签中添加
<nut-button type="primary">主要按钮</nut-button>配置别名
增加alias配置
vite 配置: vite.config.js 文件增加 resolve.alias 配置
import {
	resolve
} from 'path'
export default defineConfig({
	...
	resolve: {
		alias: [{
				find: '@',
				replacement: resolve(__dirname, 'src')
			},
			{
				find: '_c',
				replacement: resolve(__dirname, 'src/components')
			},
			{
				find: '_v',
				replacement: resolve(__dirname, 'src/views')
			},
		]
	}
});
如果“path”有错误提示, 是因为 TS 找不到类型定义,按照提示安装 “@types/node”后即可运行命令。
别名引用
利用别外导入样式文件: src/main.js
import '@/assets/css/style.css'利用别用导入组件: src/App.vue
<script setup>
    import First from '_c/First.vue'
</script>
配置全局样式
将系统自带的 src/style.css 文件删除
在 assets/css 文件夹下新建style.css(空文件)
在main.js中删除老的css,引入新的css: src/main.js
// here
import '@/assets/css/style.css'
配置项目打包预览
配置文件: vite.config.js
// 打包配置,配置输出的html文件,不需要修改的话,可以省略
build: {
		rollupOptions: {
			input: './index.html'
		}
	},
	//预览设置 build之后yarn preview;vite会创建一个服务器来运行打包之后的文件
	preview: {
		port: 4000, //端口号
		host: 'localhost',
		open: true, //是否自动打开浏览器
	},
运行预览效果:
> yarn preview静态文件的引用
页面中引用资源: src/components/First.vue
<img src="@/assets/vue.svg"/>
<img src="/vite.svg"/>