【视频分割】【深度学习】MiVOS官方Pytorch代码-S2M模块DeepLavV3Plus网络解析
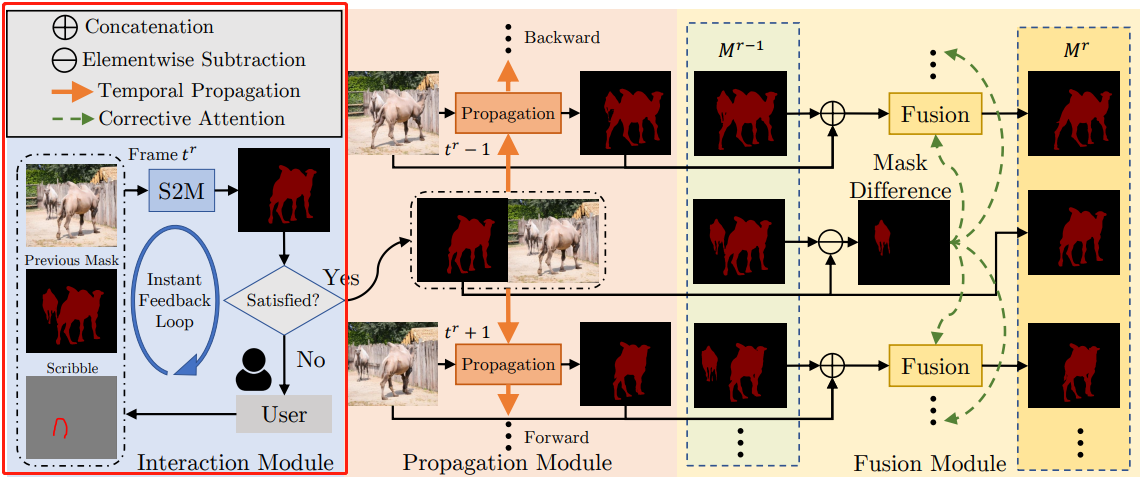
MiVOS模型将交互到掩码和掩码传播分离,从而实现更高的泛化性和更好的性能。单独训练的交互模块将用户交互转换为对象掩码,本博客将讲解S2M(用户交互产生分割图)模块中的深度学习网络代码,S2M使用语义分割网络"DeepLavV3Plus"作为backbone。
文章目录
前言
在详细解析MiVOS代码之前,首要任务是成功运行MiVOS代码【win10下参考教程】,后续学习才有意义。
本博客讲解S2M(DeepLavV3Plus)模块的深度网络代码,不再复述其他功能模块代码。
DeepLavV3Plus网络结构简述
在DeepLabV3基础上引入了Decoder,DeepLavV3Plus网络结构如下图所示,主要是空间金字塔池化的模块、编解码器(Encoder-Decoder)结构。
- 1.空洞金字塔池化模块,利用不同速率、不同有效视场的卷积或者池化操作来探测输入特征;
- 2.编码器模块,逐步减少特征映射并捕获更高的语义信息;
- 3.解码器模块,逐步恢复空间信息.

Encoder
在Encoder部分,主要包括了backbone(DCNN)、ASPP两大部分

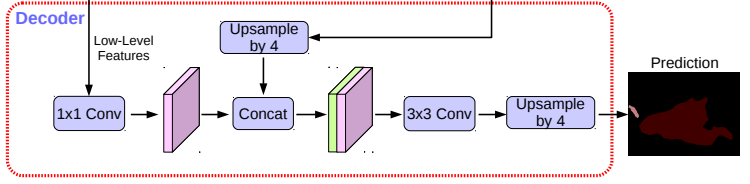
Decoder
接收来自backbone中间层的低级feature maps和来自ASPP模块的输出作为输入得到与原图分辨率大小一样的预测图。
s2m_network.py文件
model/s2m/目录下: 该文件博主猜测是为了方便管理语义分割网络,开发者可以添加自定义语义分割网络。
deeplabv3plus_resnet50
源码S2M使用deeplabv3plus作为语义分割网络,deeplabv3plus的backbone是resnet50,num_classes为1说明网络只预测一个目标,因为用户交互式过程中一次只能针对一个目标。
def deeplabv3plus_resnet50(num_classes=1, output_stride=16, pretrained_backbone=False):
    """Constructs a DeepLabV3 model with a ResNet-50 backbone.

    Args:
        num_classes (int): number of classes.
        output_stride (int): output stride for deeplab.
        pretrained_backbone (bool): If True, use the pretrained backbone.
    """
    return _load_model('deeplabv3plus', 'resnet50', num_classes, output_stride=output_stride, pretrained_backbone=pretrained_backbone)
deeplabv3_resnet50
源码提供了deeplabv3作为备选语义分割网络,deeplabv3的backbone也是resnet50。
def deeplabv3_resnet50(num_classes=1, output_stride=16, pretrained_backbone=False):
    """Constructs a DeepLabV3 model with a ResNet-50 backbone.

    Args:
        num_classes (int): number of classes.
        output_stride (int): output stride for deeplab.
        pretrained_backbone (bool): If True, use the pretrained backbone.
    """
    return _load_model('deeplabv3', 'resnet50', num_classes, output_stride=output_stride, pretrained_backbone=pretrained_backbone)
_load_model
如前面所述,定义这个方法就是为了方便管理和自定义语义分割网络,源码只有俩个。
def _load_model(arch_type, backbone, num_classes, output_stride, pretrained_backbone):
    if backbone.startswith('resnet'):
        model = _segm_resnet(arch_type, backbone, num_classes, output_stride=output_stride, pretrained_backbone=pretrained_backbone)
    else:
        raise NotImplementedError
    return model
_segm_resnet
DeepLavV3Plus网络搭建。s2m_resnet搭建backbone,DeepLabHeadV3Plus搭建ASPP和解码网络,IntermediateLayerGetter是为了backbone能够获得指定层的特征图,DeepLabV3组合backbone和classifier,并进行最后的线性插值上采样,得到与原图分辨率大小一样的预测图。
def _segm_resnet(name, backbone_name, num_classes, output_stride, pretrained_backbone):
    if output_stride == 8:
        replace_stride_with_dilation = [False, True, True]      # resnet中用空洞卷积代替下采样的layer
        aspp_dilate = [12, 24, 36]                              # ASPP中空洞卷积的步距
    else:
        replace_stride_with_dilation = [False, False, True]
        aspp_dilate = [6, 12, 18]
    # 选择适合的resnet结构作为backbone
    backbone = s2m_resnet.__dict__[backbone_name](
        pretrained=pretrained_backbone,
        replace_stride_with_dilation=replace_stride_with_dilation)
    inplanes = 2048
    low_level_planes = 256
    # 选择语义分割网络
    if name == 'deeplabv3plus':
        return_layers = {

    'layer4': 'out', 'layer1': 'low_level'}
        classifier = DeepLabHeadV3Plus(inplanes, low_level_planes, num_classes, aspp_dilate)
    elif name == 'deeplabv3':
        return_layers = {

    'layer4': 'out'}
        classifier = DeepLabHead(inplanes, num_classes, aspp_dilate)
    # 为了使得backbone能够获得指定层的特征图
    backbone = IntermediateLayerGetter(backbone, return_layers=return_layers)
    # 组合backbone和classifier后,并进行最后的线性插值上采样,得到与原图分辨率大小一样的预测图
    model = DeepLabV3(backbone, classifier)
    return model
s2m_resnet.py
model/s2m/目录下: resnet网络是基础,这里不做过多介绍,简单过一下。
源码中backbone只提供resnet50一种选择,大家可以自定义其他网络尝试。
resnet50【Encoder–backbone】

def resnet50(pretrained=False, progress=True, **kwargs):
    r"""ResNet-50 model from
    `"Deep Residual Learning for Image Recognition" <https://arxiv.org/pdf/1512.03385.pdf>`_

    Args:
        pretrained (bool): If True, returns a model pre-trained on ImageNet
        progress (bool): If True, displays a progress bar of the download to stderr
    """
    return _resnet('resnet50', Bottleneck, [3, 4, 6, 3], pretrained, progress,
                   **kwargs)
初始化resnet50网络,可选择下载其预训练权重并加载。除非是为了训练deeplabv3_resnet50,否则没用,因为deeplabv3_resnet50加载作者提供的训练权重时,这部分是会被覆盖的。
def _resnet(arch, block, layers, pretrained, progress, **kwargs):
    model = ResNet(block, layers, **kwargs)
    if pretrained:
        state_dict = load_state_dict_from_url(model_urls[arch],
                                              progress=progress)
        model.load_state_dict(state_dict)
    return model
特殊说明
在源码中,resnet网络有细微的不同。
1.resnet网络第一个卷积层的输入通道不是常规的3,而是6,即RGB三通道+上一次mask+positive/negative涂鸦图。
self.conv1 = nn.Conv2d(6, self.inplanes, kernel_size=7, stride=2, padding=3, bias=False)
2.使用了空洞卷积代替下采样,在保持特征图大小不变的情况下增大了感受野,空洞卷积的原理和作用不再这里展开讲解了。
if dilate:
    self.dilation *= stride
    stride = 1
以output_stride==16为例
replace_stride_with_dilation = [False, True, True]
注释是resnet50各层输入特征图的尺寸与原图的比例。

_deeplab.py
model/s2m/目录下: 源码中提供DeepLabHeadV3Plus和DeepLabHead俩种选择,DeepLabHead网络是DeepLavV3语义分割网络采用的方式,代码很简单且源码也没有采用就跳过讲解了。
ASPP类【Encoder–ASPP】
使用了一个普通卷积块、三种不同膨胀率的空洞卷积块和一个全局平均池化块得到五组特征图并concat拼接,最后由1×1卷积块完成处理。

class ASPP(nn.Module):
    def __init__(self, in_channels, atrous_rates):
        super(ASPP, self).__init__()
        out_channels = 256
        modules = []
        modules.append(nn.Sequential(
            nn.Conv2d(in_channels, out_channels, 1, bias=False),
            nn.BatchNorm2d(out_channels),
            nn.ReLU(inplace=True)))
        # 不同空洞卷积的步距
        rate1, rate2, rate3 = tuple(atrous_rates)
        # 初始化不同膨胀率的空洞卷积块
        modules.append(ASPPConv(in_channels, out_channels, rate1))
        modules.append(ASPPConv(in_channels, out_channels, rate2))
        modules.append(ASPPConv(in_channels, out_channels, rate3))
        # 初始化全局平均池化块
        modules.append(ASPPPooling(in_channels, out_channels))
        self.convs = nn.ModuleList(modules)

        self.project = nn.Sequential(
            nn.Conv2d(5 * out_channels, out_channels, 1, bias=False),
            nn.BatchNorm2d(out_channels),
            nn.ReLU(inplace=True),
            nn.Dropout(0.1),)
    def forward(self, x):
        res = []
        for conv in self.convs:
            res.append(conv(x))
        # 拼接正常卷积、不同空洞卷积和全局平均池化(1+3+1)卷积后的特征图
        res = torch.cat(res, dim=1)
        return self.project(res)
不同膨胀率的空洞卷积块
class ASPPConv(nn.Sequential):
    def __init__(self, in_channels, out_channels, dilation):
        modules = [
            nn.Conv2d(in_channels, out_channels, 3, padding=dilation, dilation=dilation, bias=False),
            nn.BatchNorm2d(out_channels),
            nn.ReLU(inplace=True)
        ]
        super(ASPPConv, self).__init__(*modules)
全局平均池化块
class ASPPPooling(nn.Sequential):
    def __init__(self, in_channels, out_channels):
        super(ASPPPooling, self).__init__(
            nn.AdaptiveAvgPool2d(1),
            nn.Conv2d(in_channels, out_channels, 1, bias=False),
            nn.BatchNorm2d(out_channels),
            nn.ReLU(inplace=True))
    def forward(self, x):
        size = x.shape[-2:]
        # 全局平均池化 1×1
        x = super(ASPPPooling, self).forward(x)
        # 上采样为原尺寸size
        return F.interpolate(x, size=size, mode='bilinear', align_corners=False)
DeepLabHeadV3Plus类【Decoder】
对来自ASPP的特征图做插值4倍上采样,并和resnet-layer1层的低级特征图进行concat拼接,再使用3*3卷积块进行处理。

class DeepLabHeadV3Plus(nn.Module):
    def __init__(self, in_channels, low_level_channels, num_classes, aspp_dilate=[12, 24, 36]):
        '''
        Args:
            in_channels: backbone输出特征的channels
            low_level_channels: backbone中间低级特征的channels
            aspp_dilate: ASPP中空洞卷积的步距
        '''
        super(DeepLabHeadV3Plus, self).__init__()
        # 处理backbone中间低级特征
        self.project = nn.Sequential(
            nn.Conv2d(low_level_channels, 48, 1, bias=False),
            nn.BatchNorm2d(48),
            nn.ReLU(inplace=True),
        )
        # 空洞金字塔池化处理backbone最终输出特征
        self.aspp = ASPP(in_channels, aspp_dilate)
        # 预测mask
        self.classifier = nn.Sequential(
            nn.Conv2d(304, 256, 3, padding=1, bias=False),
            nn.BatchNorm2d(256),
            nn.ReLU(inplace=True),
            nn.Conv2d(256, num_classes, 1)
        )
        self._init_weight()

    def forward(self, feature):
        low_level_feature = self.project(feature['low_level'] )
        output_feature = self.aspp(feature['out'])
        # 上采样
        output_feature = F.interpolate(output_feature, size=low_level_feature.shape[2:], mode='bilinear', align_corners=False)
        # 拼接预测mask
        return self.classifier( torch.cat( [ low_level_feature, output_feature], dim=1))

    # 网络初始化相关
    def _init_weight(self):
        for m in self.modules():
            if isinstance(m, nn.Conv2d):
                nn.init.kaiming_normal_(m.weight)
            elif isinstance(m, (nn.BatchNorm2d, nn.GroupNorm)):
                nn.init.constant_(m.weight, 1)
                nn.init.constant_(m.bias, 0)
utils.py
model/s2m/目录下: 博主不太理解为什么“画蛇添足”给该文件内代码单独新建放到一个文件里,完全可以放到相关的其他文件内。
比如DeepLabV3在_deeplab.py建立个“空壳子”继承utils.py中的_SimpleSegmentationModel。
class DeepLabV3(_SimpleSegmentationModel):
    pass
_SimpleSegmentationModel
再次进行线性插值上采样,得到与原图分辨率大小一样的预测图。

class _SimpleSegmentationModel(nn.Module):
    def __init__(self, backbone, classifier):
        super(_SimpleSegmentationModel, self).__init__()
        self.backbone = backbone
        self.classifier = classifier
    def forward(self, x):
        input_shape = x.shape[-2:]
        features = self.backbone(x)
        x = self.classifier(features)
        x = F.interpolate(x, size=input_shape, mode='bilinear', align_corners=False)
        return x
IntermediateLayerGetter类
为了使得backbone能够获得指定层的特征图,如源码提取了resnet的layer1层和layer4层的特征图。
return_layers = {

    'layer4': 'out', 'layer1': 'low_level'}
class IntermediateLayerGetter(nn.ModuleDict):
    def __init__(self, model, return_layers):
        # 判断网络中是否包含指定层
        if not set(return_layers).issubset([name for name, _ in model.named_children()]):
            raise ValueError("return_layers are not present in model")
        orig_return_layers = return_layers
        return_layers = {

    k: v for k, v in return_layers.items()}
        layers = OrderedDict()
        # 选中指定层
        for name, module in model.named_children():
            layers[name] = module
            if name in return_layers:
                del return_layers[name]
            if not return_layers:
                break
        super(IntermediateLayerGetter, self).__init__(layers)
        self.return_layers = orig_return_layers

    def forward(self, x):
        out = OrderedDict()
        # 获得指定层的特征图
        for name, module in self.named_children():
            x = module(x)
            if name in self.return_layers:
                out_name = self.return_layers[name]
                out[out_name] = x
        return out
总结
尽可能简单、详细的介绍MiVOS中S2M网络(deeplabv3plus_resnet50)的代码。后续会讲解MiVOS的其它模块的代码。