Three 之 three.js (webgl) 中实现简单热力图的方法简单整理
目录
Three 之 three.js (webgl) 中实现简单热力图的方法简单整理
方法 context.createRadialGradient 实现原理
方法 context.createRadialGradient 实现代码,相关过程,见代码注释:
方法 heatmap.js 实现代码,相关过程,见代码注释:
一、简单介绍
Three js (官网: Three.js – JavaScript 3D Library) 开发的一些知识整理,方便后期遇到类似的问题,能够及时查阅使用。
本节介绍, three.js (webgl) 中实现简单热力图的方法简单整理,这里主要介绍两种方法,一种是使用 context.createRadialGradient ,一种是使用插件heatmap.js(官网:heatmap.js : Dynamic Heatmaps for the Web),如果有不足之处,欢迎指出,或者你有更好的方法,欢迎留言。
二、实现原理
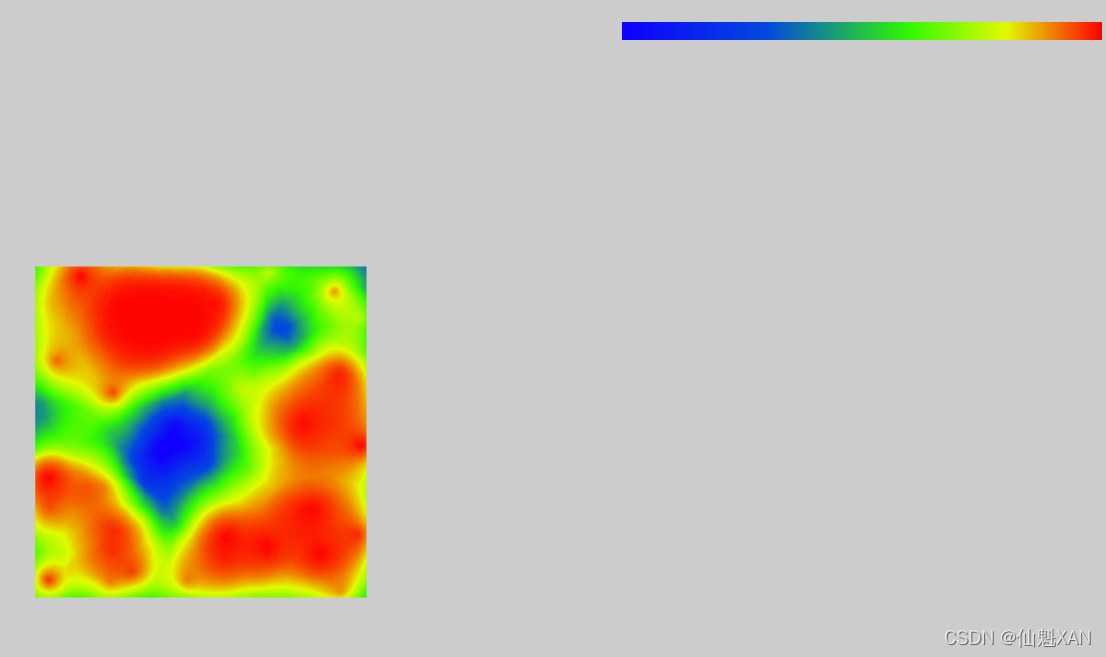
方法 context.createRadialGradient 实现原理
1、通过 指定位置指定温度,确定温度与区间的权重(0.0-1.0之间),context.createRadialGradient 得到位置与温度权重的一张图
2、通过设置温度颜色的调图(context.createLinearGradient),比重和对应颜色
		//颜色条的颜色分布
		const colorStops = {
			1.0: '#f00',
			0.8: '#e2fa00',
			0.6: '#33f900',
			0.3: '#0349df',
			0.0: '#0f00ff'
		};

3、最后通过shader ,结合 上面两张图,生成一张温度颜色匹配的热力图
// 温度转为权重alpha 并且 createRadialGradient 渐变的图
vec4 alphaColor = texture2D(alphaScaleMap, vUv);
// 根据温度转换为的权重alpha,确定改点的颜色 ,paletteMap 指定颜色条形图
vec4 color = texture2D(paletteMap, vec2(alphaColor.a, 0.0));
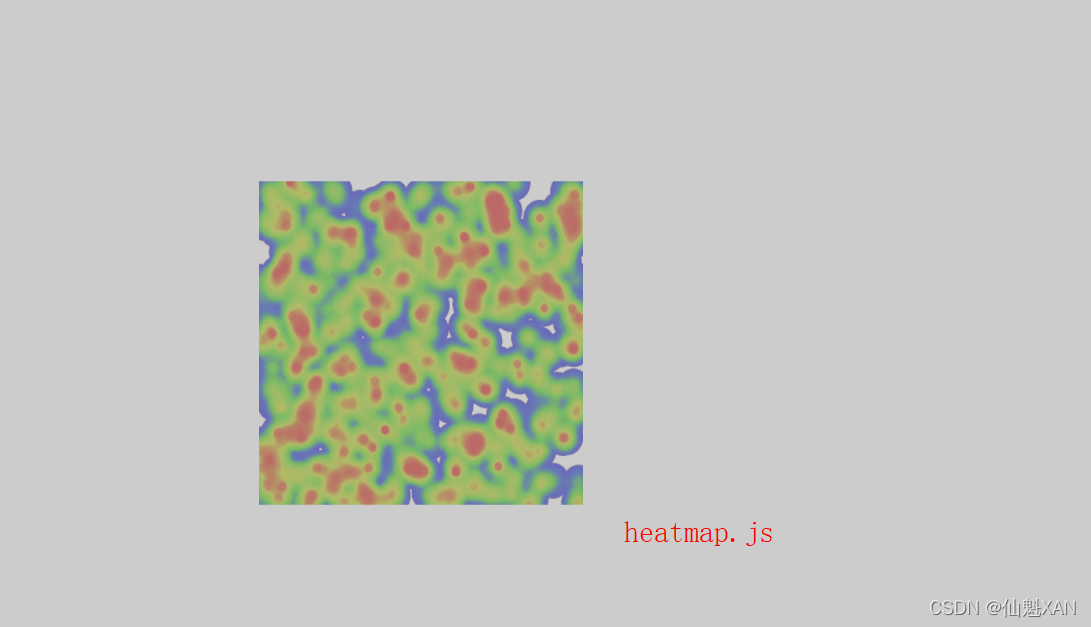
gl_FragColor = vec4(color.r, color.g, color.b, 1.0);方法 heatmap.js 实现原理
1、官网下载 heatmap.js 插件,引入工程中
2、heatmap.js 中关键两个函数
// 创建热力图,主要是热力图样式相关的参数设置
var heatmap = h337.create()
// 热力图对应的位置温度数据设置,才能生成得到热力图
heatmap.setData()
3、Three 获取 heatmap 图的关键代码
texture = new THREE.Texture(heatmap._renderer.canvas)三、注意事项
1、位置温度、以及对应的颜色条图,再加上 context.createRadialGradient 的 radius 是影响生成热力图效果的主要因素;
2、heatmap,js 插件创建热力图简单方便,context.createRadialGradient 方法或者可能可能更深刻的理解热力图形成的原理吧
3、基于github threejs - master 的工程开发测试,有必要可以下载 github threejs - master 的工程
4、可以 把 shader 中颜色的alpha 进行对应权重值设置,效果可能不一样,有兴趣可以试试
// 温度转为权重alpha 并且 createRadialGradient 渐变的图
vec4 alphaColor = texture2D(alphaScaleMap, vUv);

// 根据温度转换为的权重alpha,确定改点的颜色 ,paletteMap 指定颜色条形图
vec4 color = texture2D(paletteMap, vec2(alphaColor.a, 0.0));
gl_FragColor = vec4(color.r, color.g, color.b, alphaColor.a);
四、效果预览
五、实现代码
基于github threejs - master 的工程开发测试,有必要可以下载 github threejs - master 的工程
threejs github : https://github.com/mrdoob/three.js/
方法 context.createRadialGradient 实现代码,相关过程,见代码注释:
<!DOCTYPE html>
<html lang="en">
<head>
	<meta charset="UTF-8">
	<title>Title</title>
</head>
<body>
<script type="x-shader/x-vertex" id="vertexshader">
	#ifdef GL_ES
    precision highp float;
    #endif
    varying vec2 vUv;
    void main() {

	  // uv 和 顶点变换
      vUv = uv;
      gl_Position = projectionMatrix * modelViewMatrix * vec4(position, 1.0);

    }

  </script>

<script type="x-shader/x-fragment" id="fragmentshader">

    #ifdef GL_ES
    precision highp float;
    #endif
    varying vec2 vUv;
    uniform sampler2D alphaScaleMap;
    uniform sampler2D paletteMap;

    void main() {
      // 温度转为权重alpha 并且 createRadialGradient 渐变的图
      vec4 alphaColor = texture2D(alphaScaleMap, vUv);

	  // 根据温度转换为的权重alpha,确定改点的颜色 ,paletteMap 指定颜色条形图
      vec4 color = texture2D(paletteMap, vec2(alphaColor.a, 0.0));
      gl_FragColor = vec4(color.r, color.g, color.b, 1.0);
    }

  </script>
<script type="importmap">
			{
				"imports": {
					"three": "../../../build/three.module.js"
				}
			}
		</script>

<script type="module">

	import * as THREE from '../../../build/three.module.js';

	import { OrbitControls } from '../../jsm/controls/OrbitControls.js';

	let renderer, scene, camera;

	const segments = 45;
	const w = 256;
	const h = 256;

	// 随机给出温度值 储存在2维数组
	const getTemperature = () => {

		const temperatureArray = new Array();

		for ( let i = 0; i < segments; i ++ ) {

			temperatureArray[ i ] = parseInt( Math.random() * 25 + 10 );  // 颜色的变化区间 10 - 35

		}

		return temperatureArray;

	};

	// 绘制辐射圆
	const drawCircular = ( context, opts ) => {

		var { x, y, radius, weight } = opts;

		radius = parseInt( radius * weight );

		// 创建圆设置填充色
		const rGradient = context.createRadialGradient( x, y, 0, x, y, radius );
		rGradient.addColorStop( 0, 'rgba(255, 0, 0, 1)' );
		rGradient.addColorStop( 1, 'rgba(0, 255, 0, 0)' );
		context.fillStyle = rGradient;

		// 设置globalAlpha
		context.globalAlpha = weight;
		context.beginPath();
		context.arc( x, y, radius, 0, 2 * Math.PI );
		context.closePath();

		context.fill();

	};

	// 获得渐变颜色条图
	const getPaletteMap = () => {

		//颜色条的颜色分布
		const colorStops = {
			1.0: '#f00',
			0.8: '#e2fa00',
			0.6: '#33f900',
			0.3: '#0349df',
			0.0: '#0f00ff'
		};

		//颜色条的大小
		const width = 256, height = 10;

		// 创建canvas
		const paletteCanvas = document.createElement( 'canvas' );
		paletteCanvas.width = width;
		paletteCanvas.height = height;
		paletteCanvas.style.position = 'absolute';
		paletteCanvas.style.top = '20px';
		paletteCanvas.style.right = '10px';
		const ctx = paletteCanvas.getContext( '2d' );

		// 创建线性渐变色
		const linearGradient = ctx.createLinearGradient( 0, 0, width, 0 );
		for ( const key in colorStops ) {

			linearGradient.addColorStop( key, colorStops[ key ] );

		}

		// 绘制渐变色条
		ctx.fillStyle = linearGradient;
		ctx.fillRect( 0, 0, width, height );

		document.body.appendChild( paletteCanvas );

		const paletteTexture = new THREE.Texture( paletteCanvas );
		paletteTexture.minFilter = THREE.NearestFilter;
		paletteTexture.needsUpdate = true;

		return paletteTexture;

	};

	// 获取透明度阶梯图
	const getAlphaScaleMap = ( width, height ) => {

		const canvas = document.createElement( 'canvas' );
		canvas.width = width;
		canvas.height = height;

		const context = canvas.getContext( '2d' );

		// 随机生成温度
		const tenperature = getTemperature();

		// 绘制透明度阶梯图
		for ( let i = 0; i < segments; i ++ ) {

			// 计算出当前温度占标准温度的权值
			const weight = tenperature[ i ] / 25; // 25 是之前颜色的变化区间 10 - 35

			drawCircular( context, {
				x: Math.random() * w,
				y: Math.random() * h,
				radius: 50,
				weight: weight

			} );

		}

		// 创建 Three 中的图片
		const tex = new THREE.Texture( canvas );
		tex.minFilter = THREE.NearestFilter;
		tex.needsUpdate = true;
		return tex;

	};

	init();
	animate();

	// 初始化
	function init() {

		// 渲染器
		renderer = new THREE.WebGLRenderer( { antialias: true } );
		renderer.setPixelRatio( window.devicePixelRatio );
		renderer.setSize( window.innerWidth, window.innerHeight );
		renderer.setClearColor( '#ccc' );
		document.body.appendChild( renderer.domElement );

		// 场景创建
		scene = new THREE.Scene();

		// camera 创建设置
		camera = new THREE.PerspectiveCamera( 40, window.innerWidth / window.innerHeight, 1, 10000 );
		camera.position.set( 0, 0, 3000 );

		scene.add( new THREE.AmbientLight( 0xeef0ff ) );

		// 创建热力图渲染的平面几何体
		const heatMapGeo = new THREE.PlaneBufferGeometry( 500, 500 );

		// 创建热力图渲染的材质
		const heatMapMaterial = new THREE.ShaderMaterial( {

			transparent: true,
			vertexShader: document.getElementById( 'vertexshader' ).textContent,
			fragmentShader: document.getElementById( 'fragmentshader' ).textContent,
			uniforms: {
				'alphaScaleMap': {
					type: 't',
					value: getAlphaScaleMap( w, h )
				},
				'paletteMap': {
					type: 't',
					value: getPaletteMap()
				},
			}

		} );

		// 创建热力图Mesh,并显示在 Plane 上
		const heatMapPlane = new THREE.Mesh( heatMapGeo, heatMapMaterial );
		scene.add( heatMapPlane );

		const contorl = new OrbitControls( camera, renderer.domElement );

		window.addEventListener( 'resize', onWindowResize, false );

	}

	// 窗口变化的时候,进行 camera 视口的更新
	function onWindowResize() {

		camera.aspect = window.innerWidth / window.innerHeight;
		camera.updateProjectionMatrix();

		renderer.setSize( window.innerWidth, window.innerHeight );

	}

	// 动画 update
	function animate() {

		requestAnimationFrame( animate );
		renderer.render( scene, camera );

	}

</script>
</body>
</html>
方法 heatmap.js 实现代码,相关过程,见代码注释:
<!DOCTYPE html>
<html>
<head>
	<meta charset="UTF-8">
	<title>07SimpleHeatMapInThreejsCSDN</title>
	<style>
	</style>
</head>
<body>

<div id="container" >

</div>
<div>
	<canvas style="height: 900px; width: 100%;" id="heatmap"></canvas>

</div>

</body>
<script src="heatmap.js"></script>
<script type="importmap">
			{
				"imports": {
					"three": "../../../build/three.module.js"
				}
			}
		</script>

<script type="module">

	import * as THREE from 'three';
	import { OrbitControls } from '../../jsm/controls/OrbitControls.js';


	let renderer, scene, camera;
	let heatmapInstance;
	let texture;
	let points;
	let mesh;

	const TemperatureColorStops = {
		1.0: '#f00',
		0.9: '#e2fa00',
		0.6: '#33f900',
		0.3: '#0349df',
		0.0: '#0f00ff'
	};

	init();
	animate();

	function init() {

		initRender();
		initCameraAndScene();
		initLight();
		addPluginHeatmap();

		// control 鼠标控制旋转移动
		const contorl = new OrbitControls( camera, renderer.domElement );

		// window
		window.addEventListener( 'resize', onWindowResize, false );

	}

	// 初始化 Renderer
	function initRender() {

		const container = document.getElementById( 'container' );
		renderer = new THREE.WebGLRenderer( { antialias: true } );
		renderer.setPixelRatio( window.devicePixelRatio );
		renderer.setSize( container.innerWidth, container.innerHeight );
		renderer.setClearColor( '#ccc' );
		container.appendChild( renderer.domElement );

	}

	// 初始化场景和相机
	function initCameraAndScene() {

		scene = new THREE.Scene();

		camera = new THREE.PerspectiveCamera( 40, window.innerWidth / window.innerHeight, 1, 1000 );
		camera.position.set( 0, 0, 50 );

		scene.add( camera );

	}

	// 光照
	function initLight() {

		// 基本的半球光,类似环境光
		const hemiLight = new THREE.HemisphereLight( '#ffffff',
			'#444444', 0.5 );
		hemiLight.position.set( 0, 400, 0 );
		scene.add( hemiLight );

		// 添加平行光
		const dirLight = new THREE.DirectionalLight( 0xffffff, 0.8 );
		dirLight.position.set( 0, 200, 100 );
		dirLight.castShadow = true;
		dirLight.shadow.camera.top = 180;
		dirLight.shadow.camera.bottom = - 100;
		dirLight.shadow.camera.left = - 120;
		dirLight.shadow.camera.right = 120;
		scene.add( dirLight );

	}

	// 窗口更新
	function onWindowResize() {

		camera.aspect = window.innerWidth / window.innerHeight;
		camera.updateProjectionMatrix();

		renderer.setSize( window.innerWidth, window.innerHeight );

	}

	function animate() {

		requestAnimationFrame( animate );
		renderer.render( scene, camera );

	}

	// 创建热力图
	function addPluginHeatmap() {

		// 创建一个heatmap实例对象
		// “h337” 是heatmap.js全局对象的名称.可以使用它来创建热点图实例
		// 这里直接指定热点图渲染的div了.heatmap支持自定义的样式方案,网页外包接活具体可看官网api
		heatmapInstance = h337.create( {

			container: document.getElementById( 'heatmap' ),

			//backgroundColor:'red',    // '#121212'    'rgba(0,102,256,0.2)'
			gradient: TemperatureColorStops,
			radius: 50,	 // [0,+∞)
			opacity: .5,
			blur: '.8',

		} );

		setHeatMapData();

		// 获取 heatmap
		texture = new THREE.Texture( heatmapInstance._renderer.canvas );
		const material = new THREE.MeshLambertMaterial( {

			map: texture,
			transparent: true,
			opacity: 1

		} );


		mesh = new THREE.Mesh( new THREE.PlaneGeometry( 10, 10, 10 ), material );
		scene.add( mesh );


		// 更新图片
		if ( texture ) {

			texture.needsUpdate = true;

		}

	}

	// 设置热力图位置温度数据
	function setHeatMapData() {

		//构建一些随机数据点,网页切图价格这里替换成你的业务数据
		points = [];
		let max = 0;
		const width = document.body.clientWidth;
		const height = document.body.clientHeight;
		let len = 500;
		// 随机位置点设置温度值
		while ( len -- ) {

			var val = Math.floor( Math.random() * 25 + 10 );
			max = Math.max( max, val );
			var point = {
				x: Math.floor( Math.random() * width ),
				y: Math.floor( Math.random() * height ),
				value: val
			};
			points.push( point );

		}

		// 准备 heatmap 的数据
		const data = {
			max: max,

			data: points
		};
		//因为data是一组数据,web切图报价所以直接setData
		heatmapInstance.setData( data ); //数据绑定还可以使用

	}

</script>

</html>