1.有相机内参的情况下,对畸变图像进行处理
去畸变公式:image_undistorted(u,v)=image_raw(u_distorted,v_distorted)
1.直接获取原图的(u,v),就是去畸变后的像素坐标------------>去畸变后的归一化坐标(x,y)
2.由去畸变后的归一化坐标(x,y)--------------->计算得到去畸变前归一化坐标(x_distorted,y_distorted)
3.由去畸变前归一化坐标(x_distorted,y_distorted)------------>计算得到去畸变前(u_distorted,v_distorted)
这里直接获取原图的(u,v)是去畸变后的像素坐标有点难理解,可以看作去畸变后的尺寸和原始的图像一样,只是拿他的尺寸用,不用(u,v)对应的值,最后将原图与之对应的去畸变前(u_distorted,v_distorted)的像素值给image_undistorted(u,v)
//author:jiangcheng

#include <opencv2/opencv.hpp>
#include <string>

using namespace std;

string image_file = "./test.png";   // 请确保路径正确

int main(int argc, char **argv) {

    // 本程序需要你自己实现去畸变部分的代码。尽管我们可以调用OpenCV的去畸变,但自己实现一遍有助于理解。
    // 畸变参数
    double k1 = -0.28340811, k2 = 0.07395907, p1 = 0.00019359, p2 = 1.76187114e-05;
    // 内参
    double fx = 458.654, fy = 457.296, cx = 367.215, cy = 248.375;

    cv::Mat image = cv::imread(image_file,0);   // 图像是灰度图,CV_8UC1
    int rows = image.rows, cols = image.cols;
    cv::Mat image_undistort = cv::Mat(rows, cols, CV_8UC1);   // 去畸变以后的图

    // 计算去畸变后图像的内容
    for (int v = 0; v < rows; v++)
        for (int u = 0; u < cols; u++) {

            double u_distorted = 0, v_distorted = 0;
            // TODO 按照公式,计算点(u,v)对应到畸变图像中的坐标(u_distorted, v_distorted) (~6 lines)
            // start your code here
            // 1.当前u,v为去畸变之后的像素坐标(考虑好的图片的u,v的值对应原始图片中的u_dis,v_dis)
            //求出去畸变后的归一化坐标
            double x_undistorted=(u-cx)/fx;
            double x=x_undistorted;
            double y_undistorted=(v-cy)/fy;
            double y=y_undistorted;
            double r=sqrt(x*x+y*y);
            //计算去畸变前的归一化坐标
            double x_distorted=x*(1+k1*r*r+k2*pow(r,4))+2*p1*x*y+p2*(r*r+2*x*x);
            double y_distorted=y*(1+k1*r*r+k2*r*r*r*r)+2*p2*x*y+p1*(r*r+2*y*y);
            //计算去畸变前的像素坐标
            u_distorted=x_distorted*fx+cx;
            v_distorted=y_distorted*fy+cy;
            // end your code here

            // 赋值 (最近邻插值)
            if (u_distorted >= 0 && v_distorted >= 0 && u_distorted < cols && v_distorted < rows) {
                image_undistort.at<uchar>(v, u) = image.at<uchar>((int) v_distorted, (int) u_distorted);
            } else {
                image_undistort.at<uchar>(v, u) = 0;
            }
        }

    // 画图去畸变后图像
    cv::imshow("image undistorted", image_undistort);
    cv::imwrite("undistorted_test_img.png",image_undistort);
    cv::waitKey();

    return 0;
}
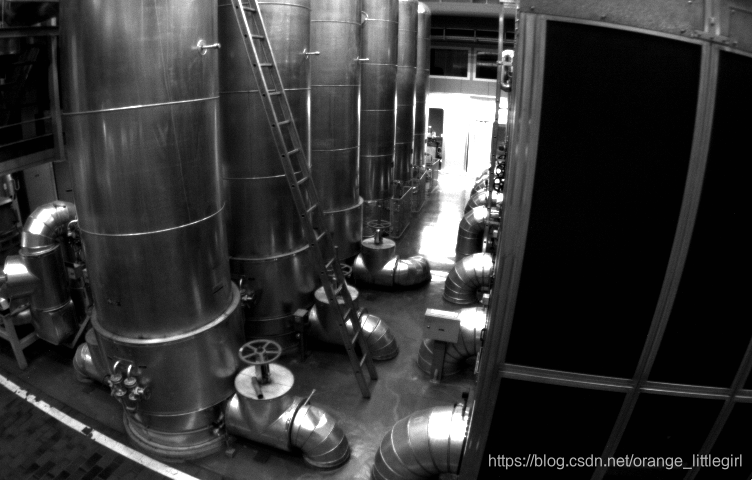
原始图片:
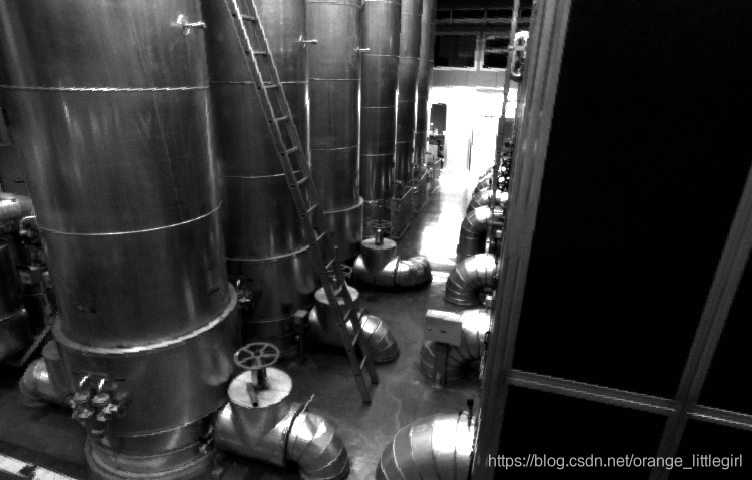
去畸变后的图片:
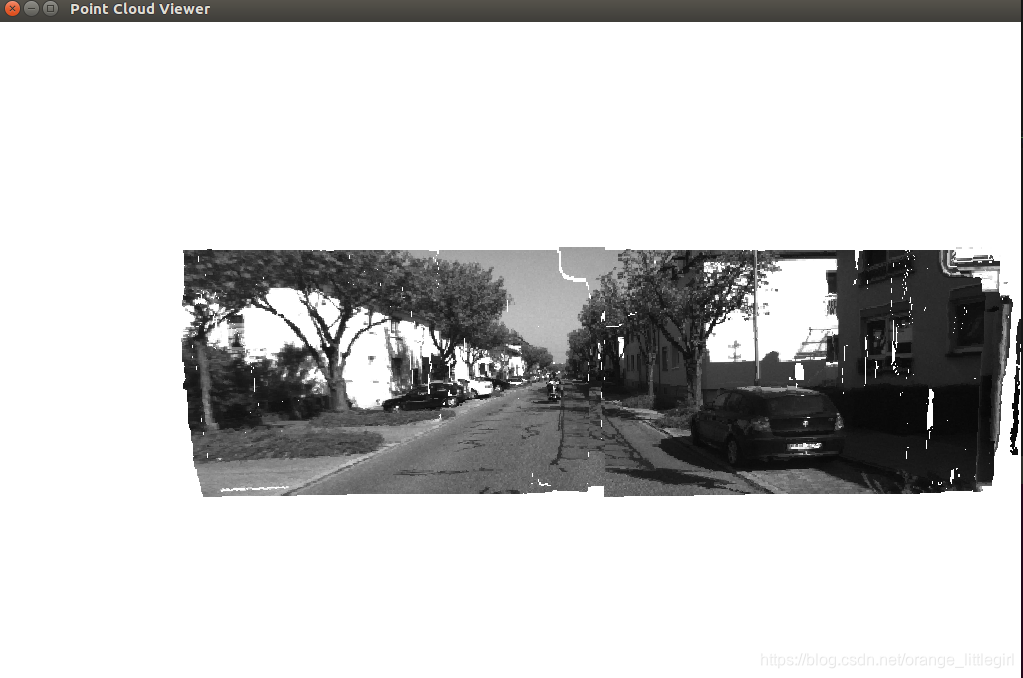
2.双目生成点云
利用左目的图像信息和视差图信息就能生成点云图像
利用以下公式计算出像素对应的三维点云:
double z = (fx * d * 1000) / disp;//计算中是以毫米为单位的;
point[2] = z ;
point[0] = (u - cx) * point[2] / fx;
point[1] = (v - cy) * point[2] / fy;
#include <opencv2/opencv.hpp>
#include <string>
#include <Eigen/Core>
#include <pangolin/pangolin.h>
#include <unistd.h>

using namespace std;
using namespace Eigen;

// 文件路径,如果不对,请调整
string left_file = "./left.png";
string right_file = "./right.png";
string disparity_file = "./disparity.png";

// 在panglin中画图,已写好,无需调整
void showPointCloud(const vector<Vector4d, Eigen::aligned_allocator<Vector4d>> &pointcloud);

int main(int argc, char **argv) {

    // 内参
    double fx = 718.856, fy = 718.856, cx = 607.1928, cy = 185.2157;
    // 间距
    double d = 0.573;

    // 读取图像
    cv::Mat left = cv::imread(left_file, 0);
    cv::Mat right = cv::imread(right_file, 0);
    cv::Mat disparity = cv::imread(disparity_file, 0); // disparty 为CV_8U,单位为像素

    // 生成点云
    vector<Vector4d, Eigen::aligned_allocator<Vector4d>> pointcloud;

    // TODO 根据双目模型计算点云
    // 如果你的机器慢,请把后面的v++和u++改成v+=2, u+=2
    for (int v = 0; v < left.rows; v++)
        for (int u = 0; u < left.cols; u++) {

            Vector4d point(0, 0, 0, left.at<uchar>(v, u) / 255.0); // 前三维为xyz,第四维为颜色

            // start your code here (~6 lines)
            // 根据双目模型计算 point 的位置

			 unsigned int disp = disparity.ptr<unsigned short>(v)[u];
			 if(disp==0){
				 cout << "disp=0" << endl;
				 continue; }
			 double z = (fx * d * 1000) / disp;//计算中是以毫米为单位的;
			 point[2] = z ;
             point[0] = (u - cx) * point[2] / fx;
			 point[1] = (v - cy) * point[2] / fy;
			// cout << "point = [" << point[0] << ", "
			// << point[1] << ", "   << point[2] <<", " << point[3] <<  "]" << endl;
			 pointcloud.push_back(point);
            // end your code here
        }

    // 画出点云
    showPointCloud(pointcloud);
    return 0;
}

void showPointCloud(const vector<Vector4d, Eigen::aligned_allocator<Vector4d>> &pointcloud) {

    if (pointcloud.empty()) {
        cerr << "Point cloud is empty!" << endl;
        return;
    }

    pangolin::CreateWindowAndBind("Point Cloud Viewer", 1024, 768);
    glEnable(GL_DEPTH_TEST);
    glEnable(GL_BLEND);
    glBlendFunc(GL_SRC_ALPHA, GL_ONE_MINUS_SRC_ALPHA);

    pangolin::OpenGlRenderState s_cam(
            pangolin::ProjectionMatrix(1024, 768, 500, 500, 512, 389, 0.1, 1000),
            pangolin::ModelViewLookAt(0, -0.1, -1.8, 0, 0, 0, 0.0, -1.0, 0.0)
    );

    pangolin::View &d_cam = pangolin::CreateDisplay()
            .SetBounds(0.0, 1.0, pangolin::Attach::Pix(175), 1.0, -1024.0f / 768.0f)
            .SetHandler(new pangolin::Handler3D(s_cam));

    while (pangolin::ShouldQuit() == false) {
        glClear(GL_COLOR_BUFFER_BIT | GL_DEPTH_BUFFER_BIT);

        d_cam.Activate(s_cam);
        glClearColor(1.0f, 1.0f, 1.0f, 1.0f);

        glPointSize(2);
        glBegin(GL_POINTS);
        for (auto &p: pointcloud) {
            glColor3f(p[3], p[3], p[3]);
            glVertex3d(p[0], p[1], p[2]);
        }
        glEnd();
        pangolin::FinishFrame();
        usleep(5000);   // sleep 5 ms
    }
    return;
}
点云显示: