一、在windows下面搭建caffe环境
1、默认已经安装好visual studio,我安装的是vs2013
2、配置caffe包含下面几步:
(1)下载cuda+cudnn,链接:
cuda链接:https://developer.nvidia.com/cuda-downloads
cudnn下载链接:https://developer.nvidia.com/cudnn
其中cuda是可以直接使用gpu的计算架构,cudnn是用于深度神经网络的gpu加速库。
注意选择默认安装路径,后面配置会容易一点,不用定义cuda路径
(2)在git上下载已经编译好的caffe源码,连接:https://github.com/Microsoft/caffe
(3)确保vs已经安装了nugetpackage,解压caffe源码在文件下windows打开caffe.sln之后会自动帮你下载好所依赖的一些库,放在同目录文件下NugetPackages下
(4)windows文件夹下拷贝一份CommonSettings.props.example并把备份文件改名为CommonSettings.props,修改CommonSettings.props的文件中的值,结合自己的配置路径设置,我的设置如下:
<?xml version="1.0" encoding="utf-8"?>
<Project ToolsVersion="4.0" xmlns="http://schemas.microsoft.com/developer/msbuild/2003">
<ImportGroup Label="PropertySheets" />
<PropertyGroup Label="UserMacros">
<BuildDir>$(SolutionDir)..\Build</BuildDir>
<!--NOTE: CpuOnlyBuild and UseCuDNN flags can't be set at the same time.-->
<CpuOnlyBuild>false</CpuOnlyBuild>//使用gpu时改为false
<UseCuDNN>true</UseCuDNN>
<CudaVersion>7.5</CudaVersion>//设置cuda版本
<!-- NOTE: If Python support is enabled, PythonDir (below) needs to be
set to the root of your Python installation. If your Python installation
does not contain debug libraries, debug build will not work. -->
<PythonSupport>false</PythonSupport>
<!-- NOTE: If Matlab support is enabled, MatlabDir (below) needs to be
set to the root of your Matlab installation. -->
<MatlabSupport>false</MatlabSupport>
<CudaDependencies></CudaDependencies>
<!-- Set CUDA architecture suitable for your GPU.
Setting proper architecture is important to mimize your run and compile time. -->
<CudaArchitecture>compute_35,sm_35;compute_52,sm_52</CudaArchitecture>
<!-- CuDNN 4 and 5 are supported -->
<CuDnnPath></CuDnnPath>//有些教程会在这边写上路径,但是我没有写好像也没有问题
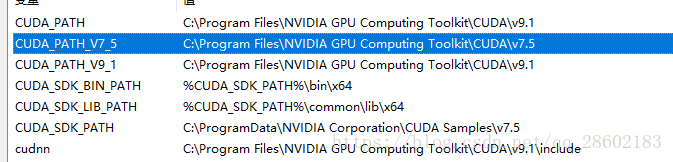
<CUDA_PATH>C:\Program Files\NVIDIA GPU Computing Toolkit\CUDA\v7.5</CUDA_PATH> //这一行我没有,但是有些教程会加上,设置好cuda的位置,我安装cuda时选择默认安装路径,没有设置caffe好像也可以自动找到cuda位置,但是注意不要更改默认安装路径
<ScriptsDir>$(SolutionDir)\scripts</ScriptsDir>
</PropertyGroup>
<PropertyGroup Condition="'$(CpuOnlyBuild)'=='false'">
<CudaDependencies>cublas.lib;cuda.lib;curand.lib;cudart.lib</CudaDependencies>
</PropertyGroup>
<PropertyGroup Condition="'$(UseCuDNN)'=='true'">
<CudaDependencies>cudnn.lib;$(CudaDependencies)</CudaDependencies>
</PropertyGroup>
<PropertyGroup Condition="'$(UseCuDNN)'=='true' And $(CuDnnPath)!=''">
<LibraryPath>$(CuDnnPath)\cuda\lib\x64;$(LibraryPath)</LibraryPath>
<IncludePath>$(CuDnnPath)\cuda\include;$(IncludePath)</IncludePath>
</PropertyGroup>
<PropertyGroup>
<OutDir>$(BuildDir)\$(Platform)\$(Configuration)\</OutDir>
<IntDir>$(BuildDir)\Int\$(ProjectName)\$(Platform)\$(Configuration)\</IntDir>
</PropertyGroup>
<PropertyGroup>
<LibraryPath>$(OutDir);$(CUDA_PATH)\lib\$(Platform);$(LibraryPath)</LibraryPath>
<IncludePath>$(SolutionDir)..\include;$(SolutionDir)..\include\caffe\proto;$(CUDA_PATH)\include;$(IncludePath)</IncludePath>
</PropertyGroup>
<PropertyGroup Condition="'$(PythonSupport)'=='true'">
<PythonDir>C:\Miniconda2\</PythonDir>
<LibraryPath>$(PythonDir)\libs;$(LibraryPath)</LibraryPath>
<IncludePath>$(PythonDir)\include;$(IncludePath)</IncludePath>
</PropertyGroup>
<PropertyGroup Condition="'$(MatlabSupport)'=='true'">
<MatlabDir>C:\Program Files\MATLAB\R2014b</MatlabDir>
<LibraryPath>$(MatlabDir)\extern\lib\win64\microsoft;$(LibraryPath)</LibraryPath>
<IncludePath>$(MatlabDir)\extern\include;$(IncludePath)</IncludePath>
</PropertyGroup>
<ItemDefinitionGroup Condition="'$(CpuOnlyBuild)'=='true'">
<ClCompile>
<PreprocessorDefinitions>CPU_ONLY;%(PreprocessorDefinitions)</PreprocessorDefinitions>
</ClCompile>
</ItemDefinitionGroup>
<ItemDefinitionGroup Condition="'$(UseCuDNN)'=='true'">
<ClCompile>
<PreprocessorDefinitions>USE_CUDNN;%(PreprocessorDefinitions)</PreprocessorDefinitions>
</ClCompile>
<CudaCompile>
<Defines>USE_CUDNN</Defines>
</CudaCompile>
</ItemDefinitionGroup>
<ItemDefinitionGroup Condition="'$(PythonSupport)'=='true'">
<ClCompile>
<PreprocessorDefinitions>WITH_PYTHON_LAYER;BOOST_PYTHON_STATIC_LIB;%(PreprocessorDefinitions)</PreprocessorDefinitions>
</ClCompile>
</ItemDefinitionGroup>
<ItemDefinitionGroup Condition="'$(MatlabSupport)'=='true'">
<ClCompile>
<PreprocessorDefinitions>MATLAB_MEX_FILE;%(PreprocessorDefinitions)</PreprocessorDefinitions>
</ClCompile>
</ItemDefinitionGroup>
<ItemDefinitionGroup>
<ClCompile>
<MinimalRebuild>false</MinimalRebuild>
<MultiProcessorCompilation>true</MultiProcessorCompilation>
<PreprocessorDefinitions>_SCL_SECURE_NO_WARNINGS;USE_OPENCV;USE_LEVELDB;USE_LMDB;%(PreprocessorDefinitions)</PreprocessorDefinitions>
<TreatWarningAsError>true</TreatWarningAsError>
</ClCompile>
</ItemDefinitionGroup>
<ItemDefinitionGroup Condition="'$(Configuration)|$(Platform)'=='Release|x64'">
<ClCompile>
<Optimization>Full</Optimization>
<PreprocessorDefinitions>NDEBUG;%(PreprocessorDefinitions)</PreprocessorDefinitions>
<RuntimeLibrary>MultiThreadedDLL</RuntimeLibrary>
<FunctionLevelLinking>true</FunctionLevelLinking>
</ClCompile>
<Link>
<EnableCOMDATFolding>true</EnableCOMDATFolding>
<GenerateDebugInformation>true</GenerateDebugInformation>
<LinkTimeCodeGeneration>UseLinkTimeCodeGeneration</LinkTimeCodeGeneration>
<OptimizeReferences>true</OptimizeReferences>
</Link>
</ItemDefinitionGroup>
<ItemDefinitionGroup Condition="'$(Configuration)|$(Platform)'=='Debug|x64'">
<ClCompile>
<Optimization>Disabled</Optimization>
<PreprocessorDefinitions>_DEBUG;%(PreprocessorDefinitions)</PreprocessorDefinitions>
<RuntimeLibrary>MultiThreadedDebugDLL</RuntimeLibrary>
</ClCompile>
<Link>
<GenerateDebugInformation>true</GenerateDebugInformation>
</Link>
</ItemDefinitionGroup>
</Project>
(5)编译libcaffe,但是需要设置关闭警告,否在会出现错误,方式如下:
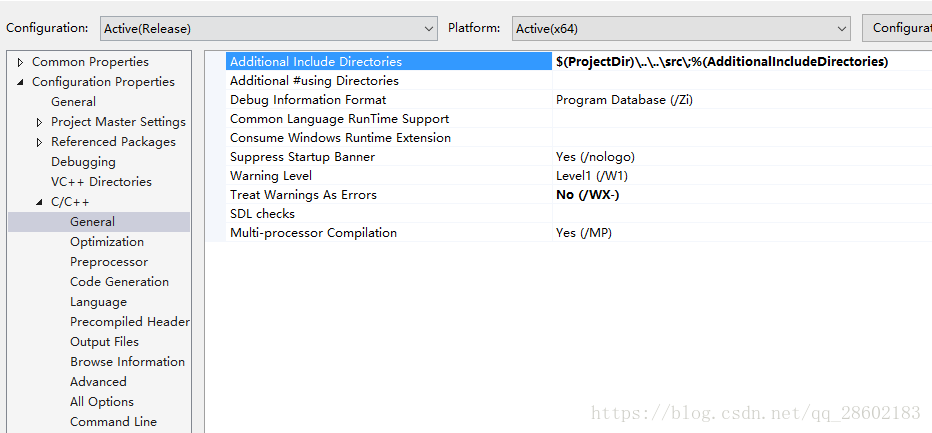
我第一次编译时没有关闭,出现了错误:“error C2220: warning treated as error - no object file generated”错误"
(6)编译成功之后会出现libcaffe.dll,如果还需要其他相关的dll,直接编译即可
教程参考:
1\https://www.cnblogs.com/love6tao/p/5706830.html
https://blog.csdn.net/xierhacker/article/details/51834563
2\https://blog.csdn.net/jiugeshao/article/details/79221462
安装过程中的其他问题:
关于卸载cuda旧版本,新安装cuda新版本,参考:https://blog.csdn.net/jiugeshao/article/details/76370137
关于nuget的下载:在vs中tools下面找找看
关于环境变量配置:


关于caffe更换为自己的opencv:caffe中默认获取的是opencv 2.4.0,一般不建议更换,之前想尝试更换为opencv3,由于opencv2X和opencv3X的语法结构还是不太一样,所以直接替换应该会出现不兼容问题,我就没有继续下去,关于如果更换为自己的opencv可以参考博客:https://blog.csdn.net/u010548772/article/details/79032224#%E4%BA%94-windows-caffe%E6%9B%B4%E6%8D%A2%E4%B8%BA%E8%87%AA%E5%B7%B1%E7%9A%84opencv, 用nuget取消opencv关联再自己配置opencv
二、在自己的项目中使用caffe
参考:
VS2013调用caffe新建自己的工程详细过程:
https://blog.csdn.net/auto1993/article/details/70198435
3、其他教程(含错误解决方法)
(1)ssd在windows下面的配置方法:http://lib.csdn.net/article/deeplearning/55082
VS2013调用caffe新建自己的工程详细过程