2.python与caffe结合,需要重新编译
http://blog.sina.com.cn/s/blog_74f32c400102wjli.html
3.caffe 和python
http://www.cnblogs.com/denny402/tag/caffe/
4,咖啡的安装
http://linusp.github.io/2015/07/21/caffe-base-usage.html
5.遇到的一些bug解决办法
http://blog.csdn.net/nemo2011/article/details/51232533
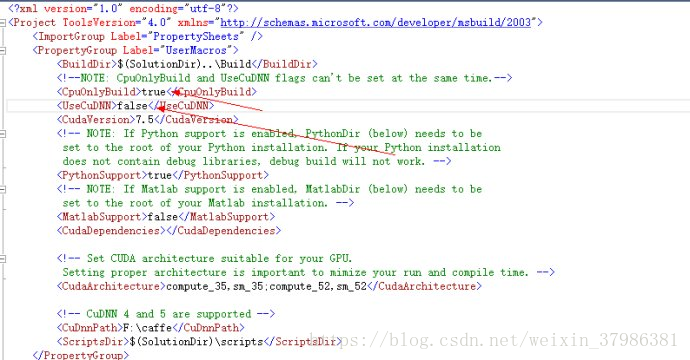
caffe安装时应该注意电脑有没有gpu,非独显的要设置成非独显模式,如下图,另外还有一个文件需要改成CPU模式# solver mode: CPU or GPU
solver_mode: CPU
33.无gpu配置
http://blog.csdn.net/zb1165048017/article/details/51355143
33.h很有用
http://www.cnblogs.com/codingmengmeng/p/6184393.html
vs python配置链接
https://blog.csdn.net/yiyisunshine/article/details/55194465
caffe测试
1.收集数据,图片转换为为levedb格式,建议还是LMDB格式,速度快
图片格式,及大小要一致,
(imageset.exe是由vs 的cpp文件生成的,下面这行代码在cmd中运行)
convert_imageset.exe --resize_height=320 --resize_width=320 --shuffle --backend="leveldb" C:\Users\user\Desktop\image1000test200\train C:\Users\user\Desktop\image1000test200\train.txt C:\Users\user\Desktop\image1000test200\train_leveldb
两个图片文件,train val 同时还有两个train.txt,val.txt 在一个层级他们四个,写train.txt,val.txt注意路径问题
2.训练模型
lenet_solver.prototxt 配置文件一定要配置好
caffe.exe train --solver=../../../examples/mnist/lenet_solver.prototxt
3.测试单张图片
需要配置python,在cmd中运行下面的命令
python classifymnist3.py --print_results --force_grayscale --center_only --labels_file ../examples/mnist/synset_words.txt ../examples/mnist/4.jpg resultsfile
4.测试图片不要太大,我试过1000像素以上上,电脑直接崩溃,800像素的卡着走不动,报错,最后改成256,测试中
测试单张图片
1)生成synset_words.txt,对应分类的文件
2)将均值文件由pb格式变为npy格式例如 E:\ProgramFiles\Caffe\caffe-master\examples\switchboard\pbtonpy.py
如下命令:
在caffe中,如果使用的是c++接口,均值文件默认为.binaryproto格式,而如果使用的是python接口,均值文件默认的是numpy的.npy格式,在工作中有时需要将两者进行互相转换,
import numpy as npimport caffeimport sys blob = caffe.proto.caffe_pb2.BlobProto() data = open( 'mean.binaryproto' , 'rb' ).read()blob.ParseFromString(data)arr = np.array( caffe.io.blobproto_to_array(blob) ) out = arr[0] np.save( 'mean.npy' , out )
http://blog.csdn.net/may0324/article/details/52316967
3)测试单张图片
可能你需要安装下面的库,pip就行
https://jingyan.baidu.com/article/a3aad71ae9d5afb1fb0096a3.html
python E:\ProgramFiles\Caffe\caffe-master\examples\switchboard\switchboard.py
import numpy as np
import matplotlib.pyplot as plt
import sys,os
# Make sure that caffe is on the python path:
caffe_root = 'F:/caffe/caffe-master/' # this file is expected to be in {caffe_root}/examples
os.chdir(caffe_root)
import caffe
# Set the right path to your model definition file, pretrained model weights,
# and the image you would like to classify.
MODEL_FILE = caffe_root + 'examples/mnist/deploy.prototxt'
PRETRAINED = caffe_root + 'examples/mnist_iter_200.caffemodel'
IMAGE_FILE = caffe_root + 'examples/mnist/Ruijie.24.jpg'
caffe.set_mode_cpu()
net = caffe.Classifier(MODEL_FILE, PRETRAINED,
mean=np.load(caffe_root + 'examples/mnist/mean.npy').mean(1).mean(1),
channel_swap=(2,1,0),
raw_scale=255,
image_dims=(256, 256))
input_image = caffe.io.load_image(IMAGE_FILE)
plt.imshow(input_image)
prediction = net.predict([input_image]) # predict takes any number of images, and formats them for the Caffe net automatically
print 'prediction shape:', prediction[0].shape
plt.plot(prediction[0])
print 'predicted class:', prediction[0].argmax()
# 加载ImageNet标签
labels_file = caffe_root + 'examples/mnist/synset_words.txt'
#if not os.path.exists(labels_file):
#!E:/ProgramFiles/Caffe/caffe-master/data/ilsvrc12/get_ilsvrc_aux.sh
labels = np.loadtxt(labels_file, str, delimiter='\t')
print 'output label:', labels[prediction[0].argmax()]
plt.show()
# sort top five predictions from softmax output
# 将softmax的输出结果按照从大到小排序,并提取前5名
#top_inds = output_prob.argsort()[::-1][:5] # reverse sort and take five largest items
#print 'probabilities and labels:'
#zip(output_prob[top_inds], labels[top_inds])