1、概述
上一讲,我们使用了别人根据COCO数据集训练好的模型来做目标检测,这一讲,我们就来训练自己的模型。
2、下载数据集
为了方便学习,我们先使用别人整理好的数据集来训练---VOC 2012数据集。VOC 2012一共有17125张图片,每张图片都有标注,标注的内容包括人、动物、交通工具、家具等20个类别。首先下载数据集,数据集很大,有1.9G,慢慢下吧~链接如下,
http://host.robots.ox.ac.uk/pascal/VOC/voc2012/VOCtrainval_11-May-2012.tar
3、修改环境变量
为了不用每次都将文件拷贝到my_object_detection文件夹下,我们可以将my_object_detection目录设置进Python的环境变量PYTHONPATH中,执行以下命令
export PYTHONPATH=$PYTHONPATH:/home/wilf/tensorflow-master/demo/my_object_detection:/home/wilf/tensorflow-master/demo/my_object_detection/slim
为了不用每次开机都执行这个命令,可以将其写入到~/.bashrc文件中。
4、VOC2012数据集结构简介
转换之前,先来看一下VOC2012数据集的结构,先将我们下载的文件VOCtrainval_11-May-2012.tar解压到my_images文件夹下,得到的目录结构为
my_images/VOCdevkit/VOC2012/
VOC2012文件夹下包含5个子文件夹,如下图所示,

JPEGImages文件夹中存储了所有的图片,每一张图片对应的物体框的标注存在Annotations文件夹中,如下图所示,

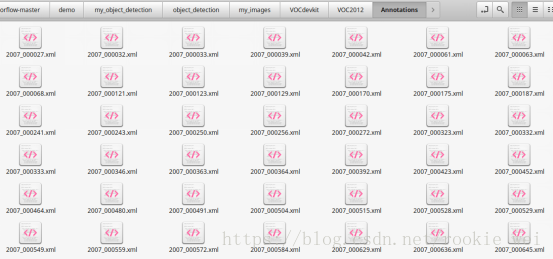
看看它是怎么标注的(注释是我加上去的),

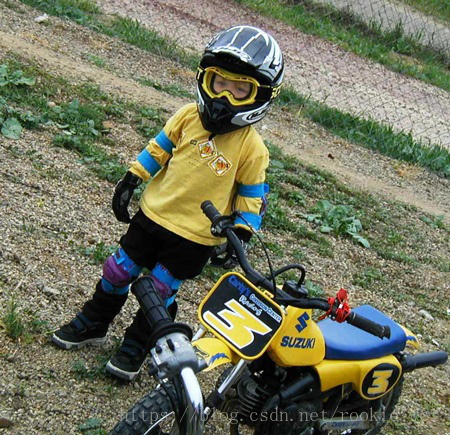
对应的图片如下,
分割图片如下(<segmented>1</segmented>),

5、将VOC2012数据集转成tfrecord格式
接下来将VOC2012数据集转为tfrecord格式,在object_detection文件夹下执行以下命令,
训练数据:
python dataset_tools/create_pascal_tf_record.py --data_dir=my_images/VOCdevkit/ --year=VOC2012 --output_path=my_images/VOCdevkit/pascal_train.record --set=train
测试数据:
python dataset_tools/create_pascal_tf_record.py --data_dir=my_images/VOCdevkit/ --year=VOC2012 --output_path=my_images/VOCdevkit/pascal_val.record --set=val
执行完以后,在my_images/VOCdevkit/文件夹下生成两个文件,pascal_train.record 和pascal_val.record。
6、下载模型
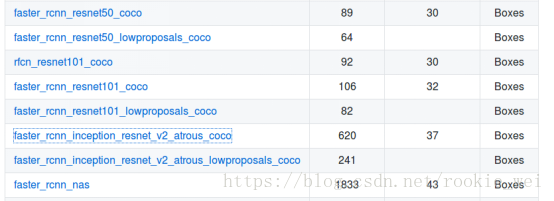
接着,下载模型,还是跟上一讲一样的链接,
下载faster_rcnn_inception_resnet_v2_atrous_coco模型,
data/pascal_label_map.pbtxt文件则对于与VOC2012的label,总共有20个分类。
下载完后,将其解压到my_images文件夹下,得到文件夹如下,

7、配置文件
接下来呢,新建配置文件,samples/configs/文件夹下有一些示例文件,我们就模仿它们配置,参考faster_rcnn_inception_resnet_v2_atrous_coco.config文件,执行命令,
cp samples/configs/faster_rcnn_inception_resnet_v2_atrous_coco.config samples/configs/faster_rcnn_inception_resnet_v2_atrous_voc2012.config
- 将num_classes: 90改为num_classes: 20
- 将num_examples: 8000改为num_examples: 5823,这个5823怎么来?上面执行的将VOC2012数据集转为tfrecord格式中,将create_pascal_tf_record.py中的examples_list的长度打印出来就得到这个5823,这个examples_list就是在验证阶段需要执行的图片数量,命令为
python dataset_tools/create_pascal_tf_record.py --data_dir=my_images/VOCdevkit/ --year=VOC2012 --output_path=my_images/VOCdevkit/pascal_val.record --set=val- 5处PATH_TO_BE_CONFIGURED的地方修改成对应的我们新建的目录
然后,在my_images文件夹下新建一个文件夹train_dir,用来保存训练模型。
上面配置文件完整内容如下,
# Faster R-CNN with Inception Resnet v2, Atrous version;
# Configured for VOC2012 Dataset.
# Users should configure the fine_tune_checkpoint field in the train config as
# well as the label_map_path and input_path fields in the train_input_reader and
# eval_input_reader. Search for "PATH_TO_BE_CONFIGURED" to find the fields that
# should be configured.

model {
  faster_rcnn {
    num_classes: 20
    image_resizer {
      keep_aspect_ratio_resizer {
        min_dimension: 600
        max_dimension: 1024
      }
    }
    feature_extractor {
      type: 'faster_rcnn_inception_resnet_v2'
      first_stage_features_stride: 8
    }
    first_stage_anchor_generator {
      grid_anchor_generator {
        scales: [0.25, 0.5, 1.0, 2.0]
        aspect_ratios: [0.5, 1.0, 2.0]
        height_stride: 8
        width_stride: 8
      }
    }
    first_stage_atrous_rate: 2
    first_stage_box_predictor_conv_hyperparams {
      op: CONV
      regularizer {
        l2_regularizer {
          weight: 0.0
        }
      }
      initializer {
        truncated_normal_initializer {
          stddev: 0.01
        }
      }
    }
    first_stage_nms_score_threshold: 0.0
    first_stage_nms_iou_threshold: 0.7
    first_stage_max_proposals: 300
    first_stage_localization_loss_weight: 2.0
    first_stage_objectness_loss_weight: 1.0
    initial_crop_size: 17
    maxpool_kernel_size: 1
    maxpool_stride: 1
    second_stage_box_predictor {
      mask_rcnn_box_predictor {
        use_dropout: false
        dropout_keep_probability: 1.0
        fc_hyperparams {
          op: FC
          regularizer {
            l2_regularizer {
              weight: 0.0
            }
          }
          initializer {
            variance_scaling_initializer {
              factor: 1.0
              uniform: true
              mode: FAN_AVG
            }
          }
        }
      }
    }
    second_stage_post_processing {
      batch_non_max_suppression {
        score_threshold: 0.0
        iou_threshold: 0.6
        max_detections_per_class: 100
        max_total_detections: 100
      }
      score_converter: SOFTMAX
    }
    second_stage_localization_loss_weight: 2.0
    second_stage_classification_loss_weight: 1.0
  }
}

train_config: {
  batch_size: 1
  optimizer {
    momentum_optimizer: {
      learning_rate: {
        manual_step_learning_rate {
          initial_learning_rate: 0.0003
          schedule {
            step: 900000
            learning_rate: .00003
          }
          schedule {
            step: 1200000
            learning_rate: .000003
          }
        }
      }
      momentum_optimizer_value: 0.9
    }
    use_moving_average: false
  }
  gradient_clipping_by_norm: 10.0
  fine_tune_checkpoint: "my_images/faster_rcnn_inception_resnet_v2_atrous_coco_2018_01_28/model.ckpt"
  from_detection_checkpoint: true
  # Note: The below line limits the training process to 200K steps, which we
  # empirically found to be sufficient enough to train the pets dataset. This
  # effectively bypasses the learning rate schedule (the learning rate will
  # never decay). Remove the below line to train indefinitely.
  num_steps: 200000
  data_augmentation_options {
    random_horizontal_flip {
    }
  }
}

train_input_reader: {
  tf_record_input_reader {
    input_path: "my_images/VOCdevkit/pascal_train.record"
  }
  label_map_path: "data/pascal_label_map.pbtxt"
}

eval_config: {
  num_examples: 5823
  # Note: The below line limits the evaluation process to 10 evaluations.
  # Remove the below line to evaluate indefinitely.
  max_evals: 10
}

eval_input_reader: {
  tf_record_input_reader {
    input_path: "my_images/VOCdevkit/pascal_val.record"
  }
  label_map_path: "data/pascal_label_map.pbtxt"
  shuffle: false
  num_readers: 1
}
8、开始训练
执行如下命令,
python train.py --train_dir=my_images/train_dir/ --pipeline_config_path=samples/configs/faster_rcnn_inception_resnet_v2_atrous_voc2012.config 报错了,
TypeError: __new__() got an unexpected keyword argument 'serialized_options'
似曾相识啊,在《tensorflow入门笔记(二十三)Object Detection API目标检测(上)》那讲也遇到了这个错误,将这个参数去掉试试。
唉,又报错了,又是OOM内存溢出~屌丝的春天什么时候才到呢??
那就用CPU咯,在train.py中加入以下代码,
#原谅我穷屌丝,电脑显卡配置太低导致内存溢出,只能用cpu计算了
os.environ["CUDA_VISIBLE_DEVICES"]="-1"
再运行看看,

天呐~又出错了,而且没有什么提示,这不是在为难我吗??!!
我猜可能是内存溢出,我们在程序运行的时候不定时的看看内存的占用情况,

一开始,可用内存有7.5G这样,

崩溃前,大概就剩下一百多M了~~!!看来没法玩了~这两天去淘宝块内存条先了。
两天过去,买了个16G的内存条,加上原来的8G,这下应该够用了吧?还买了个460G固态硬盘,还在路上。安装好内存条以后,走起!

哎哟我去,腿脚麻利了,一口气能上五楼!先出去逛个街,回来再看看效果~

我勒个去,三个多小时过去,才476步!CPU这效率,看来的上的大点内存的显卡了。
9、导出模型
训练完以后,如何对单张图片进行目标检测呢?
Object Detection API提供了一个export_inference_graph.py脚本用于导出训练好的模型,我们先将训练好的checkpoint导出成“,pb”文件,再用上一讲的代码,对图片进行目标检测。导出模型命令如下,
python export_inference_graph.py --input_type image_tensor --pipeline_config_path samples/configs/faster_rcnn_inception_resnet_v2_atrous_voc2012.config --trained_checkpoint_prefix my_images/train_dir/model.ckpt-494 --output_directory my_images/export_dir/执行成功后,export_dir文件夹下生成以下文件,

10、使用自己训练的模型对图片进行目标检测
这一步,只要修改上一讲的代码就可以了。比较简单,直接给代码好了。在object_detection目录下新建文件demo2.py,运行python demo2.py,代码如下,
#encoding:utf-8
import tensorflow as tf
import numpy as np

import os
from matplotlib import pyplot as plt
from PIL import Image
from object_detection.utils import label_map_util
from object_detection.utils import visualization_utils as vis_utils

#下载下来的模型的目录
MODEL_DIR = 'my_images/export_dir/'
#下载下来的模型的文件
MODEL_CHECK_FILE = os.path.join(MODEL_DIR, 'frozen_inference_graph.pb')
#数据集对于的label
MODEL_LABEL_MAP = os.path.join('data', 'pascal_label_map.pbtxt')
#数据集分类数量,可以打开pascal_label_map.pbtxt文件看看
MODEL_NUM_CLASSES = 20

#这里是获取实例图片文件名,将其放到数组中
PATH_TO_TEST_IMAGES_DIR = 'test_images'
TEST_IMAGES_PATHS = [os.path.join(PATH_TO_TEST_IMAGES_DIR, '06.jpg')]

#输出图像大小,单位是in
IMAGE_SIZE = (12, 8)

tf.reset_default_graph()

#将模型读取到默认的图中
with tf.gfile.GFile(MODEL_CHECK_FILE, 'rb') as fd:
    _graph = tf.GraphDef()
    _graph.ParseFromString(fd.read())
    tf.import_graph_def(_graph, name='')

#加载pascal数据标签
label_map = label_map_util.load_labelmap(MODEL_LABEL_MAP)
categories = label_map_util.convert_label_map_to_categories(label_map, max_num_classes=MODEL_NUM_CLASSES)
category_index = label_map_util.create_category_index(categories)

#将图片转化成numpy数组形式
def load_image_into_numpy_array(image):
    (im_width, im_height) = image.size
    return np.array(image.getdata()).reshape((im_height, im_width, 3)).astype(np.uint8)

#在图中开始计算
detection_graph = tf.get_default_graph()
with tf.Session(graph=detection_graph) as sess:
    for image_path in TEST_IMAGES_PATHS:
        print(image_path)
        #读取图片
        image = Image.open(image_path)
        #将图片数据转成数组
        image_np = load_image_into_numpy_array(image)
        #增加一个维度
        image_np_expanded = np.expand_dims(image_np, axis=0)
        #下面都是获取模型中的变量,直接使用就好了
        image_tensor = detection_graph.get_tensor_by_name('image_tensor:0')
        #存放所有检测框
        boxes = detection_graph.get_tensor_by_name('detection_boxes:0')
        #每个检测结果的可信度
        scores = detection_graph.get_tensor_by_name('detection_scores:0')
        #每个框对应的类别
        classes = detection_graph.get_tensor_by_name('detection_classes:0')
        #检测框的个数
        num_detections = detection_graph.get_tensor_by_name('num_detections:0')
        #开始计算
        (boxes, scores, classes, num_detections) = sess.run([boxes, scores, classes, num_detections],
                                                            feed_dict={image_tensor : image_np_expanded})
        #打印识别结果
        print(num_detections)
        print(boxes)
        print(classes)
        print(scores)

        #得到可视化结果
        vis_utils.visualize_boxes_and_labels_on_image_array(
            image_np,
            np.squeeze(boxes),
            np.squeeze(classes).astype(np.int32),
            np.squeeze(scores),
            category_index,
            use_normalized_coordinates=True,
            line_thickness=8
        )
        #显示
        plt.figure(figsize=IMAGE_SIZE)
        plt.imshow(image_np)
        plt.show()
11、运行结果

就这么简单。
等下个月底新一代的显卡出来了,再看看能不能淘个便宜点的显卡~~!
-------韦访 180725