1.TensorFlow安装
安装教程在CSDN上有很多文章,但最好依据官方教程,因为TensorFlow不断更新,需要的CUDA、cudnn等版本也在变化。官方地址在GITHUB里TensorFlow项目下可以找到安装指南,https://www.tensorflow.org/install/。这里我选择的是Anaconda安装,方便统一管理。
考虑到翻墙的原因,打不开官方网站的看这里:
(1)Requirements to run TensorFlow with GPU support
If you are installing TensorFlow with GPU support using one of the mechanisms described in this guide, then the following NVIDIA software must be installed on your system:
CUDA® Toolkit 8.0. For details, see NVIDIA’s documentation Ensure that you append the relevant Cuda pathnames to the %PATH% environment variable as described in the NVIDIA documentation.
The NVIDIA drivers associated with CUDA Toolkit 8.0.cuDNN v6.1. For details, see NVIDIA’s documentation. Note that cuDNN is typically installed in a different location from the other CUDA DLLs. Ensure that you add the directory where you installed the cuDNN DLL to your %PATH% environment variable.
GPU card with CUDA Compute Capability 3.0 or higher. See NVIDIA documentation for a list of supported GPU cards.If you have a different version of one of the preceding packages, please change to the specified versions. In particular, the cuDNN version must match exactly: TensorFlow will not load if it cannot find cuDNN64_6.dll. To use a different version of cuDNN, you must build from source.
(2)Requirements to run TensorFlow with GPU support
- The Anaconda installation is community supported, not officially supported.
Take the following steps to install TensorFlow in an Anaconda environment:
Follow the instructions on the Anaconda download site to download and install Anaconda.
Create a conda environment named tensorflow by invoking the following command:
C:> conda create -n tensorflow python=3.5 - Activate the conda environment by issuing the following command:
C:> activate tensorflow
(tensorflow)C:> # Your prompt should change - Issue the appropriate command to install TensorFlow inside your conda environment. To install the CPU-only version of TensorFlow, enter the following command:
(tensorflow)C:> pip install --ignore-installed --upgrade tensorflow- To install the GPU version of TensorFlow, enter the following command (on a single line):
(tensorflow)C:> pip install --ignore-installed --upgrade tensorflow-gpu(3)安装后日常使用时打开shell窗口,我用的conEmu,激活TensorFlow环境再执行。
activate tensorflow2.下载 TensorFlow models
地址:https://github.com/tensorflow/models
git clone 到本地目录。
3.配置依赖库
- 利用Anaconda安装protobuf:
conda install protobuf- 编译Protobuf库,在object_detection同级目录打开终端运行:
cd E:\TensorFlow\GitHub\models\research
protoc object_detection\protos\*.proto --python_out=.- 在research目录下运行:
python setup.py install- 进入slim目录运行:
python setup.py install- 添加环境变量:

- 返回research目录测试环境是否准备完毕:
python object_detection/builders/model_builder_test.py若出现缺乏相关库的提示,根据提示利用conda install安装,若仍然失败,重复(3)(4)
4.程序配置和运行
# What model to download.
MODEL_NAME = 'ssd_mobilenet_v1_coco_11_06_2017'
#MODEL_NAME = 'faster_rcnn_resnet101_coco_11_06_2017'
#MODEL_NAME = 'ssd_inception_v2_coco_11_06_2017'
MODEL_FILE = MODEL_NAME + '.tar.gz'
DOWNLOAD_BASE = 'http://download.tensorflow.org/models/object_detection/' - USB摄像头采集需要安装opencv_python
下载:https://www.lfd.uci.edu/~gohlke/pythonlibs/#opencv
根据自己的python版本选择相应版本:

python --version我的是3.5.4,所以我选择:opencv_python-3.3.1-cp35-cp35m-win_amd64.whl
安装:
pip install opencv_python-3.3.0-cp35-cp35m-win_amd64.whl- 编写视频采集及目标检测代码,运行
python webcamdetect.py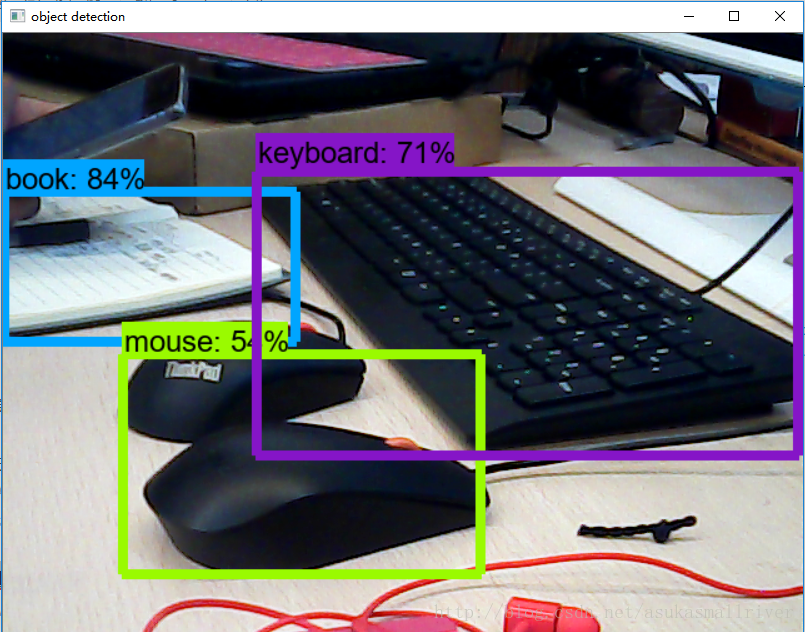
参考文献:
目标检测笔记二:Object Detection API 小白实践指南
TensorFlow:Object_Detection_API在Windows10上的配置