使用自己的数据集训练GoogLenet InceptionNet V1 V2 V3模型(TensorFlow)
【尊重原创,转载请注明出处】https://blog.csdn.net/guyuealian/article/details/81560537
InceptionNet,是 Google 的研究人员提出的网络结构(所以也叫做`GoogLeNet`),在当时取得了非常大的影响,因为网络的结构变得前所未有,它颠覆了大家对卷积网络的串联的印象和固定做法,采用了一种非常有效的 inception 模块,得到了比 VGG 更深的网络结构,但是却比 VGG 的参数更少,因为其去掉了后面的全连接层,所以参数大大减少,同时有了很高的计算效率。
目录
使用自己的数据集训练GoogLenet InceptionNet V1 V2 V3模型(TensorFlow)
一、前言
1、网上已有对GoogLenet模型原理详尽分析了,因此本博客并不打算详细分析GoogLenet,而主要谈及GoogLenet代码实现方面。诚然,网上已经有很多使用TensorFlow实现GoogLenet模型,但很尴尬的是,代码基本上都是你抄我,我复制你。原型代码貌似都是来自黄文坚著作《TensorFlow实战》-第六章的《6.3TensorFlow 实现 GooglelnceptionNet》。要想改动为实际可用的、可训练、可测试的图像分类模型,还是要花很大的力气的。
2、本博客,将使用TensorFlow实现GoogLenet V1和GoogLenet V3的图像分类,其中GoogLenet V3的源码也是参考黄文坚著作《TensorFlow实战》,注意该文的源码仅仅是对Inception V3进行运算性能的测试,并未做图像分类的测试。实质上,官网TensorFlow已经使用TF-slim实现了InceptionNet V1,V2,V3,V4等模型,为什么不用呢?因此鄙人在此基础上,完成训练和测试的封装。
3、为了方便大家,这里会提供
- (1)训练和测试的图片数据集
- (2)提供制作tfrecords数据格式的Python文件
- (3)GoogLenet训练和测试的完整代码,包含inception v1 v2 v3的训练方法
- (4)干脆整个工程的项目都放在Github,老铁要是觉得不错,记得给个“star”哈
Github源码:https://github.com/PanJinquan/tensorflow_models_nets
预训练模型下载地址:https://download.csdn.net/download/guyuealian/10610847
【尊重原创,转载请注明出处】https://blog.csdn.net/guyuealian/article/details/81560537
1、googlenet 的网络示意图:

2、Inception 模块
在上面的网络中,我们看到了多个四个并行卷积的层,这些四个卷积并行的层就是 inception 模块,可视化如下
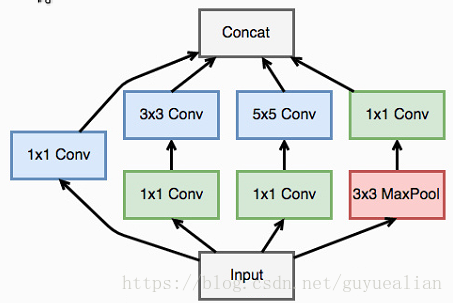
一个 inception 模块的四个并行线路如下:
1.一个 1 x 1 的卷积,一个小的感受野进行卷积提取特征
2.一个 1 x 1 的卷积加上一个 3 x 3 的卷积,1 x 1 的卷积降低输入的特征通道,减少参数计算量,然后接一个 3 x 3 的卷积做一个较大感受野的卷积
3.一个 1 x 1 的卷积加上一个 5 x 5 的卷积,作用和第二个一样
4.一个 3 x 3 的最大池化加上 1 x 1 的卷积,最大池化改变输入的特征排列,1 x 1 的卷积进行特征提取最后将四个并行线路得到的特征在通道这个维度上拼接在一起
二、项目文件结构说明

tensorflow_models_nets:
|__dataset #数据文件
|__record #里面存放record文件
|__train #train原始图片
|__val #val原始图片
|__models #保存训练的模型
|__slim #这个是拷贝自slim模块:https://github.com/tensorflow/models/tree/master/research/slim
|__test_image #存放测试的图片
|__create_labels_files.py #制作trian和val TXT的文件
|__create_tf_record.py #制作tfrecord文件
|__inception_v1_train_val.py #inception V1的训练文件
|__inception_v3_train_val.py # inception V3训练文件
|__predict.py # 模型预测文件
三、训练模型过程
1、训练和测试的图片数据集
下面是我下载的数据集,共有五类图片,分别是:flower、guitar、animal、houses和plane,每组数据集大概有800张左右。为了照顾网友,下面的数据集,都已经放在Github项目的文件夹dataset上了,记得给个“star”哈
animal:http://www.robots.ox.ac.uk/~vgg/data/pets/
flower:http://www.robots.ox.ac.uk/~vgg/data/flowers/
plane:http://www.robots.ox.ac.uk/~vgg/data/airplanes_side/airplanes_side.tar
house:http://www.robots.ox.ac.uk/~vgg/data/houses/houses.tar
guitar:http://www.robots.ox.ac.uk/~vgg/data/guitars/guitars.tar
下载图片数据集后,需要划分为train和val数据集,前者用于训练模型的数据,后者主要用于验证模型。这里提供一个create_labels_files.py脚本,可以直接生成训练train和验证val的数据集txt文件。
#-*-coding:utf-8-*-
"""
    @Project: googlenet_classification
    @File   : create_labels_files.py
    @Author : panjq
    @E-mail : [email protected]
    @Date   : 2018-08-11 10:15:28
"""

import os
import os.path


def write_txt(content, filename, mode='w'):
    """保存txt数据
    :param content:需要保存的数据,type->list
    :param filename:文件名
    :param mode:读写模式:'w' or 'a'
    :return: void
    """
    with open(filename, mode) as f:
        for line in content:
            str_line = ""
            for col, data in enumerate(line):
                if not col == len(line) - 1:
                    # 以空格作为分隔符
                    str_line = str_line + str(data) + " "
                else:
                    # 每行最后一个数据用换行符“\n”
                    str_line = str_line + str(data) + "\n"
            f.write(str_line)
def get_files_list(dir):
    '''
    实现遍历dir目录下,所有文件(包含子文件夹的文件)
    :param dir:指定文件夹目录
    :return:包含所有文件的列表->list
    '''
    # parent:父目录, filenames:该目录下所有文件夹,filenames:该目录下的文件名
    files_list = []
    for parent, dirnames, filenames in os.walk(dir):
        for filename in filenames:
            # print("parent is: " + parent)
            # print("filename is: " + filename)
            # print(os.path.join(parent, filename))  # 输出rootdir路径下所有文件(包含子文件)信息
            curr_file=parent.split(os.sep)[-1]
            if curr_file=='flower':
                labels=0
            elif curr_file=='guitar':
                labels=1
            elif curr_file=='animal':
                labels=2
            elif curr_file=='houses':
                labels=3
            elif curr_file=='plane':
                labels=4
            files_list.append([os.path.join(curr_file, filename),labels])
    return files_list


if __name__ == '__main__':
    train_dir = 'dataset/train'
    train_txt='dataset/train.txt'
    train_data = get_files_list(train_dir)
    write_txt(train_data,train_txt,mode='w')

    val_dir = 'dataset/val'
    val_txt='dataset/val.txt'
    val_data = get_files_list(val_dir)
    write_txt(val_data,val_txt,mode='w')
注意,上面Python代码,已经定义每组图片对应的标签labels:
flower ->labels=0
guitar ->labels=1
animal ->labels=2
houses ->labels=3
plane ->labels=4
2、制作tfrecords数据格式
有了 train.txt和val.txt数据集,我们就可以制作train.tfrecords和val.tfrecords文件了,项目提供一个用于制作tfrecords数据格式的Python文件:create_tf_record.py,鄙人已经把代码放在另一篇博客:《Tensorflow生成自己的图片数据集TFrecords》https://blog.csdn.net/guyuealian/article/details/80857228 ,代码有详细注释了,所以这里不贴出来了.
注意:
(1)create_tf_record.py将train和val数据分别保存为单个record文件,当图片数据很多时候,会导致单个record文件超级巨大的情况,解决方法就是,将数据分成多个record文件保存,读取时,只需要将多个record文件的路径列表交给“tf.train.string_input_producer”即可。
(2)如何将数据保存为多个record文件呢?请参考鄙人的博客:《Tensorflow生成自己的图片数据集TFrecords》https://blog.csdn.net/guyuealian/article/details/80857228
create_tf_record.py提供几个重要的函数:
- create_records():用于制作records数据的函数,
- read_records():用于读取records数据的函数,
- get_batch_images():用于生成批训练数据的函数
- get_example_nums:统计tf_records图像的个数(example个数)
- disp_records(): 解析record文件,并显示图片,主要用于验证生成record文件是否成功
3、GoogLenet网络结构
GoogLenet InceptionNet有很多的变体, 比如`InceptionV1`,`V2`, `V3`, `V4`版本,网上已经有很多使用TensorFlow实现的,但很尴尬的是,代码基本上都是你抄我,我复制你。原型代码貌似都是来自黄文坚著作《TensorFlow实战》-第六章的《6.3TensorFlow 实现 GooglelnceptionNet》。要想改动为实际可用的、可训练、可测试的图像分类模型,还是要花很大的力气的。
本人一开始就想把黄文坚第六章的《6.3TensorFlow 实现 GooglelnceptionNet》的源码封装成可训练的过程,但训练过程发现模型一直不收敛,识别率一直在0.2-0.3%浮动,不知道是我参数设置问题,还是我训练代码出错了,反正就是不行!!!
官网TensorFlow已经提供了使用TF-slim实现的InceptionNet V1,V2,V3,V4模型。TF-Slim是tensorflow中定义、训练和评估复杂模型的轻量级库。tf-slim中的组件可以轻易地和原生tensorflow框架以及例如tf.contrib.learn这样的框架进行整合。
1、官网模型地址:https://github.com/tensorflow/models/tree/master/research/slim/nets
2、slim/nets下的模型都是用TF-slim实现的网络结构,关系TF-slim的用法,可参考:
《tensorflow中slim模块api介绍》:https://blog.csdn.net/guvcolie/article/details/77686555

4、训练方法实现过程
inception_v3要求训练数据height, width = 299, 299(亲测用224也是可以的),项目使用create_tf_record.py制作了训练train299.tfrecords和验证val299.tfrecords数据,下面是inception_v3_train_val.py文件代码说明:
from datetime import datetime
import slim.nets.inception_v3 as inception_v3
from create_tf_record import *
import tensorflow.contrib.slim as slim


labels_nums = 5  # 类别个数
batch_size = 16  #
resize_height = 299  # 指定存储图片高度
resize_width = 299  # 指定存储图片宽度
depths = 3
data_shape = [batch_size, resize_height, resize_width, depths]
下面就一步一步实现训练过程:
(1)先占几个坑用来填数据:
tf.placeholder()是TensorFlow的占位符节点,由placeholder方法创建,其也是一种常量,但是由用户在调用run方法时传递的,可以简单理解为形参,用于定义过程,在执行的时候再赋具体的值。利用tf.placeholder(),代码就可以很方便的实现:is_training=True时,填充train数据进行训练过程,is_training=False时,填充val数据进行验证过程
# 定义input_images为图片数据
input_images = tf.placeholder(dtype=tf.float32, shape=[None, resize_height, resize_width, depths], name='input')
# 定义input_labels为labels数据
# input_labels = tf.placeholder(dtype=tf.int32, shape=[None], name='label')
input_labels = tf.placeholder(dtype=tf.int32, shape=[None, labels_nums], name='label')

# 定义dropout的概率
keep_prob = tf.placeholder(tf.float32,name='keep_prob')
is_training = tf.placeholder(tf.bool, name='is_training')
(2)定义一个训练函数train():
def train(train_record_file,
          train_log_step,
          train_param,
          val_record_file,
          val_log_step,
          labels_nums,
          data_shape,
          snapshot,
          snapshot_prefix):
    '''
    :param train_record_file: 训练的tfrecord文件
    :param train_log_step: 显示训练过程log信息间隔
    :param train_param: train参数
    :param val_record_file: 验证的tfrecord文件
    :param val_log_step: 显示验证过程log信息间隔
    :param val_param: val参数
    :param labels_nums: labels数
    :param data_shape: 输入数据shape
    :param snapshot: 保存模型间隔
    :param snapshot_prefix: 保存模型文件的前缀名
    :return:
    '''
(3)读取训练和验证数据
create_tf_record.py文件提供了读取records数据的函数read_records(),以及获得批训练的数据get_batch_images()。一般而言,训练时需要打乱输入数据,因此函数get_batch_images()提供了shuffle=True参数可以打乱输入数据,但该函数仅仅对一个批次的数据进行打乱的,并未达到随机打乱所有训练数据的要求,鄙人建议是:在制作records数据时就打乱训练数据,即设置create_records()函数的参数shuffle=True,而对val数据,不要求打乱数据。
    [base_lr,max_steps]=train_param
    [batch_size,resize_height,resize_width,depths]=data_shape
    # 获得训练和测试的样本数
    train_nums=get_example_nums(train_record_file)
    val_nums=get_example_nums(val_record_file)
    print('train nums:%d,val nums:%d'%(train_nums,val_nums))

    # 从record中读取图片和labels数据
    # train数据,训练数据一般要求打乱顺序shuffle=True
    train_images, train_labels = read_records(train_record_file, resize_height, resize_width, type='normalization')
    train_images_batch, train_labels_batch = get_batch_images(train_images, train_labels,
                                                              batch_size=batch_size, labels_nums=labels_nums,
                                                              one_hot=True, shuffle=True)
    # val数据,验证数据可以不需要打乱数据
    val_images, val_labels = read_records(val_record_file, resize_height, resize_width, type='normalization')
    val_images_batch, val_labels_batch = get_batch_images(val_images, val_labels,
                                                          batch_size=batch_size, labels_nums=labels_nums,
                                                          one_hot=True, shuffle=False)
(4)定义inception_v3网络模型
TensorFlow的inception_v3是用tf.contrib.slim写的。slim.arg_scope用于为tensorflow里的layer函数提供默认参数值,以使构建模型的代码更加紧凑苗条(slim)。inception_v3已经定义好了默认的参数值:inception_v3_arg_scope(),因此,需要在定义inception_v3模型之前,设置默认参数。
 # Define the model:
    with slim.arg_scope(inception_v3.inception_v3_arg_scope()):
        out, end_points = inception_v3.inception_v3(inputs=input_images, num_classes=labels_nums, dropout_keep_prob=keep_prob, is_training=is_training)
(5)指定损失函数和准确率(重点)
inception_v3模型的默认参数inception_v3.inception_v3_arg_scope()已经定义了L2正则化项(你可以看一下源码:weights_regularizer=slim.l2_regularizer(weight_decay)),因此定义损失函数时,需要把L2正则化项的损失也加进来优化。这里就需要特别特别……说明一下:
- 若使用 tf.losses自带的loss函数,则都会自动添加到loss集合中,不需要add_loss()了:如:tf.losses.softmax_cross_entropy()
- 如使用tf.nn的自带的损失函数,则必须手动添加,如: tf.nn.sparse_softmax_cross_entropy_with_logits()和 tf.nn.softmax_cross_entropy_with_logits()
- 特别的,若自定义myloss损失函数,若myloss损失函数中使用了tf.losses中的loss函数,并将该loss添加到slim.losses.add_loss()中, 这时使用tf.losses.get_total_loss()函数时相当于累加两次myloss,因为tf.losses中的loss值都会自动添加到slim.losses接合中。因此若使用tf.losses中自带的loss函数,则不需要add_loss()了,否则相当于重复添加了
本项目源码使用交叉熵损失函数tf.losses.softmax_cross_entropy()和L2正则项add_regularization_losses=True!仅仅两条语句就Ok了,简单了吧,不得不惊叹tf.contrib.slim库的强大,大大简化网络代码的定义。若你使用原生的tf定义损失函数,你会发现计算L2正则项的损失,特别麻烦。
    # Specify the loss function: tf.losses定义的loss函数都会自动添加到loss函数,不需要add_loss()了
    tf.losses.softmax_cross_entropy(onehot_labels=input_labels, logits=out)#添加交叉熵损失loss=1.6
    # slim.losses.add_loss(my_loss)
    loss = tf.losses.get_total_loss(add_regularization_losses=True)#添加正则化损失loss=2.2
    accuracy = tf.reduce_mean(tf.cast(tf.equal(tf.argmax(out, 1), tf.argmax(input_labels, 1)), tf.float32))
(6)定义优化方案
这里使用GradientDescentOptimizer梯度下降法,当然也可以选择MomentumOptimizer或者AdadeltaOptimizer其他优化方法。由于inception_v3使用了batch_norm层,需要更新每一层的`average`和`variance`参数, 更新的过程不包含在正常的训练过程中, 需要我们去手动更新,并通过`tf.get_collection`获得所有需要更新的`op`。
一个不确定的说明:
(1)若使用train_op = optimizer.minimize(loss)函数时,则需要手动更新每一层的`average`和`variance`参数,并通过`tf.get_collection`获得所有需要更新的`op`
(2)若使用slim.learning.create_train_op()产生训练的op,貌似会自动更新每一层的参数,这个不确定!主要是我发现即使没有tf.get_collection,使用slim.learning.create_train_op()时,训练也是收敛的。
    # Specify the optimization scheme:
    optimizer = tf.train.GradientDescentOptimizer(learning_rate=base_lr)

    # 在定义训练的时候, 注意到我们使用了`batch_norm`层时,需要更新每一层的`average`和`variance`参数,
    # 更新的过程不包含在正常的训练过程中, 需要我们去手动像下面这样更新
    # 通过`tf.get_collection`获得所有需要更新的`op`
    update_ops = tf.get_collection(tf.GraphKeys.UPDATE_OPS)
    # 使用`tensorflow`的控制流, 先执行更新算子, 再执行训练
    with tf.control_dependencies(update_ops):
    # create_train_op that ensures that when we evaluate it to get the loss,
    # the update_ops are done and the gradient updates are computed.
    # train_op = slim.learning.create_train_op(total_loss=loss,optimizer=optimizer)
        train_op = slim.learning.create_train_op(total_loss=loss, optimizer=optimizer)
(7)训练迭代训练
TF-Slim自带了非常强大的训练工具 slim.learning.train()函数,下面是该函数的简单用法
g = tf.Graph()

# Create the model and specify the losses...
...

total_loss = slim.losses.get_total_loss()
optimizer = tf.train.GradientDescentOptimizer(learning_rate)

# create_train_op ensures that each time we ask for the loss, the update_ops
# are run and the gradients being computed are applied too.
train_op = slim.learning.create_train_op(total_loss, optimizer)
logdir = ... # Where checkpoints are stored.

slim.learning.train(
    train_op,
    logdir,
    number_of_steps=1000,
    save_summaries_secs=300,
    save_interval_secs=600):
不过啦~本人在循环迭代过程并未使用 slim.learning.train()函数,而是使用原生普通的tensorflow代码。主要是因为我想根据自己的需要控制迭代过程,显示log信息和保存模型:
说明:
1、step_train()函数可以实现测试trian的准确率(这里仅测试训练集的一个batch),而val的数据数据是全部都需要测试的
2、可以设置模型保存间隔,源码还实现保存val准确率最高的模型
def step_train(train_op,loss,accuracy,
               train_images_batch,train_labels_batch,train_nums,train_log_step,
               val_images_batch,val_labels_batch,val_nums,val_log_step,
               snapshot_prefix,snapshot):
    '''
    循环迭代训练过程
    :param train_op: 训练op
    :param loss:     loss函数
    :param accuracy: 准确率函数
    :param train_images_batch: 训练images数据
    :param train_labels_batch: 训练labels数据
    :param train_nums:         总训练数据
    :param train_log_step:   训练log显示间隔
    :param val_images_batch: 验证images数据
    :param val_labels_batch: 验证labels数据
    :param val_nums:         总验证数据
    :param val_log_step:     验证log显示间隔
    :param snapshot_prefix: 模型保存的路径
    :param snapshot:        模型保存间隔
    :return: None
    '''
    saver = tf.train.Saver()
    max_acc = 0.0
    with tf.Session() as sess:
        sess.run(tf.global_variables_initializer())
        sess.run(tf.local_variables_initializer())
        coord = tf.train.Coordinator()
        threads = tf.train.start_queue_runners(sess=sess, coord=coord)
        for i in range(max_steps + 1):
            batch_input_images, batch_input_labels = sess.run([train_images_batch, train_labels_batch])
            _, train_loss = sess.run([train_op, loss], feed_dict={input_images: batch_input_images,
                                                                  input_labels: batch_input_labels,
                                                                  keep_prob: 0.5, is_training: True})
            # train测试(这里仅测试训练集的一个batch)
            if i % train_log_step == 0:
                train_acc = sess.run(accuracy, feed_dict={input_images: batch_input_images,
                                                          input_labels: batch_input_labels,
                                                          keep_prob: 1.0, is_training: False})
                print "%s: Step [%d]  train Loss : %f, training accuracy :  %g" % (
                datetime.now(), i, train_loss, train_acc)

            # val测试(测试全部val数据)
            if i % val_log_step == 0:
                mean_loss, mean_acc = net_evaluation(sess, loss, accuracy, val_images_batch, val_labels_batch, val_nums)
                print "%s: Step [%d]  val Loss : %f, val accuracy :  %g" % (datetime.now(), i, mean_loss, mean_acc)

            # 模型保存:每迭代snapshot次或者最后一次保存模型
            if (i % snapshot == 0 and i > 0) or i == max_steps:
                print('-----save:{}-{}'.format(snapshot_prefix, i))
                saver.save(sess, snapshot_prefix, global_step=i)
            # 保存val准确率最高的模型
            if mean_acc > max_acc and mean_acc > 0.7:
                max_acc = mean_acc
                path = os.path.dirname(snapshot_prefix)
                best_models = os.path.join(path, 'best_models_{}_{:.4f}.ckpt'.format(i, max_acc))
                print('------save:{}'.format(best_models))
                saver.save(sess, best_models)

        coord.request_stop()
        coord.join(threads)
有木有觉得step_train()函数,跟Caffe的solver.prototxt的参数设置很像,比如snapshot_prefix、snapshot等参数,没错,我就是学Caffe转学TensorFlow的。因为习惯了Caffe的训练方式,所以啦,我把循环迭代改成类似于Caffe的形式,娃哈哈!
其中net_evaluation为评价函数:
def net_evaluation(sess,loss,accuracy,val_images_batch,val_labels_batch,val_nums):
    val_max_steps = int(val_nums / batch_size)
    val_losses = []
    val_accs = []
    for _ in xrange(val_max_steps):
        val_x, val_y = sess.run([val_images_batch, val_labels_batch])
        # print('labels:',val_y)
        # val_loss = sess.run(loss, feed_dict={x: val_x, y: val_y, keep_prob: 1.0})
        # val_acc = sess.run(accuracy,feed_dict={x: val_x, y: val_y, keep_prob: 1.0})
        val_loss,val_acc = sess.run([loss,accuracy], feed_dict={input_images: val_x, input_labels: val_y, keep_prob:1.0, is_training: False})
        val_losses.append(val_loss)
        val_accs.append(val_acc)
    mean_loss = np.array(val_losses, dtype=np.float32).mean()
    mean_acc = np.array(val_accs, dtype=np.float32).mean()
    return mean_loss, mean_acc
完整的inception_v3_train_val.py代码:
#coding=utf-8

import tensorflow as tf
import numpy as np
import pdb
import os
from datetime import datetime
import slim.nets.inception_v3 as inception_v3
from create_tf_record import *
import tensorflow.contrib.slim as slim


labels_nums = 5  # 类别个数
batch_size = 16  #
resize_height = 299  # 指定存储图片高度
resize_width = 299  # 指定存储图片宽度
depths = 3
data_shape = [batch_size, resize_height, resize_width, depths]

# 定义input_images为图片数据
input_images = tf.placeholder(dtype=tf.float32, shape=[None, resize_height, resize_width, depths], name='input')
# 定义input_labels为labels数据
# input_labels = tf.placeholder(dtype=tf.int32, shape=[None], name='label')
input_labels = tf.placeholder(dtype=tf.int32, shape=[None, labels_nums], name='label')

# 定义dropout的概率
keep_prob = tf.placeholder(tf.float32,name='keep_prob')
is_training = tf.placeholder(tf.bool, name='is_training')

def net_evaluation(sess,loss,accuracy,val_images_batch,val_labels_batch,val_nums):
    val_max_steps = int(val_nums / batch_size)
    val_losses = []
    val_accs = []
    for _ in xrange(val_max_steps):
        val_x, val_y = sess.run([val_images_batch, val_labels_batch])
        # print('labels:',val_y)
        # val_loss = sess.run(loss, feed_dict={x: val_x, y: val_y, keep_prob: 1.0})
        # val_acc = sess.run(accuracy,feed_dict={x: val_x, y: val_y, keep_prob: 1.0})
        val_loss,val_acc = sess.run([loss,accuracy], feed_dict={input_images: val_x, input_labels: val_y, keep_prob:1.0, is_training: False})
        val_losses.append(val_loss)
        val_accs.append(val_acc)
    mean_loss = np.array(val_losses, dtype=np.float32).mean()
    mean_acc = np.array(val_accs, dtype=np.float32).mean()
    return mean_loss, mean_acc

def step_train(train_op,loss,accuracy,
               train_images_batch,train_labels_batch,train_nums,train_log_step,
               val_images_batch,val_labels_batch,val_nums,val_log_step,
               snapshot_prefix,snapshot):
    '''
    循环迭代训练过程
    :param train_op: 训练op
    :param loss:     loss函数
    :param accuracy: 准确率函数
    :param train_images_batch: 训练images数据
    :param train_labels_batch: 训练labels数据
    :param train_nums:         总训练数据
    :param train_log_step:   训练log显示间隔
    :param val_images_batch: 验证images数据
    :param val_labels_batch: 验证labels数据
    :param val_nums:         总验证数据
    :param val_log_step:     验证log显示间隔
    :param snapshot_prefix: 模型保存的路径
    :param snapshot:        模型保存间隔
    :return: None
    '''
    saver = tf.train.Saver()
    max_acc = 0.0
    with tf.Session() as sess:
        sess.run(tf.global_variables_initializer())
        sess.run(tf.local_variables_initializer())
        coord = tf.train.Coordinator()
        threads = tf.train.start_queue_runners(sess=sess, coord=coord)
        for i in range(max_steps + 1):
            batch_input_images, batch_input_labels = sess.run([train_images_batch, train_labels_batch])
            _, train_loss = sess.run([train_op, loss], feed_dict={input_images: batch_input_images,
                                                                  input_labels: batch_input_labels,
                                                                  keep_prob: 0.5, is_training: True})
            # train测试(这里仅测试训练集的一个batch)
            if i % train_log_step == 0:
                train_acc = sess.run(accuracy, feed_dict={input_images: batch_input_images,
                                                          input_labels: batch_input_labels,
                                                          keep_prob: 1.0, is_training: False})
                print "%s: Step [%d]  train Loss : %f, training accuracy :  %g" % (
                datetime.now(), i, train_loss, train_acc)

            # val测试(测试全部val数据)
            if i % val_log_step == 0:
                mean_loss, mean_acc = net_evaluation(sess, loss, accuracy, val_images_batch, val_labels_batch, val_nums)
                print "%s: Step [%d]  val Loss : %f, val accuracy :  %g" % (datetime.now(), i, mean_loss, mean_acc)

            # 模型保存:每迭代snapshot次或者最后一次保存模型
            if (i % snapshot == 0 and i > 0) or i == max_steps:
                print('-----save:{}-{}'.format(snapshot_prefix, i))
                saver.save(sess, snapshot_prefix, global_step=i)
            # 保存val准确率最高的模型
            if mean_acc > max_acc and mean_acc > 0.7:
                max_acc = mean_acc
                path = os.path.dirname(snapshot_prefix)
                best_models = os.path.join(path, 'best_models_{}_{:.4f}.ckpt'.format(i, max_acc))
                print('------save:{}'.format(best_models))
                saver.save(sess, best_models)

        coord.request_stop()
        coord.join(threads)

def train(train_record_file,
          train_log_step,
          train_param,
          val_record_file,
          val_log_step,
          labels_nums,
          data_shape,
          snapshot,
          snapshot_prefix):
    '''
    :param train_record_file: 训练的tfrecord文件
    :param train_log_step: 显示训练过程log信息间隔
    :param train_param: train参数
    :param val_record_file: 验证的tfrecord文件
    :param val_log_step: 显示验证过程log信息间隔
    :param val_param: val参数
    :param labels_nums: labels数
    :param data_shape: 输入数据shape
    :param snapshot: 保存模型间隔
    :param snapshot_prefix: 保存模型文件的前缀名
    :return:
    '''
    [base_lr,max_steps]=train_param
    [batch_size,resize_height,resize_width,depths]=data_shape

    # 获得训练和测试的样本数
    train_nums=get_example_nums(train_record_file)
    val_nums=get_example_nums(val_record_file)
    print('train nums:%d,val nums:%d'%(train_nums,val_nums))

    # 从record中读取图片和labels数据
    # train数据,训练数据一般要求打乱顺序shuffle=True
    train_images, train_labels = read_records(train_record_file, resize_height, resize_width, type='normalization')
    train_images_batch, train_labels_batch = get_batch_images(train_images, train_labels,
                                                              batch_size=batch_size, labels_nums=labels_nums,
                                                              one_hot=True, shuffle=True)
    # val数据,验证数据可以不需要打乱数据
    val_images, val_labels = read_records(val_record_file, resize_height, resize_width, type='normalization')
    val_images_batch, val_labels_batch = get_batch_images(val_images, val_labels,
                                                          batch_size=batch_size, labels_nums=labels_nums,
                                                          one_hot=True, shuffle=False)

    # Define the model:
    with slim.arg_scope(inception_v3.inception_v3_arg_scope()):
        out, end_points = inception_v3.inception_v3(inputs=input_images, num_classes=labels_nums, dropout_keep_prob=keep_prob, is_training=is_training)

    # Specify the loss function: tf.losses定义的loss函数都会自动添加到loss函数,不需要add_loss()了
    tf.losses.softmax_cross_entropy(onehot_labels=input_labels, logits=out)#添加交叉熵损失loss=1.6
    # slim.losses.add_loss(my_loss)
    loss = tf.losses.get_total_loss(add_regularization_losses=True)#添加正则化损失loss=2.2
    accuracy = tf.reduce_mean(tf.cast(tf.equal(tf.argmax(out, 1), tf.argmax(input_labels, 1)), tf.float32))

    # Specify the optimization scheme:
    optimizer = tf.train.GradientDescentOptimizer(learning_rate=base_lr)


    # global_step = tf.Variable(0, trainable=False)
    # learning_rate = tf.train.exponential_decay(0.05, global_step, 150, 0.9)
    #
    # optimizer = tf.train.MomentumOptimizer(learning_rate, 0.9)
    # # train_tensor = optimizer.minimize(loss, global_step)
    # train_op = slim.learning.create_train_op(loss, optimizer,global_step=global_step)


    # 在定义训练的时候, 注意到我们使用了`batch_norm`层时,需要更新每一层的`average`和`variance`参数,
    # 更新的过程不包含在正常的训练过程中, 需要我们去手动像下面这样更新
    # 通过`tf.get_collection`获得所有需要更新的`op`
    update_ops = tf.get_collection(tf.GraphKeys.UPDATE_OPS)
    # 使用`tensorflow`的控制流, 先执行更新算子, 再执行训练
    with tf.control_dependencies(update_ops):
        # create_train_op that ensures that when we evaluate it to get the loss,
        # the update_ops are done and the gradient updates are computed.
        # train_op = slim.learning.create_train_op(total_loss=loss,optimizer=optimizer)
        train_op = slim.learning.create_train_op(total_loss=loss, optimizer=optimizer)


    # 循环迭代过程
    step_train(train_op, loss, accuracy,
               train_images_batch, train_labels_batch, train_nums, train_log_step,
               val_images_batch, val_labels_batch, val_nums, val_log_step,
               snapshot_prefix, snapshot)


if __name__ == '__main__':
    train_record_file='dataset/record/train299.tfrecords'
    val_record_file='dataset/record/val299.tfrecords'

    train_log_step=100
    base_lr = 0.01  # 学习率
    max_steps = 10000  # 迭代次数
    train_param=[base_lr,max_steps]

    val_log_step=200
    snapshot=2000#保存文件间隔
    snapshot_prefix='models/model.ckpt'
    train(train_record_file=train_record_file,
          train_log_step=train_log_step,
          train_param=train_param,
          val_record_file=val_record_file,
          val_log_step=val_log_step,
          labels_nums=labels_nums,
          data_shape=data_shape,
          snapshot=snapshot,
          snapshot_prefix=snapshot_prefix)
OK啦,运行启动训练看看log信息:
2018-08-16 10:08:57.107124: Step [0] train Loss : 2.762746, training accuracy : 0.3125
2018-08-16 10:09:19.281263: Step [0] val Loss : 2.931877, val accuracy : 0.215726
2018-08-16 10:10:33.807865: Step [100] train Loss : 1.849171, training accuracy : 0.375
2018-08-16 10:11:56.997064: Step [200] train Loss : 2.248142, training accuracy : 0.0625
2018-08-16 10:12:22.684584: Step [200] val Loss : 163.246002, val accuracy : 0.200941
2018-08-16 10:13:44.102429: Step [300] train Loss : 1.785683, training accuracy : 0.25
……2018-08-16 10:48:24.938470: Step [2500] train Loss : 0.732916, training accuracy : 0.3125
2018-08-16 10:49:45.958701: Step [2600] train Loss : 0.749750, training accuracy : 0.25
2018-08-16 10:50:10.845769: Step [2600] val Loss : 9.741004, val accuracy : 0.387769
2018-08-16 10:51:31.777861: Step [2700] train Loss : 1.074746, training accuracy : 0.4375
2018-08-16 10:52:52.909256: Step [2800] train Loss : 0.814188, training accuracy : 0.125
2018-08-16 10:53:17.725089: Step [2800] val Loss : 9.216277, val accuracy : 0.368952
2018-08-16 10:54:38.721697: Step [2900] train Loss : 0.762590, training accuracy : 0.375
2018-08-16 10:55:59.860650: Step [3000] train Loss : 0.733000, training accuracy : 0.1875
2018-08-16 10:56:24.746242: Step [3000] val Loss : 13.225746, val accuracy : 0.237903
2018-08-16 10:57:45.828758: Step [3100] train Loss : 0.833523, training accuracy : 0.5625
2018-08-16 10:59:06.822897: Step [3200] train Loss : 0.710151, training accuracy : 0.625……
2018-08-16 12:40:31.923101: Step [9500] train Loss : 0.700521, training accuracy : 1
2018-08-16 12:41:53.206480: Step [9600] train Loss : 0.782273, training accuracy : 1
2018-08-16 12:42:17.757492: Step [9600] val Loss : 1.299307, val accuracy : 0.860887
2018-08-16 12:43:38.987012: Step [9700] train Loss : 0.700440, training accuracy : 0.9375
2018-08-16 12:45:00.040759: Step [9800] train Loss : 0.702021, training accuracy : 0.75
2018-08-16 12:45:25.000334: Step [9800] val Loss : 1.402472, val accuracy : 0.836021
2018-08-16 12:46:46.077850: Step [9900] train Loss : 0.701689, training accuracy : 1
2018-08-16 12:48:07.302272: Step [10000] train Loss : 0.703496, training accuracy : 1
2018-08-16 12:48:32.193206: Step [10000] val Loss : 1.131343, val accuracy : 0.889113
-----save:models/model.ckpt-10000
------save:models/best_models_10000_0.8891.ckpt
可以看到,前2000次迭代,不管是train还是val的识别率都很低,徘徊在20%-30%,但到了2000次以上,识别率一步一步往上蹭,到10000步时,train的识别率达到100%啦,而val的识别率稳定在80%以上,对于只训练了10000次,其效果还是不错的~有需要的话,可自行训练十万次以上哈
5、模型预测
模型预测代码,比较简单,这里直接贴出源码:
#coding=utf-8

import tensorflow as tf
import numpy as np
import pdb
import cv2
import os
import glob
import slim.nets.inception_v3 as inception_v3

from create_tf_record import *
import tensorflow.contrib.slim as slim


def  predict(models_path,image_dir,labels_filename,labels_nums, data_format):
    [batch_size, resize_height, resize_width, depths] = data_format

    labels = np.loadtxt(labels_filename, str, delimiter='\t')
    input_images = tf.placeholder(dtype=tf.float32, shape=[None, resize_height, resize_width, depths], name='input')

    with slim.arg_scope(inception_v3.inception_v3_arg_scope()):
        out, end_points = inception_v3.inception_v3(inputs=input_images, num_classes=labels_nums, dropout_keep_prob=1.0, is_training=False)

    # 将输出结果进行softmax分布,再求最大概率所属类别
    score = tf.nn.softmax(out)
    class_id = tf.argmax(score, 1)

    sess = tf.InteractiveSession()
    sess.run(tf.global_variables_initializer())
    saver = tf.train.Saver()
    saver.restore(sess, models_path)
    images_list=glob.glob(os.path.join(image_dir,'*.jpg'))
    for image_path in images_list:
        im=read_image(image_path,resize_height,resize_width,normalization=True)
        im=im[np.newaxis,:]
        #pred = sess.run(f_cls, feed_dict={x:im, keep_prob:1.0})
        pre_score,pre_label = sess.run([score,class_id], feed_dict={input_images:im})
        max_score=pre_score[0,pre_label]
        print "{} is: pre labels:{},name:{} score: {}".format(image_path,pre_label,labels[pre_label], max_score)
    sess.close()


if __name__ == '__main__':

    class_nums=5
    image_dir='test_image'
    labels_filename='dataset/label.txt'
    models_path='models/model.ckpt-10000'

    batch_size = 1  #
    resize_height = 299  # 指定存储图片高度
    resize_width = 299  # 指定存储图片宽度
    depths=3
    data_format=[batch_size,resize_height,resize_width,depths]
    predict(models_path,image_dir, labels_filename, class_nums, data_format)
预测结果:
test_image/flower.jpg is: pre labels:[0],name:['flower'] score: [ 0.99865556]
test_image/houses.jpg is: pre labels:[3],name:['houses'] score: [ 0.99899763]
test_image/animal.jpg is: pre labels:[2],name:['animal'] score: [ 0.96808302]
test_image/guitar.jpg is: pre labels:[1],name:['guitar'] score: [ 0.99999511]
四、其他模型训练方法
上面的程序inception_v3_train_val.py是实现googLenet inception V3训练的过程,实质上,稍微改改就可以支持训练 inception V1,V2 啦,改动方法也很简单,以 inception V1为例:
(1)import 改为:
# 将
import slim.nets.inception_v3 as inception_v3
# 改为
import slim.nets.inception_v1 as inception_v1
(2)record数据
inception V1要求输入的数据是224*224,因此制作record数据时,需要设置:
resize_height = 224 # 指定存储图片高度
resize_width = 224 # 指定存储图片宽度
(3)定义模型和默认参数修改:
    # 将
    with slim.arg_scope(inception_v3.inception_v3_arg_scope()):
        out, end_points = inception_v3.inception_v3(inputs=input_images, num_classes=labels_nums, dropout_keep_prob=keep_prob, is_training=is_training)
    # 改为
    with slim.arg_scope(inception_v1.inception_v1_arg_scope()):
        out, end_points = inception_v1.inception_v1(inputs=input_images, num_classes=labels_nums, dropout_keep_prob=keep_prob, is_training=is_training)
(4)修改优化方案
inception V3中使用的优化方案是: optimizer = tf.train.GradientDescentOptimizer(learning_rate=base_lr),但在V1中,我发现训练不收敛,后来我改为 optimizer = tf.train.MomentumOptimizer(learning_rate=base_lr,momentum= 0.9),又可以正常收敛了。总之,要是发现训练不收敛,请尝试修改几个参数:
1、增大或减小学习率参数:base_lr
2、改变优化方案:如使用MomentumOptimizer或者AdadeltaOptimizer等优化方法
3、是否有设置默认的模型参数:如slim.arg_scope(inception_v1.inception_v1_arg_scope())
4、计算损失时,增加或去掉正则项:tf.losses.get_total_loss(add_regularization_losses=False)
……最后,就可以Train了!是的,就是那么简单~
五、将ckpt转pb文件:
tensorflow实现将ckpt转pb文件的方法,请参考:
如果你觉得该帖子帮到你,还望贵人多多支持,鄙人会再接再厉,继续努力的~