推荐阅读
大家好,我是佛系工程师☆恬静的小魔龙☆,不定时更新Unity开发技巧,觉得有用记得一键三连哦。
一、前言
嗨,大家好,我是恬静的小魔龙。
同学们国庆节好呀,放假了有没有好好学习呢。
最近学习了Unity3D编辑器方面的知识,在学习的过程中,发现一些比较容易混杂的点,特意总结了一下,方便自己和同学们学习,做了一份Unity3D编辑器开发脉络图,恳请敬请批评指正。
二、Unity3D编辑器开发
2-1、Unity3D编辑器开发脉络图
首先,放一张脉络图。

大图,可放大查看。
看着这张图,是不是感觉有些不知道从哪里开始看起好呢,接下来就来分析一下如何查看。
2-2、Unity3D编辑器开发分类
博主刚开始学习编辑器开发也是一脸懵的样子,为啥一会用OnGUI绘制窗口,一会用Editor绘制窗口,一会用EditorWindows绘制窗口,还有继承PropertyDrawer后进行属性绘制的。
它们之间有什么区别与联系呢。
- 它们简单可以分成
窗口绘制、检视器绘制、场景绘制、属性绘制 窗口绘制需要继承与EditorWindow类,然后在OnGUI里面进行窗口绘制。检视器绘制需要继承与Editor类,然后在OnInspectorGUI里面进行窗口绘制。场景绘制需要继承与Editor类,然后在OnSceneGUI里面进行绘制。属性绘制需要继承与PropertyDrawer类,然后在OnGUI里面进行绘制。- 还有一个检视器属性,这个单独来说。
这么一分析,是不是有些明了了,就是如果要绘制窗口的话,就需要继承EditorWindow类,然后在OnGUI里面进行窗口绘制。
重新绘制检视器窗口也就是Inspector窗口,或者场景Scene窗口就需要继承Editor类,然后在OnInspectorGUI里面进行Inspector窗口绘制,在OnSceneGUI里面进行Scene窗口绘制。
2-3、检视器属性
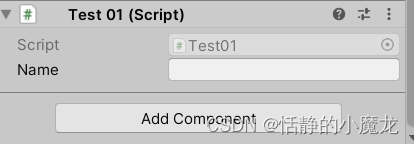
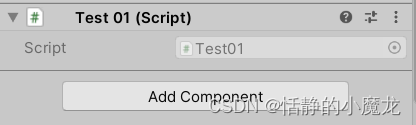
2-3-1、HideInInspector
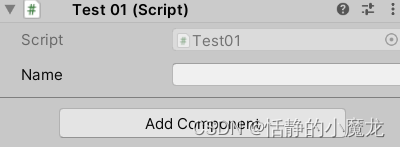
介绍:可以隐藏公共成员变量,防止Inspector的值影响到他,同时保证脚本中变量的可访问度。
举个例子:
不加[HideInInspector]
using UnityEngine;

public class Test01 : MonoBehaviour
{


    public string Name;//注意这是public访问权限
}
加[HideInInspector]
using UnityEngine;

public class Test01 : MonoBehaviour
{


    [HideInInspector]
    public string Name;//注意这是public访问权限
}
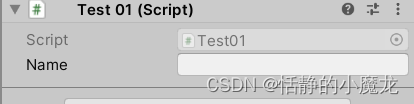
2-3-2、SerializeField
介绍:将私有变量设置为检视面板可见可修改,Unity会将对象进行序列化存储,即使是私有的,标记为可序列化后也会显示,公有变量默认是可序列化的。
举个例子:
不加[SerializeField]
using UnityEngine;

public class Test01 : MonoBehaviour
{


    private string Name;
}
加[SerializeField]
using UnityEngine;

public class Test01 : MonoBehaviour
{


    [SerializeField]
    private string Name;
}
2-3-3、Space
介绍:在当前成员变量上方留 50 像素空白区域
举个例子:
using UnityEngine;

public class Test01 : MonoBehaviour
{


    [Space]
    public string Name;
}
2-3-4、Header
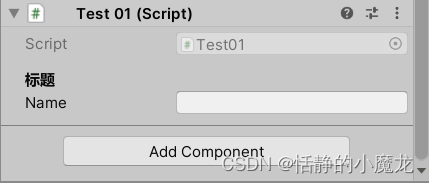
介绍:在当前成员变量上方加入一个标题文字
举个例子:
using UnityEngine;

public class Test01 : MonoBehaviour
{


    [Header("标题")]
    public string Name;
}
2-3-5、Tooltip
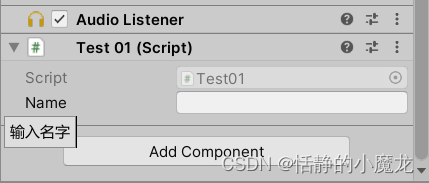
介绍:添加变量悬浮提示,当鼠标放入后会有提示
举个例子:
using UnityEngine;

public class Test01 : MonoBehaviour
{


    [Tooltip("输入名字")]
    public string Name;
}
2-3-6、Range
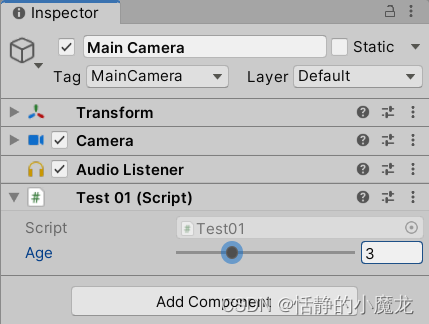
介绍:给数值设定范围。
举个例子:
using UnityEngine;

public class Test01 : MonoBehaviour
{


    [Range(0,10)]
    public int Age;
}
2-3-7、Multiline
介绍:指定输入行字符,参数为行数。
举个例子:
using UnityEngine;

public class Test01 : MonoBehaviour
{


    [Multiline(5)]
    public string Name;
}
2-3-8、TextArea
介绍:设置默认显示 5 行,最多显示 10 行内容,再多用滚动条控制显示。
举个例子:
using UnityEngine;

public class Test01 : MonoBehaviour
{


    [TextArea(5,10)]//(最小行数,最大行数)
    public string Name;
}
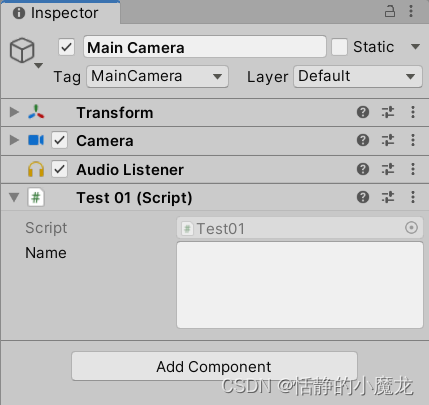
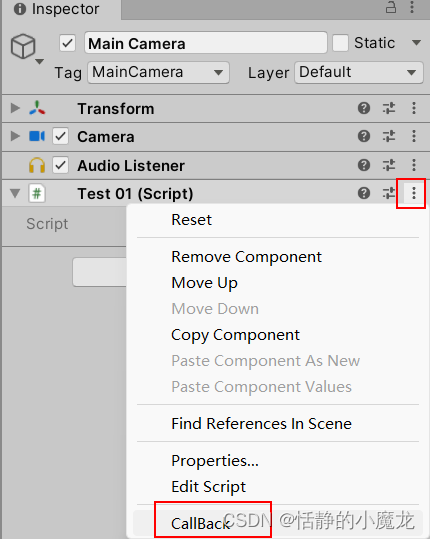
2-3-9、ContextMenu
介绍:在小齿轮中添加一个回调函数,参数为函数名称,用于调用该特性标记的方法。
举个例子:
using UnityEngine;

public class Test01 : MonoBehaviour
{


    [ContextMenu("CallBack")]
    public void CallBackFun()
    {


        Debug.Log("回调函数");
    }
}

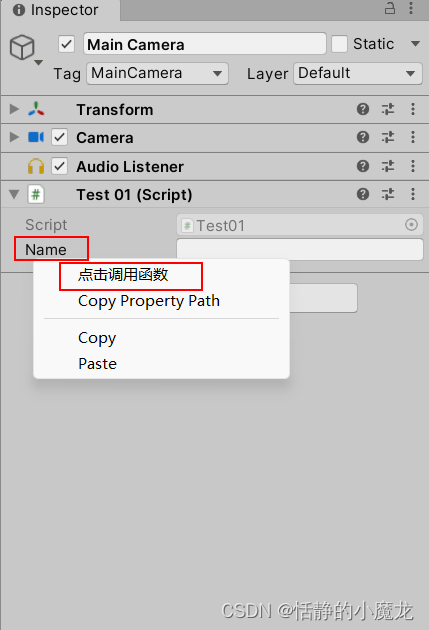
2-3-10、ContextMenuItem
介绍:给一个变量添加右键菜单,第一个参数是菜单名称,第二个参数是回调函数。
举个例子:
using UnityEngine;

public class Test01 : MonoBehaviour
{


    [ContextMenuItem("点击调用函数", "CallBackFun")]
    public string Name;

    public void CallBackFun()
    {


        Debug.Log("回调函数");
    }
}
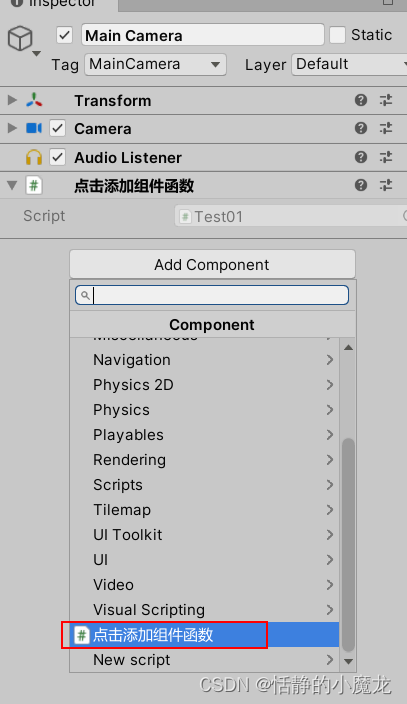
2-3-11、AddComponentMenu
介绍:在编辑器添加一个用于添加组件的菜单项,将拥有该属性的脚本添加到选中的物体上。第一个参数:分类名/组件名,第二个参数:列表中显示的顺序。
举个例子:
using UnityEngine;

[AddComponentMenu("点击添加组件函数")]
public class Test01 : MonoBehaviour
{


}
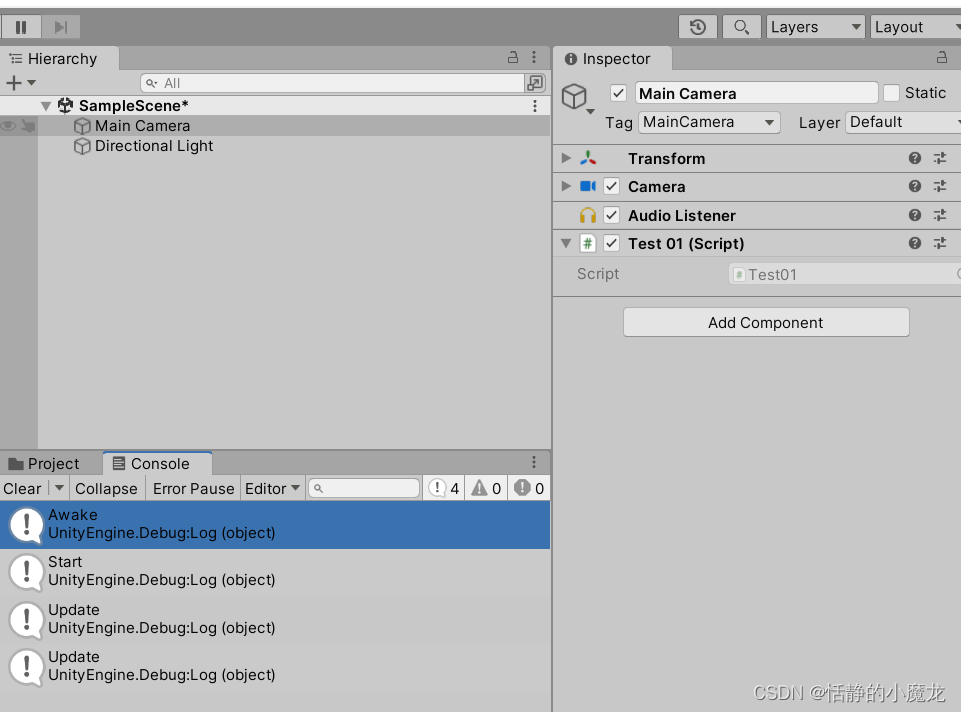
2-3-12、ExecuteInEditMode
介绍:使生命周期函数,在编辑器状态下可以执行,游戏中也可以正常使用,Update()在场景中对象发生变化或项目组织发生变化时会在编辑器下执行。也就是说,不在运行状态,也可以运行Start、Awake函数。
举个例子:
using UnityEngine;

[ExecuteInEditMode]
public class Test01 : MonoBehaviour
{


    private void Awake()
    {


        Debug.Log("Awake");
    }

    private void Start()
    {


        Debug.Log("Start");
    }

    private void Update()
    {


        Debug.Log("Update");
    }
}
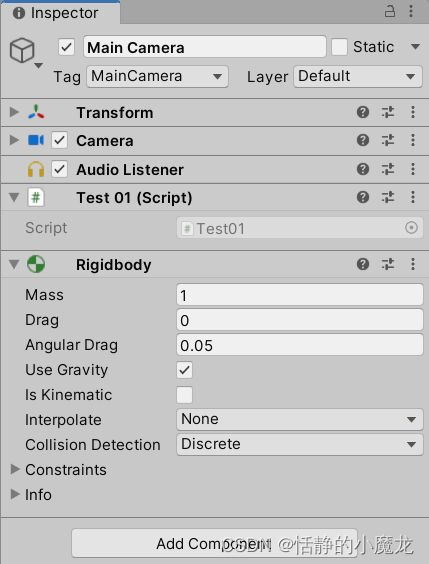
2-3-13、RequireComponent
介绍:依赖、绑定,作用是,当我们把一个Script绑定到GameObject上时会同时把需要依赖的脚本也一起绑定(添加)上去。
举个例子:
using UnityEngine;

[RequireComponent(typeof(Rigidbody))]
public class Test01 : MonoBehaviour
{


}
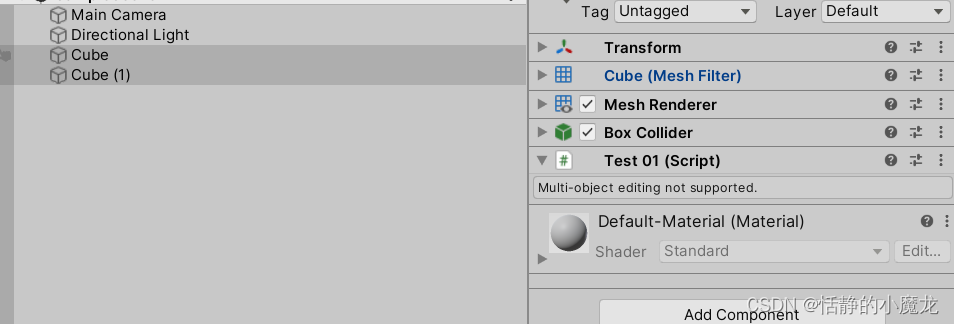
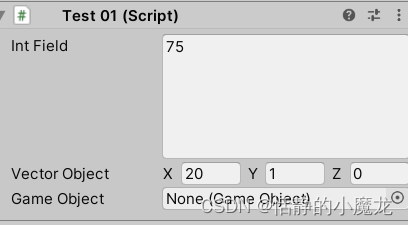
2-3-14、CanEditMultipleObjects
介绍:告诉 Unity 可以使用此编辑器来选择多个对象并同时更改所有对象。
举个例子:
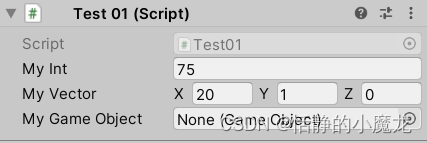
新建脚本Test01.cs编辑代码:
using UnityEngine;

public class Test01 : MonoBehaviour
{


    public int m_MyInt = 75;
    public Vector3 m_MyVector = new Vector3(20, 1, 0);
    public GameObject m_MyGameObject;
}
在Project视图中,Script文件夹内,新建Editor文件夹,在这个文件夹新建Test01Editor.cs脚本,编辑代码:
using UnityEngine;
using UnityEditor;

[CustomEditor(typeof(Test01))]
public class Test01Editor : Editor
{


    SerializedProperty m_IntProp;
    SerializedProperty m_VectorProp;
    SerializedProperty m_GameObjectProp;

    void OnEnable()
    {


        m_IntProp = serializedObject.FindProperty("m_MyInt");
        m_VectorProp = serializedObject.FindProperty("m_MyVector");
        m_GameObjectProp = serializedObject.FindProperty("m_MyGameObject");
    }

    public override void OnInspectorGUI()
    {


        EditorGUILayout.PropertyField(m_IntProp, new GUIContent("Int Field"), GUILayout.Height(20));
        EditorGUILayout.PropertyField(m_VectorProp, new GUIContent("Vector Object"));
        EditorGUILayout.PropertyField(m_GameObjectProp, new GUIContent("Game Object"));
        serializedObject.ApplyModifiedProperties();
    }
}
这时候,给多个对象挂载Test01脚本,然后选中多个对象修改脚本,就会显示Multi-object editing not supported.不支持多对象编辑:
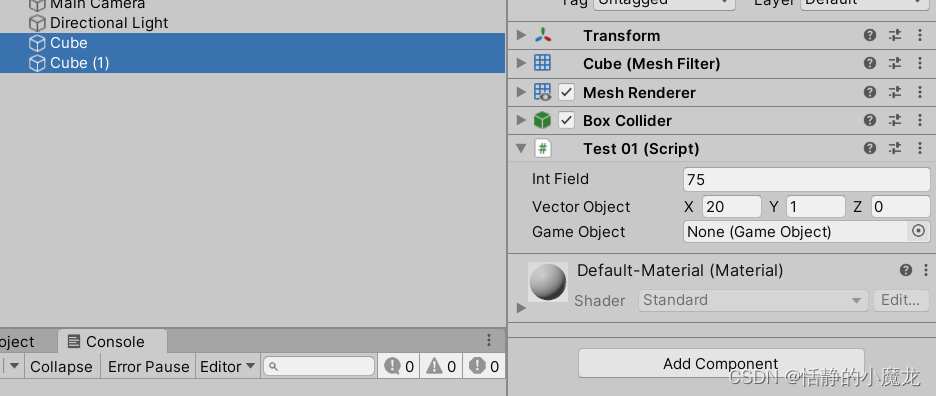
这时候修改Test01Editor.cs脚本:
using UnityEngine;
using UnityEditor;

[CustomEditor(typeof(Test01))]
[CanEditMultipleObjects]
public class Test01Editor : Editor
{


    SerializedProperty m_IntProp;
    SerializedProperty m_VectorProp;
    SerializedProperty m_GameObjectProp;

    void OnEnable()
    {


        m_IntProp = serializedObject.FindProperty("m_MyInt");
        m_VectorProp = serializedObject.FindProperty("m_MyVector");
        m_GameObjectProp = serializedObject.FindProperty("m_MyGameObject");
    }

    public override void OnInspectorGUI()
    {


        EditorGUILayout.PropertyField(m_IntProp, new GUIContent("Int Field"), GUILayout.Height(20));
        EditorGUILayout.PropertyField(m_VectorProp, new GUIContent("Vector Object"));
        EditorGUILayout.PropertyField(m_GameObjectProp, new GUIContent("Game Object"));
        serializedObject.ApplyModifiedProperties();
    }
}
就可以同时编辑多个对象了:
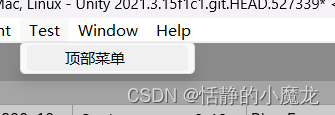
2-3-15、MenuItem
介绍:在顶部显示"工具"菜单。
举个例子:
新建脚本Test01.cs编辑代码:
using UnityEditor;
using UnityEngine;

public class Test01 : MonoBehaviour
{


    [MenuItem("Test/顶部菜单")]
    public static void CallBackFun()
    {


    }
}
2-3-16、CustomEditor
介绍:自定义编辑器,可以修改所关联组件检视面板的属性,然后重新绘制,Editor目录下建立编辑器脚本,将编辑器脚本与原始脚本关联。
举个例子:
新建脚本Test01.cs编辑代码:
using UnityEngine;

public class Test01 : MonoBehaviour
{


    public int m_MyInt = 75;
    public Vector3 m_MyVector = new Vector3(20, 1, 0);
    public GameObject m_MyGameObject;
}
在Project视图中,Script文件夹内,新建Editor文件夹,在这个文件夹新建Test01Editor.cs脚本,编辑代码:
using UnityEngine;
using UnityEditor;

[CustomEditor(typeof(Test01))]
public class Test01Editor : Editor
{


    SerializedProperty m_IntProp;
    SerializedProperty m_VectorProp;
    SerializedProperty m_GameObjectProp;

    void OnEnable()
    {


        m_IntProp = serializedObject.FindProperty("m_MyInt");
        m_VectorProp = serializedObject.FindProperty("m_MyVector");
        m_GameObjectProp = serializedObject.FindProperty("m_MyGameObject");
    }

    // 用于重新绘制Inspector面板中的属性
    public override void OnInspectorGUI()
    {


        // 设置高度
        EditorGUILayout.PropertyField(m_IntProp, new GUIContent("Int Field"), GUILayout.Height(100));
        EditorGUILayout.PropertyField(m_VectorProp, new GUIContent("Vector Object"));
        EditorGUILayout.PropertyField(m_GameObjectProp, new GUIContent("Game Object"));
        serializedObject.ApplyModifiedProperties();
    }
}
2-4、窗口绘制
2-4-1、使用窗口绘制
好!到这里暂停一下,回想一下,还记得前文说的窗口绘制要继承什么类吗?
↓
↓
↓
↓
窗口绘制需要继承与EditorWindow类,然后在OnGUI里面进行窗口绘制。
继承EditorWindow类需要将脚本放到Editor脚本中,才能生效。
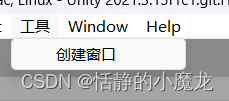
让我们在Editor文件夹中,新建Test02EditorWindow.cs脚本,编辑代码:
using System.Collections;
using System.Collections.Generic;
using UnityEditor;
using UnityEngine;

public class Test02EditorWindow : EditorWindow
{


    [MenuItem("工具/创建窗口")]
    static void OpenWindow()
    {


        //泛型T 窗口类型。必须派生自 EditorWindow。
        //第一个参数设置为 true 可创建浮动实用程序窗口,设置为 false 可创建正常窗口。
        //第三个参数设置是否为窗口提供焦点(如果已存在)。
        Test02EditorWindow window = GetWindow<Test02EditorWindow>(false, "弹窗标题", true);
        window.minSize = new Vector2(40, 30);
        window.minSize = new Vector2(80, 60);
    }

    //开窗口调用
    private void OnEnable()
    {


        Debug.Log("enable");
    }

    //关窗口调用
    private void OnDisable()
    {


        Debug.Log("disable");
    }

    //窗口开启就调用
    private void Update()
    {


        Debug.Log("update");
    }

    //用于绘制窗口内容
    private void OnGUI()
    {


        if (GUILayout.Button("测试点击"))
        {


            Debug.Log("测试点击");
        }
    }

    //场景结构发生变化,执行回调函数
    private void OnHierarchyChange()
    {


        Debug.Log("hierarchy");
    }

    //项目结构发生变化,执行回调函数
    private void OnProjectChange()
    {


        Debug.Log("project");
    }

    //选中物体发生变化,执行回调函数
    private void OnSelectionChange()
    {


        //获取当前选中的物体的名称
        Debug.Log(Selection.activeGameObject.name);
    }
}
编辑器编译通过后,在编辑器的菜单栏找到工具→创建窗口:
这个就是渲染出来的窗口了:
绘制就在OnGUI里面,绘制的UI也是OnGUI支持的UI就可以了。
具体OnGUI怎么用,这里就不再赘述了。
这里再分享一些,常用的小功能代码。
2-4-2、检查开启mipmap的非2的幂贴图
using System.Collections;
using System.Collections.Generic;
using System.IO;
using System.Linq;
using UnityEditor;
using UnityEngine;

public class Test02EditorWindow : EditorWindow
{


    [MenuItem("工具/检查开启mipmap的非2的幂贴图")]
    static void OpenWindow()
    {


        Test02EditorWindow window = GetWindow<Test02EditorWindow>(false, "弹窗标题", true);
    }

    //用于绘制窗口内容
    private void OnGUI()
    {


        if (GUILayout.Button("检查开启mipmap的非2的幂贴图"))
        {


            CheckNPOT();
        }
    }

    private void CheckNPOT()
    {


        List<string> files = AssetDatabase.FindAssets("t:Texture").Select(AssetDatabase.GUIDToAssetPath).ToList();
        List<string> outputList = new List<string>();
        foreach (var file in files)
        {


            TextureImporter textureImporter = AssetImporter.GetAtPath(file) as TextureImporter;
            if (textureImporter)
            {


                //贴图为Sprite或设置了2的幂scale
                if (textureImporter.textureType == TextureImporterType.Sprite || textureImporter.npotScale != TextureImporterNPOTScale.None)
                {


                    continue;
                }
                //贴图长宽均为2的幂
                textureImporter.GetSourceTextureWidthAndHeight(out var width, out var height);
                if (IsPowerOfTwo(width) && IsPowerOfTwo(height))
                {


                    continue;
                }
                if (textureImporter.mipmapEnabled)
                {


                    outputList.Add(file);
                    Debug.Log(file);
                }
            }
        }
        WriteLog("NPOT.log", outputList);
    }

    private void WriteLog(string fileName, List<string> outputList)
    {


        if (!Directory.Exists(@"Logs"))
        {


            Directory.CreateDirectory(@"Logs");
        }
        if (!File.Exists("Logs/" + fileName))
        {


            using (FileStream fs = new FileStream("Logs/" + fileName, FileMode.CreateNew))
            {


            }
        }
        File.WriteAllLines("Logs/" + fileName, outputList);
    }

    private bool IsPowerOfTwo(int value)
    {


        return (value & (value - 1)) == 0;
    }
}
2-4-3、获取选中文件夹下的所有资源
using System.Collections;
using System.Collections.Generic;
using System.IO;
using System.Linq;
using UnityEditor;
using UnityEngine;

public class Test02EditorWindow : EditorWindow
{


    [MenuItem("工具/获取选中文件夹下的所有资源")]
    static void OpenWindow()
    {


        Test02EditorWindow window = GetWindow<Test02EditorWindow>(false, "获取选中文件夹下的所有资源", true);
    }

    //用于绘制窗口内容
    private void OnGUI()
    {


        if (GUILayout.Button("获取选中文件夹下的所有资源"))
        {


            List<string> pathList = new List<string>();
            Object[] m_objects = Selection.GetFiltered(typeof(Object), SelectionMode.Unfiltered | SelectionMode.DeepAssets);
            foreach (var obj in m_objects)
            {


                string path = AssetDatabase.GetAssetPath(obj);
                if (!pathList.Contains(path))
                {


                    pathList.Add(path);
                }
            }
            foreach (var item in pathList)
            {


                Debug.Log(item);
            }
        }
    }
}
2-4-4、删除prefab中missing的script
using System.Collections;
using System.Collections.Generic;
using System.IO;
using System.Linq;
using UnityEditor;
using UnityEngine;

public class Test02EditorWindow : EditorWindow
{


    [MenuItem("工具/删除prefab中missing的script")]
    static void OpenWindow()
    {


        Test02EditorWindow window = GetWindow<Test02EditorWindow>(false, "删除prefab中missing的script", true);
    }

    //用于绘制窗口内容
    private void OnGUI()
    {


        if (GUILayout.Button("删除prefab中missing的script"))
        {


            List<string> logList = new List<string>();
            List<string> prefabPathList = new List<string>();
            foreach (var prefabPath in prefabPathList)
            {


                if (EditorUtility.DisplayCancelableProgressBar("Processing", string.Format("{0} {1}/{2}",
                       prefabPath, prefabPathList.IndexOf(prefabPath), prefabPathList.Count),
                       prefabPathList.IndexOf(prefabPath) / (float)prefabPathList.Count))
                {


                    EditorUtility.ClearProgressBar();
                    return;
                }
                GameObject go = AssetDatabase.LoadAssetAtPath<GameObject>(prefabPath);
                if (go)
                {


                    int count = GameObjectUtility.GetMonoBehavioursWithMissingScriptCount(go);
                    if (count > 0)
                    {


                        GameObjectUtility.RemoveMonoBehavioursWithMissingScript(go);
                        logList.Add(string.Format("删除了{0}中的{1}个missing的script", prefabPath, count));
                    }
                }
            }
            EditorUtility.ClearProgressBar();
        }
    }
}
未完待续,欢迎补充。。。
2-5、检视器Inspector绘制
将普通的类关联Editor工具,实现特殊功能。
比如一个Test01.cs类是普通类,在Editor文件夹内新建一个Test01Editor.cs编辑类,Test01Editor.cs就是一个自定义编辑器,然后在Test01Editor.cs的OnInspectorGUI函数内进行属性的修改绘制。
接下来,一个老例子来说明一下如何使用:
举个例子:
新建脚本Test01.cs编辑代码:
using UnityEngine;

public class Test01 : MonoBehaviour
{


    public int m_MyInt = 75;
    public Vector3 m_MyVector = new Vector3(20, 1, 0);
    public GameObject m_MyGameObject;
}
默认是这样的:
在Project视图中,Script文件夹内,新建Editor文件夹,在这个文件夹新建Test01Editor.cs脚本,编辑代码:
using UnityEngine;
using UnityEditor;

//CustomEditor 属性告知 Unity 应该作为哪个组件的编辑器。
[CustomEditor(typeof(Test01))]
public class Test01Editor : Editor
{


    SerializedProperty m_IntProp;
    SerializedProperty m_VectorProp;
    SerializedProperty m_GameObjectProp;

    void OnEnable()
    {


        m_IntProp = serializedObject.FindProperty("m_MyInt");
        m_VectorProp = serializedObject.FindProperty("m_MyVector");
        m_GameObjectProp = serializedObject.FindProperty("m_MyGameObject");
    }

    // 用于重新绘制Inspector面板中的属性
    public override void OnInspectorGUI()
    {


        // 设置高度
        EditorGUILayout.PropertyField(m_IntProp, new GUIContent("Int Field"), GUILayout.Height(100));
        EditorGUILayout.PropertyField(m_VectorProp, new GUIContent("Vector Object"));
        EditorGUILayout.PropertyField(m_GameObjectProp, new GUIContent("Game Object"));
        serializedObject.ApplyModifiedProperties();
    }
}
修改后是这样的:
2-6、场景Scene绘制
OnSceneGUI的运行方式很像 OnInspectorGUI,只不过在 Scene 视图中运行而已。
为了方便创建自己的编辑控件,可以使用在 Handles 类中定义的函数。
其中的所有函数都是为 3D 模式的 Scene 视图设计的。
举个例子:
新建脚本Test01.cs编辑代码:
using UnityEditor;
using UnityEngine;

[ExecuteInEditMode]
public class Test01 : MonoBehaviour
{


    public Vector3 lookAtPoint = Vector3.zero;

    public void Update()
    {


        transform.LookAt(lookAtPoint);
    }
}
在Project视图中,Script文件夹内,新建Editor文件夹,在这个文件夹新建Test01Editor.cs脚本,编辑代码:
using UnityEngine;
using UnityEditor;

[CustomEditor(typeof(Test01))]
[CanEditMultipleObjects]
public class Test01Editor : Editor
{


    SerializedProperty lookAtPoint;

    void OnEnable()
    {


        lookAtPoint = serializedObject.FindProperty("lookAtPoint");
    }

    public void OnSceneGUI()
    {


        var t = (target as Test01);

        EditorGUI.BeginChangeCheck();
        Vector3 pos = Handles.PositionHandle(t.lookAtPoint, Quaternion.identity);
        if (EditorGUI.EndChangeCheck())
        {


            Undo.RecordObject(target, "Move point");
            t.lookAtPoint = pos;
            t.Update();
        }
    }
}
2-7、属性Property绘制
用于从中派生自定义属性绘制器的基类。使用此基类可为您自己的 Serializable 类或者具有自定义 PropertyAttribute 的脚本变量创建自定义绘制器。
PropertyDrawer 有两种用途: 自定义 Serializable 类的每个实例的 GUI。 自定义具有自定义 PropertyAttribute 的脚本成员的 GUI。 如果您有自定义的 Serializable 类,可以使用 PropertyDrawer 来控制它在 Inspector 中的外观。
举个例子:
新建脚本Recipe.cs,编辑代码:
using System;
using UnityEngine;


public enum IngredientUnit {

     Spoon,Cup,Bowl,Piece}

[Serializable]
public class Ingredient
{


    public string name;
    public int amount = 1;
    public IngredientUnit unit;
}

public class Recipe : MonoBehaviour
{


    public Ingredient potionResult;
    public Ingredient[] pointIngredients;
}
在Editor文件夹内新建脚本IngredientDrawerUIE.cs,编辑代码:
using UnityEditor;
using UnityEditor.UIElements;
using UnityEngine;
using UnityEngine.UIElements;

[CustomPropertyDrawer(typeof(Ingredient))]
public class IngredientDrawerUIE : PropertyDrawer
{


    public override void OnGUI(Rect position, SerializedProperty property, GUIContent label)
    {


        EditorGUI.BeginProperty(position, label, property);

        // label
        position = EditorGUI.PrefixLabel(position, GUIUtility.GetControlID(FocusType.Passive), label);

        // 控制字段缩进 设置为不缩进
        var indent = EditorGUI.indentLevel;
        EditorGUI.indentLevel = 0;

        // 计算矩形范围
        var nameRect = new Rect(position.x, position.y, 30, position.height);
        var amountRect = new Rect(position.x + 35, position.y, 50, position.height);
        var unitRect = new Rect(position.x + 90, position.y, position.width - 90, position.height);


        // 绘制字段
        EditorGUI.PropertyField(nameRect, property.FindPropertyRelative("name"), GUIContent.none);
        EditorGUI.PropertyField(amountRect, property.FindPropertyRelative("amount"), GUIContent.none);
        EditorGUI.PropertyField(unitRect, property.FindPropertyRelative("unit"), GUIContent.none);


        // 控制字段缩进 设置为原来的数值
        EditorGUI.indentLevel = indent;

        EditorGUI.EndProperty();
    }
}
将Recipe脚本添加到对象上查看效果:

2-8、参考链接
三、后记
OK。总结一下。
Unity3D编辑器开发,就是基于Unity3D编辑器,做一些帮助开发的小工具。
在这里可以分成检视器属性、界面绘制、属性绘制三个大方面。
检视器属性参考2-3小节。
界面绘制可以分为窗口绘制、检视器界面绘制、场景绘制。
窗口绘制的话就需要继承EditorWindow类,然后在OnGUI里面渲染UI。
检视器界面绘制需要继承Editor类,然后在OnInspectorGUI里面进行绘制。
场景绘制需要继承Editor类,然后在OnSceneGUI里面进行绘制。
属性绘制需要继承PropertyDrawer类,然后在OnGUI里面进行绘制。
如果觉得本篇文章有用别忘了点个关注,关注不迷路,持续分享更多Unity干货文章。
你的点赞就是对博主的支持,有问题记得留言:
博主主页有联系方式。
博主还有跟多宝藏文章等待你的发掘哦:
| 专栏 | 方向 | 简介 |
|---|---|---|
| Unity3D开发小游戏 | 小游戏开发教程 | 分享一些使用Unity3D引擎开发的小游戏,分享一些制作小游戏的教程。 |
| Unity3D从入门到进阶 | 入门 | 从自学Unity中获取灵感,总结从零开始学习Unity的路线,有C#和Unity的知识。 |
| Unity3D之UGUI | UGUI | Unity的UI系统UGUI全解析,从UGUI的基础控件开始讲起,然后将UGUI的原理,UGUI的使用全面教学。 |
| Unity3D之读取数据 | 文件读取 | 使用Unity3D读取txt文档、json文档、xml文档、csv文档、Excel文档。 |
| Unity3D之数据集合 | 数据集合 | 数组集合:数组、List、字典、堆栈、链表等数据集合知识分享。 |
| Unity3D之VR/AR(虚拟仿真)开发 | 虚拟仿真 | 总结博主工作常见的虚拟仿真需求进行案例讲解。 |
| Unity3D之插件 | 插件 | 主要分享在Unity开发中用到的一些插件使用方法,插件介绍等 |
| Unity3D之日常开发 | 日常记录 | 主要是博主日常开发中用到的,用到的方法技巧,开发思路,代码分享等 |
| Unity3D之日常BUG | 日常记录 | 记录在使用Unity3D编辑器开发项目过程中,遇到的BUG和坑,让后来人可以有些参考。 |