推荐阅读
大家好,我是佛系工程师☆恬静的小魔龙☆,不定时更新Unity开发技巧,觉得有用记得一键三连哦。
一、前言
前段时间一直比较忙,没有时间更新博客,最近闲下来了,就给自己充充电,学习一下新知识。
最近订上了Unity3D的编辑器开发,感觉打开了新世界的大门,特意将学习的知识进行梳理,然后分享出来。
这次主要分享的内容是编辑器开发的PropertyDrawer属性。
下面,就来了解一下PropertyDrawer属性吧。
二、正文
2-1、简介
PropertyDrawer用于自定义属性绘制器的基类。
使用此基类可以为自己的[System.Serializable]类的每个实例进行GUI,也就是重新绘制。
比如说,自定义类有[System.Serializable]属性,那么就可以使用PropertyDrawer来控制它在Inspector中的样式。
2-2、举个例子
Demo代码:
using System;
using UnityEngine;


public enum IngredientUnit {

     Spoon,Cup,Bowl,Piece}

[Serializable]
public class Ingredient
{


    public string name;
    public int amount = 1;
    public IngredientUnit unit;
}

public class Recipe : MonoBehaviour
{


    public Ingredient potionResult;
    public Ingredient[] pointIngredients;
}
接着,可以 使用自定义PropertyDrawer来更改Inspector中Ingredient类的每个实例的样式。
可以使用CustomPropertyDrawer 特性将 PropertyDrawer附加到 Serializable类,然后传入绘制器进行渲染。
可以使用 UIElements构建自定义 PropertyDrawer,也可以使用 IMGUI。
若要使用 UIElements创建自定义 PropertyDrawer,必须对 PropertyDrawer类重写 PropertyDrawer.CreatePropertyGUI。
若要使用 IMGUI创建自定义 PropertyDrawer,必须对 PropertyDrawer类重写 PropertyDrawer.OnGUI。
如果在基于 UIElements的检查器或 EditorWindow内使用 PropertyDrawer,则在任何 IMGUI实现上使用回退覆盖 PropertyDrawer.CreatePropertyGUI 时,将使用 UIElements实现。
如果在基于 IMGUI的检查器或 EditorWindow内使用 PropertyDrawer,则将仅显示 IMGUI实现。UIElements无法在 IMGUI内运行。
以下是使用 IMGUI 写入的自定义 PropertyDrawer的示例:
using UnityEditor;
using UnityEditor.UIElements;
using UnityEngine;
using UnityEngine.UIElements;

[CustomPropertyDrawer(typeof(Ingredient))]
public class IngredientDrawerUIE : PropertyDrawer
{
    public override void OnGUI(Rect position, SerializedProperty property, GUIContent label)
    {
        EditorGUI.BeginProperty(position, label, property);

        // label
        position = EditorGUI.PrefixLabel(position, GUIUtility.GetControlID(FocusType.Passive), label);

        // 控制字段缩进 设置为不缩进
        var indent = EditorGUI.indentLevel;
        EditorGUI.indentLevel = 0;

        // 计算矩形范围
        var nameRect = new Rect(position.x, position.y, 30, position.height);
        var amountRect = new Rect(position.x + 35, position.y, 50, position.height);
        var unitRect = new Rect(position.x + 90, position.y, position.width - 90, position.height);


        // 绘制字段
        EditorGUI.PropertyField(nameRect, property.FindPropertyRelative("name"), GUIContent.none);
        EditorGUI.PropertyField(amountRect, property.FindPropertyRelative("amount"), GUIContent.none);
        EditorGUI.PropertyField(unitRect, property.FindPropertyRelative("unit"), GUIContent.none);


        // 控制字段缩进 设置为原来的数值
        EditorGUI.indentLevel = indent;

        EditorGUI.EndProperty();
    }
}
将Recipe脚本添加到对象上查看效果:
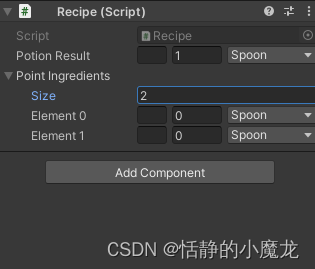
那可能有同学就会问:“嗯,很好,很强大,那有啥用呢?”

简单来说就是可以渲染 Serializable 类的实例中的样式,让我们可以实现一些快捷的作用,下面就是Unity3D中内置的PropertyDrawers,一起来看一下效果吧。
2-3、内置的PropertyDrawers
using UnityEngine;

public class ExampleClass : MonoBehaviour
{


    [Range(0, 20)]
    public int intValue = 10;

    [Header("名称")]
    public string nameStr;

    [SerializeField]
    private float floatValue = 10f;
}
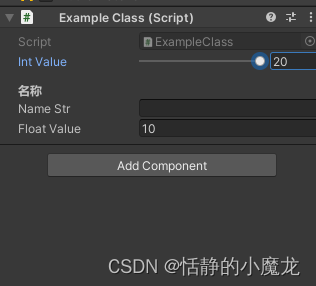
如图所示,Range可以限制intValue的取值范围0~20,Header可以给字段做一些描述或备注,SerializeField允许我们讲一个Private私有字段同Public字段一样显示在Inspector检视面板上。
2-4、重写Time特性,实现秒转分钟功能
(一)新建TimeAttribute.cs,编辑代码:
using System.Collections;
using System.Collections.Generic;
using UnityEngine;

public sealed class TimeAttribute : PropertyAttribute
{


    /// <summary>
    /// 显示小时
    /// </summary>
    public readonly bool displayHours;
    /// <summary>
    /// 显示毫秒
    /// </summary>
    public readonly bool displayMillseconds;
    /// <summary>
    /// 构造函数
    /// </summary>
    /// <param name="displayHours">显示小时</param>
    /// <param name="displayMillseconds">显示毫秒</param>
    public TimeAttribute(bool displayHours = false, bool displayMillseconds = false)
    {


        this.displayHours = displayHours;
        this.displayMillseconds = displayMillseconds;
    }
}
(2)有了TimeAttribute后,我们来自定义它如何在Inspector上进行绘制,这个需要新建一个Editor文件夹,在里面新建TimeAttributeDrawer.cs脚本,重写OnGUI方法来实现绘制,GetPropertyHeight用来定义绘制属性的高度:
using UnityEngine;
using UnityEditor;
using System;
using UnityEngine.UIElements;
using static UnityEditor.PlayerSettings;

[CustomPropertyDrawer(typeof(TimeAttribute))]
public class TimeAttributeDrawer : PropertyDrawer
{


    public override void OnGUI(Rect position, SerializedProperty property, GUIContent label)
    {


        if (property.propertyType == SerializedPropertyType.Float)
        {


            property.floatValue = EditorGUI.FloatField(new Rect(position.x, position.y, position.width * 0.6f, position.height), label, property.floatValue);
            EditorGUI.LabelField(new Rect(position.x + position.width * 0.6f, position.y, position.width * 0.4f, position.height), GetTimeFormat(property.floatValue));
        }
        else
        {


            EditorGUI.HelpBox(new Rect(position.x, position.y, position.width, position.height), "只支持float类型属性", MessageType.Error);
        }
    }

    public override float GetPropertyHeight(SerializedProperty property, GUIContent label)
    {


        return base.GetPropertyHeight(property, label);
    }

    private string GetTimeFormat(float secondsTime)
    {


        TimeAttribute ta = attribute as TimeAttribute;
        //显示小时不显示毫秒
        if (ta.displayHours && !ta.displayMillseconds)
        {


            int l = Convert.ToInt32(secondsTime);
            int hours = l / 3600;
            int minutes = l % 3600 / 60;
            int seconds = l % 3600 % 60;
            return string.Format("{0:D2}:{1:D2}:{2:D2}", hours, minutes, seconds);
        }
        //显示毫秒不显示小时
        else if (!ta.displayHours && ta.displayMillseconds)
        {


            int l = Convert.ToInt32(secondsTime * 1000);
            int minutes = l / 60000;
            int seconds = l % 60000 / 1000;
            int millSeconds = l % 60000 % 1000;
            return string.Format("{0:D2}:{1:D2}.{2:D3}", minutes, seconds, millSeconds);
        }
        //既显示小时也显示毫秒
        else if (ta.displayHours && ta.displayMillseconds)
        {


            int l = Convert.ToInt32(secondsTime * 1000);
            int hours = l / 3600000;
            int minutes = l % 3600000 / 60000;
            int seconds = l % 3600000 % 60000 / 1000;
            int millSeconds = l % 3600000 % 60000 % 1000;
            return string.Format("{0:D2}:{1:D2}:{2:D2}.{3:D3}", hours, minutes, seconds, millSeconds);
        }
        //既不显示小时也不显示毫秒
        else
        {


            int l = Convert.ToInt32(secondsTime);
            int minutes = l / 60;
            int seconds = l % 60;
            return string.Format("{0:D2}:{1:D2})", minutes, seconds);
        }
    }
}
(3)随便新建一个类,ExampleClass.cs,来调用Time特性:
using System;
using TreeEditor;
using UnityEngine;

public class ExampleClass : MonoBehaviour
{


    [Time(true)]
    public float time = 123;
}
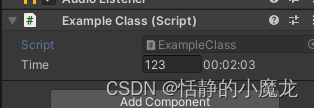
(4)将ExampleClass附加到任意对象上,运行代码:
2-5、自定义绘制可序列化的类或结构体
假设场景,我们需要制作一个人员添加功能,人员有名字、性别、年龄等属性。
那么,比较一般的实现方式如下:
using System;
using UnityEngine;


public enum Gender
{


    Man,
    Woman
}
[Serializable]
public class Person
{


    public string Name;
    public int Age;
    public Gender Sex;
}
public class ExampleClass : MonoBehaviour
{


    public Person[] people;
}
接下来,就自定义绘制Person类,需要在Editor文件夹内,新建脚本PersonDrawer.cs继承PropertyDrawer类,代码参考如下:
using UnityEngine;
using UnityEditor;

[CustomPropertyDrawer(typeof(Person))]
public class PersonDrawer : PropertyDrawer
{


    public override void OnGUI(Rect position, SerializedProperty property, GUIContent label)
    {


        EditorGUI.BeginProperty(position, label, property);
        //FocusType.Passive 使用Tab键切换时不会被选中,FocusType.Keyboard 使用Tab键切换时会被选中,很显然这里我们不需要label能被选中进行编辑
        position = EditorGUI.PrefixLabel(position, GUIUtility.GetControlID(FocusType.Passive), label);
        //不让indentLevel层级影响到同一行的绘制,因为PropertyDrawer在很多地方都有可能被用到,可能出现嵌套使用
        var indent = EditorGUI.indentLevel;
        EditorGUI.indentLevel = 0;
        var nameRect = new Rect(position.x, position.y, 80, position.height);
        var typeRect = new Rect(position.x + 85, position.y, 30, position.height);
        var overviewRect = new Rect(position.x + 120, position.y, position.width - 120, position.height);
        EditorGUI.PropertyField(nameRect, property.FindPropertyRelative("Name"), GUIContent.none);
        EditorGUI.PropertyField(typeRect, property.FindPropertyRelative("Age"), GUIContent.none);
        EditorGUI.PropertyField(overviewRect, property.FindPropertyRelative("Sex"), GUIContent.none);
        EditorGUI.indentLevel = indent;
        EditorGUI.EndProperty();
    }
}
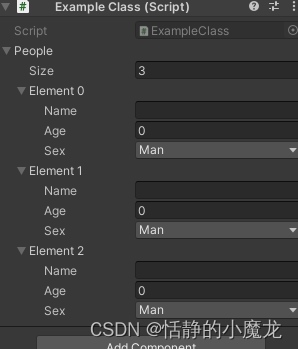
重新编译完成后,查看Inspector面板:
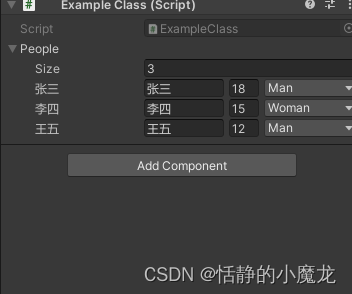
非常nice!
2-6、根据bool属性,来开启或者关闭某个对象实例
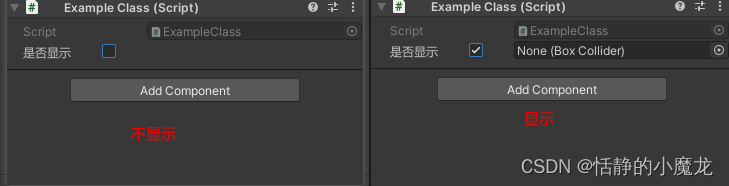
假设这么一种情况,比如勾选了isCollider,那么就应该显示BoxCollider的卡槽,如果没有勾选isCollider,就不需要显示BoxCollider的卡槽。
这种情况少,但是应该是有的,那么就来实现一下吧。
using System;
using UnityEngine;

[System.Serializable]
public class BoxColliderAttribute
{


    [SerializeField] private bool m_IsCollider;
    [SerializeField] private BoxCollider m_BoxCollider;
}

public class ExampleClass : MonoBehaviour
{


    public BoxColliderAttribute box;
}
接下来,就自定义绘制BoxColliderAttribute类,需要在Editor文件夹内,新建脚本BoxColliderAttributeDrawer.cs继承PropertyDrawer类,代码参考如下:
using UnityEditor;
using UnityEngine;

[CustomPropertyDrawer(typeof(BoxColliderAttribute), true)]
public class BoxColliderAttributeDrawer : PropertyDrawer
{


    public override void OnGUI(Rect position, SerializedProperty property, GUIContent label)
    {


        Rect drawRect = position;
        drawRect.height = EditorGUIUtility.singleLineHeight;
        EditorGUI.LabelField(position, "是否显示");
        SerializedProperty m_Selected = property.FindPropertyRelative("m_IsCollider");
        SerializedProperty m_Panel = property.FindPropertyRelative("m_BoxCollider");
        drawRect.x += 80;
        EditorGUI.PropertyField(drawRect, m_Selected, GUIContent.none);
        if (m_Selected.boolValue)
        {


            drawRect.x += 45;
            drawRect.width = position.width - 125;
            EditorGUI.PropertyField(drawRect, m_Panel, GUIContent.none);
        }

    }

    public override float GetPropertyHeight(SerializedProperty prop, GUIContent label)
    {


        return 1 * EditorGUIUtility.singleLineHeight + 1 * EditorGUIUtility.standardVerticalSpacing;
    }
}
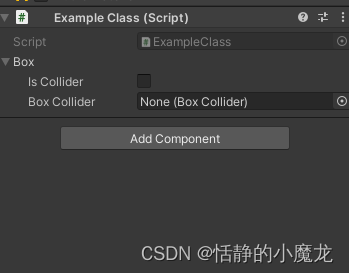
重新编译完成后,查看Inspector面板:
三、后记
PropertyDrawer还是很强大的,我们可以定义很多非常方便的Attribute去使用。
合理使用的话可以提高工作效率,省去重复工作。
如果觉得本篇文章有用别忘了点个关注,关注不迷路,持续分享更多Unity干货文章。
你的点赞就是对博主的支持,有问题记得留言:
博主主页有联系方式。
博主还有跟多宝藏文章等待你的发掘哦:
| 专栏 | 方向 | 简介 |
|---|---|---|
| Unity3D开发小游戏 | 小游戏开发教程 | 分享一些使用Unity3D引擎开发的小游戏,分享一些制作小游戏的教程。 |
| Unity3D从入门到进阶 | 入门 | 从自学Unity中获取灵感,总结从零开始学习Unity的路线,有C#和Unity的知识。 |
| Unity3D之UGUI | UGUI | Unity的UI系统UGUI全解析,从UGUI的基础控件开始讲起,然后将UGUI的原理,UGUI的使用全面教学。 |
| Unity3D之读取数据 | 文件读取 | 使用Unity3D读取txt文档、json文档、xml文档、csv文档、Excel文档。 |
| Unity3D之数据集合 | 数据集合 | 数组集合:数组、List、字典、堆栈、链表等数据集合知识分享。 |
| Unity3D之VR/AR(虚拟仿真)开发 | 虚拟仿真 | 总结博主工作常见的虚拟仿真需求进行案例讲解。 |
| Unity3D之插件 | 插件 | 主要分享在Unity开发中用到的一些插件使用方法,插件介绍等 |
| Unity3D之日常开发 | 日常记录 | 主要是博主日常开发中用到的,用到的方法技巧,开发思路,代码分享等 |
| Unity3D之日常BUG | 日常记录 | 记录在使用Unity3D编辑器开发项目过程中,遇到的BUG和坑,让后来人可以有些参考。 |