上手树莓派想玩点什么。 BLE5.0? AI? python ?
直接copy 官方的NOOBS是最方便的方式, 仅需如下几步
树莓派官方推荐的是使用其官方工具
NOOBS安装工具。
-
- 下载
NOOBS工具(https://www.raspberrypi.org/downloads/noobs/); - 下载SD卡格式化工具(https://www.sdcard.org/downloads/formatter_4/eula_windows/);
- 安装SD卡格式工具;
- 在选项Option里面设置“FORMAT SIZE ADJUSTMENT”为开启ON状态;
- 检查SD卡是否插入电脑;
- 点击格式化工具的【格式化(Format)】按钮格式化SD卡。
- 下载
- 解压NOOBS.zip文件;
- 将解压的文件复制到SD卡上面;
- 将SD卡插入到树莓派里面;
- 接上鼠标、键盘、显示器(这一部非必需);
- 接上网线(无线网卡也可以)、电源,然后就自动开机启动了。
不过这里我还是想从编译linux内核开始
搭建开发环境
vmware + ubuntu 16.04
下载源码
https://github.com/raspberrypi/linux
git clone --depth=1 https://github.com/raspberrypi/linux.git
下载tool
https://github.com/raspberrypi/tools
git clone https://github.com/raspberrypi/tools.git
确定编译工具
$ cat /proc/version
Linux version 4.10.0-28-generic (buildd@lgw01-12) (gcc version 5.4.0 20160609 (Ubuntu 5.4.0-6ubuntu1~16.04.4) ) #32~16.04.2-Ubuntu SMP Thu Jul 20 10:19:48 UTC 2017
~/Raspberry/tools-master/arm-bcm2708$ ls
arm-bcm2708hardfp-linux-gnueabi  arm-rpi-4.9.3-linux-gnueabihf
arm-bcm2708-linux-gnueabi        gcc-linaro-arm-linux-gnueabihf-raspbian
arm-linux-gnueabihf              gcc-linaro-arm-linux-gnueabihf-raspbian-x64
使用
arm-rpi-4.9.3-linux-gnueabihf
编译
Makefile 中关于ARCH 和 CROSS_COMPILE
# Cross compiling and selecting different set of gcc/bin-utils
# ---------------------------------------------------------------------------
#
# When performing cross compilation for other architectures ARCH shall be set
# to the target architecture. (See arch/* for the possibilities).
# ARCH can be set during invocation of make:
# make ARCH=ia64
# Another way is to have ARCH set in the environment.
# The default ARCH is the host where make is executed.

# CROSS_COMPILE specify the prefix used for all executables used
# during compilation. Only gcc and related bin-utils executables
# are prefixed with $(CROSS_COMPILE).
# CROSS_COMPILE can be set on the command line
# make CROSS_COMPILE=ia64-linux-
# Alternatively CROSS_COMPILE can be set in the environment.
# A third alternative is to store a setting in .config so that plain
# "make" in the configured kernel build directory always uses that.
# Default value for CROSS_COMPILE is not to prefix executables
# Note: Some architectures assign CROSS_COMPILE in their arch/*/Makefile
ARCH		?= $(SUBARCH)
CROSS_COMPILE	?= $(CONFIG_CROSS_COMPILE:"%"=%)
修改内核根目录的Makefile文件,修改下面的这两行
  ARCH      ?=arm
  CROSS_COMPILE ?=/home/xxx/Raspberry/tools-master/arm-bcm2708/arm-rpi-4.9.3-linux-gnueabihf/bin/arm-linux-gnueabihf-
或者将cross tool的path 加入到PATH中,并在make是需要加上参数,如生成配置的命令,
make ARCH=arm CROSS_COMPILE=arm-linux-gnueabihf- bcm2709_defconfig
指定KERNEL
~/Raspberry/linux$ KERNEL=kernel7
bcm2709_defconfig default configure 在arch/arm/configs下, make 生成.config
~/Raspberry/linux$ make bcm2709_defconfig
  HOSTCC  scripts/basic/fixdep
  HOSTCC  scripts/kconfig/conf.o
  SHIPPED scripts/kconfig/zconf.tab.c
  SHIPPED scripts/kconfig/zconf.lex.c
  HOSTCC  scripts/kconfig/zconf.tab.o
  HOSTLD  scripts/kconfig/conf
#
# configuration written to .config
#
生成image, dts
make zImage modules dtbs成功后在arch/arm/boot下,
~/Raspberry/linux/arch/arm/boot$ ls
bootp  compressed  dts  Image  install.sh  Makefile  zImage
安装modules
在linux内核目录顶层下创建modules目录。
$ mkdir modules
$ make INSTALL_MOD_PATH=modules modules_install
成功后,ls查看如下
modules/lib/modules/4.14.48-v7+$ ls
build              modules.builtin      modules.devname  modules.symbols.bin
kernel             modules.builtin.bin  modules.order    source
modules.alias      modules.dep          modules.softdep
modules.alias.bin  modules.dep.bin      modules.symbols
SD卡
官方的Guide:
Having built the kernel, you need to copy it onto your Raspberry Pi and install the modules; this is best done directly using an SD card reader.
First, use lsblk before and after plugging in your SD card to identify it. You should end up with something like this:
sdb
   sdb1
   sdb2
with sdb1 being the FAT (boot) partition, and sdb2 being the ext4 filesystem (root) partition.
需要两个分区
-- FAT类型 boot分区 用于放images
-- ext4类型 root分区 用于放文件系统
用fdisk 命令创建并format两个分区。
format ext4分区的命令如下
~$ sudo mkfs.ext4 /dev/sdb2
mke2fs 1.42.13 (17-May-2015)
/dev/sdb2 contains a ext4 file system
	last mounted on Sat Jun 16 05:53:04 2018
Proceed anyway? (y,n) y
Creating filesystem with 1572864 4k blocks and 393216 inodes
Filesystem UUID: 9bfea1e5-f57f-4556-8c97-029008ea8cd9
Superblock backups stored on blocks:
	32768, 98304, 163840, 229376, 294912, 819200, 884736


Allocating group tables: done
Writing inode tables: done
Creating journal (32768 blocks): done
Writing superblocks and filesystem accounting information: done
正确创建后
 sudo fdisk -l

Device     Boot   Start      End  Sectors Size Id Type
/dev/sdb1          2048  2099199  2097152   1G  b W95 FAT32
/dev/sdb2       2099200 14682111 12582912   6G 83 Linux
mount分区
~$ sudo mount /dev/sdb1 /mnt/sdb1

~$ sudo mount /dev/sdb2 /mnt/sdb2
将image, dts, fs 拷贝到SD卡
sudo cp arch/arm/boot/zImage /mnt/sdb1/$KERNEL.img
sudo cp arch/arm/boot/dts/*.dtb /mnt/sdb1/
sudo cp arch/arm/boot/dts/overlays/*.dtb* /mnt/sdb1/overlays/
sudo cp arch/arm/boot/dts/overlays/README /mnt/sdb1/overlays/
sudo cp -r modules/lib/ /mnt/sdb2/
sudo umount /dev/sdb1
sudo umount /dev/sdb2
发现启动是有问题的,
下图是NOOBS生成的boot 分区中的文件,除了kernel7.img还是有bootcode.bin, start.elf 等
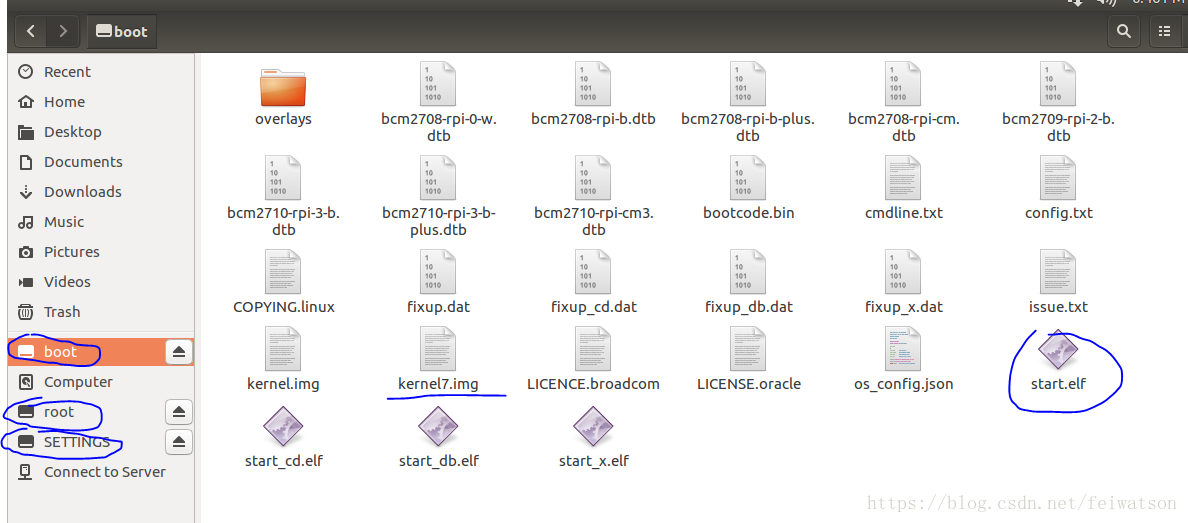
因此,采用NOOBS格式化并成功启动raspberry系统的板子,重复上面的步骤将zImage dtb等copy到boot 分区,将modules/lib copy到root分区。
If it's a NOOBS card, you should see something like this:
sdb
  sdb1
  sdb2
  sdb5
  sdb6
  sdb7
with sdb6 being the FAT (boot) partition, and sdb7 being the ext4 filesystem (root) partition.
可以成功启动。
参考:
https://www.cnblogs.com/rond/p/4970071.html
https://www.cnblogs.com/qiengo/p/5284168.html
https://blog.csdn.net/yang562887291/article/details/76649050
ubuntu 16.04的参考
https://www.cnblogs.com/nelucifer/p/7435354.html