本文将简要回顾一下卡尔曼滤波理论,然后详细介绍如何在OpenCV中使用卡尔曼滤波进行跟踪,最后给两个程序实例。
1. 卡尔曼滤波理论回顾
对于一个动态系统,我们首先定义一组状态空间方程
状态方程:

测量方程:

xk是状态向量,zk是测量向量,Ak是状态转移矩阵,uk是控制向量,Bk是控制矩阵,wk是系统误差(噪声),Hk是测量矩阵,vk是测量误差(噪声)。wk和vk都是高斯噪声,即

整个卡尔曼滤波的过程就是个递推计算的过程,不断的“预测——更新——预测——更新……”
预测
预测状态值:

预测最小均方误差:

更新
测量误差:
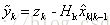
测量协方差:

最优卡尔曼增益:
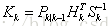
修正状态值:

修正最小均方误差:

2.OpenCV中的KalmanFilter详解
OpenCV中有两个版本的卡尔曼滤波方法KalmanFilter(C++)和CvKalman(C),用法差不太多,这里只介绍KalmanFilter。
C++版本中将KalmanFilter封装到一个类中,其结构如下所示:
-
class CV_EXPORTS_W KalmanFilter
-
{
-
public:
-
CV_WRAP KalmanFilter();
//构造默认KalmanFilter对象
-
CV_WRAP KalmanFilter(int dynamParams, int measureParams, int controlParams=0, int type=CV_32F);
//完整构造KalmanFilter对象方法
-
void init(int dynamParams, int measureParams, int controlParams=0, int type=CV_32F);
//初始化KalmanFilter对象,会替换原来的KF对象
-
-
CV_WRAP const Mat& predict(const Mat& control=Mat());
//计算预测的状态值
-
CV_WRAP const Mat& correct(const Mat& measurement);
//根据测量值更新状态值
-
-
Mat statePre;
//预测值 (x'(k)): x(k)=A*x(k-1)+B*u(k)
-
Mat statePost;
//状态值 (x(k)): x(k)=x'(k)+K(k)*(z(k)-H*x'(k))
-
Mat transitionMatrix;
//状态转移矩阵 (A)
-
Mat controlMatrix;
//控制矩阵 B
-
Mat measurementMatrix;
//测量矩阵 H
-
Mat processNoiseCov;
//系统误差 Q
-
Mat measurementNoiseCov;
//测量误差 R
-
Mat errorCovPre;
//最小均方误差 (P'(k)): P'(k)=A*P(k-1)*At + Q)
-
Mat gain;
//卡尔曼增益 (K(k)): K(k)=P'(k)*Ht*inv(H*P'(k)*Ht+R)
-
Mat errorCovPost;
//修正的最小均方误差 (P(k)): P(k)=(I-K(k)*H)*P'(k)
-
-
// 临时矩阵
-
Mat temp1;
-
Mat temp2;
-
Mat temp3;
-
Mat temp4;
-
Mat temp5;
-
};
-
-
enum
-
{
-
OPTFLOW_USE_INITIAL_FLOW = CV_LKFLOW_INITIAL_GUESSES,
-
OPTFLOW_LK_GET_MIN_EIGENVALS = CV_LKFLOW_GET_MIN_EIGENVALS,
-
OPTFLOW_FARNEBACK_GAUSSIAN =
256
-
};
函数原型见:…..\OpenCV2\sources\modules\ocl\src\kalman.cpp
只有四个方法: 构造KF对象KalmanFilter(DP,MP,CP)、初始化KF对象init(DP,MP,CP)、预测predict( )、更新correct( )。除非你要重新构造KF对象,否则用不到init( )。
KalmanFilter(DP,MP,CP)和init( )就是赋值,没什么好说的。
注意:KalmanFilter结构体中并没有测量值,测量值需要自己定义,而且一定要定义,因为后面要用。
step1:定义KalmanFilter类并初始化
//构造KF对象
KalmanFilter KF(DP, MP, 0);
//初始化相关参数
KF.transitionMatrix 转移矩阵 A
KF.measurementMatrix 测量矩阵 H
KF.processNoiseCov 过程噪声 Q
KF.measurementNoiseCov 测量噪声 R
KF.errorCovPost 最小均方误差 P
KF.statePost 系统初始状态 x(0)
Mat measurement 定义初始测量值 z(0)
step2:预测
KF.predict( ) //返回的是下一时刻的状态值KF.statePost (k+1)
step3:更新
更新measurement; //注意measurement不能通过观测方程进行计算得到,要自己定义!
更新KF KF.correct(measurement)
最终的结果应该是更新后的statePost.
相关参数的确定
对于系统状态方程,简记为Y=AX+B,X和Y是表示系统状态的列向量,A是转移矩阵,B是其他项。
状态值(向量)只要能表示系统的状态即可,状态值的维数决定了转移矩阵A的维数,比如X和Y是N×1的,则A是N×N的。
A的确定跟X有关,只要保证方程中不相干项的系数为0即可,看下面例子
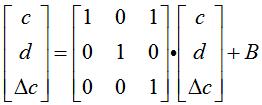
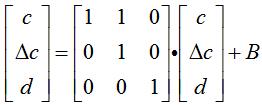
X和Y是二维的,
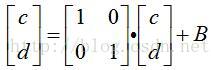
X和Y是三维的,
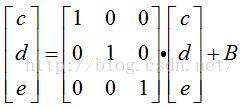
X和Y是三维的,但c和△ c是相关项
上面的1也可以是其他值。
下面对predict( ) 和correct( )函数介绍下,可以不用看,不影响编程。
-
CV_EXPORTS const oclMat& KalmanFilter::predict(const oclMat& control)
-
{
-
gemm(transitionMatrix, statePost,
1, oclMat(),
0, statePre);
-
oclMat temp;
-
-
if(control.data)
-
gemm(controlMatrix, control,
1, statePre,
1, statePre);
-
gemm(transitionMatrix, errorCovPost,
1, oclMat(),
0, temp1);
-
gemm(temp1, transitionMatrix,
1, processNoiseCov,
1, errorCovPre, GEMM_2_T);
-
statePre.copyTo(statePost);
-
return statePre;
-
}
gemm( )是矩阵的广义乘法
void gemm(const GpuMat& src1, constGpuMat& src2, double alpha, const GpuMat& src3, double beta,GpuMat& dst, int flags=0, Stream& stream=Stream::Null())
dst = alpha · src1 · src2 +beta· src3
上面,oclMat()其实是uk,只不过默认为0,所以没赋值。整个过程就计算了x'和P’。(用x'代表x的预测值,用P'代表P的预测值)。GEMM_2_T表示对第2个参数转置。
可见,和第一部分的理论介绍完全一致。x’(k)=1·A·x(k-1)
如果B非空, x'(k) = 1·B·u + 1·x'(k-1)
temp1 = 1·A·P(k-1) + 0·u(k)
P’(k) = 1· temp1·AT + 1· Qk= A·P(k-1)·AT + 1· Qk
-
CV_EXPORTS const oclMat& KalmanFilter::correct(const oclMat& measurement)
-
{
-
CV_Assert(measurement.empty() ==
false);
-
gemm(measurementMatrix, errorCovPre,
1, oclMat(),
0, temp2);
-
gemm(temp2, measurementMatrix,
1, measurementNoiseCov,
1, temp3, GEMM_2_T);
-
Mat temp;
-
solve(Mat(temp3), Mat(temp2), temp, DECOMP_SVD);
-
temp4.upload(temp);
-
gain = temp4.t();
-
gemm(measurementMatrix, statePre,
-1, measurement,
1, temp5);
-
gemm(gain, temp5,
1, statePre,
1, statePost);
-
gemm(gain, temp2,
-1, errorCovPre,
1, errorCovPost);
-
return statePost;
-
}
求解线型最小二乘估计

temp2 = 1· H·P’ + 0·u(k)
temp3 = 1· temp2·HT + 1·R = H·P’·HT+ 1· R 也就是上面的Sk
temp = argmin||tem2- temp3||
K=temp
temp5 = -1· H·x’ + 1·zk 就是上面的y’。
x = 1·K·temp5 + 1·x’ = KT·y’ +x’
P =-1·K·temp2 + 1·P’ = -K·H·P’+P’ = (I- K·H) P’也和第一部分的理论完全一致。
通过深入函数内部,学到了两个实用的函数哦。矩阵广义乘法gemm( )、最小二乘估计solve( )
补充:
1)以例2为例,为什么状态值一般都设置成(x,y,△x,△y)?我们不妨设置成(x,y,△x),对应的转移矩阵也改成3×3的。可以看到仍能跟上,不过在x方向跟踪速度快,在y方向跟踪速度慢。进一步设置成(x,y)和2×2的转移矩阵,程序的跟踪速度简直是龟速。所以,简单理解,△x和△y严重影响对应方向上的跟踪速度。
3.实例
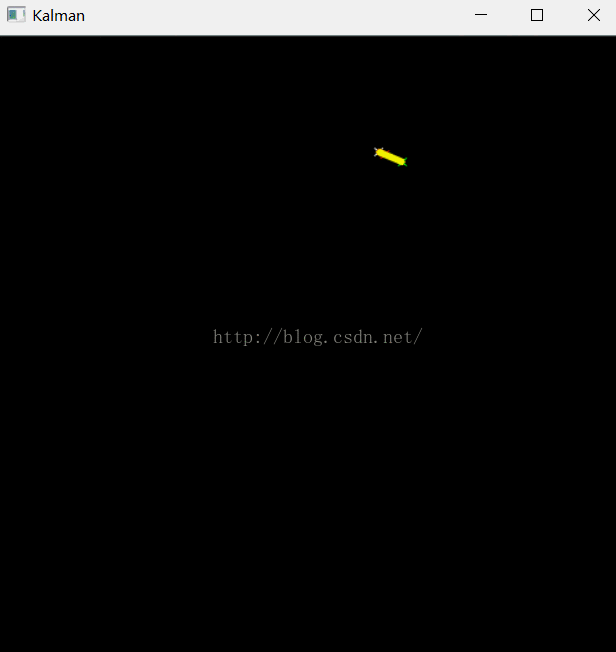
例1 OpenCV自带的示例程序
-
#include "opencv2/video/tracking.hpp"
-
#include "opencv2/highgui/highgui.hpp"
-
#include <iostream>
-
#include <stdio.h>
-
using
namespace
std;
-
using
namespace cv;
-
-
//计算相对窗口的坐标值,因为坐标原点在左上角,所以sin前有个负号
-
static inline Point calcPoint(Point2f center, double R, double angle)
-
{
-
return center + Point2f((
float)
cos(angle), (
float)-
sin(angle))*(
float)R;
-
}
-
-
static void help()
-
{
-
printf(
"\nExamle of c calls to OpenCV's Kalman filter.\n"
-
" Tracking of rotating point.\n"
-
" Rotation speed is constant.\n"
-
" Both state and measurements vectors are 1D (a point angle),\n"
-
" Measurement is the real point angle + gaussian noise.\n"
-
" The real and the estimated points are connected with yellow line segment,\n"
-
" the real and the measured points are connected with red line segment.\n"
-
" (if Kalman filter works correctly,\n"
-
" the yellow segment should be shorter than the red one).\n"
-
"\n"
-
" Pressing any key (except ESC) will reset the tracking with a different speed.\n"
-
" Pressing ESC will stop the program.\n"
-
);
-
}
-
-
int main(int, char**)
-
{
-
help();
-
Mat img(500, 500, CV_8UC3);
-
KalmanFilter KF(2, 1, 0);
//创建卡尔曼滤波器对象KF
-
Mat state(2, 1, CV_32F);
//state(角度,△角度)
-
Mat processNoise(2, 1, CV_32F);
-
Mat measurement = Mat::zeros(
1,
1, CV_32F);
//定义测量值
-
char code = (
char)
-1;
-
-
for(;;)
-
{
-
//1.初始化
-
randn( state, Scalar::all(
0), Scalar::all(
0.1) );
//
-
KF.transitionMatrix = *(Mat_<
float>(
2,
2) <<
1,
1,
0,
1);
//转移矩阵A[1,1;0,1]
-
-
-
//将下面几个矩阵设置为对角阵
-
setIdentity(KF.measurementMatrix);
//测量矩阵H
-
setIdentity(KF.processNoiseCov, Scalar::all(
1e-5));
//系统噪声方差矩阵Q
-
setIdentity(KF.measurementNoiseCov, Scalar::all(
1e-1));
//测量噪声方差矩阵R
-
setIdentity(KF.errorCovPost, Scalar::all(
1));
//后验错误估计协方差矩阵P
-
-
randn(KF.statePost, Scalar::all(
0), Scalar::all(
0.1));
//x(0)初始化
-
-
for(;;)
-
{
-
Point2f center(img.cols*0.5f, img.rows*0.5f);
//center图像中心点
-
float R = img.cols/
3.f;
//半径
-
double stateAngle = state.at<
float>(
0);
//跟踪点角度
-
Point statePt = calcPoint(center, R, stateAngle);
//跟踪点坐标statePt
-
-
//2. 预测
-
Mat prediction = KF.predict();
//计算预测值,返回x'
-
double predictAngle = prediction.at<
float>(
0);
//预测点的角度
-
Point predictPt = calcPoint(center, R, predictAngle);
//预测点坐标predictPt
-
-
-
//3.更新
-
//measurement是测量值
-
randn( measurement, Scalar::all(
0), Scalar::all(KF.measurementNoiseCov.at<
float>(
0)));
//给measurement赋值N(0,R)的随机值
-
-
// generate measurement
-
measurement += KF.measurementMatrix*state;
//z = z + H*x;
-
-
double measAngle = measurement.at<
float>(
0);
-
Point measPt = calcPoint(center, R, measAngle);
-
-
// plot points
-
//定义了画十字的方法,值得学习下
-
#define drawCross( center, color, d ) \
-
line( img, Point( center.x - d, center.y - d ), \
-
Point( center.x + d, center.y + d ), color, 1, CV_AA, 0); \
-
line( img, Point( center.x + d, center.y - d ), \
-
Point( center.x - d, center.y + d ), color, 1, CV_AA, 0 )
-
-
img = Scalar::all(
0);
-
drawCross( statePt, Scalar(
255,
255,
255),
3 );
-
drawCross( measPt, Scalar(
0,
0,
255),
3 );
-
drawCross( predictPt, Scalar(
0,
255,
0),
3 );
-
line( img, statePt, measPt, Scalar(
0,
0,
255),
3, CV_AA,
0 );
-
line( img, statePt, predictPt, Scalar(
0,
255,
255),
3, CV_AA,
0 );
-
-
-
//调用kalman这个类的correct方法得到加入观察值校正后的状态变量值矩阵
-
if(theRNG().uniform(
0,
4) !=
0)
-
KF.correct(measurement);
-
-
//不加噪声的话就是匀速圆周运动,加了点噪声类似匀速圆周运动,因为噪声的原因,运动方向可能会改变
-
randn( processNoise, Scalar(
0), Scalar::all(
sqrt(KF.processNoiseCov.at<
float>(
0,
0))));
//vk
-
state = KF.transitionMatrix*state + processNoise;
-
-
imshow(
"Kalman", img );
-
code = (
char)waitKey(
100);
-
-
if( code >
0 )
-
break;
-
}
-
if( code ==
27 || code ==
'q' || code ==
'Q' )
-
break;
-
}
-
-
return
0;
-
}
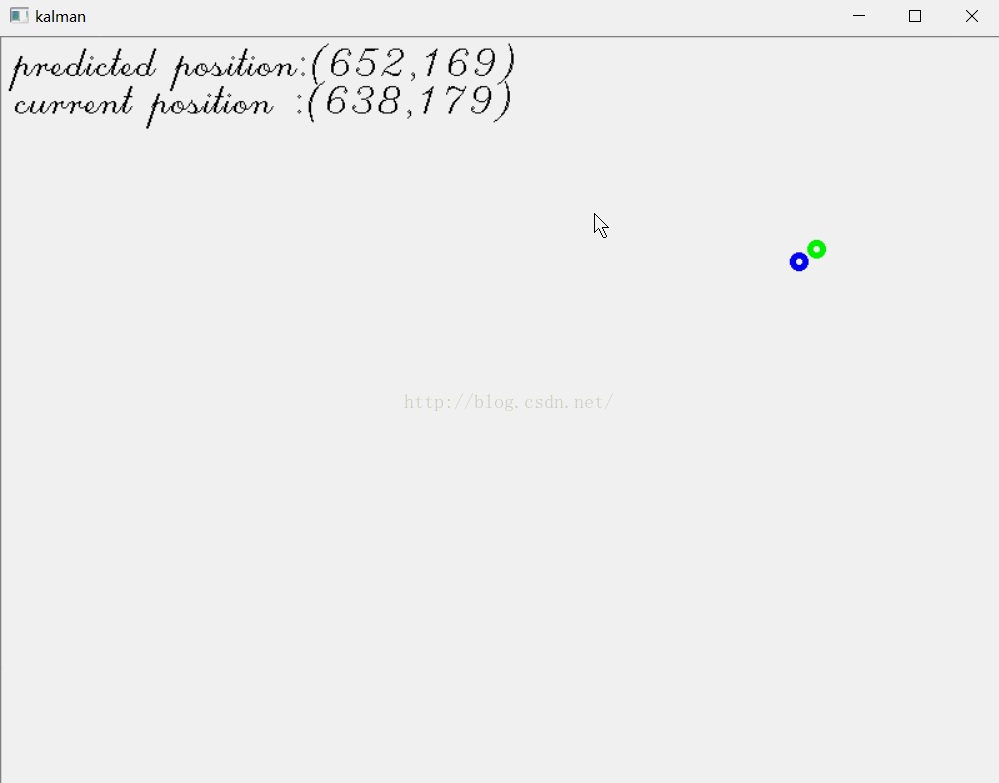
例2 跟踪鼠标位置
在我介绍粒子滤波的博文“学习Opencv2——粒子滤波Condensation算法”里,有个例3,是跟踪鼠标位置。现在我们用卡尔曼滤波来实现。
-
#include "opencv2/video/tracking.hpp"
-
#include "opencv2/highgui/highgui.hpp"
-
#include <stdio.h>
-
using
namespace cv;
-
using
namespace
std;
-
-
const
int winHeight=
600;
-
const
int winWidth=
800;
-
-
-
Point mousePosition= Point(winWidth>>
1,winHeight>>
1);
-
-
//mouse event callback
-
void mouseEvent(int event, int x, int y, int flags, void *param )
-
{
-
if (event==CV_EVENT_MOUSEMOVE) {
-
mousePosition = Point(x,y);
-
}
-
}
-
-
int main (void)
-
{
-
RNG rng;
-
//1.kalman filter setup
-
const
int stateNum=
4;
//状态值4×1向量(x,y,△x,△y)
-
const
int measureNum=
2;
//测量值2×1向量(x,y)
-
KalmanFilter KF(stateNum, measureNum, 0);
-
-
KF.transitionMatrix = *(Mat_<
float>(
4,
4) <<
1,
0,
1,
0,
0,
1,
0,
1,
0,
0,
1,
0,
0,
0,
0,
1);
//转移矩阵A
-
setIdentity(KF.measurementMatrix);
//测量矩阵H
-
setIdentity(KF.processNoiseCov, Scalar::all(
1e-5));
//系统噪声方差矩阵Q
-
setIdentity(KF.measurementNoiseCov, Scalar::all(
1e-1));
//测量噪声方差矩阵R
-
setIdentity(KF.errorCovPost, Scalar::all(
1));
//后验错误估计协方差矩阵P
-
rng.fill(KF.statePost,RNG::UNIFORM,
0,winHeight>winWidth?winWidth:winHeight);
//初始状态值x(0)
-
Mat measurement = Mat::zeros(measureNum,
1, CV_32F);
//初始测量值x'(0),因为后面要更新这个值,所以必须先定义
-
-
namedWindow(
"kalman");
-
setMouseCallback(
"kalman",mouseEvent);
-
-
Mat image(winHeight,winWidth,CV_8UC3,Scalar(0));
-
-
while (
1)
-
{
-
//2.kalman prediction
-
Mat prediction = KF.predict();
-
Point predict_pt = Point(prediction.at<
float>(
0),prediction.at<
float>(
1) );
//预测值(x',y')
-
-
//3.update measurement
-
measurement.at<
float>(
0) = (
float)mousePosition.x;
-
measurement.at<
float>(
1) = (
float)mousePosition.y;
-
-
//4.update
-
KF.correct(measurement);
-
-
//draw
-
image.setTo(Scalar(
255,
255,
255,
0));
-
circle(image,predict_pt,
5,Scalar(
0,
255,
0),
3);
//predicted point with green
-
circle(image,mousePosition,
5,Scalar(
255,
0,
0),
3);
//current position with red
-
-
char buf[
256];
-
sprintf_s(buf,
256,
"predicted position:(%3d,%3d)",predict_pt.x,predict_pt.y);
-
putText(image,buf,Point(
10,
30),CV_FONT_HERSHEY_SCRIPT_COMPLEX,
1,Scalar(
0,
0,
0),
1,
8);
-
sprintf_s(buf,
256,
"current position :(%3d,%3d)",mousePosition.x,mousePosition.y);
-
putText(image,buf,cvPoint(
10,
60),CV_FONT_HERSHEY_SCRIPT_COMPLEX,
1,Scalar(
0,
0,
0),
1,
8);
-
-
imshow(
"kalman", image);
-
int key=waitKey(
3);
-
if (key==
27){
//esc
-
break;
-
}
-
}
-
}
结果
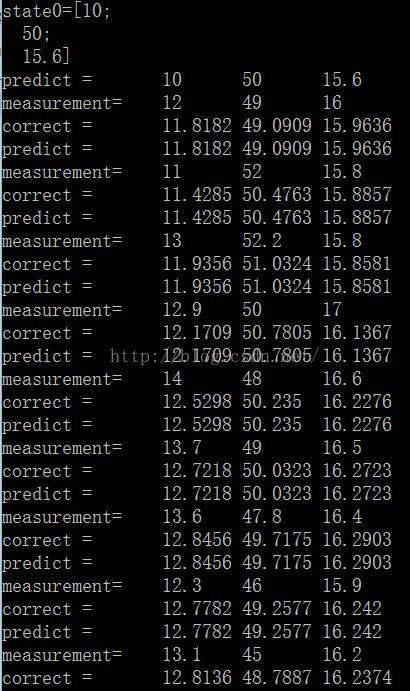
例3
-
#include "opencv2/video/tracking.hpp"
-
#include <opencv2/legacy/legacy.hpp> //#include "cvAux.h"
-
#include <opencv2/highgui/highgui.hpp>
-
#include <opencv2/core/core.hpp>
-
#include <stdio.h>
-
-
using
namespace cv;
-
using
namespace
std;
-
-
int main( )
-
{
-
float A[
10][
3] =
-
{
-
10,
50,
15.6,
-
12,
49,
16,
-
11,
52,
15.8,
-
13,
52.2,
15.8,
-
12.9,
50,
17,
-
14,
48,
16.6,
-
13.7,
49,
16.5,
-
13.6,
47.8,
16.4,
-
12.3,
46,
15.9,
-
13.1,
45,
16.2
-
};
-
-
const
int stateNum=
3;
-
const
int measureNum=
3;
-
KalmanFilter KF(stateNum, measureNum, 0);
-
KF.transitionMatrix = *(Mat_<
float>(
3,
3) <<
1,
0,
0,
0,
1,
0,
0,
0,
1);
//转移矩阵A
-
setIdentity(KF.measurementMatrix);
//测量矩阵H
-
setIdentity(KF.processNoiseCov, Scalar::all(
1e-5));
//系统噪声方差矩阵Q
-
setIdentity(KF.measurementNoiseCov, Scalar::all(
1e-1));
//测量噪声方差矩阵R
-
setIdentity(KF.errorCovPost, Scalar::all(
1));
-
Mat measurement = Mat::zeros(measureNum,
1, CV_32F);
-
-
//初始状态值
-
KF.statePost = *(Mat_<
float>(
3,
1) <<A[
0][
0],A[
0][
1],A[
0][
2]);
-
cout<<
"state0="<<KF.statePost<<
endl;
-
-
for(
int i=
1;i<=
9;i++)
-
{
-
//预测
-
Mat prediction = KF.predict();
-
//计算测量值
-
measurement.at<
float>(
0) = (
float)A[i][
0];
-
measurement.at<
float>(
1) = (
float)A[i][
1];
-
measurement.at<
float>(
2) = (
float)A[i][
2];
-
//更新
-
KF.correct(measurement);
-
//输出结果
-
cout<<
"predict ="<<
"\t"<<prediction.at<
float>(
0)<<
"\t"<<prediction.at<
float>(
1)<<
"\t"<<prediction.at<
float>(
2)<<
endl;
-
cout<<
"measurement="<<
"\t"<<measurement.at<
float>(
0)<<
"\t"<<measurement.at<
float>(
1)<<
"\t"<<measurement.at<
float>(
2)<<
endl;
-
cout<<
"correct ="<<
"\t"<<KF.statePost.at<
float>(
0)<<
"\t"<<KF.statePost.at<
float>(
1)<<
"\t"<<KF.statePost.at<
float>(
2)<<
endl;
-
}
-
system(
"pause");
-
}