tensorrtx C++版本的yolov5 tensorRT加速。 感谢开源大佬的无私奉献。
环境前提:搭建好YOLOv5所需环境,Jetson Nano自带了tensorRT环境。
进入正题,首先是tensorrtx 项目的使用。
简单翻译一下仓库readme。
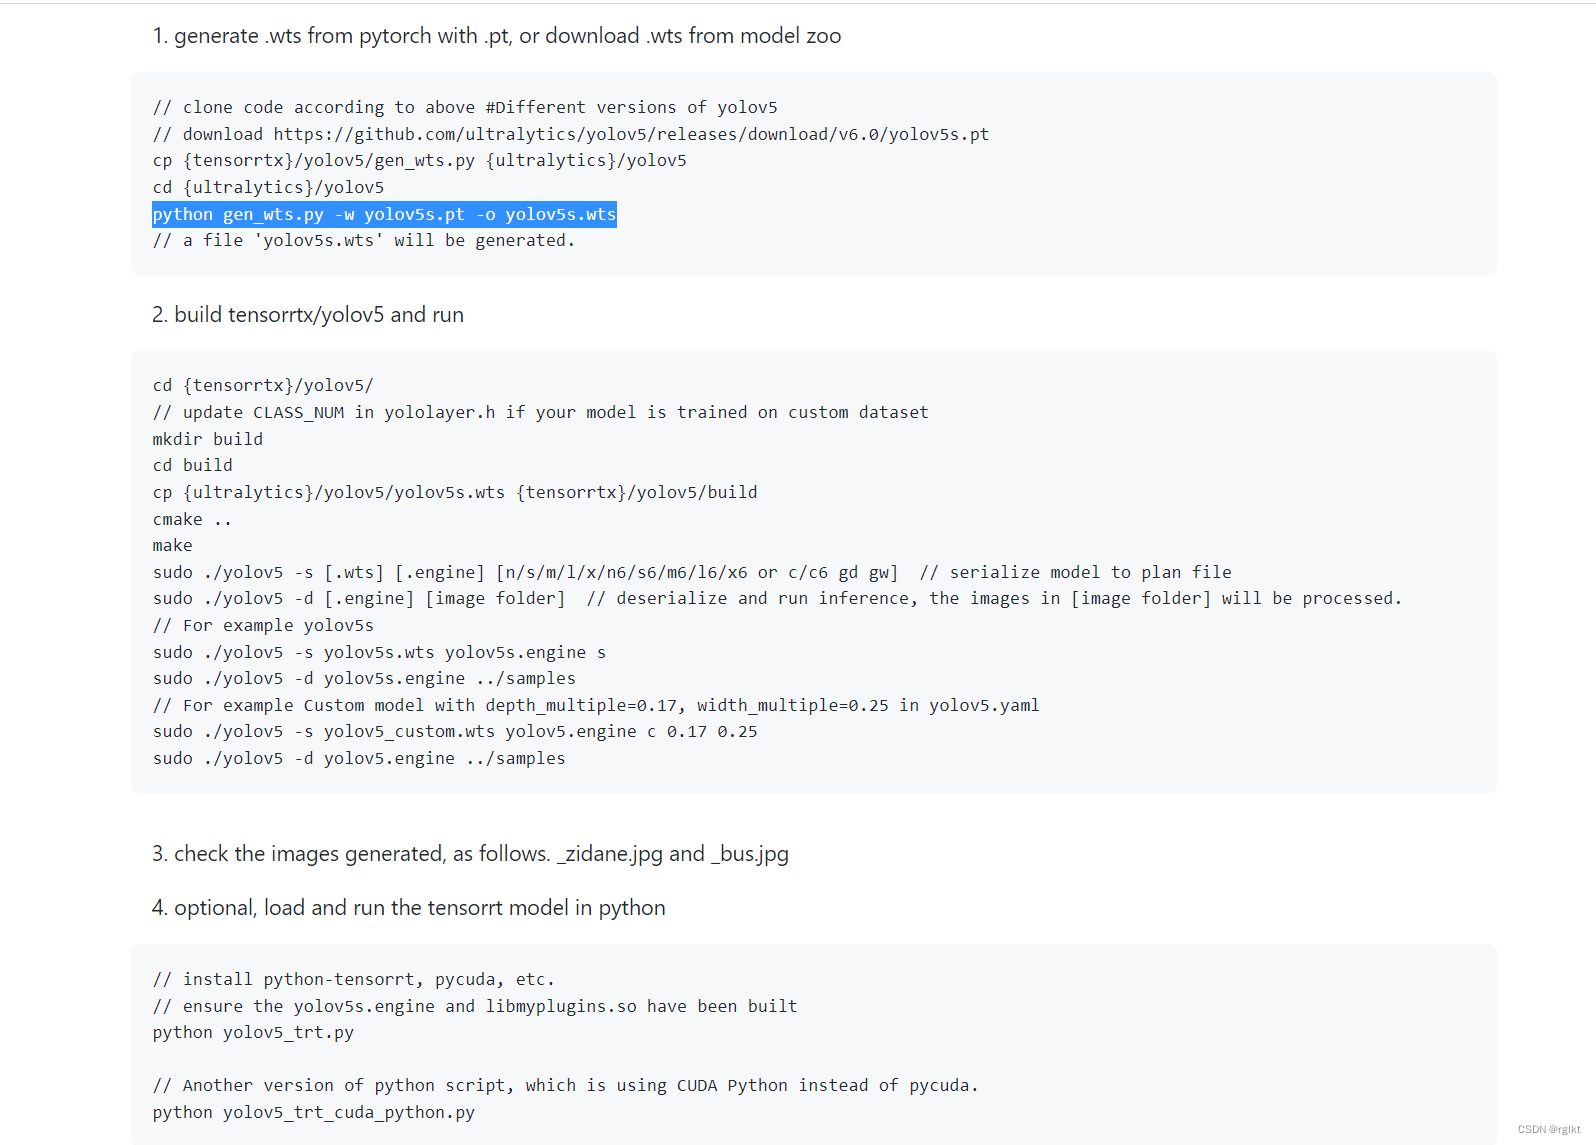
第一步生成后续需要使用到的wts文件。准备好tensorrtx yolov5代码,yolov5官方代码,以及模型权(以官方yolov5s.pt为例),将tensorrtx代码中的gen_wts.py文件复制到yolov5代码文件夹下。使用
python3 gen_wts.py -w yolov5s.pt -o yolov5s.wts
生成.wts文件,注意jetson nano中python是使用的python2.x版本,现在应该都是3.x版本的,所以用python3而不是python。
第二步,使用cmake构建tensorrtx项目并使用。
在tensorrtx yolov5 代码下创建build文件夹,并将第一步生成的wts文件复制到这个文件夹下。进入build文件夹输入以下命令,构建项目
cmake ..
make
生成可执行文件

使用以下命令生成tensorRT引擎文件
sudo ./yolov5 -s yolov5s.wts yolov5s.engine s

先准备一下测试用的图片,这里使用yolov5的图片,将tensorrtx yolov5中的samples删除,重新创建一个samples文件夹,并将yolov5以下路径的图片复制到samples文件夹下

(发现这里的cp命令错了,cp到tensorrt的根目录下了,注意复制到samples文件下)
使用可执行文件来使用tensorrtx生成的engine文件(记得回到build目录)
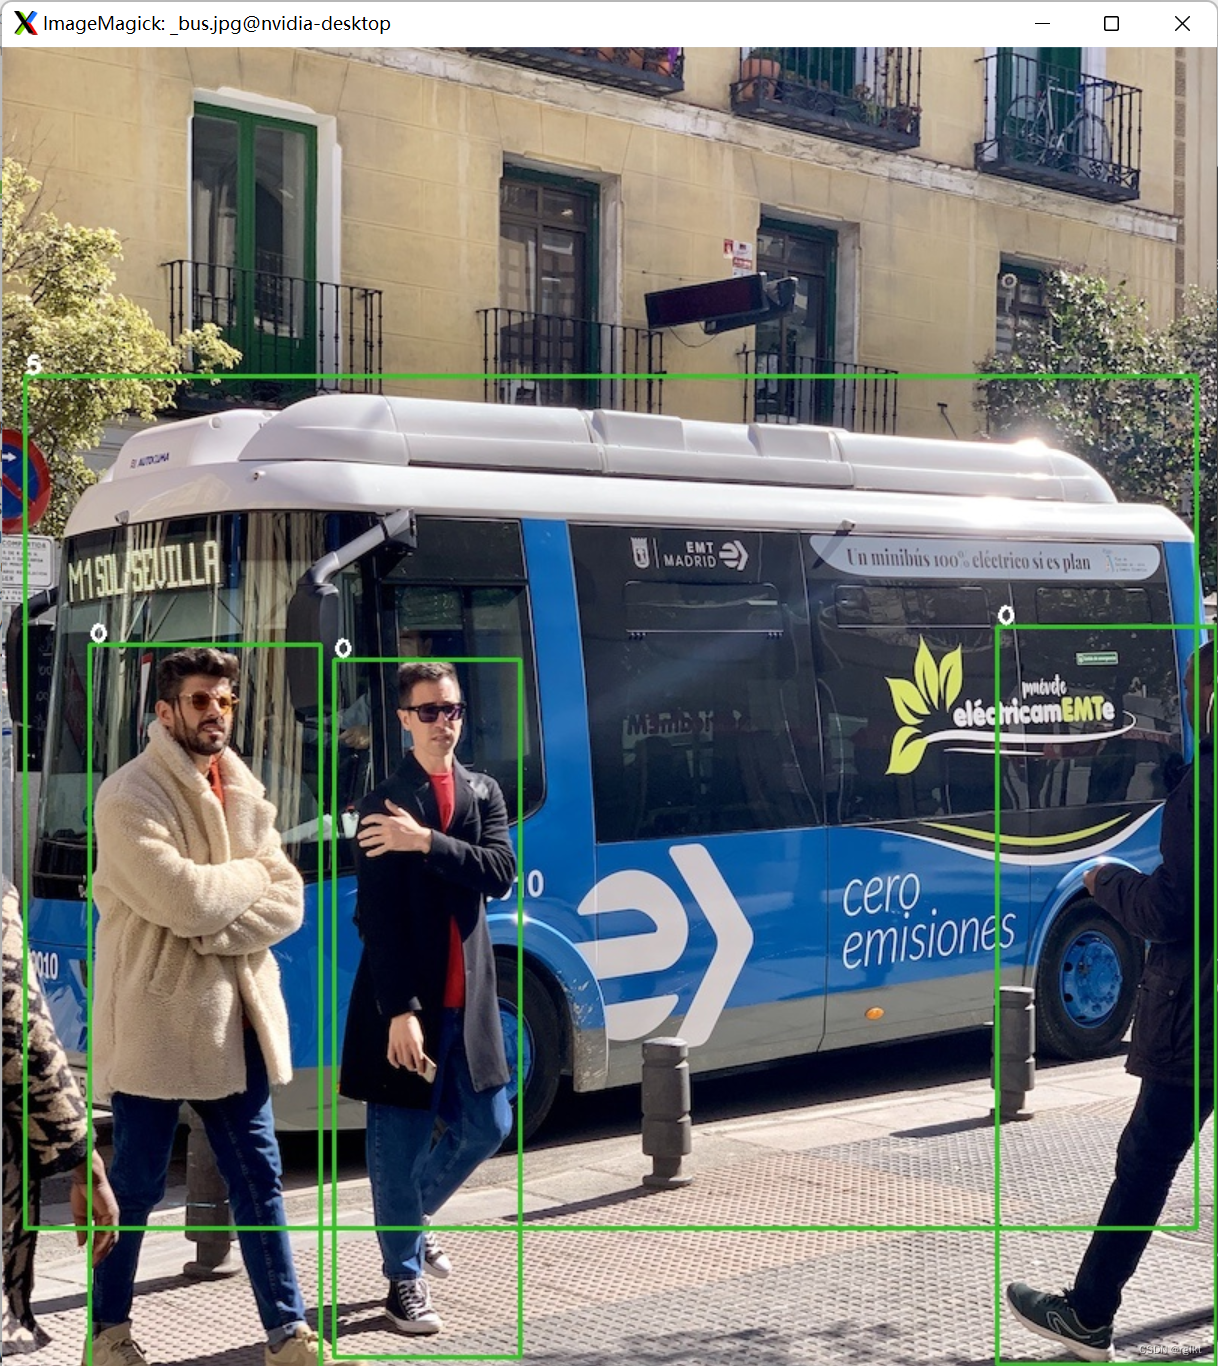
sudo ./yolov5 -d yolov5s.engine ../samples

模型没有预热,第一张照片耗时久很正常。
将其集成进qt项目中
首先是qt pro文件,以下是jetson nano环境下的配置文件。简单说明一下,除了opencv,qt,libtorch和tensorrt所需要的库和头文件,还有一个很重要的部分是需要编译.cuda文件,tensorrtx中部分函数是使用cuda进行显卡加速的,因此项目需要配置cuda文件的编译库。
#-------------------------------------------------
#
# Project created by QtCreator 2022-04-06T13:51:43
#
#-------------------------------------------------

QT       += core gui

greaterThan(QT_MAJOR_VERSION, 4): QT += widgets

TARGET = guiTensorRT
TEMPLATE = app

# The following define makes your compiler emit warnings if you use
# any feature of Qt which has been marked as deprecated (the exact warnings
# depend on your compiler). Please consult the documentation of the
# deprecated API in order to know how to port your code away from it.
DEFINES += QT_DEPRECAT/D_WARNINGS

# In order to do so, uncomment the following line.
# You can also select to disable deprecated APIs only up to a certain version of Qt.
#DEFINES += QT_DISABLE_DEPRECATED_BEFORE=0x060000    # disables all the APIs deprecated before Qt 6.0.0


SOURCES += \
        main.cpp \
        gui.cpp \
        yolov5tr.cpp \
        common.cpp

HEADERS += \
        gui.h \
        yolov5tr.h \
        common.h

# opencv
INCLUDEPATH += \
        /usr/include/opencv4/opencv2 \
        /usr/include/opencv4 \

LIBS += /usr/lib/aarch64-linux-gnu/libopencv* \


# libtorch
#INCLUDEPATH += \
#        /home/nvidia/.local/lib/python3.6/site-packages/torch/include/torch/csrc/api/include \
#        /home/nvidia/.local/lib/python3.6/site-packages/torch/include \

#LIBS += \
#        /home/nvidia/.local/lib/python3.6/site-packages/torch/lib/*.so \
#        -L/home/nvidia/.local/lib/python3.6/site-packages/torch/lib \
#        -Wl,--no-as-needed -ltorch_cuda # force to link torch_cuda


INCLUDEPATH += \
        /usr/local/cuda-10.2/targets/aarch64-linux/include/ \
        /usr/local/cuda-10.2/include/ \
        /usr/include/aarch64-linux-gnu \
        /usr/src/tensorrt/samples/common/

LIBS += \
        /usr/local/cuda-10.2/targets/aarch64-linux/lib/*.so \
        /usr/local/cuda-10.2/lib64/*.so \
        /usr/lib/aarch64-linux-gnu/*.so # cannot link opencvlib twice


#tensorRT
INCLUDEPATH += \
        /home/nvidia/Desktop/yolov5-tensorRT

LIBS += \
        /home/nvidia/Desktop/yolov5-tensorRT/build/*.so \
        -L/home/nvidia/Desktop/yolov5-tensorRT/build/

#cuda
# yolov5 tensorrt dir
HEADERS += \
    /home/nvidia/Desktop/yolov5-tensorRT/preprocess.h \

CUDA_SOURCES  += \
    /home/nvidia/Desktop/yolov5-tensorRT/preprocess.cu

CUDA_SDK = "/usr/local/cuda-10.2/"            # Path to cuda SDK install
CUDA_DIR = "/usr/local/cuda-10.2/"            # Path to cuda toolkit install

# DO NOT EDIT BEYOND THIS UNLESS YOU KNOW WHAT YOU ARE DOING....

SYSTEM_NAME = ubuntu         # Depending on your system either 'Win32', 'x64', or 'Win64'
SYSTEM_TYPE = 64            # '32' or '64', depending on your system
CUDA_ARCH = sm_53           # Type of CUDA architecture, for example 'compute_10', 'compute_11', 'sm_10' 'sm_50'
                            # https://blog.csdn.net/lb1244206405/article/details/90718040
NVCC_OPTIONS = --use_fast_math


# include paths
INCLUDEPATH += $$CUDA_DIR/include

# library directories
QMAKE_LIBDIR += $$CUDA_DIR/lib64/

CUDA_OBJECTS_DIR = ./


# Add the necessary libraries
CUDA_LIBS = -lcuda -lcudart

# The following makes sure all path names (which often include spaces) are put between quotation marks
CUDA_INC = $$join(INCLUDEPATH,'" -I"','-I"','"')
#LIBS += $$join(CUDA_LIBS,'.so ', '', '.so')
LIBS += $$CUDA_LIBS

# Configuration of the Cuda compiler
CONFIG(debug, debug|release) {
    # Debug mode
    cuda_d.input = CUDA_SOURCES
    cuda_d.output = $$CUDA_OBJECTS_DIR/${QMAKE_FILE_BASE}.o
    cuda_d.commands = $$CUDA_DIR/bin/nvcc -D_DEBUG $$NVCC_OPTIONS $$CUDA_INC $$NVCC_LIBS --machine $$SYSTEM_TYPE -arch=$$CUDA_ARCH -c -o ${QMAKE_FILE_OUT} ${QMAKE_FILE_NAME}
    cuda_d.dependency_type = TYPE_C
    QMAKE_EXTRA_COMPILERS += cuda_d
}
else {
    # Release mode
    cuda.input = CUDA_SOURCES
    cuda.output = $$CUDA_OBJECTS_DIR/${QMAKE_FILE_BASE}.o
    cuda.commands = $$CUDA_DIR/bin/nvcc $$NVCC_OPTIONS $$CUDA_INC $$NVCC_LIBS --machine $$SYSTEM_TYPE -arch=$$CUDA_ARCH -c -o ${QMAKE_FILE_OUT} ${QMAKE_FILE_NAME}
    cuda.dependency_type = TYPE_C
    QMAKE_EXTRA_COMPILERS += cuda
}
然后我根据tensorrtx的yolov5.cpp封装了一个yolov5类,方便项目中使用。加载模型后一直保留在内存中,而无需每次推理图片都重新加载一遍模型。
yolov5tr.h
#ifndef YOLOV5TR_H
#define YOLOV5TR_H

#include <iostream>
#include <chrono>
#include <cmath>
#include "cuda_utils.h"
#include "logging.h"

#include "yololayer.h"
#include "utils.h"
#include "calibrator.h"
#include "preprocess.h"

#include "common.h"

using namespace cv;


class yolov5TR
{


private:
    void doInference(IExecutionContext& context, cudaStream_t& stream, void **buffers, float* output, int batchSize);
    ICudaEngine* engine = nullptr;
    IExecutionContext* context = nullptr;
    IRuntime* runtime = nullptr;
    float* buffers[2];
    uint8_t* img_host = nullptr;
    uint8_t* img_device = nullptr;
    cudaStream_t stream;
    int inputIndex;
    int outputIndex;
    std::string engineName;
public:
    yolov5TR();
    ~yolov5TR();
    yolov5TR(std::string engine_name);
    std::vector<Yolo::Detection> DoInference(Mat img,clock_t*allTime);

};

#endif // YOLOV5TR_H
#include "yolov5tr.h"


#define USE_FP16  // set USE_INT8 or USE_FP16 or USE_FP32
#define DEVICE 0  // GPU id
#define NMS_THRESH 0.5
#define CONF_THRESH 0.1
#define BATCH_SIZE 1
#define MAX_IMAGE_INPUT_SIZE_THRESH 3000 * 3000 // ensure it exceed the maximum size in the input images !

// stuff we know about the network and the input/output blobs
static const int INPUT_H = Yolo::INPUT_H;
static const int INPUT_W = Yolo::INPUT_W;
static const int CLASS_NUM = Yolo::CLASS_NUM;
static const int OUTPUT_SIZE = Yolo::MAX_OUTPUT_BBOX_COUNT * sizeof(Yolo::Detection) / sizeof(float) + 1;  // we assume the yololayer outputs no more than MAX_OUTPUT_BBOX_COUNT boxes that conf >= 0.1
const char* YOLOv5_INPUT_BLOB_NAME = "data";
const char* YOLOv5_OUTPUT_BLOB_NAME = "prob";

class Logger : public ILogger
{


    void log(Severity severity, const char* msg) noexcept override
    {


        // suppress info-level messages
        if (severity <= Severity::kWARNING)
            std::cout << msg << std::endl;
    }
};
static Logger gLogger;

yolov5TR::~yolov5TR(){


    // Release stream and buffers
    cudaStreamDestroy(stream);
    CUDA_CHECK(cudaFree(img_device));
    CUDA_CHECK(cudaFreeHost(img_host));
    CUDA_CHECK(cudaFree(buffers[inputIndex]));
    CUDA_CHECK(cudaFree(buffers[outputIndex]));

    // Destroy the engine
    context->destroy();
    engine->destroy();
    runtime->destroy();
    std::cout<<"deleted"<<std::endl;
}

yolov5TR::yolov5TR(std::string engine_name){


   engineName = engine_name;
   std::ifstream fin(engine_name);
   std::string cached_engine = "";
   while (fin.peek() != EOF){


       std::stringstream buffer;
       buffer << fin.rdbuf();
       cached_engine.append(buffer.str());
   }
   fin.close();
   runtime = createInferRuntime(gLogger);
   assert(runtime != nullptr);
   this->engine = runtime->deserializeCudaEngine(cached_engine.data(), cached_engine.size());
   assert(engine != nullptr);
   context = engine->createExecutionContext();
   assert(context != nullptr);

   assert(engine->getNbBindings() == 2);
   inputIndex = engine->getBindingIndex(YOLOv5_INPUT_BLOB_NAME);
   outputIndex = engine->getBindingIndex(YOLOv5_OUTPUT_BLOB_NAME);
   assert(inputIndex == 0);
   assert(outputIndex == 1);

   //Create GPU buffers on device
   CUDA_CHECK(cudaMalloc((void**)&buffers[inputIndex], BATCH_SIZE * 3 * INPUT_H * INPUT_W * sizeof(float)));
   CUDA_CHECK(cudaMalloc((void**)&buffers[outputIndex], BATCH_SIZE * OUTPUT_SIZE * sizeof(float)));

//     Create stream
   CUDA_CHECK(cudaStreamCreate(&stream));

   CUDA_CHECK(cudaMallocHost((void**)&img_host, MAX_IMAGE_INPUT_SIZE_THRESH * 3));
   CUDA_CHECK(cudaMalloc((void**)&img_device, MAX_IMAGE_INPUT_SIZE_THRESH * 3));


}

void yolov5TR::doInference(IExecutionContext& context, cudaStream_t& stream, void **buffers, float* output, int batchSize) {


    // infer on the batch asynchronously, and DMA output back to host
    context.enqueue(batchSize, buffers, stream, nullptr);
    CUDA_CHECK(cudaMemcpyAsync(output, buffers[1], batchSize * OUTPUT_SIZE * sizeof(float), cudaMemcpyDeviceToHost, stream));
    cudaStreamSynchronize(stream);
}

std::vector<Yolo::Detection> yolov5TR::DoInference(Mat img,clock_t*allTime){


    float* buffer_idx = (float*)buffers[inputIndex];
    size_t  size_image = img.cols * img.rows * 3;

    //copy data to pinned memory
    memcpy(img_host,img.data,size_image);
    //copy data to device memory
    CUDA_CHECK(cudaMemcpyAsync(img_device,img_host,size_image,cudaMemcpyHostToDevice,stream));
    preprocess_kernel_img(img_device, img.cols, img.rows, buffer_idx, INPUT_W, INPUT_H, stream);

    // Run inference
    auto start = std::chrono::system_clock::now();
    static float prob[OUTPUT_SIZE];
    doInference(*context, stream, (void**)buffers, prob, BATCH_SIZE);
    auto end = std::chrono::system_clock::now();
    std::cout << "inference time: " << std::chrono::duration_cast<std::chrono::milliseconds>(end - start).count() << "ms" << std::endl;
    *allTime = *allTime + std::chrono::duration_cast<std::chrono::milliseconds>(end - start).count();
    std::vector<std::vector<Yolo::Detection>> batch_res(1);

    auto& res1 = batch_res[0];
    nms(res1, prob, CONF_THRESH, NMS_THRESH);

    auto& res = batch_res[0];
    for (size_t j = 0; j < res.size(); j++) {


        cv::Rect r = get_rect(img, res[j].bbox);
        cv::rectangle(img, r, cv::Scalar(0x27, 0xC1, 0x36), 2);
        cv::putText(img, std::to_string((int)res[j].class_id), cv::Point(r.x, r.y - 1), cv::FONT_HERSHEY_PLAIN, 1.2, cv::Scalar(0xFF, 0xFF, 0xFF), 2);
    }

    return res;

}
本来还有qt部分的代码可以演示的,但是还没有整理完,而且目前手头上暂时没有usb相机,暂且作罢,先将精华部分整理出来。
附录
关于python的tensorrt加速,实际上yolov5官方提供了export.py进行导出。直接使用官方代码就可以导出,并且推理代码也是支持tensorrt进行推理的。甚至backbone魔改后的版本,也是可以进行导出和使用的。