YOLOV5之TensorRT加速:C++版
前言
这篇文章是知乎的一篇文章,算是对前面几篇TensorRT官方文档翻译的小结。后面打算在Jetson Nano上做YOLO算法的TensoRT加速和部署,这篇文章作者没有给出完整的源码,只是用来学习总结用。
1.TesnsorRT安装
1.1 驱动安装、cuda和cudnn配置
首先根据自己的显卡安装相应的显卡驱动、CUDA和CUDNN库,可以参考文章:
NVIDIA驱动和CUDA安装
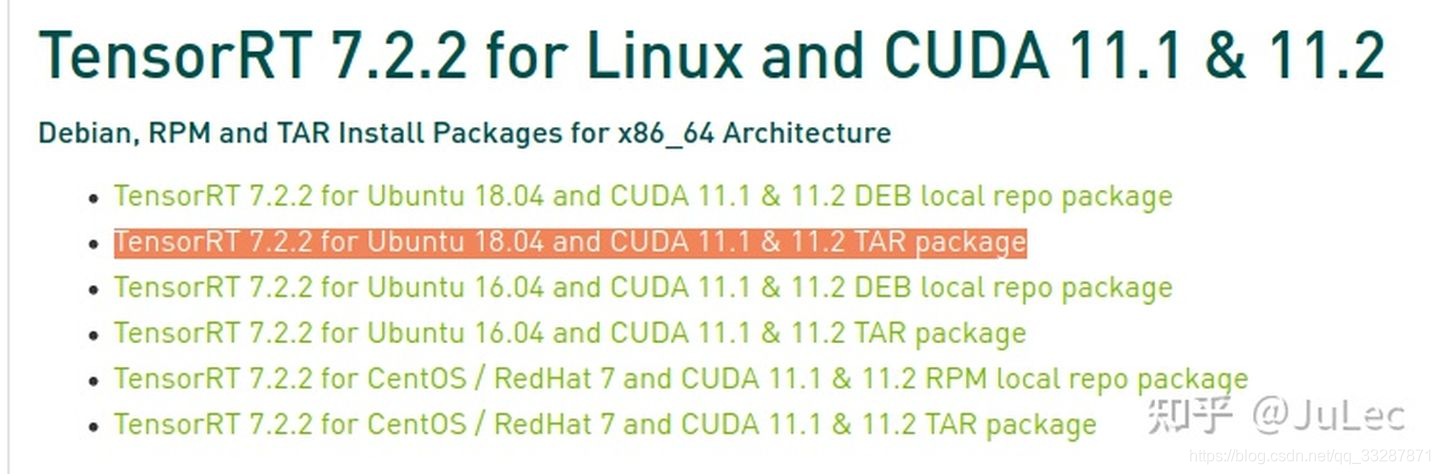
然后根据自己的CUDA和CUDNN版本下载对应的TensorRT(建议下载TAR版)
http://link.zhihu.com/?target=https%3A//developer.nvidia.com/nvidia-tensorrt-download
1.2 环境安装
cd ~/Downloads
tar -xvzf TensorRT-7.2.2.3.Ubuntu-18.04.x86_64-gnu.cuda-11.1.cudnn8.0.tar.gz
# 配置环境变量
sudo vim ~/.bashrc
# 配置如下,根据自己解压的路径配置TRT_PATH
export TRT_PATH=/your/path/to/TensorRT-7.2.2.3
export PATH=$PATH:$TRT_PATH/bin
export LD_LIBRARY_PATH=$LD_LIBRARY_PATH:$TRT_PATH/lib
export LD_LIBRARY_PATH=$LD_LIBRARY_PATH:$TRT_PATH/targets/x86_64-linux-gnu/lib

source ~/.bashrc
#如果需要安装python版,请执行下面的命令
cd TensorRT-7.2.2.3/python
#根据自己的Python版本执行下面命令
pip install tensorrt-7.2.2.3-cp37-none-linux_x86_64.whl
# 配置完成可以到python下导入tensorrt进行测试
>>import tensorrt
2. Download tensorrtx
git clone https://github.com/wang-xinyu/tensorrtx/
3. 使用C ++ API从头开始创建网络定义
3.1 gLogger
想要用TensorRT执行推理,首先需要ICudaEngine对象创建引擎engine,然后利用IExecutionContext接口执行推理。
首先创建一个ILogger类型的全局对象,它是TensorRT API的各种方法的必需参数。这是演示logger创建的示例:
class Logger : public ILogger
 {


     void log(Severity severity, const char* msg) override
     {


         // suppress info-level messages
         if (severity != Severity::kINFO)
             std::cout << msg << std::endl;
     }
 } gLogger;
3.2 过程
3.2.1 创建builder 和 network
IBuilder* builder = createInferBuilder(gLogger);
INetworkDefinition* network = builder->createNetworkV2(0U);
3.2.2 添加输入层,包括输入层名称,输入维度及类型
auto data = network->addInput(INPUT_BLOB_NAME, dt, Dims3{

    -1, 1, INPUT_H, INPUT_W});
3.2.3 添加卷积层、池化层、全连接层以及Softmax等层
auto conv1 = network->addConvolution(*data->getOutput(0), 20, DimsHW{

    5, 5}, weightMap["conv1filter"], weightMap["conv1bias"]);
conv1->setStride(DimsHW{

    1, 1});
auto pool1 = network->addPooling(*conv1->getOutput(0), PoolingType::kMAX, DimsHW{

    2, 2});
pool1->setStride(DimsHW{

    2, 2});
auto ip1 = network->addFullyConnected(*pool1->getOutput(0), 500, weightMap["ip1filter"], weightMap["ip1bias"]);
auto relu1 = network->addActivation(*ip1->getOutput(0), ActivationType::kRELU);
auto prob = network->addSoftMax(*relu1->getOutput(0));
prob->getOutput(0)->setName(OUTPUT_BLOB_NAME);
3.2.4 输出
network->markOutput(*prob->getOutput(0));
4. 模型转换,生成.wts文件(二进制文件)
执行python gen_wts.py生成yolov5s.wts
import torch
import struct
from utils.torch_utils import select_device

# Initialize
device = select_device('cpu')
# Load model
model = torch.load('weights/yolov5s.pt', map_location=device)['model'].float()  # load to FP32
model.to(device).eval()

f = open('yolov5s.wts', 'w')
f.write('{}\n'.format(len(model.state_dict().keys())))
for k, v in model.state_dict().items():
    vr = v.reshape(-1).cpu().numpy()
    f.write('{} {} '.format(k, len(vr)))
    for vv in vr:
        f.write(' ')
        f.write(struct.pack('>f',float(vv)).hex())
    f.write('\n')
5. 主要过程
5.1 序列化
该模块主要包括创建builder,config,engine以及serialize几个过程,其中engine创建根据自定义网络结构来实现。
ICudaEngine* createEngine_s(unsigned int maxBatchSize, IBuilder* builder, IBuilderConfig* config, DataType dt) {


    // 2.利用builder创建网络
    INetworkDefinition* network = builder->createNetworkV2(0U);

    // 3. 输入层,层名为:INPUT_BLOB_NAME, 数据类型为: dt, 数据纬度为: CHW
    ITensor* data = network->addInput(INPUT_BLOB_NAME, dt, Dims3{

     3, INPUT_H, INPUT_W });
    assert(data);

    //加载权重
    std::map<std::string, Weights> weightMap = loadWeights("../yolov5s.wts");
    Weights emptywts{

     DataType::kFLOAT, nullptr, 0 };
    //下面的过程参考yolov5s.yaml文件,其中基本操作都在common.hpp文件实现
    // yolov5 backbone
    // Focus层,输入为*data,输入通道为3,输出通道为32
    // 4. 添加层
    auto focus0 = focus(network, weightMap, *data, 3, 32, 3, "model.0");
    auto conv1 = convBlock(network, weightMap, *focus0->getOutput(0), 64, 3, 2, 1, "model.1");
    auto bottleneck_CSP2 = C3(network, weightMap, *conv1->getOutput(0), 64, 64, 1, true, 1, 0.5, "model.2");
    auto conv3 = convBlock(network, weightMap, *bottleneck_CSP2->getOutput(0), 128, 3, 2, 1, "model.3");
    auto bottleneck_csp4 = C3(network, weightMap, *conv3->getOutput(0), 128, 128, 3, true, 1, 0.5, "model.4");
    auto conv5 = convBlock(network, weightMap, *bottleneck_csp4->getOutput(0), 256, 3, 2, 1, "model.5");
    auto bottleneck_csp6 = C3(network, weightMap, *conv5->getOutput(0), 256, 256, 3, true, 1, 0.5, "model.6");
    auto conv7 = convBlock(network, weightMap, *bottleneck_csp6->getOutput(0), 512, 3, 2, 1, "model.7");
    auto spp8 = SPP(network, weightMap, *conv7->getOutput(0), 512, 512, 5, 9, 13, "model.8");

    // yolov5 head
    auto bottleneck_csp9 = C3(network, weightMap, *spp8->getOutput(0), 512, 512, 1, false, 1, 0.5, "model.9");
    auto conv10 = convBlock(network, weightMap, *bottleneck_csp9->getOutput(0), 256, 1, 1, 1, "model.10");

    float *deval = reinterpret_cast<float*>(malloc(sizeof(float) * 256 * 2 * 2));
    for (int i = 0; i < 256 * 2 * 2; i++) {


        deval[i] = 1.0;
    }
    Weights deconvwts11{

     DataType::kFLOAT, deval, 256 * 2 * 2 };
    IDeconvolutionLayer* deconv11 = network->addDeconvolutionNd(*conv10->getOutput(0), 256, DimsHW{

     2, 2 }, deconvwts11, emptywts);
    deconv11->setStrideNd(DimsHW{

     2, 2 });
    deconv11->setNbGroups(256);
    weightMap["deconv11"] = deconvwts11;

    ITensor* inputTensors12[] = {

     deconv11->getOutput(0), bottleneck_csp6->getOutput(0) };
    auto cat12 = network->addConcatenation(inputTensors12, 2);
    auto bottleneck_csp13 = C3(network, weightMap, *cat12->getOutput(0), 512, 256, 1, false, 1, 0.5, "model.13");
    auto conv14 = convBlock(network, weightMap, *bottleneck_csp13->getOutput(0), 128, 1, 1, 1, "model.14");

    Weights deconvwts15{

     DataType::kFLOAT, deval, 128 * 2 * 2 };
    IDeconvolutionLayer* deconv15 = network->addDeconvolutionNd(*conv14->getOutput(0), 128, DimsHW{

     2, 2 }, deconvwts15, emptywts);
    deconv15->setStrideNd(DimsHW{

     2, 2 });
    deconv15->setNbGroups(128);

    ITensor* inputTensors16[] = {

     deconv15->getOutput(0), bottleneck_csp4->getOutput(0) };
    auto cat16 = network->addConcatenation(inputTensors16, 2);
    auto bottleneck_csp17 = C3(network, weightMap, *cat16->getOutput(0), 256, 128, 1, false, 1, 0.5, "model.17");
    IConvolutionLayer* det0 = network->addConvolutionNd(*bottleneck_csp17->getOutput(0), 3 * (Yolo::CLASS_NUM + 5), DimsHW{

     1, 1 }, weightMap["model.24.m.0.weight"], weightMap["model.24.m.0.bias"]);

    auto conv18 = convBlock(network, weightMap, *bottleneck_csp17->getOutput(0), 128, 3, 2, 1, "model.18");
    ITensor* inputTensors19[] = {

     conv18->getOutput(0), conv14->getOutput(0) };
    auto cat19 = network->addConcatenation(inputTensors19, 2);
    auto bottleneck_csp20 = C3(network, weightMap, *cat19->getOutput(0), 256, 256, 1, false, 1, 0.5, "model.20");
    IConvolutionLayer* det1 = network->addConvolutionNd(*bottleneck_csp20->getOutput(0), 3 * (Yolo::CLASS_NUM + 5), DimsHW{

     1, 1 }, weightMap["model.24.m.1.weight"], weightMap["model.24.m.1.bias"]);

    auto conv21 = convBlock(network, weightMap, *bottleneck_csp20->getOutput(0), 256, 3, 2, 1, "model.21");
    ITensor* inputTensors22[] = {

     conv21->getOutput(0), conv10->getOutput(0) };
    auto cat22 = network->addConcatenation(inputTensors22, 2);
    auto bottleneck_csp23 = C3(network, weightMap, *cat22->getOutput(0), 512, 512, 1, false, 1, 0.5, "model.23");
    IConvolutionLayer* det2 = network->addConvolutionNd(*bottleneck_csp23->getOutput(0), 3 * (Yolo::CLASS_NUM + 5), DimsHW{

     1, 1 }, weightMap["model.24.m.2.weight"], weightMap["model.24.m.2.bias"]);

    // 获取yolo输出头,有三个尺度,分别为缩放8/16/32
    auto yolo = addYoLoLayer(network, weightMap, det0, det1, det2);
    yolo->getOutput(0)->setName(OUTPUT_BLOB_NAME);
    // 5. 标记输出
    network->markOutput(*yolo->getOutput(0));

    // 7. 下面的代码为创建engine
    builder->setMaxBatchSize(maxBatchSize);

    // 下面的代码为创建引擎
    config->setMaxWorkspaceSize(16 * (1 << 20));  // 16MB
#ifdef USE_FP16
    config->setFlag(BuilderFlag::kFP16);
#endif

    ICudaEngine* engine = builder->buildEngineWithConfig(*network, *config);           // Build the engine using the builder object
    // Don't need the network any more
    network->destroy();

    // Release host memory
    for (auto& mem : weightMap)
    {


        free((void*)(mem.second.values));
    }
    return engine;
}
序列化
void APIToModel(unsigned int maxBatchSize, IHostMemory** modelStream) {


    // 1. 创建builder
    IBuilder* builder = createInferBuilder(gLogger);
    // 6. 创建config
    IBuilderConfig* config = builder->createBuilderConfig();

    ICudaEngine* engine = createEngine_s(maxBatchSize, builder, config, DataType::kFLOAT);
    assert(engine != nullptr);

    // 8. 序列化engine
    (*modelStream) = engine->serialize();

    engine->destroy();
    builder->destroy();
}
//序列化到本地,生成yolov5s.engine
bool toSerial(std::string engine_name)
{


    IHostMemory* modelStream{

     nullptr };
    APIToModel(BATCH_SIZE, &modelStream);
    assert(modelStream != nullptr);
    std::ofstream p("yolov5s.engine", std::ios::binary);
    if (!p) {


        std::cerr << "could not open plan output file" << std::endl;
        return -1;
    }
    p.write(reinterpret_cast<const char*>(modelStream->data()), modelStream->size());
    modelStream->destroy();
    return true;
}
5.2 反序列化及执行推理
5.2.1 读取yolov5s.engine,创建runtime反序列化加载engine,并加载IExecutionContext用于推理
std::ifstream file("yolov5s.engine", std::ios::binary);
if (file.good()) {


    file.seekg(0, file.end);
    size = file.tellg();
    file.seekg(0, file.beg);
    trtModelStream = new char[size];
    assert(trtModelStream);
    file.read(trtModelStream, size);
    file.close();
}

IRuntime* runtime = createInferRuntime(gLogger);
assert(runtime != nullptr);
ICudaEngine* engine = runtime->deserializeCudaEngine(trtModelStream, size);
assert(engine != nullptr);
IExecutionContext* context = engine->createExecutionContext();
assert(context != nullptr);
delete[] trtModelStream;
5.2.2 执行推理
void doInference(IExecutionContext& context, cudaStream_t& stream, void **buffers, float* input, float* output, int batchSize) {


    // DMA input batch data to device, infer on the batch asynchronously, and DMA output back to host
    CHECK(cudaMemcpyAsync(buffers[0], input, batchSize * 3 * INPUT_H * INPUT_W * sizeof(float), cudaMemcpyHostToDevice, stream));
    context.enqueue(batchSize, buffers, stream, nullptr);
    CHECK(cudaMemcpyAsync(output, buffers[1], batchSize * OUTPUT_SIZE * sizeof(float), cudaMemcpyDeviceToHost, stream));
    cudaStreamSynchronize(stream);
}
5.3 喂入数据,进行推理并解析结果
void parseYolov5(cv::Mat& img,ICudaEngine* engine,IExecutionContext* context,std::vector<Yolo::Detection>& batch_res)
{


    // 准备数据 ---------------------------
    static float data[BATCH_SIZE * 3 * INPUT_H * INPUT_W];  //输入
    static float prob[BATCH_SIZE * OUTPUT_SIZE];            //输出

    assert(engine->getNbBindings() == 2);
    void* buffers[2];
    // In order to bind the buffers, we need to know the names of the input and output tensors.
    // Note that indices are guaranteed to be less than IEngine::getNbBindings()
    const int inputIndex = engine->getBindingIndex(INPUT_BLOB_NAME);
    const int outputIndex = engine->getBindingIndex(OUTPUT_BLOB_NAME);
    assert(inputIndex == 0);
    assert(outputIndex == 1);
    // Create GPU buffers on device
    CHECK(cudaMalloc(&buffers[inputIndex], BATCH_SIZE * 3 * INPUT_H * INPUT_W * sizeof(float)));
    CHECK(cudaMalloc(&buffers[outputIndex], BATCH_SIZE * OUTPUT_SIZE * sizeof(float)));
    // Create stream
    cudaStream_t stream;
    CHECK(cudaStreamCreate(&stream));

    if (!img.empty())
    {


        cv::Mat pr_img = preprocess_img(img); // letterbox BGR to RGB
        int i = 0;
        for (int row = 0; row < INPUT_H; ++row) {


            uchar* uc_pixel = pr_img.data + row * pr_img.step;
            for (int col = 0; col < INPUT_W; ++col) {


                data[i] = (float)uc_pixel[2] / 255.0;
                data[i + INPUT_H * INPUT_W] = (float)uc_pixel[1] / 255.0;
                data[i + 2 * INPUT_H * INPUT_W] = (float)uc_pixel[0] / 255.0;
                uc_pixel += 3;
                ++i;
            }
        }
    }

    // Run inference
    doInference(*context, stream, buffers, data, prob, BATCH_SIZE);

    nms(batch_res, &prob[0 * OUTPUT_SIZE], CONF_THRESH, NMS_THRESH);

    // Release stream and buffers
    cudaStreamDestroy(stream);
    CHECK(cudaFree(buffers[inputIndex]));
    CHECK(cudaFree(buffers[outputIndex]));
}
5.4 画框
void drawBox(cv::Mat &img,std::vector<Yolo::Detection>& res)
{


    for (size_t j = 0; j < res.size(); j++) {


        cv::Rect r = get_rect(img, res[j].bbox);
        cv::rectangle(img, r, cv::Scalar(0x27, 0xC1, 0x36), 2);
        cv::putText(img, classes[(int)res[j].class_id], cv::Point(r.x, r.y - 1), cv::FONT_HERSHEY_PLAIN, 1.2, cv::Scalar(0xFF, 0xFF, 0xFF), 2);
    }
}
5.5 效果展示
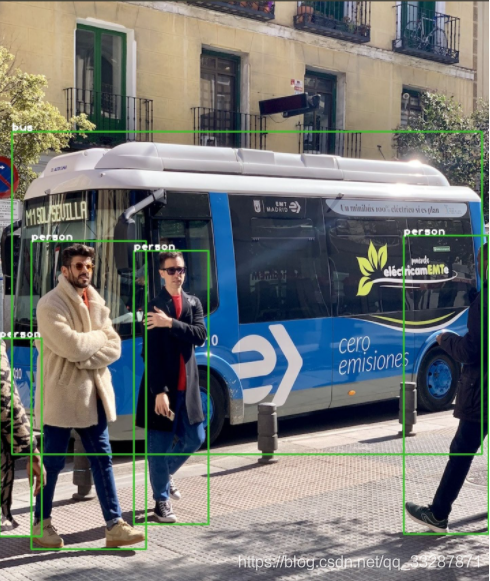
拉流测试可以达到 85FPS (GTX 1070)。