一、KITTI数据集介绍(重点是lidar-图像坐标系转换)
1.数据格式
数据包含4个部分,即激光雷达数据velodyne、图像数据image_2、校准数据calib和标注数据label_2。
1.激光雷达数据(data_object_velodyne)
velodyne文件夹下存储了点云文件,以bin格式存储。velodyne文件是激光雷达的测量数据(绕其垂直轴(逆时针)连续旋转),激光雷达参数如下:
1 × Velodyne HDL-64E rotating 3D laser scanner,
10 Hz, 64 beams, 0.09 degree angular resolution,
2 cm distance accuracy, collecting ∼ 1.3 million points/second,
field of view: 360◦ horizontal, 26.8◦ vertical, range: 120 m
以“000000.bin”文件为例,点云数据以浮点二进制文件格式存储,每行包含8个数据,每个数据由四位十六进制数表示(浮点数),每个数据通过空格隔开。一个点云数据由四个浮点数数据构成,分别表示点云的x、y、z、r(强度 or 反射值)。
KITTI激光雷达文件夹下的训练点云数量有7481个,即7481个bin文件,共13.2GB大小。测试点云数量有7518个,即7518个bin文件,共13.4GB大小。
可视化
利用python中的open3d实现 点云数据可视化(.bin文件)
import numpy as np
import struct
import open3d

def read_bin_velodyne(path):
    '''read bin file and transfer to array data'''
    pc_list=[]
    with open(path,'rb') as f:
        content=f.read()
        pc_iter=struct.iter_unpack('ffff',content)
        for idx,point in enumerate(pc_iter):
            pc_list.append([point[0],point[1],point[2]])
    return np.asarray(pc_list,dtype=np.float32)

def main():
    pc_path='/KITTI_DATASET_ROOT/testing/velodyne/000045.bin'
    example = np.fromfile(pc_path, dtype=np.float32, count=-1).reshape(-1, 4)
    example_xyz=example[:,:3]
    example_xyz=example_xyz[example_xyz[:,2]>-3]

    # From numpy to Open3D
    pcd = open3d.open3d.geometry.PointCloud()
    pcd.points= open3d.open3d.utility.Vector3dVector(example_xyz)
    vis_ = open3d.visualization.Visualizer()
    vis_.create_window()
    vis_.add_geometry(pcd)
    render_options = vis_.get_render_option()
    render_options.point_size = 1
    render_options.background_color = np.array([0, 0, 0])
    vis_.run()
    vis_.destroy_window()


if __name__=="__main__":
    main()
2.标注数据label_2.
标签存储在data_object_label_2文件夹中,存储为txt文本文件,即data_object_label_2/training/label_2/xxxxxx.txt。标签中仅不含了7481个训练场景的标注数据,而没有测试场景的标注数据。
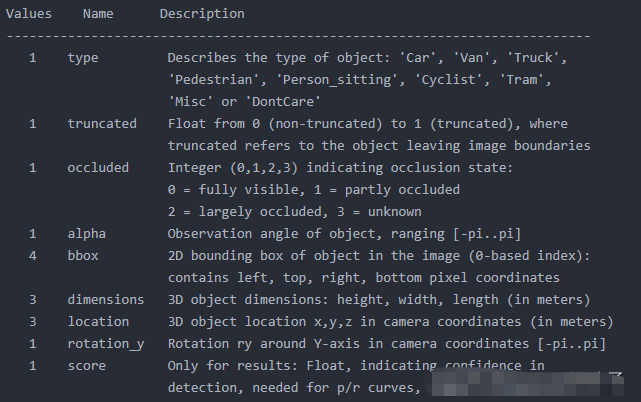
标注文件中16个属性,即16列。但我们只能够看到前15列数据,因为第16列是针对测试场景下目标的置信度得分,也可以认为训练场景中得分全部为1但是没有专门标注出来。下图是000001.txt的标注内容和对应属性介绍。
第1列
目标类比别(type),共有8种类别,分别是Car、Van、Truck、Pedestrian、Person_sitting、Cyclist、Tram、Misc或’DontCare。DontCare表示某些区域是有目标的,但是由于一些原因没有做标注,比如距离激光雷达过远。但实际算法可能会检测到该目标,但没有标注,这样会被当作false positive (FP)。这是不合理的。用DontCare标注后,评估时将会自动忽略这个区域的预测结果,相当于没有检测到目标,这样就不会增加FP的数量了。此外,在 2D 与 3D Detection Benchmark 中只针对 Car、Pedestrain、Cyclist 这三类。
第2列
截断程度(truncated),表示处于边缘目标的截断程度,取值范围为0~1,0表示没有截断,取值越大表示截断程度越大。处于边缘的目标可能只有部分出现在视野当中,这种情况被称为截断。
第3列
遮挡程度(occlude),取值为(0,1,2,3)。0表示完全可见,1表示小部分遮挡,2表示大部分遮挡,3表示未知(遮挡过大)。
第4列
观测角度(alpha),取值范围为(-pi, pi)。是在相机坐标系下,以相机原点为中心,相机原点到物体中心的连线为半径,将物体绕相机y轴旋转至相机z轴,此时物体方向与相机x轴的夹角。这相当于将物体中心旋转到正前方后,计算其与车身方向的夹角。
第5-8列
二维检测框(bbox),目标二维矩形框坐标,分别对应left、top、right、bottom,即左上(xy)和右下的坐标(xy)。
第9-11列
三维物体的尺寸(dimensions),分别对应高度、宽度、长度,以米为单位。
第12-14列
中心坐标(location),三维物体中心在相机坐标系下的位置坐标(x,y,z),单位为米。
第15列
旋转角(rotation_y),取值范围为(-pi, pi)。表示车体朝向,绕相机坐标系y轴的弧度值,即物体前进方向与相机坐标系x轴的夹角。rolation_y与alpha的关系为alpha=rotation_y - theta,theta为物体中心与车体前进方向上的夹角。alpha的效果是从正前方看目标行驶方向与车身方向的夹角,如果物体不在正前方,那么旋转物体或者坐标系使得能从正前方看到目标,旋转的角度为theta。
第16列
置信度分数(score),仅在测试评估的时候才需要用到。置信度越高,表示目标越存在的概率越大。
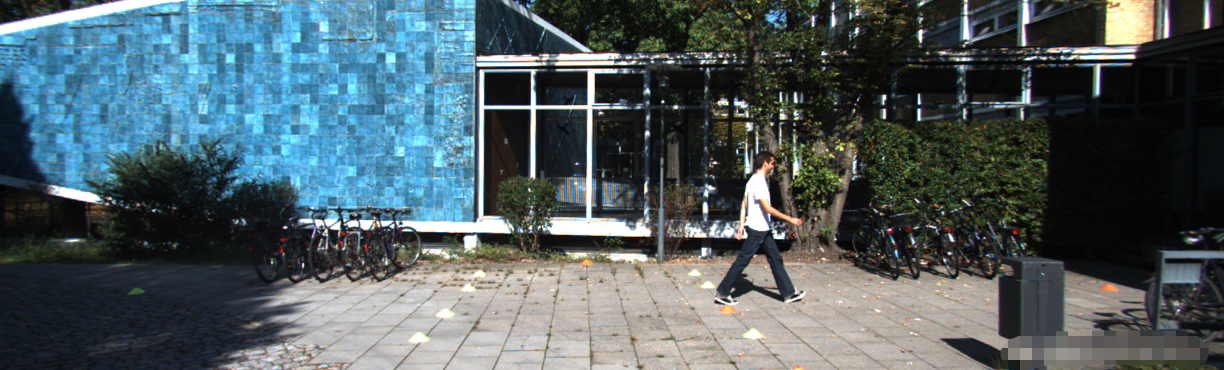
3.图像数据image_2
KITTI数据集种共包含了4相机数据,2个灰度相机和2个彩色相机,其中image_2存储了左侧彩色相机采集的RGB图像数据(RGB)。
存储方式为png格式。KITTI相机的分辨率是1392x512,而image_2种存储的图像是矫正后的图像,分辨率为1242x375。训练集共7481张图片;测试集共7518张图片。
4.标定校准数据calib
标定校准文件主要作用是把 激光雷达坐标系 测得的点云坐标 转换到相机坐标中 去,相关参数存在data object calib中,共包含7481个训练标定文件和7518个测试标定文件。标定文件的存储方式为txt文本文件
以训练文件中的000000.txt标定校准文件为例,其内容如下图所示:
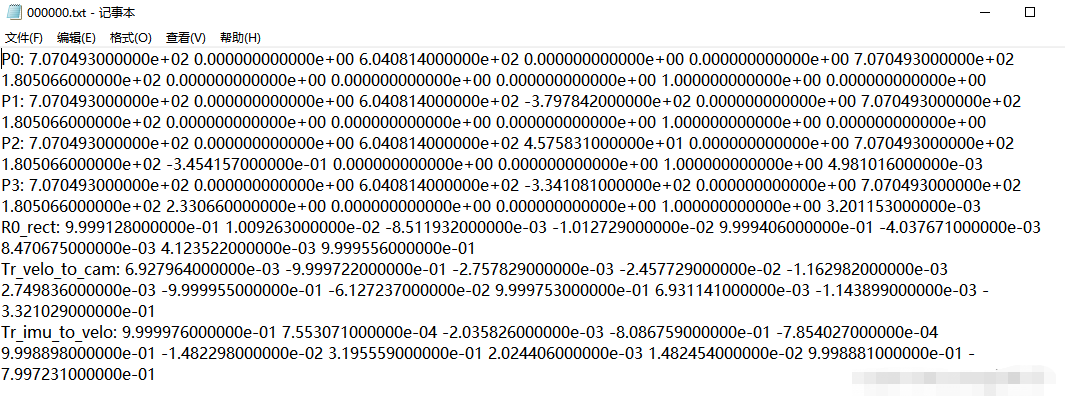
其中,0、1、2、3分别代表左边灰度相机、右边灰度相机、左边彩色相机和右边彩色相机。
1. 内参矩阵
P0-P3分别表示4个相机的内参矩阵,或投影矩阵, 大小为 3x4。相机内参矩阵是为了计算点云空间位置坐标在相机坐标系下的坐标,即把点云坐标投影到相机坐标系。将相机的内参矩阵乘以点云在世界坐标系中的坐标即可得到点云在相机坐标系中的坐标。
如果需要进一步将点云在相机坐标系下的坐标投影到像平面,还需要除以Z值,以及内参矩阵的推导请参考:https://blog.csdn.net/qq_33801763/article/details/77033064。
2. 外参矩阵
根据上述介绍,我们知道存在三种坐标系世界坐标系、相机坐标系、激光雷达坐标系。世界坐标系反映了物体的真实位置坐标,也是作为相机坐标系和激光雷达坐标系之间相互变换的过渡坐标系。
点云位置坐标投影到相机坐标系前,需要转换到世界坐标系下,对应的矩阵为外参矩阵。外参矩阵为Tr_velo_to_cam ,大小为3x4,包含了旋转矩阵 R 和 平移向量 T。将相机的外参矩阵乘以点云坐标即可得到点云在世界坐标系中的坐标。
3.R0校准矩阵
R0_rect 为0号相机的修正矩阵,大小为3x3,目的是为了使4个相机成像达到共面的效果,保证4个相机光心在同一个xoy平面上。在进行外参矩阵变化之后,需要于R0_rect相乘得到相机坐标系下的坐标。
4.点云坐标到相机坐标
综上所述,点云坐标在相机坐标系中的坐标等于
内参矩阵 * 外参矩阵 * R0校准矩阵 * 点云坐标
P * R0_rect *Tr_velo_to_cam * x
例如,要将Velodyne激光雷达坐标系中的点x投影到左侧的彩色图像中y,使用公式:
y = P2 * R0_rect *Tr_velo_to_cam * x
当计算出z<0的时候表明该点在相机的后面 。
按照上述过程得到的结果是点云在相机坐标系中的坐标,如果需要将点云坐标投影到像平面还需要除以Z。参考2.1节。示例程序可以参考 :https://blog.csdn.net/suiyingy/article/details/124817919。
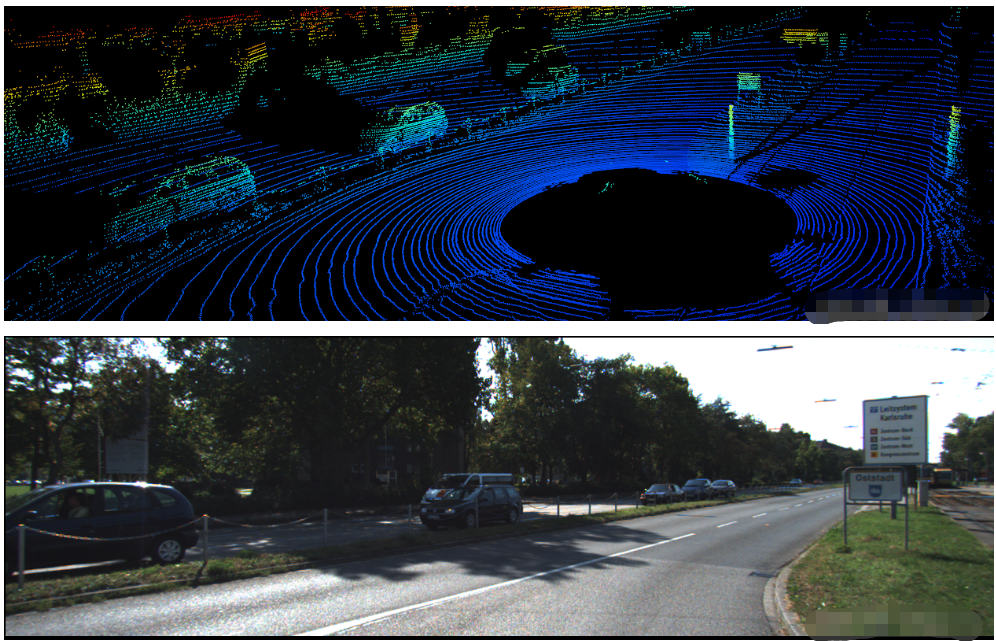
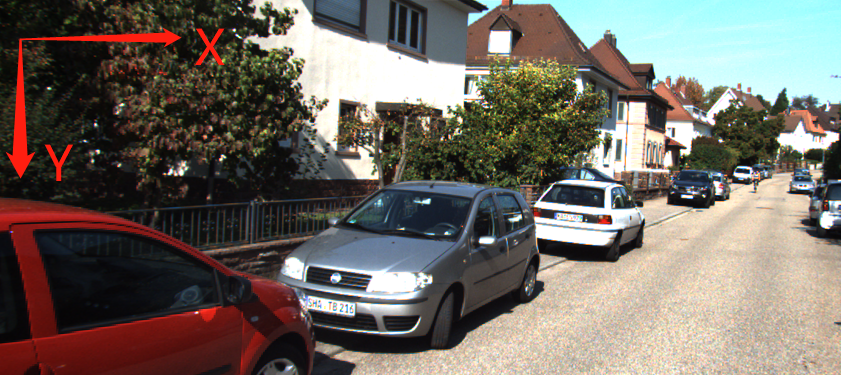
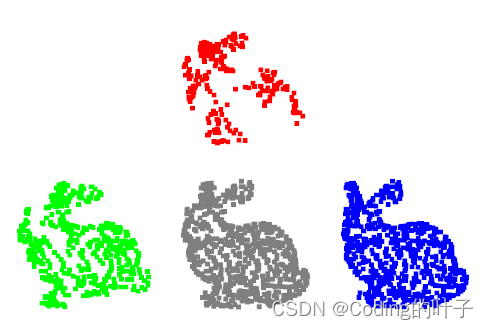
2.KITTI数据集中的三个坐标系:
- 激光雷达坐标系 (下图中的蓝色坐标系)
- 相机坐标系 (下图中的红色坐标系)

- 图像坐标系 (下图:相机采集的图像)
3.点云数据转鸟瞰图(BEV)
import numpy as np
from PIL import Image
import matplotlib.pyplot as plt

# -------------------------------1.点云读取----------------------------
pc_path= '/home/xzz/Downloads/mini_kitti/mini kitti/data object veloyne/training/000004.bin'
pointcloud = np.fromfile(pc_path, dtype=np.float32, count=-1).reshape([-1, 4])           # (115976, 4)


# -----------------------------2.设置鸟瞰图范围---------------------------
side_range = (-40, 40)  # 左右距离
fwd_range = (0, 70.4)  # 后前距离

x_points = pointcloud[:, 0]            # (115976)
y_points = pointcloud[:, 1]            # (115976)
z_points = pointcloud[:, 2]            # (115976)


# ------------------------------3.获得区域内的点----------------------------
f_filt = np.logical_and(x_points > fwd_range[0], x_points < fwd_range[1])      # (115976): [True, False, True...]
s_filt = np.logical_and(y_points > side_range[0], y_points < side_range[1])
filter = np.logical_and(f_filt, s_filt)                                        # (115976): [True, False, True...]
indices = np.argwhere(filter).flatten()                                        # (59732) : [0, 2, ...115976, 115975]
x_points = x_points[indices]
y_points = y_points[indices]
z_points = z_points[indices]

# ----------------------------4. 把坐标单位从米,调整到厘米-------------------------
res = 0.1  # 分辨率0.1m
x_img = (-y_points / res).astype(np.int32)
y_img = (-x_points / res).astype(np.int32)


# -----------------------------5.调整坐标原点(到(0,0))----------------------------
x_img -= int(np.floor(side_range[0]) / res)
y_img += int(np.floor(fwd_range[1]) / res)
print(x_img.min(), x_img.max(), y_img.min(), x_img.max())


# -----------------------------6.填充像素值(用z值)-------------------------
height_range = (-2, 0.5)                                   # z值范围选取
pixel_value = np.clip(a=z_points, a_max=height_range[1], a_min=height_range[0])


def scale_to_255(a, min, max, dtype=np.uint8):
	return ((a - min) / float(max - min) * 255).astype(dtype)


pixel_value = scale_to_255(pixel_value, height_range[0], height_range[1])   # z值映射到到(0,255)

# -----------------------------7.创建图像数组-------------------------------------
x_max = 1 + int((side_range[1] - side_range[0]) / res)
y_max = 1 + int((fwd_range[1] - fwd_range[0]) / res)
im = np.zeros([y_max, x_max], dtype=np.uint8)
im[y_img, x_img] = pixel_value


# -------------------------8.鸟瞰图可视化(灰度/彩色)------------------------
# im2 = Image.fromarray(im)
# im2.show()

# imshow (彩色)
plt.imshow(im, cmap="nipy_spectral", vmin=0, vmax=255)
plt.show()

4.将标注画在鸟瞰图(BEV)上
先分析了主函数 test。实际跑代码,可以把主函数放最后
from __future__ import division
import os
import numpy as np
import cv2
import math
def test():
lidar_file = '/home/xzz/Downloads/mini_kitti/mini kitti/data object veloyne/training/000004.bin' # 点云
calib_file = '/home/xzz/Downloads/mini_kitti/mini kitti/data object calib/training/000004.txt' # 修正文件
label_file = '/home/xzz/Downloads/mini_kitti/mini kitti/data_object_label_2/training/000004.txt' # GroundTruth
# 1.加载雷达数据------------------------------------------------------------------------------------------------
print("Processing: ", lidar_file)
lidar = np.fromfile(lidar_file, dtype=np.float32)
lidar = lidar.reshape((-1, 4)) # (115976, 4) 点云
# 2.加载修正文件------------------------------------------------------------------------------------------------
calib = load_kitti_calib(calib_file) # return: P2:(3, 4), R0:(3, 3), Tr_velo2cam:(3, 4)
# 3.标注转三维目标检测框----------------------------------------------------------------------------------------
# 读入GT[8:]( 即h,w,l,x,y,z,r )和外参矩阵,将中心点修正,3D边框绕Z轴旋转,相加得到8个顶点坐标
# 点云与外参矩阵相乘,得到世界坐标系中坐标(此时xy值,就是俯视图中的坐标了。对应的z值就是像素值)
gt_box3d = load_kitti_label(label_file, calib['Tr_velo2cam']) # (n, 8, 3)
# 4.手动筛选(过滤指定范围之外的点和目标框)---------------------------------------------------------------------
lidar, gt_box3d = get_filtered_lidar(lidar, gt_box3d) # (58590, 4) (2, 8, 3)
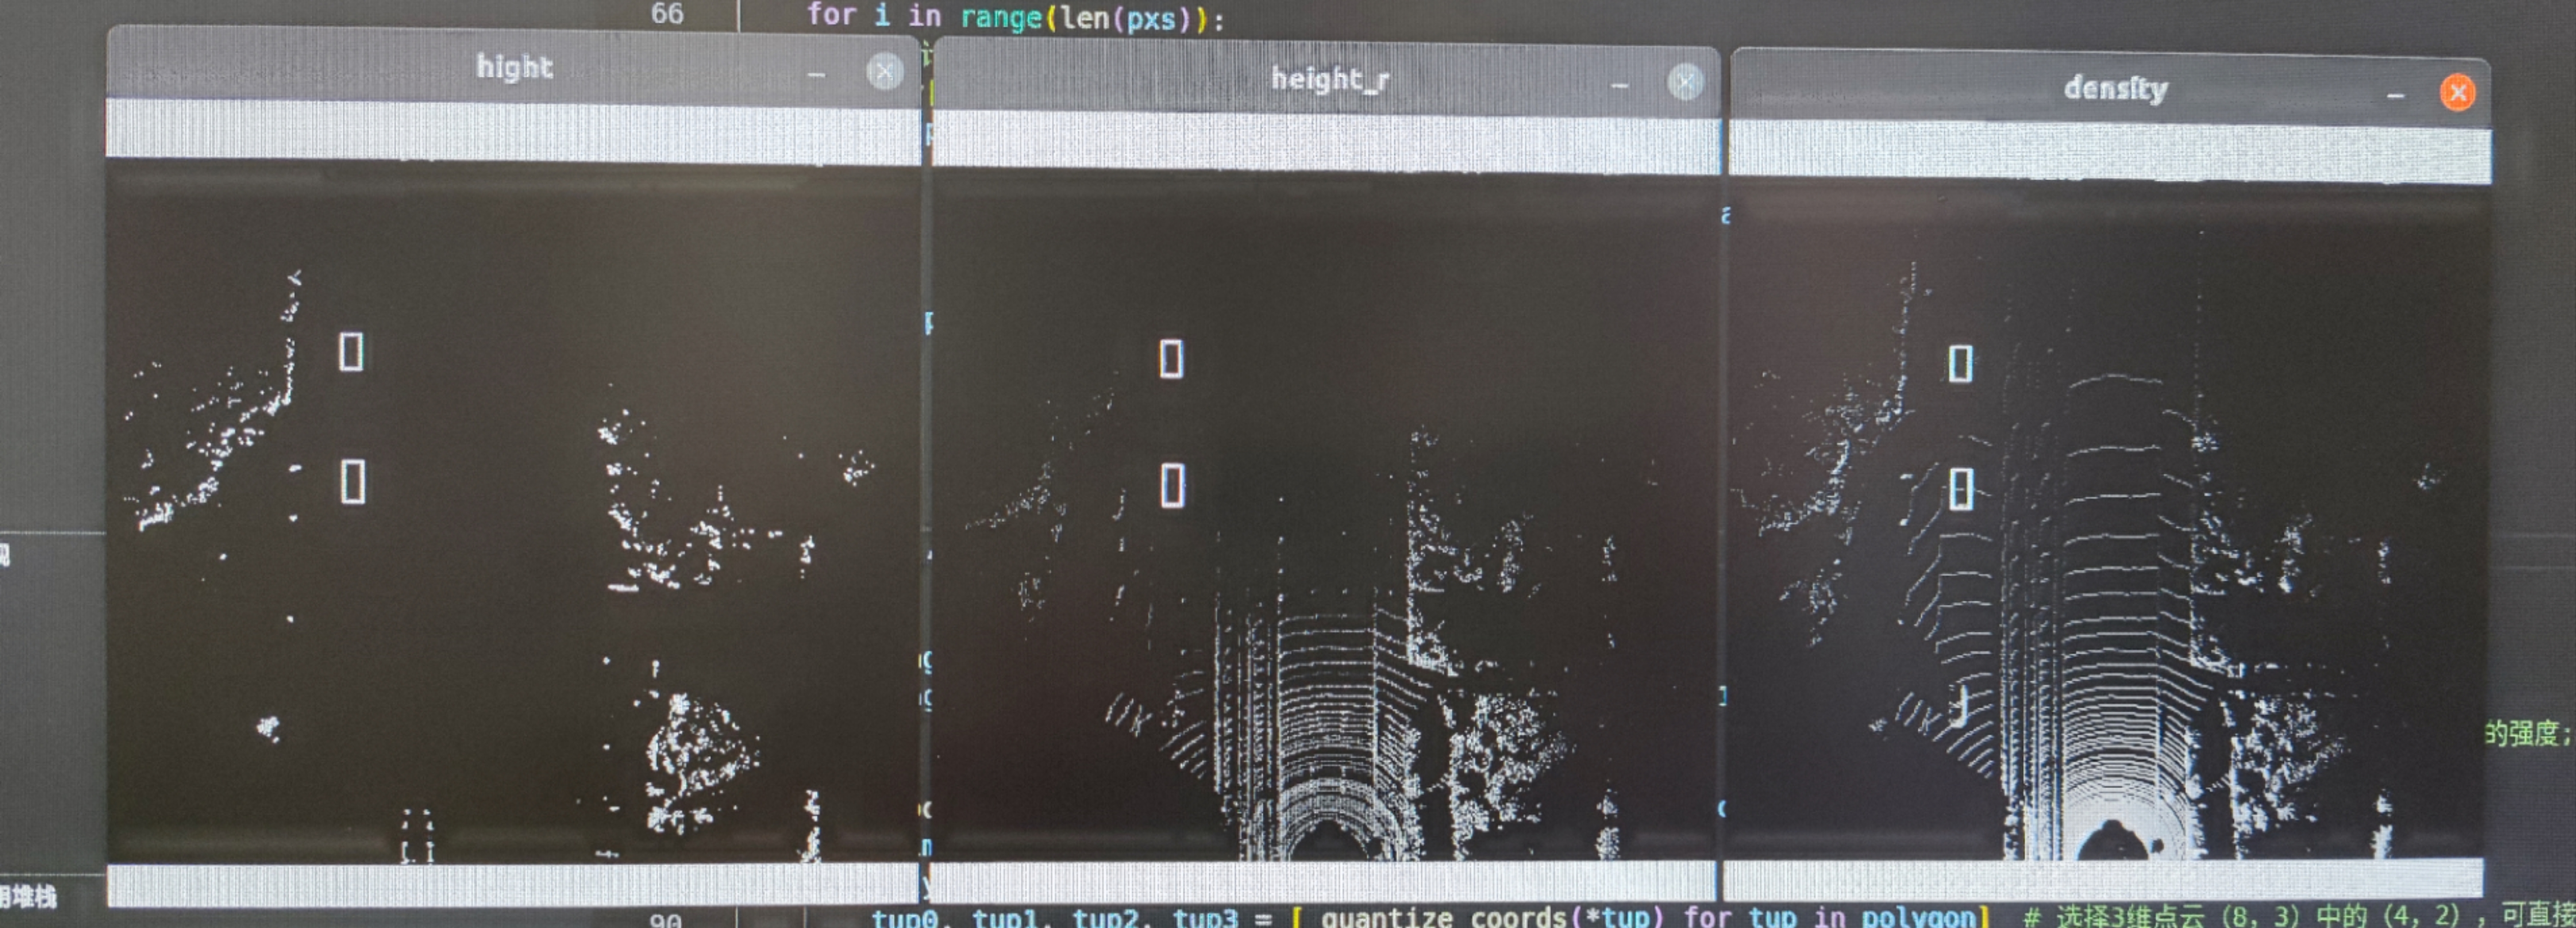
# 5.得到素中最高点的高度、强度,体素中点的密度(即点的数量)------------------------------------------------------
hight_image, height_r_image, density_image = lidar_to_bev(lidar)
# 6.可视化 (只取xy坐标,八个顶点只取上面4个或下面4个)----------------------------------------------------------
hight_with_box = draw_polygons(hight_image,gt_box3d[:,:4,:2])
height_r_with_box = draw_polygons(height_r_image,gt_box3d[:,:4,:2])
density_with_box = draw_polygons(density_image,gt_box3d[:,:4,:2])
cv2.imshow('hight', hight_with_box)
cv2.imshow('height_r', height_r_with_box)
cv2.imshow('density', density_with_box)
cv2.imwrite('hight.png', hight_with_box)
cv2.imwrite('height_r.png', height_r_with_box)
cv2.imwrite('density.png', density_with_box)
cv2.waitKey(0)
# voxel size
vd = 0.4
vh = 0.2
vw = 0.2
# points cloud range
xrange = (0, 70.4)
yrange = (-40, 40)
zrange = (-3, 1)
# voxel grid
W = math.ceil((xrange[1] - xrange[0]) / vw) # 352
H = math.ceil((yrange[1] - yrange[0]) / vh) # 400
D = math.ceil((zrange[1] - zrange[0]) / vd) # 10
def _quantize_coords(x, y):
xx = H - int((y - yrange[0]) / vh)
yy = W - int((x - xrange[0]) / vw)
return xx, yy
#过滤指定范围之外的点和目标框
def get_filtered_lidar(lidar, boxes3d=None):
# lidar:(115976, 4) boxes3d: (2, 8, 3)
xrange = (0, 70.4)
yrange = (-40, 40)
zrange = (-3, 1)
pxs = lidar[:, 0]
pys = lidar[:, 1]
pzs = lidar[:, 2]
filter_x = np.where((pxs >= xrange[0]) & (pxs < xrange[1]))[0] # (59820) : [0, 2, ...105689]
filter_y = np.where((pys >= yrange[0]) & (pys < yrange[1]))[0] # (115833)
filter_z = np.where((pzs >= zrange[0]) & (pzs < zrange[1]))[0] # (113897): [ 162, 165,...115976 ]
filter_xy = np.intersect1d(filter_x, filter_y) # (59737)
filter_xyz = np.intersect1d(filter_xy, filter_z) # (58590)
if boxes3d is not None:
box_x = (boxes3d[:, :, 0] >= xrange[0]) & (boxes3d[:, :, 0] < xrange[1]) # (2, 8): [True. F,..True]
box_y = (boxes3d[:, :, 1] >= yrange[0]) & (boxes3d[:, :, 1] < yrange[1])
box_z = (boxes3d[:, :, 2] >= zrange[0]) & (boxes3d[:, :, 2] < zrange[1])
box_xyz = np.sum(box_x & box_y & box_z,axis=1)
return lidar[filter_xyz], boxes3d[box_xyz>0]
return lidar[filter_xyz]
def lidar_to_bev(lidar):
pxs = lidar[:, 0] # ( 58590 )
pys = lidar[:, 1]
pzs = lidar[:, 2]
prs = lidar[:, 3]
qxs=((pxs-xrange[0])/vw).astype(np.int32)
qys=((pys-yrange[0])/vh).astype(np.int32)
qzs=((pzs-zrange[0])/vd).astype(np.int32)
print('height,width,channel=%d,%d,%d'%(W, H, D))
top = np.zeros(shape=(W, H, D), dtype=np.float32)
mask = np.ones(shape=(W, H, D), dtype=np.float32)* -5
bev = np.zeros(shape=(W, H, 3), dtype=np.float32)
bev[:, : ,0] = np.ones(shape=(W, H), dtype=np.float32)* -5
for i in range(len(pxs)):
#统计高度方向上每个体素的个数
bev[-qxs[i], -qys[i], -1]= 1+ bev[-qxs[i], -qys[i], -1]
if pzs[i]>mask[-qxs[i], -qys[i],qzs[i]]:
#记录每个体素中点的最大高度值
top[-qxs[i], -qys[i], qzs[i]] = max(0,pzs[i]-zrange[0])
#更新最大高度值
mask[-qxs[i], -qys[i],qzs[i]]=pzs[i]
if pzs[i]>bev[-qxs[i], -qys[i], 0]:
#记录高度方向上的最大高度值
bev[-qxs[i], -qys[i], 0]=pzs[i]
#记录高度方向上最高点的强度值
bev[-qxs[i], -qys[i], 1]=prs[i]
bev[:,:,-1] = np.log(bev[:,:,-1]+1)/math.log(64) # 数值缩小
bev_image = bev - np.min(bev.reshape(-1, 3), 0)
bev_image_image = (bev_image/np.max(bev_image.reshape(-1, 3), 0)*255).astype(np.uint8)
return bev[:, :, 0], bev[:, :, 1], bev[:, :, 2] # bev[:, :, 0]表示体素中最高点的高度值; 最高点的强度; 体素中点的密度即点的数量。
def draw_polygons(image, polygons,color=(255,255,255), thickness=1, darken=1):
img = image.copy() * darken # polygons: (n,4,2)
for polygon in polygons:
tup0, tup1, tup2, tup3 = [_quantize_coords(*tup) for tup in polygon] # 选择3维点云(8,3)中的(4,2),可直接画在2D体素图上
cv2.line(img, tup0, tup1, color, thickness, cv2.LINE_AA)
cv2.line(img, tup1, tup2, color, thickness, cv2.LINE_AA)
cv2.line(img, tup2, tup3, color, thickness, cv2.LINE_AA)
cv2.line(img, tup3, tup0, color, thickness, cv2.LINE_AA)
return img
def load_kitti_calib(calib_file):
"""
load projection matrix
"""
with open(calib_file) as fi:
lines = fi.readlines()
assert (len(lines) == 8)
obj = lines[0].strip().split(' ')[1:]
P0 = np.array(obj, dtype=np.float32)
obj = lines[1].strip().split(' ')[1:]
P1 = np.array(obj, dtype=np.float32)
obj = lines[2].strip().split(' ')[1:]
P2 = np.array(obj, dtype=np.float32)
obj = lines[3].strip().split(' ')[1:]
P3 = np.array(obj, dtype=np.float32)
obj = lines[4].strip().split(' ')[1:]
R0 = np.array(obj, dtype=np.float32)
obj = lines[5].strip().split(' ')[1:]
Tr_velo_to_cam = np.array(obj, dtype=np.float32)
obj = lines[6].strip().split(' ')[1:]
Tr_imu_to_velo = np.array(obj, dtype=np.float32)
return {
'P2': P2.reshape(3, 4),
'R0': R0.reshape(3, 3),
'Tr_velo2cam': Tr_velo_to_cam.reshape(3, 4)}
def box3d_cam_to_velo(box3d, Tr):
# Tr: Tr_velo_to_cam(3, 4)
def project_cam2velo(cam, Tr):
T = np.zeros([4, 4], dtype=np.float32)
T[:3, :] = Tr
T[3, 3] = 1
T_inv = np.linalg.inv(T) # 算矩阵的(乘法)逆
lidar_loc_ = np.dot(T_inv, cam)
lidar_loc = lidar_loc_[:3]
return lidar_loc.reshape(1, 3)
def ry_to_rz(ry):
angle = -ry - np.pi / 2
if angle >= np.pi:
angle -= np.pi
if angle < -np.pi:
angle = 2*np.pi + angle
return angle
h,w,l,tx,ty,tz,ry = [float(i) for i in box3d]
cam = np.ones([4, 1])
cam[0] = tx
cam[1] = ty
cam[2] = tz
t_lidar = project_cam2velo(cam, Tr) # 把目标中心点,转移到像机坐标系 Tr_velo_to_cam -> (1,3)
Box = np.array([[-l / 2, -l / 2, l / 2, l / 2, -l / 2, -l / 2, l / 2, l / 2],
[w / 2, -w / 2, -w / 2, w / 2, w / 2, -w / 2, -w / 2, w / 2],
[0, 0, 0, 0, h, h, h, h]])
rz = ry_to_rz(ry)
rotMat = np.array([
[np.cos(rz), -np.sin(rz), 0.0],
[np.sin(rz), np.cos(rz), 0.0],
[0.0, 0.0, 1.0]])
velo_box = np.dot(rotMat, Box) # (3, 8)
cornerPosInVelo = velo_box + np.tile(t_lidar, (8, 1)).T
box3d_corner = cornerPosInVelo.transpose()
return box3d_corner.astype(np.float32) # (8, 3)
def load_kitti_label(label_file, Tr):
# Tr: Tr_velo_to_cam(3, 4)
with open(label_file,'r') as f:
lines = f.readlines()
gt_boxes3d_corner = []
num_obj = len(lines)
for j in range(num_obj):
obj = lines[j].strip().split(' ')
obj_class = obj[0].strip()
if obj_class not in ['Car']:
continue # 只顯示車輛目標
box3d_corner = box3d_cam_to_velo(obj[8:], Tr) # input:(h,w,l,x,y,z,r) (Tr) out:(8, 3)
gt_boxes3d_corner.append(box3d_corner)
gt_boxes3d_corner = np.array(gt_boxes3d_corner).reshape(-1,8,3)
return gt_boxes3d_corner # (2, 8, 3)
if __name__ == '__main__':
test()
效果图:
5. 将标注画在点云上
# -*- coding: utf-8 -*-
"""
乐乐感知学堂公众号
@author: https://blog.csdn.net/suiyingy
"""

from __future__ import division
import os
import numpy as np
import mayavi.mlab as mlab

#过滤指定范围之外的点和目标框
def get_filtered_lidar(lidar, boxes3d=None):
    xrange = (0, 70.4)
    yrange = (-40, 40)
    zrange = (-3, 1)
    pxs = lidar[:, 0]
    pys = lidar[:, 1]
    pzs = lidar[:, 2]
    filter_x = np.where((pxs >= xrange[0]) & (pxs < xrange[1]))[0]
    filter_y = np.where((pys >= yrange[0]) & (pys < yrange[1]))[0]
    filter_z = np.where((pzs >= zrange[0]) & (pzs < zrange[1]))[0]
    filter_xy = np.intersect1d(filter_x, filter_y)
    filter_xyz = np.intersect1d(filter_xy, filter_z)
    if boxes3d is not None:
        box_x = (boxes3d[:, :, 0] >= xrange[0]) & (boxes3d[:, :, 0] < xrange[1])
        box_y = (boxes3d[:, :, 1] >= yrange[0]) & (boxes3d[:, :, 1] < yrange[1])
        box_z = (boxes3d[:, :, 2] >= zrange[0]) & (boxes3d[:, :, 2] < zrange[1])
        box_xyz = np.sum(box_x & box_y & box_z,axis=1)

        return lidar[filter_xyz], boxes3d[box_xyz>0]

    return lidar[filter_xyz]


def draw_lidar(lidar, is_grid=False, is_axis = True, is_top_region=True, fig=None):
    pxs=lidar[:,0]
    pys=lidar[:,1]
    pzs=lidar[:,2]
    prs=lidar[:,3]
    if fig is None: fig = mlab.figure(figure=None, bgcolor=(0,0,0), fgcolor=None, engine=None, size=(1000, 500))
    mlab.points3d(
        pxs, pys, pzs, prs,
        mode='point',  # 'point'  'sphere'
        colormap='gnuplot',  #'bone',  #'spectral',  #'copper',
        scale_factor=1,
        figure=fig)
    #draw grid
    if is_grid:
        mlab.points3d(0, 0, 0, color=(1,1,1), mode='sphere', scale_factor=0.2)
        for y in np.arange(-50,50,1):
            x1,y1,z1 = -50, y, 0
            x2,y2,z2 =  50, y, 0
            mlab.plot3d([x1, x2], [y1, y2], [z1,z2], color=(0.5,0.5,0.5), tube_radius=None, line_width=1, figure=fig)
        for x in np.arange(-50,50,1):
            x1,y1,z1 = x,-50, 0
            x2,y2,z2 = x, 50, 0
            mlab.plot3d([x1, x2], [y1, y2], [z1,z2], color=(0.5,0.5,0.5), tube_radius=None, line_width=1, figure=fig)

    #draw axis
    if is_grid:
        mlab.points3d(0, 0, 0, color=(1,1,1), mode='sphere', scale_factor=0.2)
        axes=np.array([
            [2.,0.,0.,0.],
            [0.,2.,0.,0.],
            [0.,0.,2.,0.],
        ],dtype=np.float64)
        fov=np.array([  ##<todo> : now is 45 deg. use actual setting later ...
            [20., 20., 0.,0.],
            [20.,-20., 0.,0.],
        ],dtype=np.float64)

        mlab.plot3d([0, axes[0,0]], [0, axes[0,1]], [0, axes[0,2]], color=(1,0,0), tube_radius=None, figure=fig)
        mlab.plot3d([0, axes[1,0]], [0, axes[1,1]], [0, axes[1,2]], color=(0,1,0), tube_radius=None, figure=fig)
        mlab.plot3d([0, axes[2,0]], [0, axes[2,1]], [0, axes[2,2]], color=(0,0,1), tube_radius=None, figure=fig)
        mlab.plot3d([0, fov[0,0]], [0, fov[0,1]], [0, fov[0,2]], color=(1,1,1), tube_radius=None, line_width=1, figure=fig)
        mlab.plot3d([0, fov[1,0]], [0, fov[1,1]], [0, fov[1,2]], color=(1,1,1), tube_radius=None, line_width=1, figure=fig)

    #draw top_image feature area
    if is_top_region:
        #关注指定范围内的点云
        x1 = 0
        x2 = 70.4
        y1 = -40
        y2 = 40
        mlab.plot3d([x1, x1], [y1, y2], [0,0], color=(0.5,0.5,0.5), tube_radius=None, line_width=1, figure=fig)
        mlab.plot3d([x2, x2], [y1, y2], [0,0], color=(0.5,0.5,0.5), tube_radius=None, line_width=1, figure=fig)
        mlab.plot3d([x1, x2], [y1, y1], [0,0], color=(0.5,0.5,0.5), tube_radius=None, line_width=1, figure=fig)
        mlab.plot3d([x1, x2], [y2, y2], [0,0], color=(0.5,0.5,0.5), tube_radius=None, line_width=1, figure=fig)
    mlab.orientation_axes()
    mlab.view(azimuth=180,elevation=None,distance=50,focalpoint=[ 12.0909996 , -1.04700089, -2.03249991])#2.0909996 , -1.04700089, -2.03249991
    return fig

def draw_gt_boxes3d(gt_boxes3d, fig, color=(1,0,0), line_width=2):
    num = len(gt_boxes3d)
    for n in range(num):
        b = gt_boxes3d[n]
        for k in range(0,4):
            i,j=k,(k+1)%4
            mlab.plot3d([b[i,0], b[j,0]], [b[i,1], b[j,1]], [b[i,2], b[j,2]], color=color, tube_radius=None, line_width=line_width, figure=fig)
            i,j=k+4,(k+3)%4 + 4
            mlab.plot3d([b[i,0], b[j,0]], [b[i,1], b[j,1]], [b[i,2], b[j,2]], color=color, tube_radius=None, line_width=line_width, figure=fig)
            i,j=k,k+4
            mlab.plot3d([b[i,0], b[j,0]], [b[i,1], b[j,1]], [b[i,2], b[j,2]], color=color, tube_radius=None, line_width=line_width, figure=fig)
    mlab.view(azimuth=180,elevation=None,distance=50,focalpoint=[ 12.0909996 , -1.04700089, -2.03249991])#2.0909996 , -1.04700089, -2.03249991

def load_kitti_calib(calib_file):
    """
    load projection matrix
    """
    with open(calib_file) as fi:
        lines = fi.readlines()
        assert (len(lines) == 8)
    obj = lines[0].strip().split(' ')[1:]
    P0 = np.array(obj, dtype=np.float32)
    obj = lines[1].strip().split(' ')[1:]
    P1 = np.array(obj, dtype=np.float32)
    obj = lines[2].strip().split(' ')[1:]
    P2 = np.array(obj, dtype=np.float32)
    obj = lines[3].strip().split(' ')[1:]
    P3 = np.array(obj, dtype=np.float32)
    obj = lines[4].strip().split(' ')[1:]
    R0 = np.array(obj, dtype=np.float32)
    obj = lines[5].strip().split(' ')[1:]
    Tr_velo_to_cam = np.array(obj, dtype=np.float32)
    obj = lines[6].strip().split(' ')[1:]
    Tr_imu_to_velo = np.array(obj, dtype=np.float32)
    return {

    'P2': P2.reshape(3, 4),
            'R0': R0.reshape(3, 3),
            'Tr_velo2cam': Tr_velo_to_cam.reshape(3, 4)}


def box3d_cam_to_velo(box3d, Tr):
    def project_cam2velo(cam, Tr):
        T = np.zeros([4, 4], dtype=np.float32)
        T[:3, :] = Tr
        T[3, 3] = 1
        T_inv = np.linalg.inv(T)
        lidar_loc_ = np.dot(T_inv, cam)
        lidar_loc = lidar_loc_[:3]
        return lidar_loc.reshape(1, 3)

    def ry_to_rz(ry):
        angle = -ry - np.pi / 2
        if angle >= np.pi:
            angle -= np.pi
        if angle < -np.pi:
            angle = 2*np.pi + angle
        return angle

    h,w,l,tx,ty,tz,ry = [float(i) for i in box3d]
    cam = np.ones([4, 1])
    cam[0] = tx
    cam[1] = ty
    cam[2] = tz
    t_lidar = project_cam2velo(cam, Tr)
    Box = np.array([[-l / 2, -l / 2, l / 2, l / 2, -l / 2, -l / 2, l / 2, l / 2],
                    [w / 2, -w / 2, -w / 2, w / 2, w / 2, -w / 2, -w / 2, w / 2],
                    [0, 0, 0, 0, h, h, h, h]])
    rz = ry_to_rz(ry)
    rotMat = np.array([
        [np.cos(rz), -np.sin(rz), 0.0],
        [np.sin(rz), np.cos(rz), 0.0],
        [0.0, 0.0, 1.0]])
    velo_box = np.dot(rotMat, Box)
    cornerPosInVelo = velo_box + np.tile(t_lidar, (8, 1)).T
    box3d_corner = cornerPosInVelo.transpose()
    return box3d_corner.astype(np.float32)

def load_kitti_label(label_file, Tr):
    with open(label_file,'r') as f:
        lines = f.readlines()
    gt_boxes3d_corner = []
    num_obj = len(lines)
    for j in range(num_obj):
        obj = lines[j].strip().split(' ')
        obj_class = obj[0].strip()
        if obj_class not in ['Car']:
            continue
        box3d_corner = box3d_cam_to_velo(obj[8:], Tr)
        gt_boxes3d_corner.append(box3d_corner)
    gt_boxes3d_corner = np.array(gt_boxes3d_corner).reshape(-1,8,3)
    return gt_boxes3d_corner

def test():
    lidar_file = '/home/xzz/Desktop/mini_kitti/data object veloyne/training/000016.bin'
    calib_file = '/home/xzz/Desktop/mini_kitti/data object calib/training/calib/000016.txt'
    label_file = '/home/xzz/Desktop/mini_kitti/data_object_label_2/training/label_2/000016.txt'

    #加载雷达数据
    print("Processing: ", lidar_file)
    lidar = np.fromfile(lidar_file, dtype=np.float32)
    lidar = lidar.reshape((-1, 4))                                         # (113070, 4)

    #加载标注文件
    calib = load_kitti_calib(calib_file)
    #标注转三维目标检测框
    gt_box3d = load_kitti_label(label_file, calib['Tr_velo2cam'])          # (4,8,3)

    #过滤指定范围之外的点和目标框
    lidar, gt_box3d = get_filtered_lidar(lidar, gt_box3d)                  # (55356, 4)

    # view in point cloud,可视化
    fig = draw_lidar(lidar, is_grid=True, is_top_region=True)
    draw_gt_boxes3d(gt_boxes3d=gt_box3d, fig=fig)
    mlab.show()

if __name__ == '__main__':
    test()
二、几种点云可视化方式
常用点云格式如 ply、obj ,可直接安装软件 meshlab 直接可视化,也可实现格式转换。
其它如bin格式可见以下方法:
方案一:mayavi可视化点云
from mayavi import mlab
import numpy as np

def viz_mayavi(points):
    x = points[:, 0]  # x position of point
    y = points[:, 1]  # y position of point
    z = points[:, 2]  # z position of point
    fig = mlab.figure(bgcolor=(0, 0, 0), size=(640, 360)) #指定图片背景和尺寸
    mlab.points3d(x, y, z,
                         z,          # Values used for Color,指定颜色变化依据
                         mode="point",
                          colormap='spectral', # 'bone', 'copper', 'gnuplot'
                         # color=(0, 1, 0),   # 也可以使用固定的RGB值
                         )
    mlab.show()
points = np.loadtxt('airplane_0001.txt', delimiter=',')
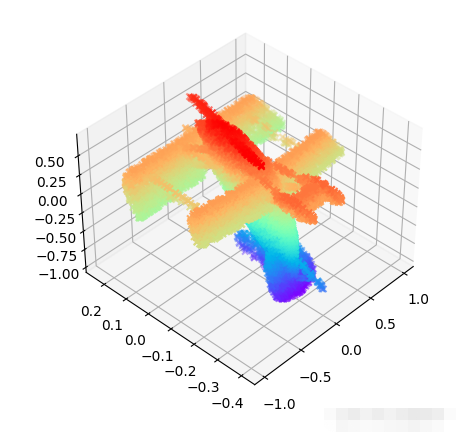
方案二、matplotlib可视化点云
import matplotlib.pyplot as plt
import numpy as np

def viz_matplot(points):
    x = points[:, 0]  # x position of point
    y = points[:, 1]  # y position of point
    z = points[:, 2]  # z position of point
    fig = plt.figure()
    ax = fig.add_subplot(111, projection='3d')
    ax.scatter(x,   # x
               y,   # y
               z,   # z
               c=z, # height data for color
               cmap='rainbow',
               marker="x")
    ax.axis()
    plt.show()


points = np.loadtxt('airplane_0001.txt', delimiter=',')
方案三、CloudCompare可视化点云
Mayavi常用函数
from mayavi import mlab

fig = mlab.figure(bgcolor=(0, 0, 0), size=(640, 360)) #指定图片背景和尺寸

mlab.points3d(x, y, z,
              z,          # Values used for Color,指定颜色变化依据
              mode="point",
              colormap='spectral', # 'bone', 'copper', 'gnuplot'
              # color=(0, 1, 0),   # 也可以使用固定的RGB值
               )

opacity=1.0  # 不透明度,取值范围0-1。0.0表示完全透明,1.0表示完全不透明
color=(1, 1, 1)  # RGB数值,每个数的取值范围均为0-1。例:(1, 1, 1)表示白色。
colormap='spectral'  #  不同的配色方案

mlab.show()#显示结果

# 2D data
img = xxxx  # img is a 2D nunmpy array
mlab.imshow(img) #显示二维结果
mlab.surf()
mlab.contour_surf()
mlab.mesh()             #将物体表面以网格(mesh)的形式展示出来,即坐标空间的网格化。# 参数:representation = 'wireframe' 可以仅绘制线框。
# 参数:representation = 'surface' 为default值,绘制完整曲面。mlab.mesh(x, y, z, representation='wireframe', line_width=1.0 )
三、点云数据变换
1.pcd点云可视化与移动(利用open3d)
点云的平移函数为translate。其函数原型如下所示:
pcd.translate((tx,ty,tz),relative=True)
1.当relative为True时,(tx, ty, tz)表示点云平移的相对尺度,也就是平移了多少距离。
2.当relative为False时,(tx, ty, tz)表示点云中心(质心)平移到的指定位置。
3.质心可以坐标可以通过 pcd.get_center( ) 得到。
from copy import deepcopy
import  open3d as o3d

if __name__ == '__main__':
    file_path = 'rabbit.pcd'
    pcd = o3d.io.read_point_cloud(file_path)
    print(pcd)

    # 点云转为 numpy矩阵
    points = np.array(pcd.points)

    # x方向平移
    pcd1 = deepcopy(pcd)
    pcd1.translate((20,0,0), relative=True)

    # y方向平移
    pcd2 = deepcopy(pcd)
    pcd2.translate((0,20,0), relative=True)

    # z方向平移
    pcd3 = deepcopy(pcd)
    pcd3.translate((0,0,20), relative=True)
    pcd4 = deepcopy(pcd)
    pcd4.translate((20,20,20), relative=True)

    # 点云显示
    o3d.visualization.draw_geometries([pcd, pcd1, pcd2, pcd3, pcd4], #点云列表
                                      window_name="点云平移",
                                      point_show_normal=False,
                                      width=800,  # 窗口宽度
                                      height=600)  # 窗口高度
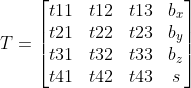
2.pcd点云旋转
pcd.rotate(R, center=(20, 0, 0))
1.第一个参数R是旋转矩阵。open3d中点云的旋转仍然是通过矩阵运算来完成的,因而需要先获取旋转矩阵。旋转矩阵可以自己进行定义,也可以根据欧拉角、旋转向量和四元数计算得到。
2.第二个参数是旋转中心,即围绕哪个点进行旋转。如果不指定center的值,默认为点云质心 (pcd.get_center())。
1.1 根据欧拉角计算旋转矩阵
   pcd.get_rotation_matrix_from_xyz(α, β, γ)。
   # 欧拉角旋转与旋转轴的先后顺序有关。除xyz外:xzy、yxz、yzx、等。

   R = pcd.get_rotation_matrix_from_xyz((0, np.pi/2, 0))#绕y轴旋转90°
1.2 根据旋转向量(轴角)计算旋转矩阵
旋转向量用3行1列的列向量(x, y, z).T来表示。那么旋转轴为向量方向,旋转角度为向量模长。
R = pcd.get_rotation_matrix_from_axis_angle(np.array([0, -np.pi/2, 0]).T)
#向量方向为旋转轴,模长等于旋转角度,绕y轴旋转-90°
1.3 根据四元数计算旋转矩阵
四元数用4行1列的列向量(w, x, y, z).T来表示。
R = pcd.get_rotation_matrix_from_quaternion(np.array([0, 0, 0, 1]).T)
# 绕x轴旋转180°
import open3d as o3d
from copy import deepcopy
import numpy as np

if __name__ == '__main__':
    file_path = 'rabbit.pcd'
    pcd = o3d.io.read_point_cloud(file_path)
    pcd.paint_uniform_color([0.5, 0.5, 0.5])#指定显示为灰色
    print(pcd)
    print(pcd.get_center())

    pcd1 = deepcopy(pcd)
    #采用欧拉角进行旋转
    R = pcd.get_rotation_matrix_from_xyz((0, np.pi/2, 0))#绕y轴旋转90°
    pcd1.rotate(R, center=(20, 0, 0))#旋转点位于x=20处,若不指定则默认为原始点云质心。
    pcd1.paint_uniform_color([0, 0, 1])#指定显示为蓝色
    print(pcd1.get_center())
    print(R)

    #采用旋转向量(轴角)进行旋转
    pcd2 = deepcopy(pcd)
    R = pcd.get_rotation_matrix_from_axis_angle(np.array([0, -np.pi/2, 0]).T)#向量方向为旋转轴,模长等于旋转角度,绕y轴旋转-90°
    pcd2.paint_uniform_color([0, 1, 0])#指定显示为绿色
    pcd2.rotate(R, center=(20, 0, 0))#旋转点位于x=20处,若不指定则默认为原始点云质心。
    print(pcd2.get_center())
    print(R)

    #采用四元数进行旋转
    pcd3 = deepcopy(pcd)
    R = pcd.get_rotation_matrix_from_quaternion(np.array([0, 0, 0, 1]).T)#绕x轴旋转180°
    pcd3.paint_uniform_color([1, 0, 0])#指定显示为红色
    pcd3.rotate(R, center=(0, 10, 0))#旋转点位于y=10处,若不指定则默认为原始点云质心。
    print(pcd3.get_center())
    print(R)
    # 点云显示
    o3d.visualization.draw_geometries([pcd, pcd1, pcd2, pcd3], #点云列表
                                      window_name="点云旋转",
                                      point_show_normal=False,
                                      width=800,  # 窗口宽度
                                      height=600)  # 窗口高度
3.点云仿射变换
仿射变换包含了一组线性变换和一个平移变换。其中,线性变换可以用矩阵左乘来表示。因此,仿射变换可以用矩阵和向量的方式来表达。
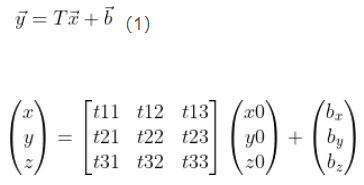
pen3d中的投影变换为函数为transform,参数为投影变换矩阵T。需要注意的是,open3d中的投影变换不仅仅包括仿射变换,还包括透视投影变换。仿射变换是线性的投影变换,而透视变换是非线性的。因此。open3d中的变换矩阵是4x4大小,而不是3x4。即:
矩阵T前3行对应仿射变换,最后一行对应透视变换。其中,s可以用来控制缩放系数,表示缩小的倍数。
import open3d as o3d
from copy import deepcopy
import numpy as np

if __name__ == '__main__':
    file_path = 'rabbit.pcd'
    pcd = o3d.io.read_point_cloud(file_path)
    pcd.paint_uniform_color([0.5, 0.5, 0.5])#指定显示为灰色
    print(pcd)


    #采用欧拉角进行旋转
    R = pcd.get_rotation_matrix_from_xyz((0, np.pi/2, 0))#绕y轴旋转90°
    #旋转矩阵
    R = np.array([[0, 0, 1], [0, 1, 0], [-1, 0, 0]])

    # 仿射变换
    T = np.array([[1, 0, 0, 20], [0, 1, 1, 20], [0, 0, 1, 0], [0, 0, 0, 1]])
    pcd1 = deepcopy(pcd)
    pcd1.transform(T)
    pcd1.paint_uniform_color([0, 0, 1])#指定显示为蓝色

    # 旋转矩阵R+x方向平移20个单位
    T = np.array([[0, 0, 1, 20], [0, 1, 0, 0], [-1, 0, 0, 0], [0, 0, 0, 1]]) #旋转矩阵R+x方向平移20个单位
    pcd2 = deepcopy(pcd)
    pcd2.transform(T)
    pcd2.paint_uniform_color([0, 1, 0])#指定显示为绿色


    # y方向平移40个单位,并且缩小3倍
    T = np.array([[1, 0, 0, 0], [0, 1, 0, 40], [0, 0, 1, 0], [0, 0, 0, 3]]) #y方向平移40个单位,并且缩小3倍
    pcd3 = deepcopy(pcd)
    pcd3.transform(T)
    pcd3.paint_uniform_color([1, 0, 0])#指定显示为红色

    # 点云显示
    o3d.visualization.draw_geometries([pcd, pcd1, pcd2, pcd3], #点云列表
                                      window_name="投影变换",
                                      point_show_normal=False,
                                      width=800,  # 窗口宽度
                                      height=600)  # 窗口高度
4.点云缩放
import open3d as o3d
from copy import deepcopy
import numpy as np

if __name__ == '__main__':
    file_path = 'rabbit.pcd'
    pcd = o3d.io.read_point_cloud(file_path)
    pcd.paint_uniform_color([0.5, 0.5, 0.5])#指定显示为灰色
    print(pcd)
    print('原始点云质心:', pcd.get_center())

    # 采用numpy计算
    points = np.array(pcd.points)
    points = points/2.0#缩小到原来的一半
    points[:, 0] = points[:, 0] + 20#质心平移到x=20处
    pcd1 = o3d.geometry.PointCloud()
    pcd1.points = o3d.utility.Vector3dVector(points)
    pcd1.paint_uniform_color([0, 0, 1])#指定显示为蓝色
    print('数组平移后点云质心:', pcd1.get_center())


    # 采用scale函数
    pcd2 = deepcopy(pcd)
    pcd2.scale(2.0, (40, 0, 0))#点云放大两倍,质心平移至(-40, 0, 0)
    pcd2.paint_uniform_color([0, 1, 0])#指定显示为绿色
    print('scale缩放后点云质心:', pcd2.get_center())

    # 采用仿射变换
    T = np.array([[1, 0, 0, 0], [0, 1, 0, 80], [0, 0, 1, 0], [0, 0, 0, 3]])#点云缩小到1/3,质心平移到(0, 80, 0)
    pcd3 = deepcopy(pcd)
    pcd3.transform(T)
    pcd3.paint_uniform_color([1, 0, 0])#指定显示为红色
    print('仿射变换缩放后点云质心:', pcd3.get_center())


    # 点云显示
    o3d.visualization.draw_geometries([pcd, pcd1, pcd2, pcd3], #点云列表
                                      window_name="点云缩放",
                                      point_show_normal=False,
                                      width=800,  # 窗口宽度
                                      height=600)  # 窗口高度
5. ply 与其他数据处理
PLY是一种电脑档案格式,全名为 多边形档案(Polygon File Format)或 斯坦福三角形档案(Stanford Triangle
Format)。
格式组成:
头:声明数据格式,规定和点和面片的数据内容
点:点的数据内容(坐标x,y,z 颜色r,g,b等)
线:线的数据内容(组成线的点序号索引,颜色等)
面片:面片的数据内容(组成面的点序号索引,颜色等)
举例:
ply
format ascii 1.0
//数据保存格式,三类
//format ascii 1.0
//format binary_little_endian 1.0
//format binary_big_endian 1.0
element vertex 8 //元素:顶点 个数为8
property float x
property float y
property float z //顶点格式:依次为x,yz坐标
element edge 6 //元素:边 6条
property int vertex1
property int vertex2
property uchar red
property uchar green
property uchar blue //边存储格式为: 顶点id 1,2,颜色r,g,b
end_header //头,以end_header结束
0.194585 0.0202505 -0.654565
0.393574 0.0181872 -0.634588
0.196413 0.220227 -0.652125
0.174584 0.0180056 -0.455581
0.811062 -0.0294865 -0.551833
0.991697 -0.0650619 -0.473697
0.845413 0.167279 -0.541659
0.73238 -0.0252545 -0.368009 //点内容,8个顶点(x,y,z)坐标
0 1 255 0 0
0 2 0 255 0
0 3 0 0 255
4 5 255 0 0
4 6 0 255 0
4 7 0 0 255 //6条边,(id1,id2,r,g,b)
ply 数据读取(open3d、plyfile、 直接打开)
法1:转换为TriangleMesh格式才能被Open3d处理,包括存储和点云处理等。
import open3d as o3d
import numpy as np
ply = o3d.geometry.TriangleMesh()
ply.vertices = o3d.utility.Vector3dVector(points_array)

path = 'L004.ply'
# 1.读入mesh
ply = o3d.io.read_triangle_mesh(path)

# 2.读入点云
pcd = o3d.io.read_point_cloud(path)

# 3.体素下采样
pcd1 = deepcopy(pcd)
# pcd1.paint_uniform_color([0, 0, 1])#指定显示为蓝色
pcd1.translate((20, 0, 0)) #整体进行x轴方向平移
pcd1 = pcd1.voxel_down_sample(voxel_size=0.1)

# 4.保存下采样的点云
o3d.io.write_point_cloud( '/home/xzz/L004_down.ply' , pcd1)

# 5.可视化
o3d.visualization.draw_geometries([pcd1 ], #点云列表
                                      window_name="体素下采样",
                                      point_show_normal=False,
                                      width=800,  # 窗口宽度
                                      height=600)  # 窗口高度

points = np.array(ply.vertices) #转为矩阵
法2:利用plyfile 等数据包打开,需要提前 pip install这个包
import numpy as np
import pandas as pd
from plyfile import PlyData, PlyElement
# ply = o3d.geometry.TriangleMesh()
# ply.vertices = o3d.utility.Vector3dVector(points_array)

path = '/media/xzz/Elements/L002.ply'
plydata = PlyData.read(path)

# plydata.comments : ['Created by CloudComp...(Zephyrus)', 'Created 2020-04-21 4:33 PM']
# plydata.header : 'ply\nformat binary_little_endian 1.0\ ncomment Created by CloudCompare v2.10.2 (Zephyrus)\
#                   ncomment Created 2020-04-21 4:33 PM\ nobj_info Generated by CloudCompare!\
#                   nelement vertex 10283800\nproperty double x\ nproperty double y\ nproperty double z\
#                   nproperty uchar red\ nproperty uchar green\ nproperty uchar blue\ nproperty float scalar_Intensity\
#                   nproperty float scalar_GPSTime\ nproperty float scalar_ScanAngleRank\ nproperty float scalar_Label\nend_header'
# plydata.obj_info : ['Generated by CloudCompare!']
data = plydata.elements[0].data
# data[0].dtype.names : ('x', 'y', 'z', 'red', 'green', 'blue', 'scalar_Intensity', 'scalar_GPSTime', 'scalar_ScanAngleRank', 'scalar_Label')
data_pd = pd.DataFrame(data)                        # 转换成DataFrame, 因为DataFrame可以解析结构化的数据
data_np = np.zeros(data_pd.shape, dtype=np.float)   # 初始化储存数据的array
property_names = data[0].dtype.names                # 读取property的名字
for i, name in enumerate(property_names):           # 按property读取数据,这样可以保证读出的数据是同样的数据类型。
    data_np[:, i] = data_pd[name]                   # 最后转成array
print(data_np.shape)
法3:用 open 直接打开(适合纯数据,不包含头文件的ply)
def pcd_read(file_path):
    lines = []
    with open(file_path, 'r') as f:
        lines = f.readlines()
    return lines

#将每一行数据分割后转为数字
def ls2n(line):
    line = line.strip().split(' ')
    return list(map(float, line))

if __name__ == '__main__':
    file_path = 'bun_zipper.ply'
    points = pcd_read(file_path)[12:(12+35947)]
    points = list(map(lambda x: ls2n(x), points))
保存ply文件
# -----------------保存ply文件 法1 --------------------
def write_ply(save_path, points, text=True):
    points = [(points[i,0],points[i,1],points[i,2]) for i in range(points.shape[0])]
    vertex = np.array(points, dtype=[('x','f4'),('y','f4'),('z','f4')])
    el = PlyElement.describe(vertex,'vertex',comments=['vertices'])
    # PlyData([el],text=text).write(save_path)
    face = PlyElement.describe(np.array(dace_data,dtype=[]),'face')
    color = PlyElement.describe(np.array(clolr_data,dtype=[]),'clolr')
    normals = PlyElement.describe(np.array(normals_data,dtype=[]),'normals')
    PlyData([point,face,color,normals]).write(save_path)


# -----------------保存ply文件 法2 --------------------
output_file = 'Andre_Agassi_0015.ply'
a = np.load("Andre_Agassi_0015.npy")
points = np.float32(a)

one = np.ones((43867,3))                              # 43867是我的点云的数量,用的时候记得改成自己的
colors = np.float32(one)*255
# colors = np.array([[0, 255, 255], [0, 255, 255]])   # 给每个点添加rgb
create_output(points, colors, output_file)

def create_output(vertices, colors, filename):
    colors = colors.reshape(-1, 3)
    vertices = np.hstack([vertices.reshape(-1, 3), colors])
    np.savetxt(filename, vertices, fmt='%f %f %f %d %d %d')     # 必须先写入,然后利用write()在头部插入ply header
    ply_header = '''ply
    		format ascii 1.0
    		element vertex %(vert_num)d
    		property float x
    		property float y
    		property float z
    		property uchar red
    		property uchar green
    		property uchar blue
    		end_header
    		\n
    		'''
    with open(filename, 'r+') as f:
        old = f.read()
        f.seek(0)
        f.write(ply_header % dict(vert_num=len(vertices)))
        f.write(old)
ply转pcd
pip install open3d 或conda 安装该库,conda install -c open3d-admin open3d
import open3d as o3d

pcd = o3d.io.read_point_cloud("source_pointcloud.ply")
o3d.io.write_point_cloud("sink_pointcloud.pcd", pcd)
ply转bin,任意点云格式转ply
首先安装 pip install plyfile
读取ply中的点云数据为numpy矩阵,直接保存为bin格式。不一定需要plyfile库,也可以是open3d库,或直接用with open打开文件读取即可。
import numpy as np
import pandas as pd
from plyfile import PlyData

def convert_ply(input_path, output_path):
    plydata = PlyData.read(input_path)  # read file
    data = plydata.elements[0].data  # read data
    data_pd = pd.DataFrame(data)  # convert to DataFrame
    data_np = np.zeros(data_pd.shape, dtype=np.float)  # initialize array to store data
    property_names = data[0].dtype.names  # read names of properties
    for i, name in enumerate(
            property_names):  # read data by property
        data_np[:, i] = data_pd[name]
    data_np.astype(np.float32).tofile(output_path)

if __name__ == '__main__':
    convert_ply('bun_zipper.ply', 'bun_zipper.bin')
semantic kitti数据
点云(bin)与标注(label)处理
import numpy as np
scan = np.fromfile('.bin',dtype=float32)
scan = san.reshape((-1,4))

label = np.fromfile('.bin',dtype=float32)
7.下采样
最远点采样FPS
点云最远点采样FPS(Farthest Point Sampling)方法的优势是可以尽可能多地覆盖到全部点云,但是需要多次计算全部距离,因而属于复杂度较高的、耗时较多的采样方法。
FPS采样步骤
    (1)选择一个初始点:可以随机选择,也可以按一定的规则来选。随机选取,每次得到的结果都不一样;反之每次得到的结果就是一致的。

    (2)计算所有点与(1)中点的距离,选择距离最大的值作为新的初始点。

    (3)重复前两步过程,直到选择的点数量满足要求。

    由于(2)中每次选择的距离都是最大的,所以迭代的过程距离最大值会逐渐减少。这也就是下面代码中mask选取的依据。如果不加这一个限制,那么点会被来回重复选到。
import numpy as np

def farthest_point_sample(point, npoint):
    """
    Input:
        xyz: pointcloud data, [N, D]
        npoint: number of samples
    Return:
        centroids: sampled pointcloud index, [npoint, D]
    """
    N, D = point.shape
    xyz = point[:,:3]
    centroids = np.zeros((npoint,))
    distance = np.ones((N,)) * 1e10
    farthest = np.random.randint(0, N)
    for i in range(npoint):
        centroids[i] = farthest
        centroid = xyz[farthest, :]
        dist = np.sum((xyz - centroid) ** 2, -1)
        mask = dist < distance
        distance[mask] = dist[mask]
        farthest = np.argmax(distance, -1)
    point = point[centroids.astype(np.int32)]
    return point
体素下采样(open3d)
- open3d中体素下采样的函数为: voxel_down_sample(voxel_size=0.1)。
其参数为体素尺寸。尺寸越大,下采样的倍数越大,点云更稀疏。
- voxel_down_sample_and_trace(self, voxel_size, min_bound, max_bound, approximate_class=False)
参数voxel_size体素尺寸外,还有min_bound、max_bound体素边界的最小最大坐标;
approximate_class=True时,体素采样后的点的颜色由体素中大多数点的颜色决定。当approximate_class=False时,体素采样后的点的颜色由体素中所有点的平均颜色决定。
输出包含如下两部分:
(1)稀疏后点云坐标
(2)稀疏后点云中各个点在原点云中的索引
import open3d as o3d
from copy import deepcopy

if __name__ == '__main__':
    file_path = '/home/Downloads/rabbit.pcd'
    pcd = o3d.io.read_point_cloud(file_path)
    pcd.paint_uniform_color([0.5, 0.5, 0.5])#指定显示为灰色
    print(pcd)

    pcd1 = deepcopy(pcd)
    pcd1.paint_uniform_color([0, 0, 1])#指定显示为蓝色
    pcd1.translate((20, 0, 0)) #整体进行x轴方向平移
    pcd1 = pcd1.voxel_down_sample(voxel_size=1)
    print(pcd1)

    pcd2 = deepcopy(pcd)
    pcd2.paint_uniform_color([0, 1, 0])#指定显示为绿色
    pcd2.translate((0, 20, 0)) #整体进行y轴方向平移
    res = pcd2.voxel_down_sample_and_trace(1, min_bound=pcd2.get_min_bound()-0.5, max_bound=pcd2.get_max_bound()+0.5, approximate_class=True)
    pcd2 = res[0]
    print(pcd2)


    # 点云显示
    o3d.visualization.draw_geometries([pcd, pcd1, pcd2], #点云列表
                                      window_name="体素下采样",
                                      point_show_normal=False,
                                      width=800,  # 窗口宽度
                                      height=600)  # 窗口高度

均匀下采样(open3d)
是指每隔固定的点数采样一次。样本按点的顺序执行,始终选择从第 1 个点开始,而不是随机选择。显然点存储的顺序不同,得到的结果也会不一样(适合有序点云),适合均匀采集的点云,如果点云本身不均匀,那么有可能造成某一部分的点云没被采样到。相比于体素的采样方法,点云均匀采样后的点数是固定可控的,而体素采样后的点云数量是不可控的。
pcd1 = deepcopy(pcd)
pcd1.paint_uniform_color([0, 0, 1])#指定显示为蓝色
pcd1.translate((20, 0, 0)) #整体进行x轴方向平移
pcd1 = pcd1.uniform_down_sample(100)#每100个点采样一次
随机下采样(open3d 与 numpy )
# open3d方法
pcd2 = deepcopy(pcd)
pcd2.paint_uniform_color([0, 1, 0])#指定显示为绿色
pcd2.translate((0, 20, 0)) #整体进行y轴方向平移
pcd2 = pcd2.random_down_sample(0.1)#采1/10的点云

# numpy方法
points = np.array(pcd3.points)
n = np.random.choice(len(points), 500, replace=False) #s随机采500个数据
pcd3.points = o3d.utility.Vector3dVector(points[n])
pcd3.paint_uniform_color([1, 0, 0])#指定显示为红色

# 点云显示
o3d.visualization.draw_geometries([pcd, pcd1, pcd2, pcd3], #点云列表
                                      window_name="均匀随机采样",
                                      point_show_normal=False,
                                      width=800,  # 窗口宽度
                                      height=600)  # 窗口高度
8.点云离群点剔除 (open3d)
离群点一般是指偏离大部分数据的点,可能是由于随机误差造成异常点。
离群点剔除方法: 基于统计、邻近度、密度、方差等方法。
open3d中三种剔除方法: 无效值剔除、统计方法、半径滤波法。
1. 无效值剔除
无效值包括空值和无限值。空值一般用NaN表示。
remove_non_finite_points(self, remove_nan=True, remove_infinite=True)
当remove_nan为True时,剔除空值。当remove_infinite为True时表示去除无限值。
2. 统计方式剔除(邻域滤波)
在一个点周围选择若干个点,计算它们距离的统计参数,如果某个点偏离平均值超过stdio_ratio倍的方差则认为是离群点,并进行删除。std_ratio实际上是指偏离标准差的倍数。
remove_statistical_outlier(nb_neighbors,std_ratio,print_progress = False)
第一个参数: nb_neighbors ( int ) – 目标点周围的邻居数。
第二参数: std_ratio ( float ) – 标准偏差比率。
第三个参数: print_progress ( bool , optional , default=False ) – 设置为 True 以打印进度条。
3. 半径滤波方式剔除
在指在目标点周围指定半径内统计点的数量,如果小于某一阈值则认为目标点是离群点并进行删除。两个主要参数:半径和点云数量阈值。
remove_radius_outlier(self,nb_points,半径,print_progress = False)
import open3d as o3d
from copy import deepcopy
import numpy as np


if __name__ == '__main__':
    file_path = 'rabbit.pcd'
    # 均匀采样
    pcd = o3d.io.read_point_cloud(file_path)
    pcd = pcd.uniform_down_sample(50)#每50个点采样一次
    pcd.paint_uniform_color([0.5, 0.5, 0.5])#指定显示为灰色
    print(pcd)

    # 剔除无效值
    pcd1 = deepcopy(pcd)
    pcd1.paint_uniform_color([0, 0, 1])#指定显示为蓝色
    pcd1.translate((20, 0, 0)) #整体进行x轴方向平移
    pcd1 = pcd1.remove_non_finite_points(True, True)#剔除无效值
    print(pcd1)

    # 统计方法剔除
    pcd2 = deepcopy(pcd)
    pcd2.paint_uniform_color([0, 1, 0])#指定显示为绿色
    pcd2.translate((-20, 0, 0)) #整体进行x轴方向平移
    res = pcd2.remove_statistical_outlier(20, 0.5)#统计方法剔除
    pcd2 = res[0]#返回点云,和点云索引
    print(pcd2)

    # 半径方法剔除
    pcd3 = deepcopy(pcd)
    pcd3.paint_uniform_color([1, 0, 0])#指定显示为红色
    pcd3.translate((0, 20, 0)) #整体进行y轴方向平移
    res = pcd3.remove_radius_outlier(nb_points=20, radius=2)#半径方法剔除
    pcd3 = res[0]#返回点云,和点云索引
    print(pcd3)

    # 点云显示
    o3d.visualization.draw_geometries([pcd, pcd1, pcd2, pcd3], #点云列表
                                      window_name="离群点剔除",
                                      point_show_normal=False,
                                      width=800,  # 窗口宽度
                                      height=600)  # 窗口高度
9、聚类
1、DBSCAN点云聚类
是一种基于密度的聚类算法,大体思想是根据样本点的密度和连通性,将密度满足要求且密度可达的点设置为同一类。
函数cluster_dbscan:
第1个参数eps表示DBSCAN算法确定点密度时和邻近点的距离大小,即考虑eps距离范围内的点进行密度计算。
第2个参数min_points表示组成一类最少需要多少个点。print_progress可以用来显示运行的进度。
labels返回聚类成功的类别,-1表示没有分到任何类中的点,原始点云中每个点都会分别得到一个类别标签。
labels=pcd.cluster_dbscan(eps, min_points, print_progress=False)
#labels返回聚类成功的类别,-1表示没有分到任何类中的点
file_path = '/home/xzz/Downloads/rabbit.pcd'

pcd = o3d.io.read_point_cloud(file_path)
pcd.paint_uniform_color([0.5, 0.5, 0.5])#指定显示为灰色
print(pcd)                              # (35947, 3)

# labels返回聚类成功的类别,-1表示没有分到任何类中的点 -> (37947): [ -1, 0 ,..145,93,-1 ]
labels = np.array(pcd.cluster_dbscan(eps=0.25, min_points=16, print_progress=True))

# 最大值相当于共有多少个类别
max_label = np.max(labels)

# 生成n+1个类别的颜色,n表示聚类成功的类别,1表示没有分类成功的类别
colors = np.random.randint(255, size=(max_label+1, 3))/255.                     # (145, 3)
colors = colors[labels]
                                                        # (35947, 3)
# 没有分类成功的点设置为黑色
colors[labels < 0] = 0
pcd.colors = o3d.utility.Vector3dVector(colors[:, :3])

# 点云显示
o3d.visualization.draw_geometries([pcd], #点云列表
                                  window_name="DBSCAN聚类",
                                  point_show_normal=False,
                                  width=800,  # 窗口宽度
                                  height=600)  # 窗口高

2. KMeans点云聚类
1.先确定k个分类中心,使得各个分类中的点到分类中心的距离总和最小。最直观的效果是将距离相近的点聚为同一类。Kmeans聚类的总数需要提前设置,即假定K个类别,也就是聚类后的类别是确定的。而DBSCAN方法聚类的类别是不确定的。
2.KMeans通常第一步是随机选择K个点作为初始化的类别中心,然后通过不断迭代进行中心坐标更新直到中心点更新距离变化小于阈值或者迭代次数达到上限。
3.KMeans++是在第一步上进行了改进,在初始化过程中尽可能选择距离相隔较远的点作为初始化中心。Skit-learn的Kmeans默认采用的初始化方式为KMeans++。
Skit-learn的Kmeans函数为sklearn.cluster.KMeans
result= KMeans(n_clusters=8,init='k-means++',n_init=10,max_iter=300,tol=0.0001,
       precompute_distances='auto',verbose=0,random_state=None,
       copy_x=True,n_jobs=1,algorithm='auto').fit(points)
(共11个参数)其中三个参数:n_clusters定义类别数量;max_iter定义最大迭代次数。
函数返回值中:返回结果用result表示,可以用 result.__dict__查看其包含的结果数据。n_iter_为算法实际迭代的次数,cluster_centers_为类别中心,labels_返回各个点的类别标签,从0开始。
#返回结果的属性
dict_keys(['n_clusters', 'init', 'max_iter', 'tol', 'precompute_distances', 'n_init', 'verbose', 'random_state', 'copy_x', 'n_jobs', 'algorithm', '_n_threads', 'n_features_in_', 'cluster_centers_', 'labels_', 'inertia_', 'n_iter_'])
from sklearn.cluster import KMeans

if __name__ == '__main__':
    file_path = '/home/xzz/Downloads/rabbit.pcd'

    pcd = o3d.io.read_point_cloud(file_path)
    # pcd = pcd.uniform_down_sample(50)#每50个点采样一次
    pcd.paint_uniform_color([0.5, 0.5, 0.5])#指定显示为灰色
    print(pcd)

    points = np.array(pcd.points)           # (35947, 3)
    result = KMeans(n_clusters=8).fit(points)
    # 各个类别中心
    center = result.cluster_centers_        # (8, 3)
    # labels返回聚类成功的类别,从0开始,每个数据表示一个类别
    labels = result.labels_                 # (35947):[5,1,3,...]

    # 最大值相当于共有多少个类别
    max_label = np.max(labels) + 1 #从0开始计算标签
    print(max(labels))
    # 生成k个类别的颜色,k表示聚类成功的类别
    colors = np.random.randint(255, size=(max_label, 3))/255.
    colors = colors[labels]
    pcd.colors = o3d.utility.Vector3dVector(colors[:, :3])

    # 点云显示
    o3d.visualization.draw_geometries([pcd], #点云列表
                                      window_name="Kmeans点云聚类",
                                      point_show_normal=False,
                                      width=800,  # 窗口宽度
                                      height=600)  # 窗口高度

此外还有OPTICS、Spectral Clustering(SC,即谱聚类)、 Hierarchical Clustering(层次聚类)、Mean-shift(即:均值迁移)、BIRCH、Affinity Propagation等聚类算法在点云聚类上的简单应用效果。具体可见:
https://blog.csdn.net/suiyingy/article/details/124519378
四、点云数据增强
1 中心归一化
减去均值,并除以点距原点的最大距离。
def pc_normalize(pc):
    centroid = np.mean(pc, axis=0)
    pc = pc - centroid
    m = np.max(np.sqrt(np.sum(pc ** 2, axis=1)))
    pc = pc / m
    return pc
2 打乱点云顺序
def shuffle_data(data, labels):
    """ Shuffle data and labels.
        Input:
          data: B,N,... numpy array
          label: B,... numpy array
        Return:
          shuffled data, label and shuffle indices
    """
    idx = np.arange(len(labels))
    np.random.shuffle(idx)
    return data[idx, ...], labels[idx], idx


def shuffle_points(batch_data):
    """ Shuffle orders of points in each point cloud -- changes FPS behavior.
        Use the same shuffling idx for the entire batch.
        Input:
            BxNxC array
        Output:
            BxNxC array
    """
    idx = np.arange(batch_data.shape[1])
    np.random.shuffle(idx)
    return batch_data[:,idx,:]
3 点云随机旋转
def rotate_point_cloud(batch_data):
    """ Randomly rotate the point clouds to augument the dataset
        rotation is per shape based along up direction
        Input:
          BxNx3 array, original batch of point clouds
        Return:
          BxNx3 array, rotated batch of point clouds
    """
    rotated_data = np.zeros(batch_data.shape, dtype=np.float32)
    for k in range(batch_data.shape[0]):
        rotation_angle = np.random.uniform() * 2 * np.pi
        cosval = np.cos(rotation_angle)
        sinval = np.sin(rotation_angle)
        rotation_matrix = np.array([[cosval, 0, sinval],
                                    [0, 1, 0],
                                    [-sinval, 0, cosval]])
        shape_pc = batch_data[k, ...]
        rotated_data[k, ...] = np.dot(shape_pc.reshape((-1, 3)), rotation_matrix)
    return rotated_data

#含法向量
def rotate_point_cloud_with_normal(batch_xyz_normal):
    ''' Randomly rotate XYZ, normal point cloud.
        Input:
            batch_xyz_normal: B,N,6, first three channels are XYZ, last 3 all normal
        Output:
            B,N,6, rotated XYZ, normal point cloud
    '''
    for k in range(batch_xyz_normal.shape[0]):
        rotation_angle = np.random.uniform() * 2 * np.pi
        cosval = np.cos(rotation_angle)
        sinval = np.sin(rotation_angle)
        rotation_matrix = np.array([[cosval, 0, sinval],
                                    [0, 1, 0],
                                    [-sinval, 0, cosval]])
        shape_pc = batch_xyz_normal[k,:,0:3]
        shape_normal = batch_xyz_normal[k,:,3:6]
        batch_xyz_normal[k,:,0:3] = np.dot(shape_pc.reshape((-1, 3)), rotation_matrix)
        batch_xyz_normal[k,:,3:6] = np.dot(shape_normal.reshape((-1, 3)), rotation_matrix)
    return batch_xyz_normal
4 z方向点云随机旋转
def rotate_point_cloud_z(batch_data):
    """ Randomly rotate the point clouds to augument the dataset
        rotation is per shape based along up direction
        Input:
          BxNx3 array, original batch of point clouds
        Return:
          BxNx3 array, rotated batch of point clouds
    """
    rotated_data = np.zeros(batch_data.shape, dtype=np.float32)
    for k in range(batch_data.shape[0]):
        rotation_angle = np.random.uniform() * 2 * np.pi
        cosval = np.cos(rotation_angle)
        sinval = np.sin(rotation_angle)
        rotation_matrix = np.array([[cosval, sinval, 0],
                                    [-sinval, cosval, 0],
                                    [0, 0, 1]])
        shape_pc = batch_data[k, ...]
        rotated_data[k, ...] = np.dot(shape_pc.reshape((-1, 3)), rotation_matrix)
    return rotated_data
5 欧拉角随机旋转
随机生成三个角度,代表x、y、z方向的旋转角。
def rotate_perturbation_point_cloud(batch_data, angle_sigma=0.06, angle_clip=0.18):
    """ Randomly perturb the point clouds by small rotations
        Input:
          BxNx3 array, original batch of point clouds
        Return:
          BxNx3 array, rotated batch of point clouds
    """
    rotated_data = np.zeros(batch_data.shape, dtype=np.float32)
    for k in range(batch_data.shape[0]):
        angles = np.clip(angle_sigma*np.random.randn(3), -angle_clip, angle_clip)
        Rx = np.array([[1,0,0],
                       [0,np.cos(angles[0]),-np.sin(angles[0])],
                       [0,np.sin(angles[0]),np.cos(angles[0])]])
        Ry = np.array([[np.cos(angles[1]),0,np.sin(angles[1])],
                       [0,1,0],
                       [-np.sin(angles[1]),0,np.cos(angles[1])]])
        Rz = np.array([[np.cos(angles[2]),-np.sin(angles[2]),0],
                       [np.sin(angles[2]),np.cos(angles[2]),0],
                       [0,0,1]])
        R = np.dot(Rz, np.dot(Ry,Rx))
        shape_pc = batch_data[k, ...]
        rotated_data[k, ...] = np.dot(shape_pc.reshape((-1, 3)), R)
    return rotated_data

#含法向量
def rotate_perturbation_point_cloud_with_normal(batch_data, angle_sigma=0.06, angle_clip=0.18):
    """ Randomly perturb the point clouds by small rotations
        Input:
          BxNx6 array, original batch of point clouds and point normals
        Return:
          BxNx3 array, rotated batch of point clouds
    """
    rotated_data = np.zeros(batch_data.shape, dtype=np.float32)
    for k in range(batch_data.shape[0]):
        angles = np.clip(angle_sigma*np.random.randn(3), -angle_clip, angle_clip)
        Rx = np.array([[1,0,0],
                       [0,np.cos(angles[0]),-np.sin(angles[0])],
                       [0,np.sin(angles[0]),np.cos(angles[0])]])
        Ry = np.array([[np.cos(angles[1]),0,np.sin(angles[1])],
                       [0,1,0],
                       [-np.sin(angles[1]),0,np.cos(angles[1])]])
        Rz = np.array([[np.cos(angles[2]),-np.sin(angles[2]),0],
                       [np.sin(angles[2]),np.cos(angles[2]),0],
                       [0,0,1]])
        R = np.dot(Rz, np.dot(Ry,Rx))
        shape_pc = batch_data[k,:,0:3]
        shape_normal = batch_data[k,:,3:6]
        rotated_data[k,:,0:3] = np.dot(shape_pc.reshape((-1, 3)), R)
        rotated_data[k,:,3:6] = np.dot(shape_normal.reshape((-1, 3)), R)
    return rotated_data
6 指定角度旋转点云
def rotate_point_cloud_by_angle(batch_data, rotation_angle):
    """ Rotate the point cloud along up direction with certain angle.
        Input:
          BxNx3 array, original batch of point clouds
        Return:
          BxNx3 array, rotated batch of point clouds
    """
    rotated_data = np.zeros(batch_data.shape, dtype=np.float32)
    for k in range(batch_data.shape[0]):
        #rotation_angle = np.random.uniform() * 2 * np.pi
        cosval = np.cos(rotation_angle)
        sinval = np.sin(rotation_angle)
        rotation_matrix = np.array([[cosval, 0, sinval],
                                    [0, 1, 0],
                                    [-sinval, 0, cosval]])
        shape_pc = batch_data[k,:,0:3]
        rotated_data[k,:,0:3] = np.dot(shape_pc.reshape((-1, 3)), rotation_matrix)
    return rotated_data

def rotate_point_cloud_by_angle_with_normal(batch_data, rotation_angle):
    """ Rotate the point cloud along up direction with certain angle.
        Input:
          BxNx6 array, original batch of point clouds with normal
          scalar, angle of rotation
        Return:
          BxNx6 array, rotated batch of point clouds iwth normal
    """
    rotated_data = np.zeros(batch_data.shape, dtype=np.float32)
    for k in range(batch_data.shape[0]):
        #rotation_angle = np.random.uniform() * 2 * np.pi
        cosval = np.cos(rotation_angle)
        sinval = np.sin(rotation_angle)
        rotation_matrix = np.array([[cosval, 0, sinval],
                                    [0, 1, 0],
                                    [-sinval, 0, cosval]])
        shape_pc = batch_data[k,:,0:3]
        shape_normal = batch_data[k,:,3:6]
        rotated_data[k,:,0:3] = np.dot(shape_pc.reshape((-1, 3)), rotation_matrix)
        rotated_data[k,:,3:6] = np.dot(shape_normal.reshape((-1,3)), rotation_matrix)
    return rotated_data
7.随机扰动
def jitter_point_cloud(batch_data, sigma=0.01, clip=0.05):
    """ Randomly jitter points. jittering is per point.
        Input:
          BxNx3 array, original batch of point clouds
        Return:
          BxNx3 array, jittered batch of point clouds
    """
    B, N, C = batch_data.shape
    assert(clip > 0)
    jittered_data = np.clip(sigma * np.random.randn(B, N, C), -1*clip, clip)
    jittered_data += batch_data
    return jittered_data
8.随机平移
def shift_point_cloud(batch_data, shift_range=0.1):
    """ Randomly shift point cloud. Shift is per point cloud.
        Input:
          BxNx3 array, original batch of point clouds
        Return:
          BxNx3 array, shifted batch of point clouds
    """
    B, N, C = batch_data.shape
    shifts = np.random.uniform(-shift_range, shift_range, (B,3))
    for batch_index in range(B):
        batch_data[batch_index,:,:] += shifts[batch_index,:]
    return batch_data
9.随机缩放
def random_scale_point_cloud(batch_data, scale_low=0.8, scale_high=1.25):
    """ Randomly scale the point cloud. Scale is per point cloud.
        Input:
            BxNx3 array, original batch of point clouds
        Return:
            BxNx3 array, scaled batch of point clouds
    """
    B, N, C = batch_data.shape
    scales = np.random.uniform(scale_low, scale_high, B)
    for batch_index in range(B):
        batch_data[batch_index,:,:] *= scales[batch_index]
    return batch_data
10.随机丢弃
def random_point_dropout(batch_pc, max_dropout_ratio=0.875):
    ''' batch_pc: BxNx3 '''
    for b in range(batch_pc.shape[0]):
        dropout_ratio =  np.random.random()*max_dropout_ratio # 0~0.875
        drop_idx = np.where(np.random.random((batch_pc.shape[1]))<=dropout_ratio)[0]
        if len(drop_idx)>0:
            batch_pc[b,drop_idx,:] = batch_pc[b,0,:] # set to the first point
    return batch_pc
五、分割可视化
if __name__ == '__main__':
    preds = np.loadtxt('Area_5_office_33.txt')    # 预测结果(xyzrgbl)
    points = np.load('Area_5_office_33.npy')      # 标签 (xyzrgbl)
    print(preds.shape, points.shape)
    print(set(preds))

    # 随机生成13个类别的颜色
    colors_0 = np.random.randint(255, size=(13, 3))/255.

    pcd = o3d.geometry.PointCloud()
    pcd.points = o3d.utility.Vector3dVector(points[:, :3])

    # 为各个真实标签指定颜色
    colors = colors_0[points[:, -1].astype(np.uint8)]
    pcd.colors = o3d.utility.Vector3dVector(colors[:, :3])

    # 显示预测结果
    pcd1 = deepcopy(pcd)
    pcd1.translate((0, 5, 0)) #整体进行y轴方向平移5
    #为各个预测标签指定颜色
    colors = colors_0[preds.astype(np.uint8)]
    pcd1.colors = o3d.utility.Vector3dVector(colors[:, :3])


    # 显示预测结果和真实结果对比
    pcd2 = deepcopy(pcd)
    pcd2.translate((0, -5, 0)) #整体进行y轴方向平移-5
    preds = preds.astype(np.uint8) == points[:, -1].astype(np.uint8)
    # 为各个预测标签指定颜色
    colors = colors_0[preds.astype(np.uint8)]
    pcd2.colors = o3d.utility.Vector3dVector(colors[:, :3])


    # 点云显示
    o3d.visualization.draw_geometries([pcd, pcd1, pcd2], window_name="PointNet++语义分割结果",
                                      point_show_normal=False,
                                      width=800,  # 窗口宽度
                                      height=600)  # 窗口高度
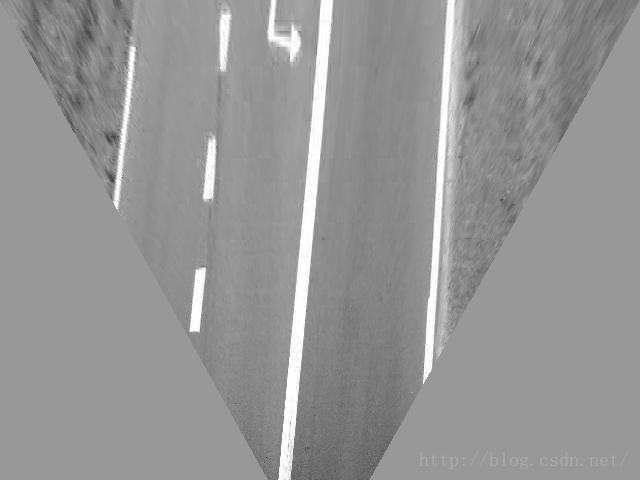
六、逆透视变换
详情请见:
https://blog.csdn.net/yeyang911/article/details/51915348
变换结果为: