情感分析(四):基于 Tokenizer 和 Word2Vec 的 CNN 实现
本文是 情感分析 系列的第 4 4 4 篇,前三篇分别是:
- 【自然语言处理】情感分析(一):基于 NLTK 的 Naive Bayes 实现
- 【自然语言处理】情感分析(二):基于 scikit-learn 的 Naive Bayes 实现
- 【自然语言处理】情感分析(三):基于 Word2Vec 的 LSTM 实现
本文将用 卷积神经网络(Convolutional Neural Networks, C N N CNN CNN)替换上一篇博客中的 L S T M LSTM LSTM。 L S T M LSTM LSTM 是 循环神经网络(Recurrent Neural Network, R N N RNN RNN)的一种。本文代码已上传至 我的GitHub,需要可自行下载。
1.数据准备
import sys
sys.path.append("..") # Adds higher directory to python modules path.
from NLPmoviereviews.data import load_data
X_train, y_train, X_test, y_test = load_data(percentage_of_sentences=10)
2.基于 Tokenizer 的 CNN 实现
tf.keras.preprocessing.text.Tokenizer 将文本语料库向量化。每个文本被转换为整数序列(每个整数是字典中标记的索引)或转换为向量,其中每个标记的系数可以是二进制的(如:One-Hot),基于数量统计的(如:BOW),基于 TF-IDF 的……
默认情况下会删除所有标点符号,文本被转换为以空格分隔的单词序列(单词可能包含 ' 字符)。然后将这些序列分成标记列表,再将它们索引或矢量化。 0 0 0 是保留索引,不会分配给任何单词。
from tensorflow.keras.preprocessing.text import Tokenizer

# This initializes a Keras utilities that does all the tokenization for you
tokenizer = Tokenizer()

# The tokenization learns a dictionary that maps a token (integer) to each word
# It can be done only on the train set - we are not supposed to know the test set!
# This tokenization also lowercases your words, apply some filters, and so on - you can check the doc if you want
tokenizer.fit_on_texts(X_train)

# We apply the tokenization to the train and test set
X_train_token = tokenizer.texts_to_sequences(X_train)
X_test_token = tokenizer.texts_to_sequences(X_test)

vocab_size=len(tokenizer.word_index)
为了实现的简便,keras 只能接受长度相同的序列输入。因此,如果目前序列长度参差不齐,这时需要使用 pad_sequences。该函数是将序列转化为经过填充以后的一个长度相同的新序列新序列。
from tensorflow.keras.preprocessing.sequence import pad_sequences

X_train_pad = pad_sequences(X_train_token, dtype=float, padding='post', maxlen=150)
X_test_pad = pad_sequences(X_test_token, dtype=float, padding='post', maxlen=150)

X_train_pad.shape, y_train.shape, X_test_pad.shape, y_test.shape

from tensorflow.keras import models, layers

embedding_size=100

model_cnn = models.Sequential()
model_cnn.add(layers.Embedding(input_dim=vocab_size+1, output_dim=embedding_size, mask_zero=True, input_length=150))
model_cnn.add(layers.Conv1D(20, kernel_size=3, activation='relu'))
model_cnn.add(layers.Flatten())
model_cnn.add(layers.Dense(10, activation="relu"))
model_cnn.add(layers.Dense(1, activation="sigmoid"))

model_cnn.compile(loss='binary_crossentropy', optimizer='rmsprop', metrics=['accuracy'])
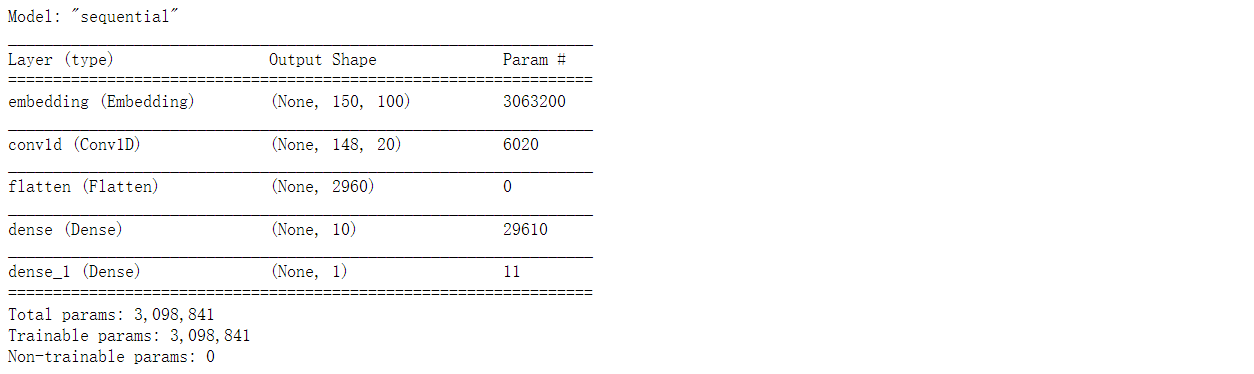
Embedding:嵌入层。一种比 One-Hot 更加有效的对离散特征进行编码的方法。一般用于将输入中的单词映射为稠密向量。嵌入层的参数需要学习。
在本模型中,Embedding 层参数:input_dim 是 vocab_size + 1 1 1,output_dim 是嵌入空间维度,mask_zero 必须设置为 True。在这里,出于计算原因,将 input_length 设置为您观察的最大长度(您刚刚在上一个问题中定义)。更多参数如下:
input_dim:int > > > 0 0 0。词汇表大小, 即最大整数index+ 1 1 1。output_dim:int > = >= >= 0 0 0。词向量的维度。embeddings_initializer:embeddings 矩阵的初始化方法(keras.initializers)。embeddings_regularizer:embeddings 矩阵的正则化方法(keras.regularizers)。embeddings_constraint:embeddings 矩阵的约束函数(keras.constraints)。mask_zero:是否把 0 0 0 看作为一个应该被遮蔽的特殊的padding值。 这对于可变长的 循环神经网络层 十分有用。 如果设定为True,那么接下来的所有层都必须支持masking,否则就会抛出异常。 如果mask_zero为True,作为结果,索引 0 0 0 就不能被用于词汇表中 (input_dim应该与vocabulary+ 1 1 1 大小相同)。input_length:输入序列的长度,当它是固定的时。 如果你需要连接Flatten和Dense层,则这个参数是必须的(没有它,dense层的输出尺寸就无法计算)。
Conv1D:普通一维卷积,常用于文本,内核的大小恰好对应于每个内核正在考虑的并排单词(标记)的数量。参数个数 = 输入通道数 × 卷积核尺寸(如 3 3 3) × 卷积核个数。
Flatten:平展层,用于将多维张量压成一维。
Dense:稠密层,参数个数 = 输入层特征数 × 输出层特征数(weight)+ 输出层特征数(bias)。
model_cnn.summary()
使用 早停法(EarlyStopping)拟合模型,并根据测试数据对其进行评估。
from tensorflow.keras.callbacks import EarlyStopping

es = EarlyStopping(patience=5, restore_best_weights=True, verbose=1)

model_cnn.fit(X_train_pad, y_train,
          epochs=20,
          batch_size=32,
          validation_split=0.3,
          verbose=0,
          callbacks=[es]
         )


res = model_cnn.evaluate(X_test_pad, y_test, verbose=0)

print(f'The accuracy evaluated on the test set is of {

      res[1]*100:.3f}%')

3.基于 Word2Vec 的 CNN 实现
import gensim.downloader as api
print(list(api.info()['models'].keys()))

word2vec=api.load('glove-wiki-gigaword-100')
from NLPmoviereviews.utilities import padding

X_train_pad = padding(word2vec, X_train, maxlen=150)
X_test_pad = padding(word2vec, X_test, maxlen=150)

X_train_pad.shape, y_train.shape, X_test_pad.shape, y_test.shape

from tensorflow.keras import models, layers
from tensorflow.keras.optimizers import Adam
from tensorflow.keras import regularizers

reg_l1 = regularizers.l1(0.001)
reg_l1l2 = regularizers.L1L2(l1=0.005, l2=0.005)

model = models.Sequential()
model.add(layers.Masking(mask_value=0, input_shape=(150,100)))
model.add(layers.Conv1D(16, kernel_size=3, activation='relu'))
model.add(layers.Dropout(0.5))
model.add(layers.Conv1D(32, kernel_size=2, activation='relu', kernel_regularizer=reg_l1))
model.add(layers.Dropout(0.5))
model.add(layers.Flatten())
model.add(layers.Dense(10, activation="relu", activity_regularizer=reg_l1l2))
model.add(layers.Dropout(0.5))
model.add(layers.Dense(1, activation="sigmoid"))

optim = Adam(learning_rate=0.0005)
model.compile(loss='binary_crossentropy', optimizer=optim, metrics=['accuracy'])
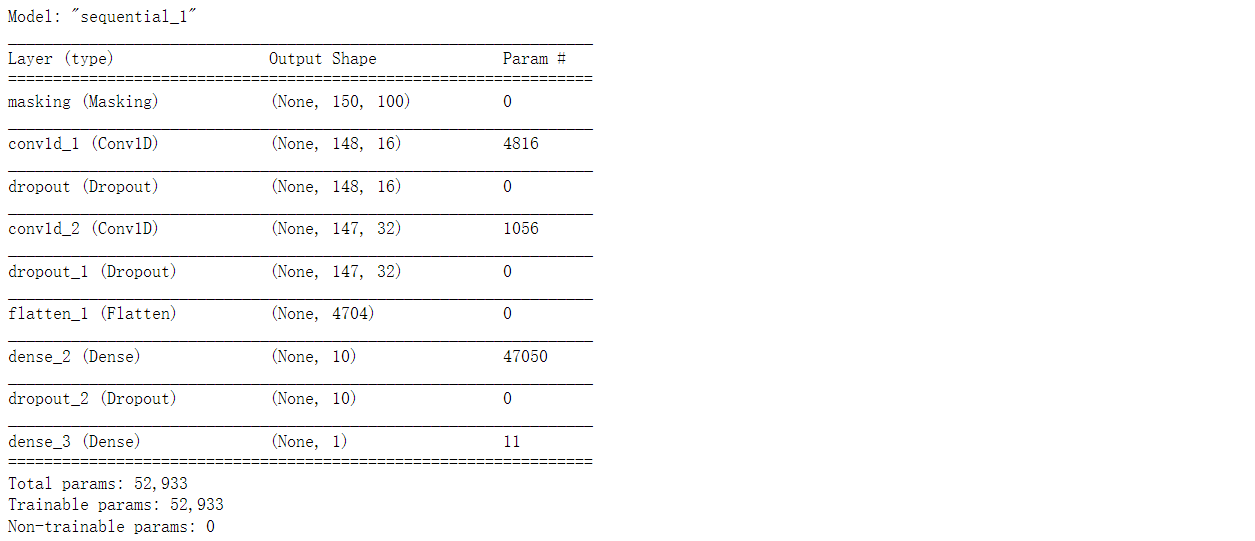
tf.keras.regularizers 提供的内置类如下:

model.summary()
from tensorflow.keras.callbacks import EarlyStopping

es = EarlyStopping(patience=10, restore_best_weights=True, verbose=1)

history = model.fit(X_train_pad, y_train,
          epochs=200,
          batch_size=64,
          validation_split=0.3,
          verbose=0,
          callbacks=[es]
         )


res = model.evaluate(X_test_pad, y_test, verbose=0)

print(f'The accuracy evaluated on the test set is of {

      res[1]*100:.3f}%')

import matplotlib.pyplot as plt

plt.subplots(figsize=(10, 8))
plt.plot(history.history['loss'])
plt.plot(history.history['val_loss'])
plt.show()
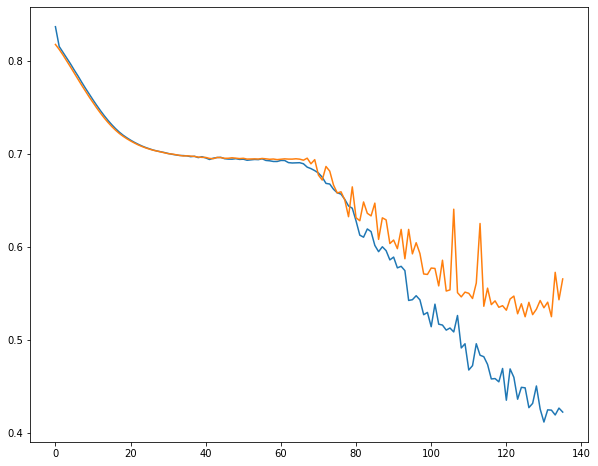
如果我们的模型非常适合任务,那么最简单和最快的模型能以与复杂的预训练模型相当的精度完成相同的任务。