python实现情感分析(Word2Vec)
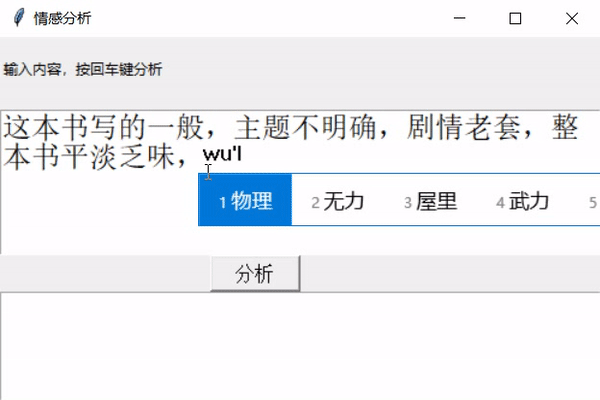
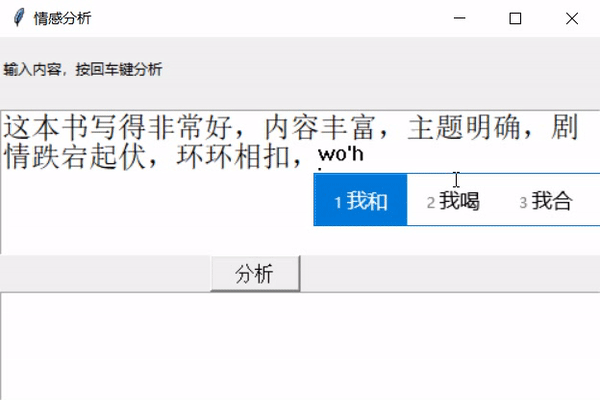
** 前几天跟着老师做了几个项目,老师写的时候劈里啪啦一顿敲,写了个啥咱也布吉岛,线下自己就瞎琢磨,终于实现了一个最简单的项目。输入文本,然后分析情感,判断出是好感还是反感。看最终结果:↓↓↓↓↓↓
•加载数据,预处理
数据就是正反两类,保存在neg.xls和pos.xls文件中,
数据内容类似购物网站的评论,分别有一万多个好评和一万多个差评,通过对它们的处理,变成我们用来训练模型的特征和标记。
首先导入几个python常见的库,train_test_split用来对特征向量的划分,numpy和pands是处理数据常见的库,jieba库用来分词,joblib用来保存训练好的模型,sklearn.svm是机器学习训练模型常用的库,我觉得核心的就是Word2Vec这个库了,作用就是将自然语言中的字词转为计算机可以理解的稠密向量。
from sklearn.model_selection import train_test_split
import numpy as np
import pandas as pd
import jieba as jb
from sklearn.externals import joblib
from sklearn.svm import SVC
from gensim.models.word2vec import Word2Vec
加载数据,将数据分词,将正反样本拼接,然后创建全是0和全是1的向量拼接起来作为标签
neg =pd.read_excel("data/neg.xls",header=None)
pos =pd.read_excel("data/pos.xls",header=None)
# 这是两类数据都是x值
pos['words'] = pos[0].apply(lambda x:list(jb.cut(x)))
neg['words'] = neg[0].apply(lambda x:list(jb.cut(x)))
#需要y值  0 代表neg 1代表是pos
y = np.concatenate((np.ones(len(pos)),np.zeros(len(neg))))
X = np.concatenate((pos['words'],neg['words']))
•词向量计算
网上搜到的专业解释是这样说的:使用一层神经网络将one-hot(独热编码)形式的词向量映射到分布式形式的词向量。使用了Hierarchical softmax, negative sampling等技巧进行训练速度上的优化。作用:我们日常生活中使用的自然语言不能够直接被计算机所理解,当我们需要对这些自然语言进行处理时,就需要使用特定的手段对其进行分析或预处理。使用one-hot编码形式对文字进行处理可以得到词向量,但是,由于对文字进行唯一编号进行分析的方式存在数据稀疏的问题,Word2Vec能够解决这一问题,实现word embedding
专业解释的话我还是一脸懵,后来看了一个栗子,大概是这样:
word2vec也叫word embeddings,中文名“词向量”,作用就是将自然语言中的字词转为计算机可以理解的稠密向量(Dense Vector)。在word2vec出现之前,自然语言处理经常把字词转为离散的单独的符号,也就是One-Hot Encoder。
X_train,X_test,y_train,y_test = train_test_split(X,y,test_size=0.2,random_state=3)
#保存数据
np.save("data/y_train.npy",y_train)
np.save("data/y_test.npy",y_test)
•词向量计算
网上搜到的专业解释是这样说的:使用一层神经网络将one-hot(独热编码)形式的词向量映射到分布式形式的词向量。使用了Hierarchical softmax, negative sampling等技巧进行训练速度上的优化。作用:我们日常生活中使用的自然语言不能够直接被计算机所理解,当我们需要对这些自然语言进行处理时,就需要使用特定的手段对其进行分析或预处理。使用one-hot编码形式对文字进行处理可以得到词向量,但是,由于对文字进行唯一编号进行分析的方式存在数据稀疏的问题,Word2Vec能够解决这一问题,实现word embedding
专业解释的话我还是一脸懵,后来看了一个栗子,大概是这样:
word2vec也叫word embeddings,中文名“词向量”,作用就是将自然语言中的字词转为计算机可以理解的稠密向量(Dense Vector)。在word2vec出现之前,自然语言处理经常把字词转为离散的单独的符号,也就是One-Hot Encoder。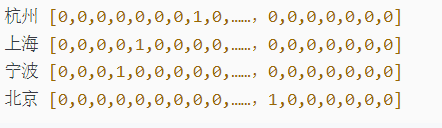
在语料库中,杭州、上海、宁波、北京各对应一个向量,向量中只有一个值为1,其余都为0。但是使用One-Hot Encoder有以下问题。一方面,城市编码是随机的,向量之间相互独立,看不出城市之间可能存在的关联关系。其次,向量维度的大小取决于语料库中字词的多少。如果将世界所有城市名称对应的向量合为一个矩阵的话,那这个矩阵过于稀疏,并且会造成维度灾难。
使用Vector Representations可以有效解决这个问题。Word2Vec可以将One-Hot Encoder转化为低维度的连续值,也就是稠密向量,并且其中意思相近的词将被映射到向量空间中相近的位置。
如果将embed后的城市向量通过PCA降维后可视化展示出来,那就是这个样子。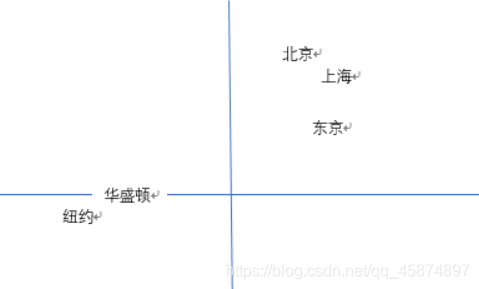

•计算词向量
def get_train_vecs(x_train,x_test):
    #初始化模型和词表
    twitter_w2v = Word2Vec(vector_size=300,min_count=10)
    twitter_w2v.build_vocab(x_train)

    # 训练并建模
    twitter_w2v.train(x_train,total_examples=1, epochs=1)
    #获取train_vecs
    train_vecs = np.concatenate([ build_vector(z,300,twitter_w2v.wv) for z in x_train])
    #保存处理后的词向量
    np.save('data/train_vecs.npy',train_vecs)
    #保存模型
    twitter_w2v.save("data/model3.pkl")

    twitter_w2v.train(x_test,total_examples=1, epochs=1)
    test_vecs = np.concatenate([build_vector(z,300,twitter_w2v.wv) for z in x_test])
    np.save('data/test_vecs.npy',test_vecs)
•对句子中的所有词向量取均值,来生成一个句子的vec
def build_vector(text,size,wv):
    #创建一个指定大小的数据空间
    vec = np.zeros(size).reshape((1,size))
    #count是统计有多少词向量
    count = 0
    #循环所有的词向量进行求和
    for w in text:
        try:
            vec +=  wv[w].reshape((1,size))
            count +=1
        except:
            continue

    #循环完成后求均值
    if count!=0:
        vec/=count
    return vec
以上是比较难的代码讲解,如若跑完整项目代码只需要以下两部
1.运行train.py训练模型
2.运行predict.py预测
代码和数据集已上传git仓库,链接放在本文最末尾
train.py代码
from sklearn.model_selection import train_test_split
import numpy as np
import pandas as pd
import jieba as jb
import joblib
from sklearn.svm import SVC
from gensim.models.word2vec import Word2Vec


def load_file_and_preprocessing():
    neg =pd.read_excel("data/neg.xls",header=None)
    pos =pd.read_excel("data/pos.xls",header=None)
    # 这是两类数据都是x值
    pos['words'] = pos[0].apply(lambda x:list(jb.cut(x)))
    neg['words'] = neg[0].apply(lambda x:list(jb.cut(x)))
    #需要y值  0 代表neg 1代表是pos
    y = np.concatenate((np.ones(len(pos)),np.zeros(len(neg))))
    X = np.concatenate((pos['words'],neg['words']))
    # 切分训练集和测试集
    X_train,X_test,y_train,y_test = train_test_split(X,y,test_size=0.2,random_state=3)
    #保存数据
    np.save("data/y_train.npy",y_train)
    np.save("data/y_test.npy",y_test)

    return X_train,X_test

def build_vector(text,size,wv):
    #创建一个指定大小的数据空间
    vec = np.zeros(size).reshape((1,size))
    #count是统计有多少词向量
    count = 0
    #循环所有的词向量进行求和
    for w in text:
        try:
            vec +=  wv[w].reshape((1,size))
            count +=1
        except:
            continue

    #循环完成后求均值
    if count!=0:
        vec/=count
    return vec

def get_train_vecs(x_train,x_test):
    #初始化模型和词表
    twitter_w2v = Word2Vec(vector_size=300,min_count=10)
    twitter_w2v.build_vocab(x_train)

    # 训练并建模
    twitter_w2v.train(x_train,total_examples=1, epochs=1)
    #获取train_vecs
    train_vecs = np.concatenate([ build_vector(z,300,twitter_w2v.wv) for z in x_train])
    #保存处理后的词向量
    np.save('data/train_vecs.npy',train_vecs)
    #保存模型
    twitter_w2v.save("data/model3.pkl")

    twitter_w2v.train(x_test,total_examples=1, epochs=1)
    test_vecs = np.concatenate([build_vector(z,300,twitter_w2v.wv) for z in x_test])
    np.save('data/test_vecs.npy',test_vecs)

def get_data():
    train_vecs = np.load("data/train_vecs.npy")
    y_train = np.load("data/y_train.npy")
    test_vecs = np.load("data/test_vecs.npy")
    y_test = np.load("data/y_test.npy")
    return train_vecs,y_train,test_vecs,y_test

def suc_train(train_vecs,y_train,test_vecs,y_test):
    #创建SVC模型
    cls = SVC(kernel="rbf",verbose=True)
    #训练模型
    cls.fit(train_vecs,y_train)
    #保存模型
    joblib.dump(cls,"data/svcmodel.pkl")
    #输出评分
    print(cls.score(test_vecs,y_test))

def get_predict_vecs(words):
    # 加载模型
    wv = Word2Vec.load("data/model3.pkl")
    #将新的词转换为向量
    train_vecs = build_vector(words,300,wv)
    return train_vecs

def svm_predict(string):
    # 对语句进行分词
    words = jb.cut(string)
    # 将分词结果转换为词向量
    word_vecs = get_predict_vecs(words)
    #加载模型
    cls = joblib.load("data/svcmodel.pkl")
    #预测得到结果
    result = cls.predict(word_vecs)
    #输出结果
    if result[0]==1:
        print("pos")
    else:
        print("neg")

def train():
    x_train,x_test = load_file_and_preprocessing()
    get_train_vecs(x_train,x_test)
    train_vecs,y_train,test_vecs,y_test = get_data()
    suc_train(train_vecs,y_train,test_vecs,y_test)

train()

string = "这本书非常好,我喜欢"

svm_predict(string)
predict.py代码
from tkinter import *
import numpy as np
import jieba as jb
import joblib
from gensim.models.word2vec import Word2Vec

import sys
from os import path
sys.path.append( path.dirname( path.dirname( path.abspath(__file__) ) ) )


class core():
    def __init__(self,str):
        self.string=str

    def build_vector(self,text,size,wv):
        #创建一个指定大小的数据空间
        vec = np.zeros(size).reshape((1,size))
        #count是统计有多少词向量
        count = 0
        #循环所有的词向量进行求和
        for w in text:
            try:
                vec +=  wv[w].reshape((1,size))
                count +=1
            except:
                continue
        #循环完成后求均值
        if count!=0:
            vec/=count
        return vec
    def get_predict_vecs(self,words):
        # 加载模型
        twitter_w2v = Word2Vec.load("data/model3.pkl")
        #将新的词转换为向量
        train_vecs = self.build_vector(words,300,twitter_w2v.wv)
        return train_vecs
    def svm_predict(self,string):
        # 对语句进行分词
        words = jb.cut(string)
        # 将分词结果转换为词向量
        word_vecs = self.get_predict_vecs(words)
        #加载模型
        cls = joblib.load("data/svcmodel.pkl")
        #预测得到结果
        result = cls.predict(word_vecs)
        #输出结果
        if result[0]==1:
            return "好感"
        else:
            return "反感"
    def main(self):
        s=self.svm_predict(self.string)
        return s

root=Tk()
root.title("情感分析")
sw = root.winfo_screenwidth()
#得到屏幕宽度
sh = root.winfo_screenheight()
#得到屏幕高度
ww = 500
wh = 300
x = (sw-ww) / 2
y = (sh-wh) / 2-50
root.geometry("%dx%d+%d+%d" %(ww,wh,x,y))
# root.iconbitmap('tb.ico')

lb2=Label(root,text="输入内容,按回车键分析")
lb2.place(relx=0, rely=0.05)

txt = Text(root,font=("宋体",20))
txt.place(rely=0.7, relheight=0.3,relwidth=1)

inp1 = Text(root, height=15, width=65,font=("宋体",18))
inp1.place(relx=0, rely=0.2, relwidth=1, relheight=0.4)

def run1():
    txt.delete("0.0",END)
    a = inp1.get('0.0',(END))
    p=core(a)
    s=p.main()
    print(s)
    txt.insert(END, s)   # 追加显示运算结果

def button1(event):
    btn1 = Button(root, text='分析', font=("",12),command=run1) #鼠标响应
    btn1.place(relx=0.35, rely=0.6, relwidth=0.15, relheight=0.1)
    # inp1.bind("<Return>",run2) #键盘响应

button1(1)
root.mainloop()

github链接:GitHub - fengjun321/Language