本期主要通过shader实现雷达扫描效果,如下所示

根据效果,我们需要先画一个轮廓圆,代码如下
Shader "Unlit/shader7"
{


    ///鼠标移动正方形
    Properties
    {


    _Center("Center",Vector)=(0,0,0,0)
    _Raduis("Radius",float)=0.1
    }
    SubShader
    {


        Tags {

     "RenderType"="Opaque" }
        LOD 100

        Pass
        {


            CGPROGRAM
            #pragma vertex vert
            #pragma fragment frag


            #include "UnityCG.cginc"
        struct v2f{


            float4 vertex:SV_POSITION;
            float4 position:TEXCOORD1;
            float2 uv:TEXCOORD;
        };
        v2f vert(appdata_base v){


            v2f o;
            o.vertex=UnityObjectToClipPos(v.vertex);
            o.position=v.vertex;
            o.uv=v.texcoord;
            return o;
        }
        //中心点
        float4 _Center;
        //半径
        float _Raduis;
        //绘制正方形
        float rect(float2 pt,float2 size,float2 center){


            float2 p=pt-center;
            float2 halfsize=size*0.5;
            float hotz=step(-halfsize.x,p.x)-step(halfsize.x,p.x);
            float vert=step(-halfsize.y,p.y)-step(halfsize.y,p.y);
            return hotz*vert;
        }
        //普通的实心圆
        float circle(float2 pt,float2 center,float radius){


            float2 p=pt-center;
            return 1.0-step(radius,length(p));
        }
        //边缘软化圆
          float circle(float2 pt,float2 center,float radius,bool soften){


            float2 p=pt-center;
            float edge=(soften)?radius*0.05:0.0;
            return 1.0-smoothstep(radius-edge,radius+edge,length(p));
        }
         //轮廓圆
        float circle(float2 pt,float2 center,float radius,float line_width){


            float2 p=pt-center;
            float len=length(p);
            float half_line_width=line_width/2.0;

            return step(radius-half_line_width,len)-step(radius+half_line_width,len);
        }

            fixed4 frag (v2f i) : SV_Target
            {


                float2 pos=i.position*2;
                float2 size=0.2;
                float outlineCircle=circle(pos,_Center,_Raduis,0.01f);
                fixed3 col=fixed3(1,1,0)*outlineCircle;
                return fixed4(col,1.0);
            }
            ENDCG
        }
    }
}
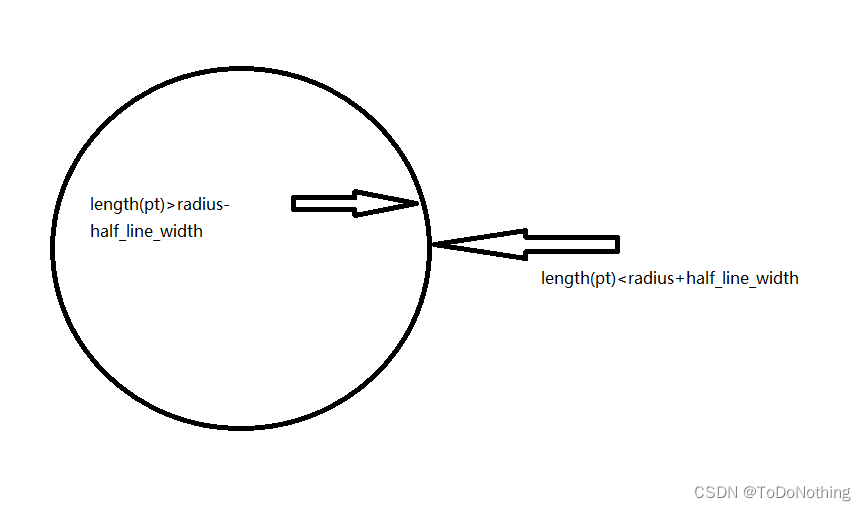
代码中的轮廓圆,是在实心圆的基础上进行绘制,实心圆需要绘制半径内所有点的颜色信息,而轮廓圆,只需要绘制轮廓线即可,因此只需要取半径radius+half_line_width和radius-half_line_width范围之内的点即可,如下图所示
,只要判断出在该点范围内进行输出即可。
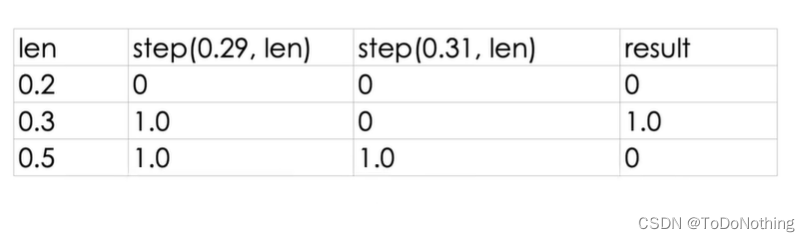
代码中使用到了两个step函数,可以将结果控制在该范围内,如下图所示,只要是在该范围内,就输出1,不在该范围,都输出0。
在以上代码的基础上,我们还需要画线,线的代码如下所示
 //画线
        float onLine(float a,float b,float line_width,float edge_thickness){


            float half_line_width=line_width*0.5;
            return smoothstep(a-half_line_width-edge_thickness,a-half_line_width,b)-smoothstep(a+half_line_width,a+half_line_width+edge_thickness,b);
        }
在该函数中,使用了smoothstep函数,该函数的意义如下
float smoothstep(float a, float b, float x)
{


  x = clamp((x - a) / (b- a), 0.0, 1.0);
  return x * x * (3 - 2 * x);
}
当a<b,x<a时 返回0 x>b时,返回1 否则在a和b之间平滑过渡
当a>b,x>a时,返回0,当x<b是,返回1。具体可参考了解shader函数
回到画线的函数中,a和b分别为线的x,y点位置,line_width为线的宽度,edge_thickness为线的厚度,通过smoothstep判断点是否在该范围内,这里根据的是x和y的坐标来判定的,稍微有一点难理解,最好就是自己画图输入参数证明一下。
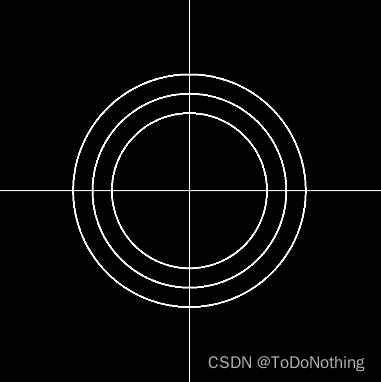
完成画圈和直线的函数之后,在片元着色器里面处理一下
            fixed4 frag (v2f i) : SV_Target
            {


                float2 pos=i.position*2;
                float2 size=0.2;
                float ouline1=onLine(i.uv.y,0.5,0.002,0.001)*_AxisColor;
                float ouline2=onLine(i.uv.x,0.5,0.002,0.001)*_AxisColor;

                float outlineCircle=circle(pos,_Center,_Raduis,0.01f);
                fixed3 col=ouline1+ouline2+outlineCircle;
                col+=circle(pos,_Center,_Raduis-0.1,0.01f);
                col+=circle(pos,_Center,_Raduis-0.2,0.01f);
                return fixed4(col,1.0);
            }
可以得到以下图形:
接下来,画扫描线,需要用到一个非常关键的内置函数_Time,该函数可以实现循环输出数值的一个效果
t是自该场景加载开始所经过的时间,4个分量分别是 (t/20, t, t2, t3)
_Time float4 time (t/20, t, t2, t3)
   //扫描线
        float sweep(float2 pt,float2 center,float radius,float line_width,float edge_thickness){


            float2 d=pt-center;
            float theta=_Time.z;
            float2 p=float2(cos(theta),-sin(theta))*radius;
            float h=clamp(dot(d,p)/dot(p,p),0.0,1.0);
            float l=length(d-p*h);
            return 1.0-smoothstep(line_width,line_width+edge_thickness,l);
        }
扫描线主要是根据向量d的位置,计算到循环出来的p点的距离,然后判断距离是否在范围内,在这个过程中使用了点乘dot函数计算点d投影到p的长度,该长度h使用了clamp函数进行限制,限制范围在0-1内。得到h后,计算点到p的距离,先使用d-p*h获得该投影点的向量,再使用length函数。得到的效果如下:

最后,再加上扫描的延迟阴影,整体代码如下:
    //扫描线
        float sweep(float2 pt,float2 center,float radius,float line_width,float edge_thickness){


            float2 d=pt-center;
            float theta=_Time.z;
            float2 p=float2(cos(theta),-sin(theta))*radius;
            float h=clamp(dot(d,p)/dot(p,p),0.0,1.0);
            float l=length(d-p*h);
            float gradient=0.0;
            const float gradient_angle=UNITY_PI*0.5;
            if(length(d)<radius){


                float angle=fmod(theta+atan2(d.y,d.x),UNITY_TWO_PI);
                gradient=clamp(gradient_angle-angle,0,gradient_angle)/gradient_angle*0.5;


            return gradient+1.0-smoothstep(line_width,line_width+edge_thickness,l);
        }
延迟阴影这部分主要是针对点d与p之间的角度进行处理,原理也是对角度进行判断和计算,涉及到较多数学问题,后面有机会再细讲,这里只讲用到的函数
fmod:返回a / b的浮点余数
atan2:返回反正切值
完整代码:
Shader "Unlit/shader7"
{


    ///鼠标移动正方形
    Properties
    {


    _Center("Center",Vector)=(0,0,0,0)
    _Raduis("Radius",float)=0.1
    _AxisColor("AxisColor",Color)=(1,1,0,1)
    }
    SubShader
    {


        Tags {

     "RenderType"="Opaque" }
        LOD 100

        Pass
        {


            CGPROGRAM
            #pragma vertex vert
            #pragma fragment frag


            #include "UnityCG.cginc"
        struct v2f{


            float4 vertex:SV_POSITION;
            float4 position:TEXCOORD1;
            float2 uv:TEXCOORD;
            float4 screenPos:TEXCOORD2;
        };
        v2f vert(appdata_base v){


            v2f o;
            o.vertex=UnityObjectToClipPos(v.vertex);
            o.position=v.vertex;
            o.uv=v.texcoord;
            o.screenPos=ComputeScreenPos(o.vertex);
            return o;
        }
        //中心点
        float4 _Center;
        //半径
        float _Raduis;

        fixed4 _AxisColor;
        //绘制正方形
        float rect(float2 pt,float2 size,float2 center){


            float2 p=pt-center;
            float2 halfsize=size*0.5;
            float hotz=step(-halfsize.x,p.x)-step(halfsize.x,p.x);
            float vert=step(-halfsize.y,p.y)-step(halfsize.y,p.y);
            return hotz*vert;
        }
        //普通的实心圆
        float circle(float2 pt,float2 center,float radius){


            float2 p=pt-center;
            return 1.0-step(radius,length(p));
        }
        //边缘软化圆
          float circle(float2 pt,float2 center,float radius,bool soften){


            float2 p=pt-center;
            float edge=(soften)?radius*0.05:0.0;
            return 1.0-smoothstep(radius-edge,radius+edge,length(p));
        }
         //轮廓圆
        float circle(float2 pt,float2 center,float radius,float line_width){


            float2 p=pt-center;
            float len=length(p);
            float half_line_width=line_width/2.0;

            return step(radius-half_line_width,len)-step(radius+half_line_width,len);
        }
        //画线
        float onLine(float a,float b,float line_width,float edge_thickness){


            float half_line_width=line_width*0.5;
            return smoothstep(a-half_line_width-edge_thickness,a-half_line_width,b)-smoothstep(a+half_line_width,a+half_line_width+edge_thickness,b);
        }
        //扫描线
        float sweep(float2 pt,float2 center,float radius,float line_width,float edge_thickness){


            float2 d=pt-center;
            float theta=_Time.z;
            float2 p=float2(cos(theta),-sin(theta))*radius;
            float h=clamp(dot(d,p)/dot(p,p),0.0,1.0);
            float l=length(d-p*h);
            float gradient=0.0;
            const float gradient_angle=UNITY_PI*0.5;
            if(length(d)<radius){


                float angle=fmod(theta+atan2(d.y,d.x),UNITY_TWO_PI);
                gradient=clamp(gradient_angle-angle,0,gradient_angle)/gradient_angle*0.5;
            }
            return gradient+1.0-smoothstep(line_width,line_width+edge_thickness,l);
        }


            fixed4 frag (v2f i) : SV_Target
            {


                float2 pos=i.position*2;
                float2 size=0.2;
                float ouline1=onLine(i.uv.y,0.5,0.002,0.001)*_AxisColor;
                float ouline2=onLine(i.uv.x,0.5,0.002,0.001)*_AxisColor;

                float outlineCircle=circle(pos,_Center,_Raduis,0.01f);
                fixed3 col=ouline1+ouline2+outlineCircle;
                col+=circle(pos,_Center,_Raduis-0.1,0.01f);
                col+=circle(pos,_Center,_Raduis-0.2,0.01f);
                col+=sweep(pos,_Center,_Raduis,0.002,0.001)*_AxisColor;
                return fixed4(col,1.0);
            }
            ENDCG
        }
    }
}