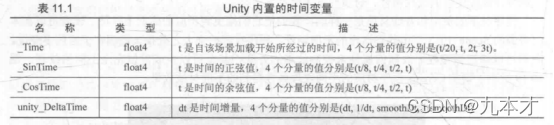
Unity Shader中的内置变量(时间)
动画效果往往都是把时间添加到一些变量的计算中,以便在时间变换时画面也可以随之变化。Unity Shader提供了一系列关于时间的内置变量来允许我们方便在Shader中访问运行时间,实现各种动画效果。
纹理动画
纹理动画在游戏中的应用非常广泛。尤其在各种资源都比较局限的移动平台上,我们往往会使用纹理动画来代替复杂的粒子系统等模拟各种动画效果。
序列帧动画
最常见的纹理动画之一就是序列帧动画。序列帧动画的原理非常简单,它像是放电影一样,依次播放一系列关键帧图像,当播放速度达到一定数值时,看起来就是一个连续的动画。他的优点在于灵活性很强,我们不需要进行任何物理计算就可以得到非常细腻的动画效果。他的缺点也很明显,由于序列帧中每张关键帧图像都不一样,因此,要制作一张出色的序列帧纹理需要的美工工程量比较大。
要播放帧动画,本质上来说,我们需要计算出每个时刻需要播放的关键帧在纹理中的位置。而由于序列帧纹理都是按行按列排列的,因此这个位置可以认为是该关键帧所在的行列索引数。因此,在上面的代码的前三行我们计算了行列数,其中使用Unity的内置时间变量_Time。_Time.y就是自该场景加载后所经过的时间。我们首先把_Time.y和速度属性_Speed相乘来得到模拟的时间,并使用CG的floor函数对结果取整来得到时间time。然后,我们使用time除以_HorizontalAmount的结果值得商来作为当前对应的行索引,除法结果的余数则是列索引。接下来,我们需要使用行索引值来构建真正的采样坐标。由于序列帧图像包含了许多关键帧图像,这意味着采样坐标需要映射到每个关键帧图像的坐标范围。然后,我们需要使用当前的行列数对上面的结果进行偏移,得到当前子图像的纹理坐标范围。然后,我们需要使用当前的行列式对上边的结果进行偏移,得到当前子图像的纹理坐标范围。然后,我们需要使用当前的行列数对上面的结果进行偏移,得到当前子图像的纹理坐标。需要注意的是,对竖直方向的坐标偏移需要使用减法,这是因为在Unity中纹理坐标竖直方向的顺序和序列帧纹理中的顺序是相反的。这对应了上面代码中注释掉的代码部分。我们可以吧上述过程中的除法整合到一起,得到了注释下方的代码。
Shader "Image Sequence Animation" {
	Properties {
		_Color ("Color Tint", Color) = (1, 1, 1, 1)
		_MainTex ("Image Sequence", 2D) = "white" {}
    	_HorizontalAmount ("Horizontal Amount", Float) = 4
    	_VerticalAmount ("Vertical Amount", Float) = 4
    	_Speed ("Speed", Range(1, 100)) = 30
	}
	SubShader {
		Tags {"Queue"="Transparent" "IgnoreProjector"="True" "RenderType"="Transparent"}

		Pass {
			Tags { "LightMode"="ForwardBase" }

			ZWrite Off
			Blend SrcAlpha OneMinusSrcAlpha

			CGPROGRAM

			#pragma vertex vert
			#pragma fragment frag

			#include "UnityCG.cginc"

			fixed4 _Color;
			sampler2D _MainTex;
			float4 _MainTex_ST;
			float _HorizontalAmount;
			float _VerticalAmount;
			float _Speed;

			struct a2v {
			    float4 vertex : POSITION;
			    float2 texcoord : TEXCOORD0;
			};

			struct v2f {
			    float4 pos : SV_POSITION;
			    float2 uv : TEXCOORD0;
			};

			v2f vert (a2v v) {
				v2f o;
				o.pos = UnityObjectToClipPos(v.vertex);
				o.uv = TRANSFORM_TEX(v.texcoord, _MainTex);
				return o;
			}

			fixed4 frag (v2f i) : SV_Target {
				float time = floor(_Time.y * _Speed);
				float row = floor(time / _HorizontalAmount);
				float column = time - row * _HorizontalAmount;

				half2 uv = i.uv + half2(column, -row);
				uv.x /=  _HorizontalAmount;
				uv.y /= _VerticalAmount;

				fixed4 c = tex2D(_MainTex, uv);
				c.rgb *= _Color;

				return c;
			}

			ENDCG
		}
	}
	FallBack "Transparent/VertexLit"
}
滚动的背景
很多的2D游戏都使用了不断滚动的背景来模拟游戏角色在场景中的穿梭,这些背景往往包含了多个层来模拟一种视差效果。而这些背景的实现玩玩就是利用纹理动画。我们将实现一个包含两层的无限滚动的2D游戏背景。
Shader "Unity Shaders Book/Chapter 11/Scrolling Background" {
	Properties {
		_MainTex ("Base Layer (RGB)", 2D) = "white" {}
		_DetailTex ("2nd Layer (RGB)", 2D) = "white" {}
		_ScrollX ("Base layer Scroll Speed", Float) = 1.0
		_Scroll2X ("2nd layer Scroll Speed", Float) = 1.0
		_Multiplier ("Layer Multiplier", Float) = 1
	}
	SubShader {
		Tags { "RenderType"="Opaque" "Queue"="Geometry"}

		Pass {
			Tags { "LightMode"="ForwardBase" }

			CGPROGRAM

			#pragma vertex vert
			#pragma fragment frag

			#include "UnityCG.cginc"

			sampler2D _MainTex;
			sampler2D _DetailTex;
			float4 _MainTex_ST;
			float4 _DetailTex_ST;
			float _ScrollX;
			float _Scroll2X;
			float _Multiplier;

			struct a2v {
				float4 vertex : POSITION;
				float4 texcoord : TEXCOORD0;
			};

			struct v2f {
				float4 pos : SV_POSITION;
				float4 uv : TEXCOORD0;
			};

			v2f vert (a2v v) {
				v2f o;
				o.pos = UnityObjectToClipPos(v.vertex);

				o.uv.xy = TRANSFORM_TEX(v.texcoord, _MainTex) + frac(float2(_ScrollX, 0.0) * _Time.y);
				o.uv.zw = TRANSFORM_TEX(v.texcoord, _DetailTex) + frac(float2(_Scroll2X, 0.0) * _Time.y);

				return o;
			}

			fixed4 frag (v2f i) : SV_Target {
				fixed4 firstLayer = tex2D(_MainTex, i.uv.xy);
				fixed4 secondLayer = tex2D(_DetailTex, i.uv.zw);

				fixed4 c = lerp(firstLayer, secondLayer, secondLayer.a);
				c.rgb *= _Multiplier;

				return c;
			}

			ENDCG
		}
	}
	FallBack "VertexLit"
}
顶点动画
河流的模拟是顶点动画中最常见的应用之一。它的原理通常就是使用正弦函数来模拟水流波动效果。
首先计算顶点位移量。我们只希望对顶点的x方向进行位移,因此yzw的位移量被设置为0。然后,我们利用_Frequency属性和内置的_Time.y变量来控制正弦函数的频率。为了让不同位置具有不同的位移,我们对上述结果加上了模型空间下的位置分量,并乘以_InvWaveLength来控制波长。最后,我们对结果值乘以_Magnitude属性来控制波动幅度,得到最终的位移。剩下的工作,我们只需要把位移量添加到顶点位置上,再进行正常的顶点变换即可。
Shader "Water" {
	Properties {
		_MainTex ("Main Tex", 2D) = "white" {}
		_Color ("Color Tint", Color) = (1, 1, 1, 1)
		_Magnitude ("Distortion Magnitude", Float) = 1
 		_Frequency ("Distortion Frequency", Float) = 1
 		_InvWaveLength ("Distortion Inverse Wave Length", Float) = 10
 		_Speed ("Speed", Float) = 0.5
	}
	SubShader {
		// Need to disable batching because of the vertex animation
		Tags {"Queue"="Transparent" "IgnoreProjector"="True" "RenderType"="Transparent" "DisableBatching"="True"}

		Pass {
			Tags { "LightMode"="ForwardBase" }

			ZWrite Off
			Blend SrcAlpha OneMinusSrcAlpha
			Cull Off

			CGPROGRAM
			#pragma vertex vert
			#pragma fragment frag

			#include "UnityCG.cginc"

			sampler2D _MainTex;
			float4 _MainTex_ST;
			fixed4 _Color;
			float _Magnitude;
			float _Frequency;
			float _InvWaveLength;
			float _Speed;

			struct a2v {
				float4 vertex : POSITION;
				float4 texcoord : TEXCOORD0;
			};

			struct v2f {
				float4 pos : SV_POSITION;
				float2 uv : TEXCOORD0;
			};

			v2f vert(a2v v) {
				v2f o;

				float4 offset;
				offset.yzw = float3(0.0, 0.0, 0.0);
				offset.x = sin(_Frequency * _Time.y + v.vertex.x * _InvWaveLength + v.vertex.y * _InvWaveLength + v.vertex.z * _InvWaveLength) * _Magnitude;
				o.pos = UnityObjectToClipPos(v.vertex + offset);

				o.uv = TRANSFORM_TEX(v.texcoord, _MainTex);
				o.uv +=  float2(0.0, _Time.y * _Speed);

				return o;
			}

			fixed4 frag(v2f i) : SV_Target {
				fixed4 c = tex2D(_MainTex, i.uv);
				c.rgb *= _Color.rgb;

				return c;
			}

			ENDCG
		}
	}
	FallBack "Transparent/VertexLit"
}