ROS2 搭建vscode的debug调试环境
1、新建ROS工作空间并使用VSCode打开
1.1 新建工作空间并打开
首先新建一个文件夹,我命名为test_ros,在该文件夹中打开终端,执行以下命令来创建ROS工作环境:
第一种:标准流程建立空间
mkdir test_ros
cd test_ros
mkdir src
cd src
catkin_init_workspace
cd ../
catkin_make
第二种:简要流程建立空间
mkdir test_ros
cd test_ros
mkdir src
catkin_make
1.2 使用vscode打开工作空间
code .
1.3 vscode安装相关插件

2、foxy版本的ros相关文件修改
2.1 c_cpp_properties.json:
{


    "configurations": [
        {


            "name": "Linux",
            "includePath": [
                "${workspaceFolder}/**",
                "/opt/ros/foxy/include/**"
            ],
            "defines": [],
            "compilerPath": "/usr/bin/gcc",
            "cStandard": "c99",
            "cppStandard": "c++14",
            "intelliSenseMode": "clang-x64"
        }
    ],
    "version": 4
}';
2.2 setting.json:
{


    "editor.tabSize": 8,
    "editor.rulers": [
        100
    ],
    "files.associations": {


        "*.repos": "yaml",
        "*.world": "xml",
        "*.xacro": "xml",
        "chrono": "cpp"
    },
    // Autocomplete from ros python packages
    "python.autoComplete.extraPaths": [
        "/opt/ros/foxy/lib/python3.8/site-packages/"
    ],
    // Environment file lets vscode find python files within workspace
    "python.envFile": "${workspaceFolder}/.env",
    // Use the system installed version of autopep8
    "python.formatting.autopep8Path": "/usr/bin/autopep8",
    "python.formatting.autopep8Args": [
        "--max-line-length=100"
    ],
    "C_Cpp.default.intelliSenseMode": "clang-x64",
    "C_Cpp.formatting": "Disabled",
    "uncrustify.useReplaceOption": true,
    "uncrustify.configPath.linux": "/opt/ros/foxy/lib/python3.8/site-packages/ament_uncrustify/configuration/ament_code_style.cfg",
    "cSpell.words": [
        "RTPS",
        "athackst",
        "autopep",
        "cmake",
        "cppcheck",
        "cpplint",
        "deque",
        "devcontainer",
        "ints",
        "noqa",
        "pytest",
        "rclcpp",
        "rclpy",
        "repos",
        "rosdistro",
        "rosidl",
        "uncrustify",
        "xmllint"
    ],
    "search.exclude": {


        "**/node_modules": true,
        "**/bower_components": true,
        "**/*.code-search": true,
        "**/build": true,
        "**/install": true,
        "**/log": true
    },
    "python.analysis.extraPaths": [
        "/opt/ros/foxy/lib/python3.8/site-packages/"
    ],
    "cSpell.allowCompoundWords": true,
    "cSpell.ignorePaths": [
        "**/package-lock.json",
        "**/node_modules/**",
        "**/vscode-extension/**",
        "**/.git/objects/**",
        ".vscode",
        ".vscode-insiders",
        ".devcontainer/devcontainer.json"
    ]
}
2.3 task.json:
使用Ctrl+Shift+P
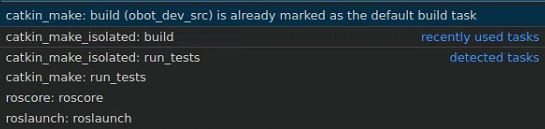
然后在搜索栏中搜索Configure Default Build Task
- Terminal -> Configure Default Build Task
- 选择 -> catkin_make:build
生成并修改task.json
{


    // See https://go.microsoft.com/fwlink/?LinkId=733558
    // for the documentation about the tasks.json format
    "version": "2.0.0",
    "tasks": [
        // Build tasks
        {


            "label": "colcon make",
            "detail": "Build workspace (default)",
            "type": "shell",
            "command": "colcon build --merge-install --cmake-args '-DCMAKE_BUILD_TYPE=RelWithDebInfo' -Wall -Wextra -Wpedantic",
            "group": {


                "kind": "build",
                "isDefault": true
            },
            "problemMatcher": "$gcc"
        }
    ]
}
然后再次Ctrl+Shift+B进行编译(此时已经自动),并会在build文件夹下出现compile_commands.json
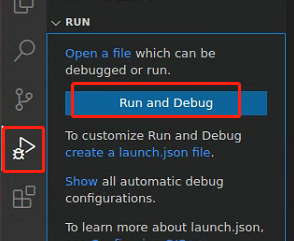
2.4 launch.json:
单击此处,创建 launch.json
{


  // Use IntelliSense to learn about possible attributes.
  // Hover to view descriptions of existing attributes.
  // For more information, visit: https://go.microsoft.com/fwlink/?linkid=830387
  "version": "0.2.0",
  "configurations": [
    // Example launch of a python file
    {


      "name": "Launch",
      "type": "python",
      "request": "launch",
      "program": "${workspaceFolder}/install/${input:package}/bringup/launch/cleaner_gazebo.py",
      "console": "integratedTerminal",
    },
    // Example gdb launch of a ros executable
    {


      "name": "(gdb) Launch",
      "type": "cppdbg",
      "request": "launch",
      "program": "${workspaceFolder}/install/lib/${input:package}/${input:program}",
      "args": [],
      "stopAtEntry": true,
      "cwd": "${workspaceFolder}",
      "externalConsole": false,
      "MIMode": "gdb",
      "setupCommands": [
        {


          "description": "Enable pretty-printing for gdb",
          "text": "-enable-pretty-printing",
          "ignoreFailures": true
        }
      ]
    }
  ],
  "inputs": [
    {


      "id": "package",
      "type": "promptString",
      "description": "Package name",
      "default": "learning_ros2"
    },
    {


      "id": "program",
      "type": "promptString",
      "description": "Program name",
      "default": "ros2_talker"
    }
  ]
}
3、melodic 版本的ros相关文件修改
3.1 c_cpp_properties.json:
可能还有一些头文件找不到,比如ros/ros.h,我们还需要配置一些东西。
用命令行编译我们写的c++代码,同时输出编译信息文件,这里以ROS为例
1、打开终端,输入以下命令:
catkin_make -DCMAKE_EXPORT_COMPILE_COMMANDS=Yes
2、这个命令会输出一个compile_commands.json文件在ROS工作空间的build文件夹下面
然后在c_cpp_properties.json文件添加下面一段话
"compileCommands": "${workspaceFolder}/build/compile_commands.json"
修改后的 c_cpp_properties.json 如下:
{


    "configurations": [
        {


            "name": "Linux",
            "includePath": [
                "${workspaceFolder}/**"
            ],
            "defines": [],
            "compilerPath": "/usr/bin/gcc",
            "cStandard": "c11",
            "cppStandard": "c++17",
            "intelliSenseMode": "clang-x64",
            "compileCommands": "${workspaceFolder}/build/compile_commands.json"
        }
    ],

    "version": 4
}
3.2 setting.json:
{


    "python.autoComplete.extraPaths": [
        "/opt/ros/melodic/lib/python2.7/dist-packages"
    ],
    "python.analysis.extraPaths": [
        "/opt/ros/melodic/lib/python2.7/dist-packages"
    ],
    "terminal.integrated.cursorBlinking": true,//控制终端光标是否闪烁
    "terminal.integrated.fontSize": 12,//控制终端字号大小
    "terminal.integrated.fontFamily": "monospace"//控制终端字体
}
2.3 task.json:
{


    "version": "2.0.0",
    "tasks": [
        {


            "label": "catkin_make", //代表提示的描述性信息
            "type": "shell",  //可以选择shell或者process,如果是shell代码是在shell里面运行一个命令,如果是process代表作为一个进程来运行
            "command": "catkin_make",//这个是我们需要运行的命令
            "args": [],//如果需要在命令后面加一些后缀,可以写在这里,比如-DCATKIN_WHITELIST_PACKAGES=“pac1;pac2”
            "group": {

    "kind":"build","isDefault":true},
            "presentation": {


                "reveal": "always"//可选always或者silence,代表是否输出信息
            },
            "problemMatcher": "$msCompile"
        },
    ]
}
2.4 launch.json:
{


    "version": "0.2.0",
    "configurations": [
        {


            "name": "(gdb) Launch", // 配置名称,将会在调试配置下拉列表中显示
            "type": "cppdbg",  // 调试器类型 该值自动生成
            "request": "launch",  // 调试方式,还可以选择attach
            "program": "${workspaceRoot}/devel/lib/waypoint_follower/pure_persuit", //要调试的程序(完整路径,支持相对路径)
            "args": [],  // 传递给上面程序的参数,没有参数留空即可
            "stopAtEntry": false,  // 是否停在程序入口点(停在main函数开始)
            "cwd": "${workspaceRoot}",  // 调试程序时的工作目录
            "environment": [], //针对调试的程序,要添加到环境中的环境变量. 例如: [ { "name": "squid", "value": "clam" } ]
            "externalConsole": false,   //如果设置为true,则为应用程序启动外部控制台。 如果为false,则不会启动控制台,并使用VS Code的内置调试控制台。
            "MIMode": "gdb",  // VSCode要使用的调试工具
            "setupCommands": [
                {


                    "description": "Enable pretty-printing for gdb",
                    "text": "-enable-pretty-printing",
                    "ignoreFailures": true
                }
            ]
        }
    ]
}
3、测试程序
测试打印 hello world
#include<ros/ros.h>
#include<std_msgs/String.h>
#include<iostream>
#include<string>
#include<sstream>

using namespace std;

int main(int argc, char** argv)
{


    ros::init(argc, argv,"talker");
    ros::NodeHandle n;
    ros::Publisher chatter_pub = n.advertise<std_msgs::String>("chatter",1000);

    ros::Rate loop_rate(10);
    int count = 0;

    while( ros::ok() )
    {


        std_msgs::String msg;
        std::stringstream ss;
        ss << "hello world " << count;
        msg.data = ss.str();
        ROS_INFO("%s",msg.data.c_str());
        chatter_pub.publish(msg);
        ros::spinOnce();
        loop_rate.sleep();
        count++;
    }

    return 0;
}