这篇博客的由来
当然是因为我学习之余,喜欢打打王者上上分 (下面是我王者个人主页,啊还没上过荣耀…)

以及因为,我要学习 Scrapy 的ImagesPipeline,爬图片
绝对不是因为我喜欢带妹儿,
只不过…:
爱打游戏的妹儿最近问我,
“这些(王者)皮肤好好看噢,可惜我没有它们的海报,小哥哥你有吗?”
我心想,皮肤海报,这还不简单?
于是我沉思一会儿,一副好为难的样子。
我说:“这有些许棘手啊,啧,不过你要的话,我可以办得到。”
妹子追问,“那小哥哥是怎么办的呀?”
我笑一笑:“噢,这个你不用担心,你就简单想想我给到你皮肤海报,那你能给到我…”
妹儿笑一笑…

先看一下给妹儿的成品。
爬虫结束后的日志,只爬到了93个items(93个英雄的皮肤,当然皮肤不只93)


以下内容,有一些是翻译的,我会附上文档的英文原文。
一、口水话说说,ImagePipeline
想要边学习scrapy 框架,边学习英文?
想同时提高scrapy框架的掌握程度,和英文阅读水平?
那就有空多看scrapy权威文档(authoritative document)
At first
提到ImagesPipeline 就要先提它的 “本体” ——FilesPipeline。
因为 ImagesPipeline 是 FilesPipeline的一个扩展(extension),The ImagesPipeline is an extension of the FilesPipeline
嗯,就提这么多。
0、一般来说,简单使用ImagesPipeline。
(当然先创建scrapy 项目。)
只需要:
1.启用媒体管道(Enabling your Media Pipeline):
在setting.py中的ITEM_PIPELINES添加
'scrapy.pipelines.images.ImagesPipeline': 1
2.配置存储目标地址(configure the target storage)
否则即便完成了第一步也不能启用pipeline
在setting.py中设置 IMAGES_STORE setting:
FILES_STORE = '/path/to/valid/dir'
我存到了scrapy project根目录。就是与scrapy.cfg相同的文件夹
3.items.py类的配置
很简单,添两个字段。import scrapy class MyItem(scrapy.Item): # ... other item fields ... image_urls = scrapy.Field() #务必添加的 images = scrapy.Field() # 务必添加的image_urls ,一个list,存放图片url (http://…jpg/png等)
images,一个RESULT,一个2元素元组的列表
每个元组将包含 (success, file_info_or_error)。
·
下面是results参数的一个典型值:


[(True,
  {

    'checksum': '2b00042f7481c7b056c4b410d28f33cf',
   'path': 'full/0a79c461a4062ac383dc4fade7bc09f1384a3910.jpg',
   'url': 'http://www.example.com/files/product1.pdf',
   'status': 'downloaded'}),
 (False,
  Failure(...))]
4.写爬虫(spider.py),返回item(图片url列表)
简单使用的时候,存储的图片。
存在一个full目录下,
图片文件名是根据原始url计算SHA1 hash值后进行存储;
大概长这样:

这显然满足不了妹子的需求,人家只想看中文字的图片名
所以要进一步配置setting.py
1.ImagePipeline可以做这样的事情
1.如生成缩略图
generating thumbnails
2.根据大小过滤图像。
filtering the images based on their size.
3.允许重定向 (其实皮肤海报的url是重定向的,但有一个小规律,可以不用重定向)
Allowing redirections
默认情况下(By default),
媒体管道会忽略重定向( ignore redirects,)
例如,一个指向媒体文件URL请求的HTTP重定向将意味着媒体下载失败。
4.当然还可以自己指定文件名、文件夹名
5.避免下载最近下载的文件
指定延迟天数
# 120 days of delay for files expiration
FILES_EXPIRES = 120

# 30 days of delay for images expiration
IMAGES_EXPIRES = 30
2.进一步配置setting.py
我创建的scrapy项目:叫做KingshonerskinPipeline
手快打错了应该是honor,不是honer,
而且呢用glory代替honor,更好
我创建的spider 叫做 skin.py
在setting.py中:
ROBOTSTXT_OBEY = False   #首先,一般都不遵循Robot协议


DEFAULT_REQUEST_HEADERS = {


    'Accept': 'application/json, text/javascript, */*; q=0.01',
    'Accept-Language': 'en',
    'User-Agent': 'Mozilla/5.0 (Windows NT 10.0; Win64; x64) AppleWebKit/537.36 (KHTML, like Gecko) Chrome/88.0.4324.182 Safari/537.36'
}
# 默认请求头

ITEM_PIPELINES = {


    'kingshonerSkin.pipelines.KingshonerskinPipeline': 300,
   # 'scrapy.pipelines.images.ImagesPipeline': 1
}
# 注释了默认的ImagePipeline,
# 同时启用,我自己customize(自己写的)KingshonerskinPipeline

IMAGES_STORE = './王者荣耀皮肤'  #我设置的文件存储目录
IMAGES_URLS_FIELD = 'skin_urls'  # 我给默认的image_urls 改成了 skin_urls
IMAGES_RESULT_FIELD = 'skin_results'  # 我给默认的image 改成了 skin_results
我的setting.py的部分截图

3.我这样写爬虫spider.py
从这里开始爬:
英雄资料列表页-英雄介绍-王者荣耀官方网站-腾讯游戏https://pvp.qq.com/web201605/herolist.shtml
先大概分析。
进入每个英雄的页面后,


我一般在pycharm console 先来交互式的编程
导入requests,Beautiful 来一步一步“进入网页”,爬取信息。
代码有效就复制到spider.py里面
免得一次性写好爬虫文件(spider.py)再来debug,
导入库
直接requests.get(url)
没有加headers或者其他参数,直接在右边看到,Resposne 200了
这网站,没什么反扒
分析:我用select方法定位标签
接着我


for i in soup.select('.herolist-content > ul > li > a'):
	print(i.text)
结果print一些乱码出来:我发现是response.encoding的问题。
改一下encoding,就正常显示中文字。
到了这里说明没有页面渲染,每个英雄的url都能拿到
·
接着进入单个英雄,就拿瑶瑶分析吧
https://pvp.qq.com/web201605/herodetail/505.shtml
用select抓一下标签
结果抓了个寂寞,
要么我写错了select,要么网页动态渲染了。
但我向来不会犯这样写错小错误,结果还真是渲染了。
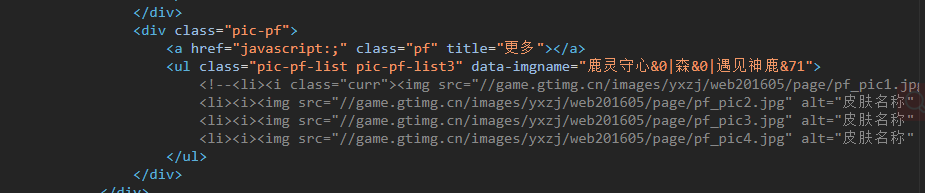
我Refresh了网页,这个url真正html代码:
经过一番对比
发现background_url(网页背景皮肤海报的url)是一样的,下面pic-pf标签不一样
·
但真正需要的就是background_url,
·
因为相同英雄的皮肤海报url,就后面的数字在递增


所以到现在,spider.py真正要解决的是
1.每个hero对应的id
2.皮肤的数量和名字
4.上代码(我的item.py/skin.py(我写的爬虫类))
# items.py
import scrapy

class KingshonerskinItem(scrapy.Item):
    skin_urls = scrapy.Field()  # 必须要有的字段,list,存放皮肤url
    skins_name = scrapy.Field()  # list,存放皮肤name
    skin_results = scrapy.Field()  # 必须要有的字段,result 存放...
    hero_name = scrapy.Field()  # str, 英雄中文名
# spider.py
import scrapy
from bs4 import BeautifulSoup
from scrapy import Request
import re
from kingshonerSkin.items import KingshonerskinItem


class SkinSpider(scrapy.Spider):
    name = 'skin'
    start_urls = ['https://pvp.qq.com/web201605/herolist.shtml']

    def parse(self, response):   # 进入每个英雄的皮肤所在页面
        soup = BeautifulSoup(response.text,'html.parser')
        for i in soup.select('.herolist-content > ul > li > a'):
            url_id = re.findall(r'/\d+.shtml',i.get('href'))[0]  # 拿到每个英雄对应的id
            yield Request(url='https://pvp.qq.com/web201605/herodetail'+url_id, callback=self.parse_skin)
            # 按照id,组成每个英雄的url,去yield Request

    def parse_skin(self, response):
        item = KingshonerskinItem()
        soup = BeautifulSoup(response.text, 'html.parser')
        skin_id = 'https:' + re.findall(r'//.*.jpg',soup.select_one('.wrapper > div').get('style'))[0].replace('1.jpg','{}.jpg')
        # 将background_url 变成通用的
        skins_name = soup.select_one('.pic-pf > ul').get('data-imgname').split('|')  # 皮肤名字列表
        hero_name = soup.select_one('h2.cover-name').text
        urls = []
        for i in range(len(skins_name)):
            skins_name[i] = skins_name[i].split('&')[0] # 清理多余的符号“&3”
            urls.append(skin_id.format(i+1))
        item['hero_name'] = hero_name
        item['skin_urls'] = urls
        item['skins_name'] = skins_name
        return item
5.写ItemPipeline,(Customize ItemPipeline)
如果简单使用ImagesPipeline
就无需写这个类,
只用:启用’scrapy.pipelines.images.ImagesPipeline’: 1,
甚至不禁用自己写的pipeline.py也可以
ITEM_PIPELINES = {


   'kingshonerSkin.pipelines.KingshonerskinPipeline': 300,
    'scrapy.pipelines.images.ImagesPipeline': 1
}
当然,我们要处理英雄和皮肤的对应关系。
自己写ItemPipeline.
我先上我的itempipeline.py代码
from scrapy import Request
from scrapy.pipelines.images import ImagesPipeline


class KingshonerskinPipeline(ImagesPipeline):
    def file_path(self, request, response=None, info=None, *, item):
        skin_num = int(request.url[-5]) - 1   # 海报url和海报名字对应上。
        return f'{item["hero_name"]}/{item["skins_name"][skin_num]}.jpg'

    def get_media_requests(self, item, info):
        # for i in item['skins_name']:
        #     yield Request(i)
        return [Request(i) for i in item['skin_urls']]
二、真正要学习的就是这三个函数了
6.1 file_path(self, request, response=None, info=None, *, item=None)
This method is called once per downloaded item.
It returns the download path of the file originating from the specified
·
这个方法对每个下载的item调用一次。
返回来自指定的文件的下载路径
override this method to customize the download path of each file
覆盖/重写这个函数就可以自定义存储文件(图片)的路径
对于这个函数的几个参数,
1.在我写的pipeline中,item=None的None去掉了。
于是就可以使用我放在item里面的字段(hero_name 、skins_name)
在指定英雄和皮肤的对应关系
def file_path(self, request, response=None, info=None, *, item):
        skin_num = int(request.url[-5]) - 1   # 海报url和海报名字对应上。
        return f'{item["hero_name"]}/{item["skins_name"][skin_num]}.jpg'
2.我尝试用response.meta去传递(hero_name 、skins_name)
但是失败了。不知道原因出自哪里。
·
3.不知道这个info怎么用
哪天发现了,再加到这里
·
4.request,就相当于request
文档里面给了一用request.url的后缀作为图片名的例子
import os
from urllib.parse import urlparse

from scrapy.pipelines.files import FilesPipeline

class MyFilesPipeline(FilesPipeline):

    def file_path(self, request, response=None, info=None, *, item=None):
        return 'files/' + os.path.basename(urlparse(request.url).path)
6.2 get_media_requests(item, info)
As seen on the workflow,
the pipeline will get the URLs of the images to download from the item.
return a Request for each file URL:
·
这个函数很简单,就是作为一个 生成器 ,
不断地 return a Request for each file URL:
    def get_media_requests(self, item, info):
        # for i in item['skins_name']:
        #     yield Request(i)
        return [Request(i) for i in item['skin_urls']]
代码中,注释部分和下面的return是等价的。
Those requests will be processed by the pipeline and,
when they have finished downloading,
the results will be sent to the item_completed() method, as a list of 2-element tuples.
Each tuple will contain (success, file_info_or_error)
·
这些请求将由管道处理,
当它们完成下载后,
结果将作为一个包含2个元素的元组列表发送到
item_completed()方法。
每个元组将包含(success, file_info_or_error)
我就不翻译了。

6.3item_completed(results, item, info)
The ImagesPipeline.item_completed() method is called
when all image requests for a single item have completed
(either finished downloading, or failed for some reason).
·
当单个item的所有图像请求都完成
(或者下载完成,或者由于某些原因失败)时,
将调用ImagesPipeline.item_completed()方法。
we store the downloaded file paths (passed in results) in the file_paths item field,
and we drop the item if it doesn’t contain any files:
·
我们将下载的文件路径(传到result),存储在file_paths 的item字段中,
如果item不包含任何文件,我们就删除它:
下面附一下 文档给的,实现这个方法的an example
from itemadapter import ItemAdapter
from scrapy.exceptions import DropItem

def item_completed(self, results, item, info):
    file_paths = [x['path'] for ok, x in results if ok]
    if not file_paths:
        raise DropItem("Item contains no files")
    adapter = ItemAdapter(item)
    adapter['file_paths'] = file_paths
    return item
result 是一个包含两个元素的元组列表 (a list of 2-element tuples.)
# a typical value of the results argument:
[(True,
  {

    'checksum': '2b00042f7481c7b056c4b410d28f33cf',
   'path': 'full/0a79c461a4062ac383dc4fade7bc09f1384a3910.jpg',
   'url': 'http://www.example.com/files/product1.pdf',
   'status': 'downloaded'}),
 (False,
  Failure(...))]
我没有覆盖这个item_completed函数,
我在file_paths,写英雄名字和皮肤的对应关系了。
写到这,完工了。
scrapy crawl skin
Enter一下,就跑起来了。
我把爬下的海报给到妹儿,
·
她笑一笑,说"以后要一直和我打游戏上分"
·
真不错