Anaconda简易使用
创建新环境
conda create -n rcnn python=3.6删除环境
conda remove -n rcnn --all重命名环境
conda 其实没有重命名指令,实现重命名是通过 clone 完成的,分两步:
- 先 clone 一份 new name 的环境
- 删除 old name 的环境
比如,想把环境 rcnn 重命名成 tf
第1步
conda create -n tf --clone rcnn
Source:      /anaconda3/envs/rcnn
Destination: /anaconda3/envs/tf
Packages: 37
Files: 8463
第2步
conda remove -n rcnn --all结果
conda info -e
# conda environments:
#
crawl                    /anaconda3/envs/crawl
flask                    /anaconda3/envs/flask
tf                       /anaconda3/envs/tf
root                  *  /anaconda3
tensorflow gpu 安装
首先显卡一定要支持
没想到的是GTX 1050TI,GTX 1070TI等主流显卡竟然都不支持
(还好我买的是GTX 1050)
(并没有暗示需要一块TESLA)
其次需要对好版本号,不同的TensorFlow版本对应的CUDA驱动程序版本号也有所不同
然而这还不够,还需要安装CUDNN才能完美运行,CUDNN的版本号和CUDA的版本号也要对好
但是下载CUDNN需要注册NVIDIA账号,那就点击join注册喽
注册的时候刚开始我使用了QQ邮箱,按道理这没毛病
但是到了验证邮箱一步又嗝屁了
你的验证邮件呢,验证邮件呢,邮件呢?????
经过百度多方查阅,原来不能用QQ邮箱
坑爹的是过了三个小时它又发过来了,没错,就是QQ邮箱,它发过来了。。。
不过我的163邮箱都注册好了。。。。。
所以就使用163邮箱注册了一个账号
终于顺利下载
下载完了也很懵逼
压缩包里面是长这样的:

使用这样的东西已经完全超出了我的能力范围了呀,怎么办
于是乎又百度,原来是放在CUDA的安装目录下呀。。。。
好的安装好了,听度娘说可以用安装目录\extras\demo_suite下的bandwidthTest.exe和deviceQuery.exe来检测
检测出来好像没什么问题
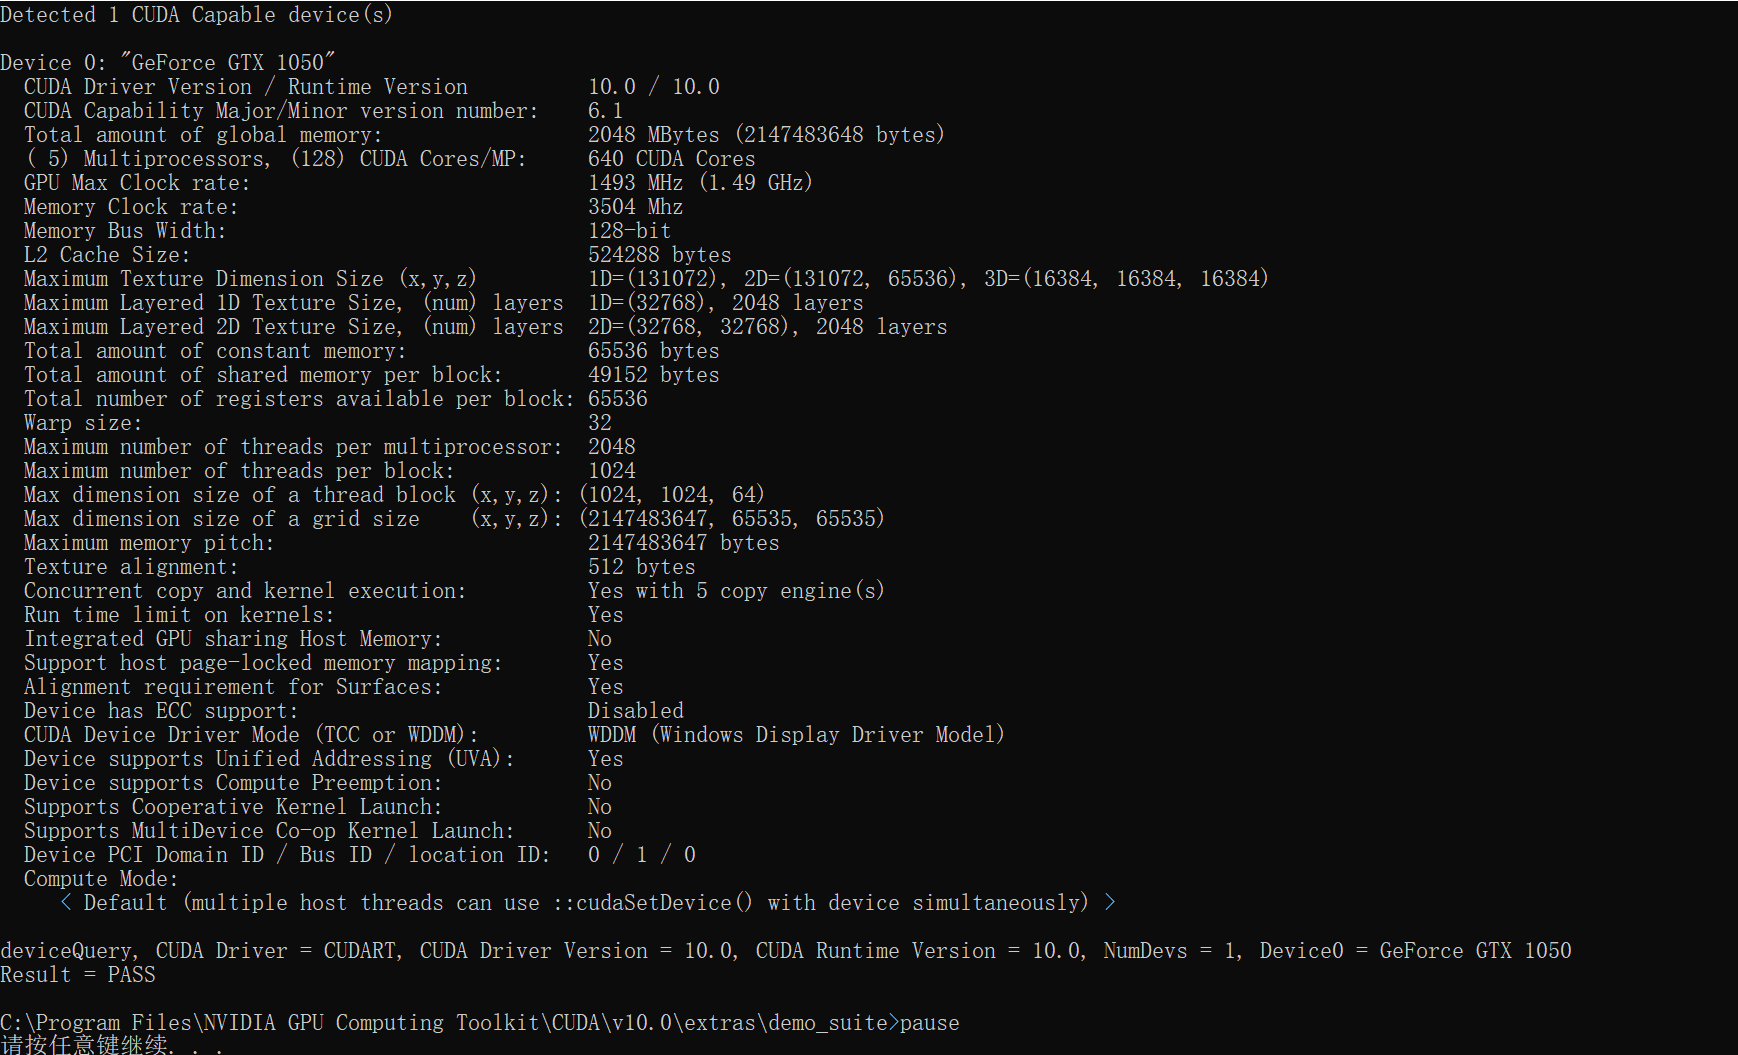
(图片中用了pause暂停来查看的)
然后环境搭载完成,到了万众瞩目的安装环节
pip install tensorflow-gpu
当然是需要卸载之前的版本的tensorflow 的
20KB/s的高速下了不知道多久
反正最后是装好了
大概是这样的

看起来还不错有没有
但是运行一下吧
。。。。。。。
下面的错误我都不忍心看,红了一片。。。。。
(画面太过血腥,已被屏蔽)
然后继续求助万能的度娘
最后找到了这个帖子
Win10 +VS2017+ python3.66 + CUDA10 + cuDNNv7.3.1 + tensorflow-gpu 1.12.0
你早说不支持CUDA10.0嘛,害的我费那么大力
于是就看了下这个贴子里面所附带的大佬创作的安装包
tensorflow_gpu-1.12.0-cp36-cp36m-win_amd64.whl
CUDA10.0+CUDNN7.3.1
然后又跑去重新安装CUDNN7.3.1
再cd到安装包目录下
pip install tensorflow_gpu-1.12.0-cp36-cp36m-win_amd64.whl
效果拔群,最终安装完成

如图
(当时看到可把我激动惨了)
至此安装完成
既然安装了就来测试一下喽,不测试的话显得自己很捞
求助度娘找到了大佬写的五层卷积神经网络的代码
Tensorflow对比AlexNet的CPU和GPU运算效率
为了简便起见,就直接放经过我魔改的大佬的代码

  1 from datetime import datetime
  2 import math
  3 import time
  4 import tensorflow as tf
  5 import os
  6 #os.environ["CUDA_DEVICE_ORDER"] = "PCI_BUS_ID"
  7 #os.environ["CUDA_VISIBLE_DEVICES"] = "-1"
  8 batch_size = 32
  9 num_batches = 100
 10 # 该函数用来显示网络每一层的结构,展示tensor的尺寸
 11
 12 def print_activations(t):
 13     print(t.op.name, ' ', t.get_shape().as_list())
 14
 15 # with tf.name_scope('conv1') as scope  # 可以将scope之内的variable自动命名为conv1/xxx,便于区分不同组件
 16
 17 def inference(images):
 18     parameters = []
 19     # 第一个卷积层
 20     with tf.name_scope('conv1') as scope:
 21         # 卷积核、截断正态分布
 22         kernel = tf.Variable(tf.truncated_normal([11, 11, 3, 64],
 23                                                  dtype=tf.float32, stddev=1e-1), name='weights')
 24         conv = tf.nn.conv2d(images, kernel, [1, 4, 4, 1], padding='SAME')
 25         # 可训练
 26         biases = tf.Variable(tf.constant(0.0, shape=[64], dtype=tf.float32), trainable=True, name='biases')
 27         bias = tf.nn.bias_add(conv, biases)
 28         conv1 = tf.nn.relu(bias, name=scope)
 29         print_activations(conv1)
 30         parameters += [kernel, biases]
 31         # 再加LRN和最大池化层,除了AlexNet,基本放弃了LRN,说是效果不明显,还会减速?
 32         lrn1 = tf.nn.lrn(conv1, 4, bias=1.0, alpha=0.001 / 9, beta=0.75, name='lrn1')
 33         pool1 = tf.nn.max_pool(lrn1, ksize=[1, 3, 3, 1], strides=[1, 2, 2, 1], padding='VALID', name='pool1')
 34         print_activations(pool1)
 35     # 第二个卷积层,只有部分参数不同
 36     with tf.name_scope('conv2') as scope:
 37         kernel = tf.Variable(tf.truncated_normal([5, 5, 64, 192], dtype=tf.float32, stddev=1e-1), name='weights')
 38         conv = tf.nn.conv2d(pool1, kernel, [1, 1, 1, 1], padding='SAME')
 39         biases = tf.Variable(tf.constant(0.0, shape=[192], dtype=tf.float32), trainable=True, name='biases')
 40         bias = tf.nn.bias_add(conv, biases)
 41         conv2 = tf.nn.relu(bias, name=scope)
 42         parameters += [kernel, biases]
 43         print_activations(conv2)
 44         # 稍微处理一下
 45         lrn2 = tf.nn.lrn(conv2, 4, bias=1.0, alpha=0.001 / 9, beta=0.75, name='lrn2')
 46         pool2 = tf.nn.max_pool(lrn2, ksize=[1, 3, 3, 1], strides=[1, 2, 2, 1], padding='VALID', name='pool2')
 47         print_activations(pool2)
 48     # 第三个
 49     with tf.name_scope('conv3') as scope:
 50         kernel = tf.Variable(tf.truncated_normal([3, 3, 192, 384], dtype=tf.float32, stddev=1e-1), name='weights')
 51         conv = tf.nn.conv2d(pool2, kernel, [1, 1, 1, 1], padding='SAME')
 52         biases = tf.Variable(tf.constant(0.0, shape=[384], dtype=tf.float32), trainable=True, name='biases')
 53         bias = tf.nn.bias_add(conv, biases)
 54         conv3 = tf.nn.relu(bias, name=scope)
 55         parameters += [kernel, biases]
 56         print_activations(conv3)
 57     # 第四层
 58     with tf.name_scope('conv4') as scope:
 59         kernel = tf.Variable(tf.truncated_normal([3, 3, 384, 256], dtype=tf.float32, stddev=1e-1), name='weights')
 60         conv = tf.nn.conv2d(conv3, kernel, [1, 1, 1, 1], padding='SAME')
 61         biases = tf.Variable(tf.constant(0.0, shape=[256], dtype=tf.float32), trainable=True, name='biases')
 62         bias = tf.nn.bias_add(conv, biases)
 63         conv4 = tf.nn.relu(bias, name=scope)
 64         parameters += [kernel, biases]
 65         print_activations(conv4)
 66     # 第五个
 67     with tf.name_scope('conv5') as scope:
 68         kernel = tf.Variable(tf.truncated_normal([3, 3, 256, 256], dtype=tf.float32, stddev=1e-1), name='weights')
 69         conv = tf.nn.conv2d(conv4, kernel, [1, 1, 1, 1], padding='SAME')
 70         biases = tf.Variable(tf.constant(0.0, shape=[256], dtype=tf.float32), trainable=True, name='biases')
 71         bias = tf.nn.bias_add(conv, biases)
 72         conv5 = tf.nn.relu(bias, name=scope)
 73         parameters += [kernel, biases]
 74         print_activations(conv5)
 75         # 之后还有最大化池层
 76         pool5 = tf.nn.max_pool(conv5, ksize=[1, 3, 3, 1], strides=[1, 2, 2, 1], padding='VALID', name='pool5')
 77         print_activations(pool5)
 78         return pool5, parameters
 79 # 全连接层
 80 # 评估每轮计算时间,第一个输入是tf得Session,第二个是运算算子,第三个是测试名称
 81 # 头几轮有显存加载,cache命中等问题,可以考虑只计算第10次以后的
 82 def time_tensorflow_run(session, target, info_string):
 83     num_steps_burn_in = 10
 84     total_duration = 0.0
 85     total_duration_squared = 0.0
 86     # 进行num_batches+num_steps_burn_in次迭代
 87     # 用time.time()记录时间,热身过后,开始显示时间
 88     for i in range(num_batches + num_steps_burn_in):
 89         start_time = time.time()
 90         _ = session.run(target)
 91         duration = time.time() - start_time
 92         if i >= num_steps_burn_in:
 93             if not i % 10:
 94                 print('%s:step %d, duration = %.3f' % (datetime.now(), i - num_steps_burn_in, duration))
 95             total_duration += duration
 96             total_duration_squared += duration * duration
 97         # 计算每轮迭代品均耗时和标准差sd
 98         mn = total_duration / num_batches
 99         vr = total_duration_squared / num_batches - mn * mn
100         sd = math.sqrt(vr)
101         print('%s: %s across %d steps, %.3f +/- %.3f sec / batch' % (datetime.now(), info_string, num_batches, mn, sd))
102 def run_benchmark():
103     # 首先定义默认的Graph
104     with tf.Graph().as_default():
105         # 并不实用ImageNet训练,知识随机计算耗时
106         image_size = 224
107         images = tf.Variable(tf.random_normal([batch_size, image_size, image_size, 3], dtype=tf.float32, stddev=1e-1))
108         pool5, parameters = inference(images)
109         init = tf.global_variables_initializer()
110         sess = tf.Session(config=tf.ConfigProto(allow_soft_placement=True, log_device_placement=False))
111         sess.run(init)
112         # 下面直接用pool5传入训练(没有全连接层)
113         # 只是做做样子,并不是真的计算
114         time_tensorflow_run(sess, pool5, "Forward")
115         # 瞎弄的,伪装
116         objective = tf.nn.l2_loss(pool5)
117         grad = tf.gradients(objective, parameters)
118         time_tensorflow_run(sess, grad, "Forward-backward")
119 run_benchmark()
如果使用TensorFlow-GPU的话这个默认是用GPU运行的
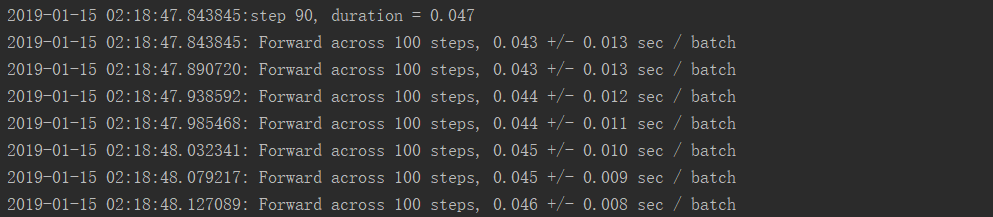
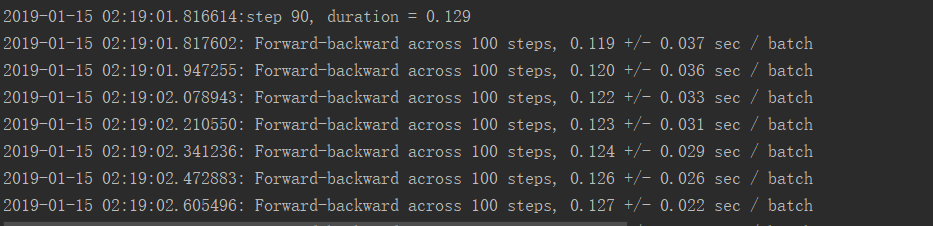
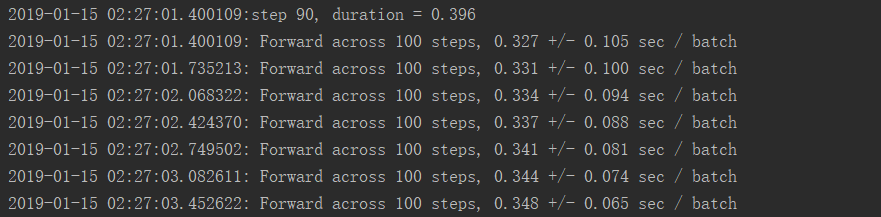
GPU运行结果:
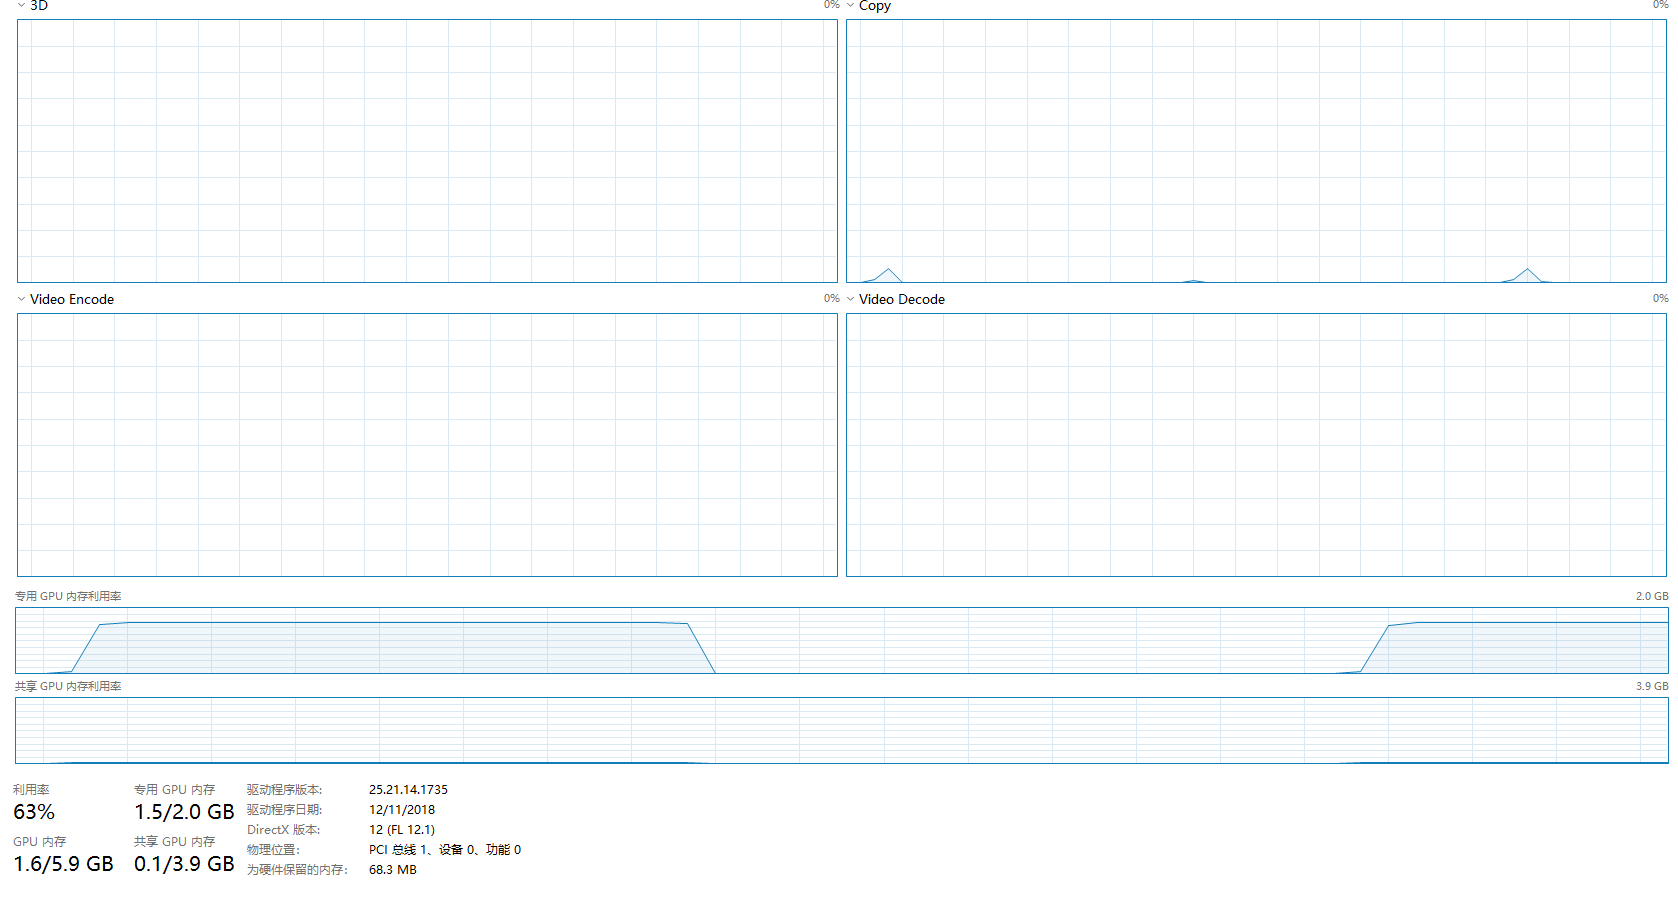
GPU使用率:
CPU使用率:
可以看出较为占用显存
将上面代码的6到7行注释解除即为CPU运行
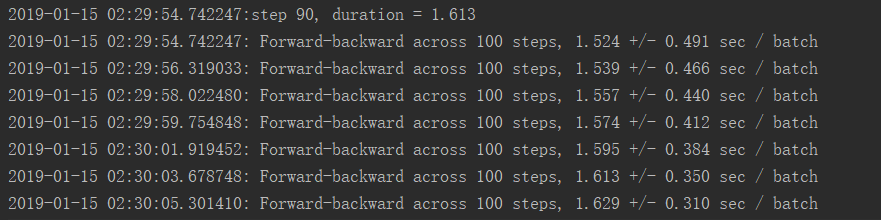
CPU运行结果:
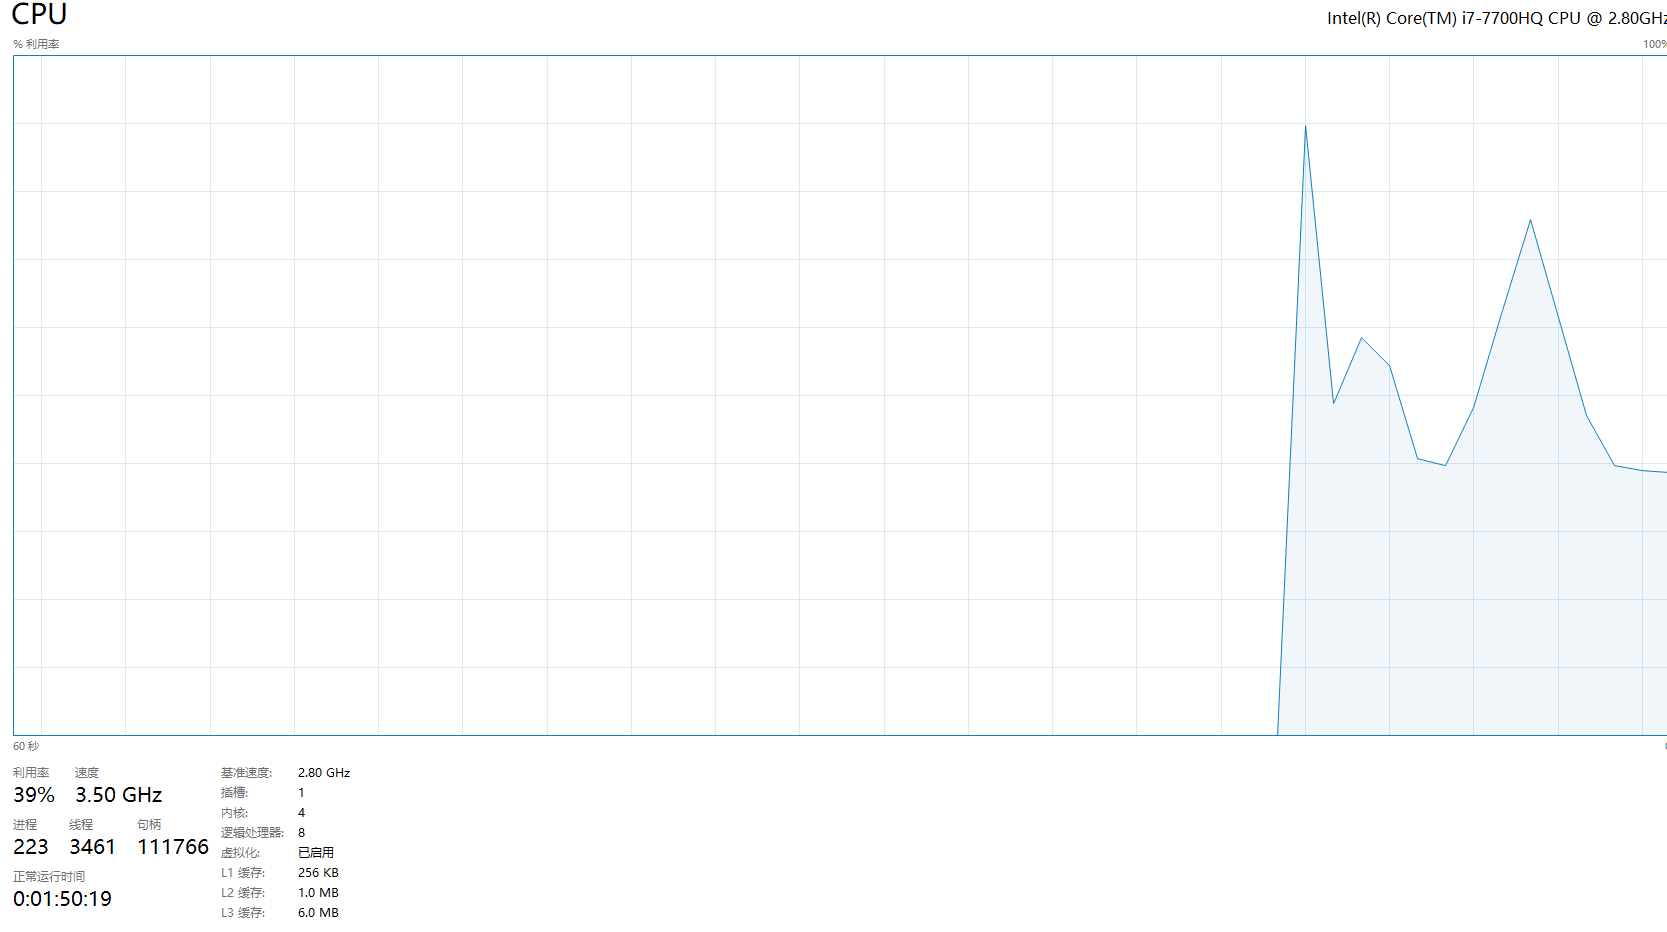
CPU利用率:

我2.8GHZ的CPU都跑到3.4GHZ了
这么对我的CPU真的好么
测试结果:
正向GPU运行时间效率是CPU运行效率的8.42倍
反向GPU运行时间效率是CPU运行效率的12.50倍
并且GPU运行模式下GPU占用率仅仅只有大约65%,CPU占用率仅仅只有45%左右
而CPU运行模式下CPU占用率长时间到达100%,且效率低下
看出GPU能够直接完爆CPU运行的
注意事项:
1.本次测试仅仅采用了卷积神经网络进行运行,不代表所有情况下GPU一定有优势;
2.鉴于CPU的瓶颈,可能CPU运行效率并不是非常理想,若采用更加高端的CPU运行效果可能会有大幅度提升;