3D Style Transfer
代码源参见:(https://github.com/tensorflow/lucid)
通过使用[可区分图像]实现从纹理3D模型和样式图像到3D模型的新纹理的样式转换参数](https://distill.pub/2018/differentiable-parameterizations/#section-style-transfer-3d)。

这款笔记本没有介绍清晰的抽象背后; 您可能还希望阅读[Lucid教程](https://colab.research.google.com/github/tensorflow/lucid/blob/master/notebooks/tutorial.ipynb)。
注意:使用本教程的最简单方法是作为colab笔记本,它允许您在没有设置的情况下潜入。
安装,导入,初始化OpenGL,并加载CNN模型
本教程使用OpenGL,因此需要 GPU,
您可以检查GPU是否可用并且是否正确配置了tensorflow:
import tensorflow as tf
assert tf.test.is_gpu_available()
如果上面的断言语句失败,您可以随时在colab上运行笔记本并使用免费的GPU选择:
Runtime → Change runtime type → Hardware Accelerator: GPU
!pip install -q lucid>=0.2.3
import os
import io
import sys
from string import Template
from pathlib import Path

import numpy as np
import PIL.Image
import matplotlib.pylab as pl
from google.colab import files

from IPython.display import clear_output, display, Image, HTML

from lucid.misc.gl.glcontext import create_opengl_context
import OpenGL.GL as gl

from lucid.misc.gl import meshutil
from lucid.misc.gl import glrenderer
import lucid.misc.io.showing as show
import lucid.misc.io as lucid_io
from lucid.misc.tfutil import create_session

from lucid.modelzoo import vision_models
from lucid.optvis import objectives
from lucid.optvis import param
from lucid.optvis.style import StyleLoss, mean_l1_loss
from lucid.optvis.param.spatial import sample_bilinear
您可以检查已安装的OpenGL版本:
create_opengl_context()
gl.glGetString(gl.GL_VERSION)
model = vision_models.InceptionV1()
model.load_graphdef()
加载3D模型
我们先下载一些3D模型。 这类似于[3D功能可视化笔记本]中的步骤(https://colab.research.google.com/github/tensorflow/lucid/blob/master/notebooks/differentiable-parameterizations/texture_synth_3d.ipynb)如果你’ 热衷于细节,还没有完成那个笔记本。
TEXTURE_SIZE = 1024
!gsutil cp gs://deepdream/article_models.zip . && \
 unzip -qo article_models.zip && \
 ls -al article_models && \
 cat article_models/readme.txt
def prepare_image(fn, size=None):
  data = lucid_io.reading.read(fn)
  im = PIL.Image.open(io.BytesIO(data)).convert('RGB')
  if size:
    im = im.resize(size, PIL.Image.ANTIALIAS)
  return np.float32(im)/255.0
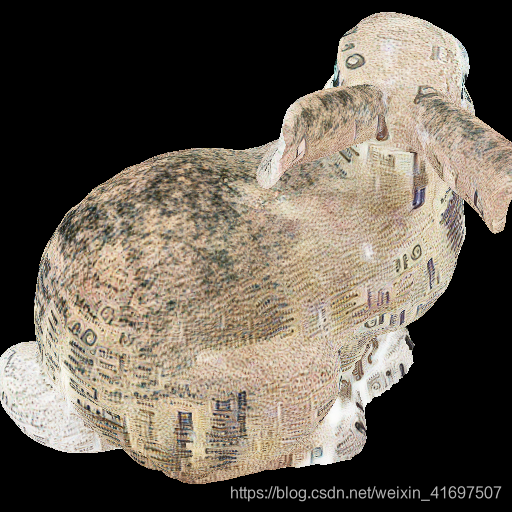
mesh = meshutil.load_obj('article_models/bunny.obj')
mesh = meshutil.normalize_mesh(mesh)

original_texture = prepare_image('article_models/bunny.png', (TEXTURE_SIZE, TEXTURE_SIZE))
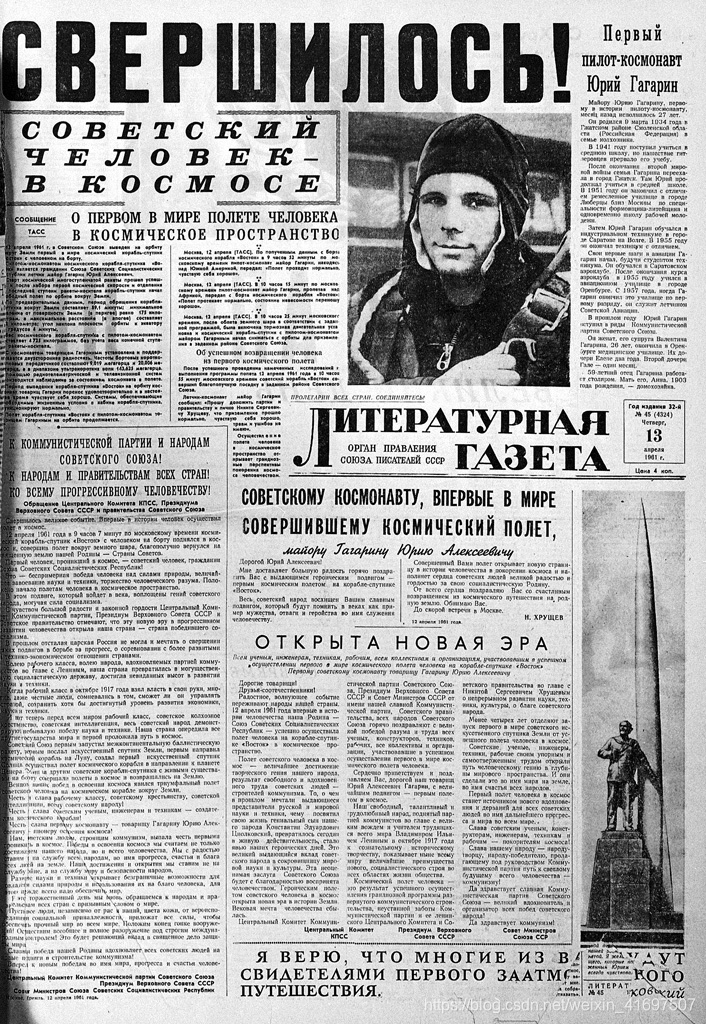
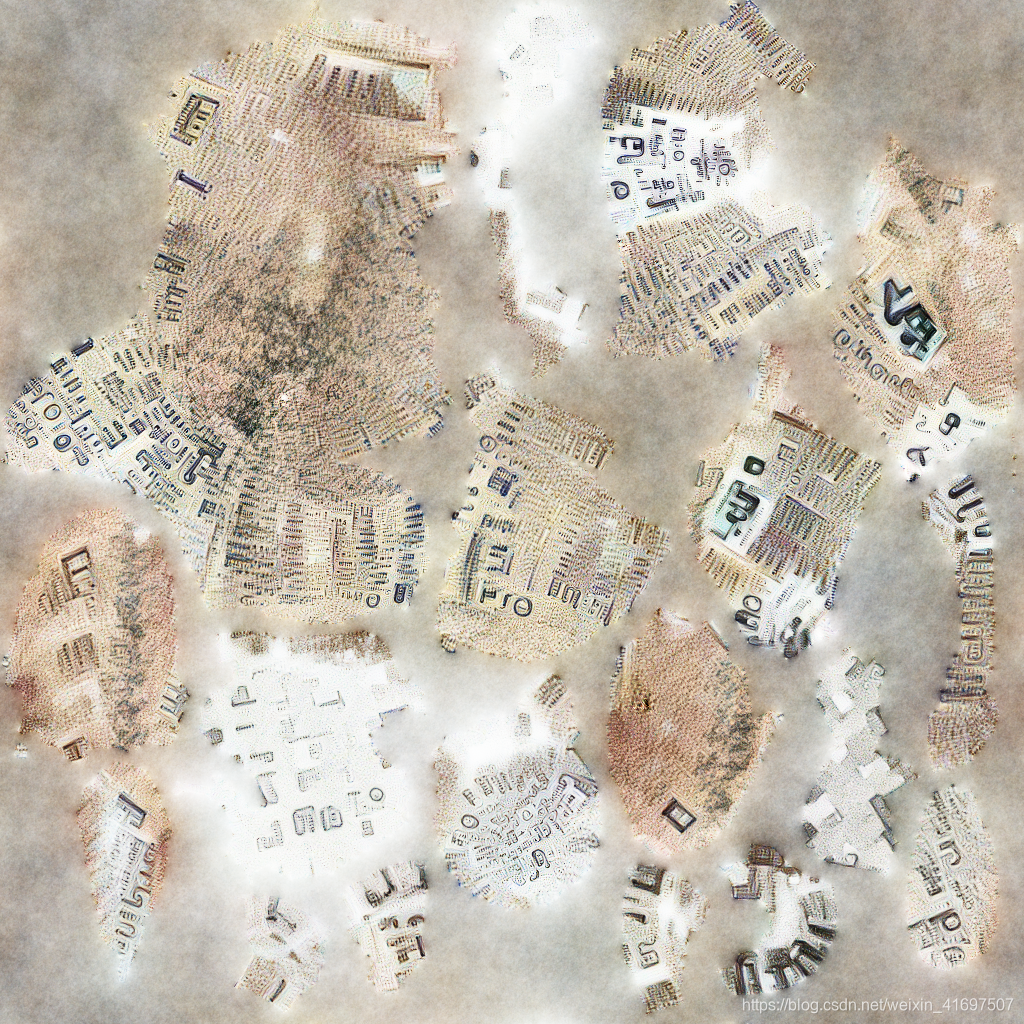
style_url = 'https://upload.wikimedia.org/wikipedia/commons/d/db/RIAN_archive_409362_Literaturnaya_Gazeta_article_about_YuriGagarin%2C_first_man_in_space.jpg'
style = prepare_image(style_url)
show.image(style, 'jpeg')
纹理合成
renderer = glrenderer.MeshRenderer((512, 512))
googlenet_style_layers = [
    'conv2d2',
    'mixed3a',
    'mixed3b',
    'mixed4a',
    'mixed4b',
    'mixed4c',
]

googlenet_content_layer = 'mixed3b'
content_weight = 100.0
# Style Gram matrix weighted average decay coefficient
style_decay = 0.95
sess = create_session(timeout_sec=0)
# t_fragments is used to feed rasterized UV coordinates for the current view.
# Channels: [U, V, _, Alpha]. Alpha is 1 for pixels covered by the object, and
# 0 for background.
t_fragments = tf.placeholder(tf.float32, [None, None, 4])
t_uv = t_fragments[...,:2]
t_alpha = t_fragments[...,3:]
# Texture atlas to optimize
t_texture = param.image(TEXTURE_SIZE, fft=True, decorrelate=True)[0]
# Variable to store the original mesh texture used to render content views
content_var = tf.Variable(tf.zeros([TEXTURE_SIZE, TEXTURE_SIZE, 3]), trainable=False)
# Sample current and original textures with provided pixel data
t_joined_texture = tf.concat([t_texture, content_var], -1)
t_joined_frame = sample_bilinear(t_joined_texture, t_uv) * t_alpha
t_frame_current, t_frame_content = t_joined_frame[...,:3], t_joined_frame[...,3:]
t_joined_frame = tf.stack([t_frame_current, t_frame_content], 0)
# Feeding the rendered frames to the Neural Network
t_input = tf.placeholder_with_default(t_joined_frame, [None, None, None, 3])
model.import_graph(t_input)
# style loss
style_layers = [sess.graph.get_tensor_by_name('import/%s:0'%s)[0] for s in googlenet_style_layers]
# L1-loss seems to be more stable for GoogleNet
# Note that we use style_decay>0 to average style-describing Gram matrices
# over the recent viewports. Please refer to StyleLoss for the details.
sl = StyleLoss(style_layers, style_decay, loss_func=mean_l1_loss)
# content loss
content_layer = sess.graph.get_tensor_by_name('import/%s:0'%googlenet_content_layer)
content_loss = mean_l1_loss(content_layer[0], content_layer[1]) * content_weight
# setup optimization
total_loss = content_loss + sl.style_loss
t_lr = tf.constant(0.05)
trainer = tf.train.AdamOptimizer(t_lr)
train_op = trainer.minimize(total_loss)
init_op = tf.global_variables_initializer()
loss_log = []
def reset(style_img, content_texture):
del loss_log[:]
init_op.run()
sl.set_style({t_input: style_img[None,...]})
content_var.load(content_texture)
def run(mesh, step_n=400):
for i in range(step_n):
fragments = renderer.render_mesh(
modelview=meshutil.sample_view(10.0, 12.0),
position=mesh['position'], uv=mesh['uv'],
face=mesh['face'])
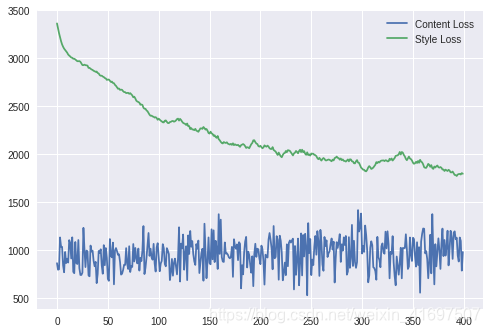
_, loss = sess.run([train_op, [content_loss, sl.style_loss]], {t_fragments: fragments})
loss_log.append(loss)
if i==0 or (i+1)%50 == 0:
clear_output()
last_frame, last_content = sess.run([t_frame_current, t_frame_content], {t_fragments: fragments})
show.images([last_frame, last_content], ['current frame', 'content'])
if i==0 or (i+1)%10 == 0:
print(len(loss_log), loss)
reset(style, original_texture)
run(mesh)
pl.plot(loss_log);
pl.legend(['Content Loss', 'Style Loss'])
pl.show()

显示结果
对于质地较不复杂的模型 - 即。 所有除了兔子模型 - 内容目标可能是微妙的。 例如,在头骨的情况下,最容易观察到在观察[颅缝线]时内容物丢失是有效的(https://en.wikipedia.org/wiki/Suture_(anatomy))。 您可以单击并拖动下一个单元格的输出以查看头骨模型的侧面和顶部。
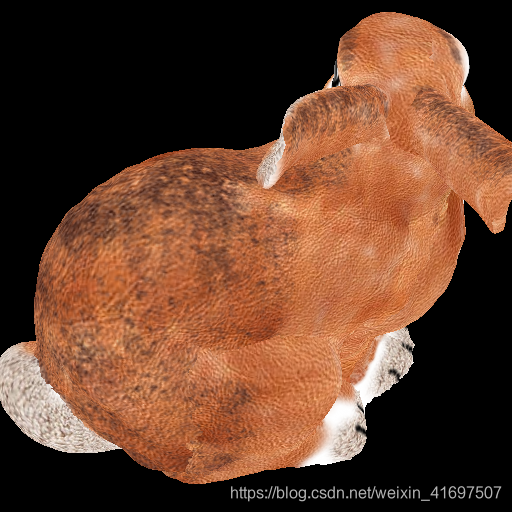
texture = t_texture.eval()
show.textured_mesh(mesh, texture)
show.image(texture, 'jpeg')
作为感兴趣的读者的旁白:上面的纹理仍然显示在渲染期间未看到的补丁中的原始随机初始化。 你能想到一种让这些部件变黑的方法,那么纹理压缩得更好吗?
*提示:一种方法可能是在整体纹理的平均值上添加损失。*试一试!
批量纹理生成
我们有时被问到如何为交互式[Distill](https://distill.pub)文章生成数据。 通常这个过程不是很有趣,所以我们并不总是将它包含在我们的笔记本中。 但是,对于感兴趣的读者来说,这是一个为许多不同的输入图像运行colab函数的例子。
这些单元在colab运行时的VM上本地保存资产。 运行这些单元格后,我们使用google.colab.files模块将这些资源下载到我们的开发机器中。
styles = '''
starry  https://upload.wikimedia.org/wikipedia/commons/thumb/e/ea/Van_Gogh_-_Starry_Night_-_Google_Art_Project.jpg/606px-Van_Gogh_-_Starry_Night_-_Google_Art_Project.jpg
onwhite https://upload.wikimedia.org/wikipedia/commons/c/c4/Vassily_Kandinsky%2C_1923_-_On_White_II.jpg
mosaic  https://upload.wikimedia.org/wikipedia/commons/thumb/9/9e/Fernand_L%C3%A9ger_-_Grand_parade_with_red_background_%28mosaic%29_1958_made.jpg/637px-Fernand_L%C3%A9ger_-_Grand_parade_with_red_background_%28mosaic%29_1958_made.jpg
points https://upload.wikimedia.org/wikipedia/commons/thumb/c/c9/Robert_Delaunay%2C_1906%2C_Portrait_de_Metzinger%2C_oil_on_canvas%2C_55_x_43_cm%2C_DSC08255.jpg/449px-Robert_Delaunay%2C_1906%2C_Portrait_de_Metzinger%2C_oil_on_canvas%2C_55_x_43_cm%2C_DSC08255.jpg
scream https://upload.wikimedia.org/wikipedia/commons/thumb/f/f4/The_Scream.jpg/471px-The_Scream.jpg
noodles https://upload.wikimedia.org/wikipedia/commons/thumb/d/d9/Noodles_and_eggs20170520_1035.jpg/526px-Noodles_and_eggs20170520_1035.jpg
newspaper https://upload.wikimedia.org/wikipedia/commons/d/db/RIAN_archive_409362_Literaturnaya_Gazeta_article_about_YuriGagarin%2C_first_man_in_space.jpg
birds https://canyouseedotca.files.wordpress.com/2016/01/mce-birds.jpg
cross https://upload.wikimedia.org/wikipedia/commons/thumb/5/50/Cross_stitch_detail.jpg/640px-Cross_stitch_detail.jpg
galaxy https://upload.wikimedia.org/wikipedia/commons/thumb/c/c3/NGC_4414_%28NASA-med%29.jpg/582px-NGC_4414_%28NASA-med%29.jpg
cd https://upload.wikimedia.org/wikipedia/commons/thumb/d/d5/CD_autolev_crop.jpg/480px-CD_autolev_crop.jpg
'''.split()
styles = list(zip(styles[::2], styles[1::2]))
HTML(" ".join('<a href="%s">%s</a>'%(url, name) for name, url in styles))
from google.colab import files
from lucid.misc.io.writing import write


def export_mesh(name, mesh):
  data_to_save = {
      'position': mesh['position'].ravel(),
      'uv': mesh['uv'].ravel(),
      'face': np.uint32(mesh['face'].ravel())
  }
  for key, value in data_to_save.items():
    data = value.tobytes()
    filename = '%s_%s.3d'%(name, key)
    write(data, filename)
for mesh_path in Path('article_models/').glob('*.obj'):
  mesh_name = mesh_path.stem
  print(mesh_name)

  tex_path = mesh_path.with_suffix('.jpg')
  if not tex_path.exists():
    tex_path = mesh_path.with_suffix('.png')

  mesh = meshutil.load_obj(str(mesh_path))
  mesh = meshutil.normalize_mesh(mesh)
  original_texture = prepare_image(str(tex_path), (TEXTURE_SIZE, TEXTURE_SIZE))

  export_mesh(mesh_name, mesh)
  lucid_io.save(original_texture, mesh_name+'_tex.jpg', quality=90)

  for style_name, url in styles:
    if style_name[0] == '#':
      continue
    style_img = prepare_image(url)
    reset(style_img, original_texture)
    run(mesh, step_n=800)
    texture = t_texture.eval()
    filename = '%s_tex_%s.jpg'%(mesh_name, style_name)
    lucid_io.save(texture, filename, quality=90)