6.5 卷积神经网络迁移学习
6.5.1 迁移学习介绍
下标给出了从2012年到2015年ILSVRC(Large Scale Visual Recognition Challenge)第一名模型的层数以及前五个答案的错误率
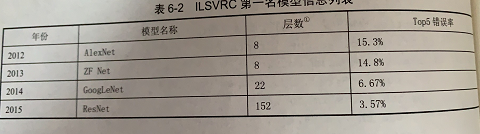
随着模型层数以及复杂度的增加,模型在ImageNet上的错误率也随之降低。然而,训练复杂的卷积神经网络需要非常多的标注数据。ImageNet图像分类数据集中有120万标注图片,所以才能将152层的ResNet的模型训练到大约96.5%的正确率。为了解决标注数据和训练时间的问题,本届将要介绍迁移学习的方式。
所谓迁移学习,就是讲一个问题上训练好的模型通过简单的调整使其适用于一个新的问题。本节将介绍图和利用ImageNet数据集上训练好的Inception-v3模型来解决一个新的图像分类问题。
根据论文DeCAF:A Deep Convolutional Activation Feature for Generic Visual Recognition中的结论,可以保留训练好的Inception-v3模型中所有卷积层的参数,只是替换最后一层全连接层。在最后这一层全连接之前的网络层称之为瓶颈层(bottleneck)。
将新的图像通过训练好的卷积神经网络直到瓶颈处的过程可以看成事对图像进行特征提取的过程。在训练好的Inception-v3模型中,因为将瓶颈处的输出再通过一个单层的全连接层神经网络可以很好地区分1000种类别的图像,所以有理由认为瓶颈处输出的节点向量可以被作为任何图像的一个更加精简且表达能力更强的特征向量。
于是,在新数据集上,可以直接利用这个训练好的神经网络对图像进行特征提取,然后再将提取得到的特征向量作为输入来训练一个新的单层全连接神经网络处理新的分类问题。
一般来说,迁移学习所需要的训练时间和训练样本书远远小于训练完整的模型。
6.5.2 TensorFlow实现迁移学习
本节将给出一个完整的TensorFlow程序来介绍如何通过TensorFlow实现迁移学习。一下大妈给出了如何下载这一节中将要用到的数据集。
wget http://download.tensorflow.org/example_images/flower_photos.tgz
tar xzf flower_photos.tgz
解压之后的文件夹包含了5个子文件夹,每一个子文件的名称为一种花的名称,代表不同的类别。平均每一种花有734张图片,每一张图片都是RGB色彩模式的,大小也不相同。和之前的样例不同,在这一节中给出的程序将直接处理没有整理过的图像数据。
以下代码给出了如何将原始的图像数据整理成模型需要的输入数据。
# -*- coding: utf-8 -*-
# @Time    : 2019/3/28 16:59
# @Author  : Chord

import glob;
import os.path;
import numpy as np;
import tensorflow as tf;
from tensorflow.python.platform import  gfile;

# 原始输入数据的目录,这个目录下有5个子目录,每个子目录底下保存属于该类别的所有图片
INPUT_DATA = 'C:\Documents\workspace\Resource\\flower_photos'
# 输出文件地址,将整理后的图片数据通过numpy格式保存。
OUTPUT_FILE = 'C:\Documents\workspace\Resource\\flower_processed_data.npy'

# 测试数据和验证数据比例
VALIDATION_PERCENTAGE = 10
TEST_PERCENTAGE = 10

# 读取数据并将数据分割成训练数据、验证数据和测试数据
def create_image_lists(sess, testing_percentage, validation_percentage):
    sub_dirs = [x[0] for x in os.walk(INPUT_DATA)] # 读取数据数据目录的root
    is_root_dir = True

    # 初始化各个数据集
    training_images = []
    training_labels = []
    testing_images = []
    testing_labels= []
    validation_images = []
    validation_labels = []
    current_label = 0

    # 读取所有的子目录
    for sub_dir in sub_dirs:
        if (is_root_dir):
            is_root_dir = False
            continue

        # 获取一个子目录中所有的图片文件
        extensions = ['jpg', 'jpeg', 'JPG', 'JPEG']
        file_list = []
        dir_name = os.path.basename(sub_dir)
        for extension in extensions:
            file_glob = os.path.join(INPUT_DATA, dir_name, '*.' + extension)
            print(file_glob)
            file_list.extend(glob.glob(file_glob))
        if not file_list: continue

        # 处理图片数据
        for file_name in file_list:
            # 读取并解析图片,将图片转化为299×299以便inception-v3模型来处理
            image_raw_data = gfile.FastGFile(file_name, 'rb').read()
            image = tf.image.decode_jpeg(image_raw_data)
            if (image.dtype != tf.float32):
                iamge = tf.image.convert_image_dtype(
                    image, dtype=tf.float32
                )
            image = tf.image.resize_images(image, [299, 299])
            image_value = sess.run(image)

            # 随机划分数据集
            chance = np.random.randint(100)
            if chance < validation_percentage:
                validation_images.append(image_value)
                validation_labels.append(current_label)
            elif chance < (testing_percentage + validation_percentage):
                testing_images.append(image_value)
                testing_labels.append(current_label)
            else:
                training_images.append(image_value)
                training_labels.append(current_label)
        current_label += 1
    # 将训练数据随机打乱以获得更好的训练效果
    state = np.random.get_state()
    np.random.shuffle(training_images)
    np.random.set_state(state)
    np.random.shuffle(training_labels)

    return np.asarray([training_images, training_labels,
                       validation_images, validation_labels,
                       training_images, training_labels])

# 数据整理主函数
def main():
    with tf.Session() as sess:
        processed_data = create_image_lists(
            sess, TEST_PERCENTAGE, VALIDATION_PERCENTAGE
        )
        # 通过numpy格式保存处理后的数据
        np.save(OUTPUT_FILE, processed_data)

if __name__ == '__main__':
    main()
运行以上代码可以将所有的图片数据划分成训练、验证和测试3个数据集,并且将图片从原始的jpg格式转化为inception-v3模型需要的299×299×3的数字矩阵。在数据处理完毕之后,通过以下命令可以下载Google提供的训练好的inception-v3模型。
我这台工作站配置比较低,用GPU预处理,还不到一半,4G内存就爆了。
换CPU跑预处理,16内存,也爆了。
最后不得已,把每个分类的图片数控制在300以内,终于能运行完了…

wget
http://download.tensorflow.org/models/inception_v3_2016_08_28.tar.gz

# 解压之后可以得到训练好的模型文件inception_v3.ckpt
tar xzf inception_v3_2016_08-28.tar.gz
当新的数据集和已经训练好的模型都准备好之后,可以铜鼓哦一下代码来完成迁移学习的过程。
# -*- coding: utf-8 -*-
# @Time    : 2019/3/28 17:04
# @Author  : Chord

import glob;
import os.path;
import numpy as np;
import tensorflow as tf;
from tensorflow.python.platform import gfile;
import tensorflow.contrib.slim as slim;

# 加载通过TensorFlow-Slim定义好的inception-v3模型
import tensorflow.contrib.slim.python.slim.nets.inception_v3 as inception_v3;

# 处理好之后的数据文件
INPUT_DATA = 'C:\Documents\workspace\Resource\\flower_processed_data.npy'

# 保存训练好的模型的路径。这里可以将使用新数据训练得到的完整模型保存下来,
# 如果计算资源充足,还可以在训练完最后的全连接层之后再训练所有的网络层,
# 这样可以使得新模型更加贴近新数据
TRAIN_FILE = 'C:\Documents\workspace\Resource\save_model'
# Google提供的训练好的模型文件地址
CKPT_FILE = 'C:\Documents\workspace\Resource\inception_v3\inception_v3.ckpt'

# 定义训练中使用的参数
LERANING_RATE = 0.0001
STEPS = 300
BATCH = 32
N_CLASSES = 5

# 不需要从Google训练好的模型中姐在参数。这里就是最后的全连接层,因为在新的问题中
# 要重新训练这一层的参数。这里给出的是参数的前缀
CHECKPOINT_EXCLUDE_SCOPES = 'InceptionV3/Logits, InceptionV3/AuxLogits'
# 需要训练的网络层参数名称,在fine-tuning过程中就是最后的全连接层
TRAINABLE_SCOPES = 'InceptionV3/Logits, InceptionV3/AuxLogits'

# 获取所有需要从Google训练好的模型中加载的参数
def get_tuned_variables():
    exclusions = [scope.strip() for scope in\
                  CHECKPOINT_EXCLUDE_SCOPES.split(',')]
    variables_to_restore = []
    # 枚举inception-v3模型中所有的参数,然后判断是否需要从加载列表中移除
    for var in slim.get_model_variables():
        excluded = False
        for exclusion in exclusions:
            if var.op.name.startswith(exclusion):
                excluded = True
                break
        if not excluded:
            variables_to_restore.append(var)
    return variables_to_restore

# 获取所有需要训练的变量列表
def get_trainable_variables():
    scopes = [scope.strip() for scope in TRAINABLE_SCOPES.split(',')]
    variables_to_train = []
    # 枚举所有需要训练的参数前缀,并通过这些前缀找到所有的参数
    for scope in scopes:
        variables = tf.get_collection(
            tf.GraphKeys.TRAINABLE_VARIABLES, scope
        )
        variables_to_train.extend(variables)
    return variables_to_train

def main(_):
    # 加载预处理好的数据
    processed_data = np.load(INPUT_DATA)
    training_images = processed_data[0]
    n_training_example = len(training_images)
    training_labels = processed_data[1]
    validation_images = processed_data[2]
    validation_labels = processed_data[3]
    testing_images = processed_data[4]
    testing_labels = processed_data[5]
    print("%d training examples, %d validation examplesand %d"
          "testing examples." %
          (n_training_example, len(validation_labels), len(training_labels)
    ))

    # 定义inception-v3的输入,images为输入图片,labels为每一张图片对应的标签
    images = tf.placeholder(
        tf.float32, [None, 299, 299, 3],
        name='input_images'
    )
    labels = tf.placeholder(tf.int64, [None], name='labels')

    # 定义inception-v3模型。因为谷歌给出的只有模型参数取值,所以这里需要在这个代码当中定义
    # inception-v3的模型结构。虽然理论上需要区分训练和测试中使用的模型,也就是说在测试时应
    # 该使用is_training=False,但是因为预先训练好的inception-v3模型中使用的batch normalization
    # 参数与新数据会有差异,导致效果差,所以这里直接使用同一个模型来进行测试。
    with slim.arg_scope(inception_v3.inception_v3_arg_scope()):
        logits, _ = inception_v3.inception_v3(
            images, num_classes=N_CLASSES
        )
        # 获取需要训练的变量
        trainable_variables = get_trainable_variables()
        # 定义交叉熵损失。注意在模型定义的时候已经将正则化损失加入损失集合了
        tf.losses.softmax_cross_entropy(
            tf.one_hot(labels, N_CLASSES), logits, weights=1.0
        )
        # 定义训练过程。这里minimize的过程中指定了需要优化的变量集合。
        train_step = tf.train.RMSPropOptimizer(LERANING_RATE).minimize( # RMS均方根
            tf.losses.get_total_loss()
        )

        # 计算正确率
        with tf.name_scope('evaluation'):
            correct_prediction = tf.equal(tf.argmax(logits, 1), labels)
            evaluation_step = tf.reduce_mean(tf.cast(
                correct_prediction, tf.float32
            ))
            # 定义加载模型的函数
            load_fn = slim.assign_from_checkpoint_fn(
                CKPT_FILE,
                get_tuned_variables(),
                ignore_missing_vars=True
            )

            # 定义保存新的训练好的模型的函数
            saver = tf.train.Saver()
            with tf.Session() as sess:
                # 初始化没有加载进来的变量。注意这个过程一定要在模型加载之前,否则初始化过程
                # 会将已经加载好的变量重新复制
                init = tf.global_variables_initializer()
                sess.run(init)

                # 加载Google已经训练好的模型
                print('Loading tuned variables from %s' % CKPT_FILE)
                load_fn(sess)

                start = 0
                end = BATCH
                for i in range(STEPS):
                    # 运行训练过程,这里不会更新全部的参数,只会更新指定部分的参数
                    sess.run(train_step, feed_dict={
                        images: training_images[start:end],
                        labels: training_labels[start:end]
                    })

                    # 输出日志
                    if (i % 30 ==0 or i + 1 == STEPS):
                        saver.save(sess, TRAIN_FILE, global_step=i)
                        validation_accuracy = sess.run(evaluation_step, feed_dict={
                            images: validation_images, labels:validation_labels
                        })
                        print('Step %d: Validation accuracy = %.1f%%' % (i, validation_accuracy * 100.0))

                    # 因为在数据预处理的时候已经做过了打乱数据的操作,所以这里只需要顺序使用训练数据
                    start = end
                    if (start == n_training_example):
                        start = 0

                    end = start + BATCH
                    if (end > n_training_example):
                        end = n_training_example

                # 在最后的测试数据上测试正确率
                test_accuracy = sess.run(evaluation_step, feed_dict={
                    images: testing_images, labels:training_labels
                })
                print('Final test accuracy = %.1f%%' % (test_accuracy * 100.0))

if __name__ == "__main__":
    tf.app.run()
运行时长大概需要3小时,能看出模型在新的数据上很快能够收敛。
我的机器运行不出来…内存完全不够用…这里贴一下书上的结果吧。
Step 0: Validation accuracy = 22.8%
Step 30: Validation accuracy = 29.6%
Step 60: Validation accuracy = 63.2%
Step 90: Validation accuracy = 81.2%
Step 120: Validation accuracy = 88.6%
...
Step 299: Validation accuracy = 91.5%
Final test accuracy = 91.9%