版权声明:该版权归博主个人所有,在非商用的前提下可自由使用,转载请注明出处. https://blog.csdn.net/qq_24696571/article/details/86543043
Flume架构
Flume:Flume是一个分布式、可扩展、可靠、高可用的海量日志有效聚合及移动的框架。
Flume不止用于收集日志,也可以处理数据.
数据来源:前台:锚点,事件操作产生的数据 ; 后台:日志数据 , 数据库数据 ; 从第三方购买的数据等 .
Flume NG架构 1.0X版本
flume1.0x版本只有agent组成 .
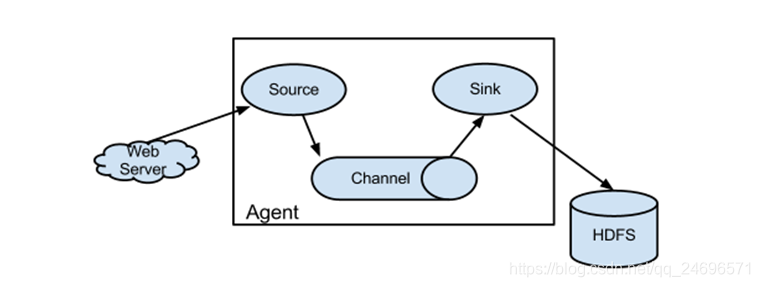
- WebServer : 数据提交
- Agent:Flume架构,由source、channel、sink三部分组成.
- Source:数据源 , 接收外部源发送过来的数据 , 可以接受不同的数据格式 .
- Chanel:数据池 , 数据的存储地 , 不但可以基于内存存储 , 也可以基于磁盘存储 . 接收source的输出,直到有sink消费掉channel中的数据Channel中的数据直到进入到下一个channel中或者进入终端才会被删除;当sink写入失败后,可以自动重启,不会造成数据丢失,因此很可靠。
- Sink : 从Chanel提取数据 , 用于输出到HDFS , HBase , Hive , 本地 , Mysql…
Flume OG架构 0.9X版本
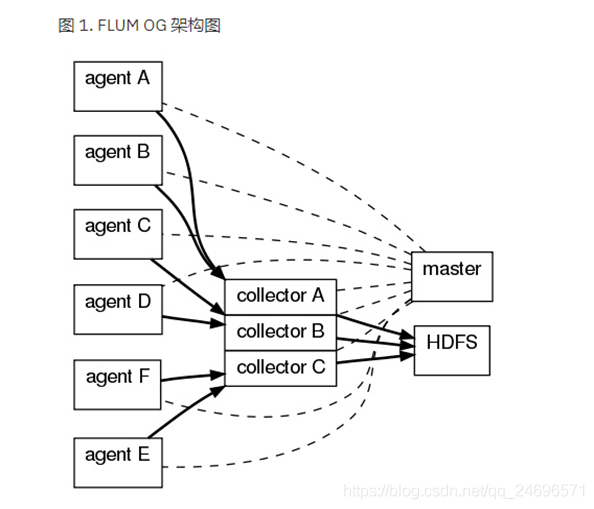
- OG架构由多个agent和多个collector收集器以及负责统一管理的master, 如图架构就存在单点故障的问题 , 要解决该问题就不得不使用多个master节点以及zookeeper集群来实现高可用 . 繁重复杂
Flume操作
- 首先说明三种格式 :
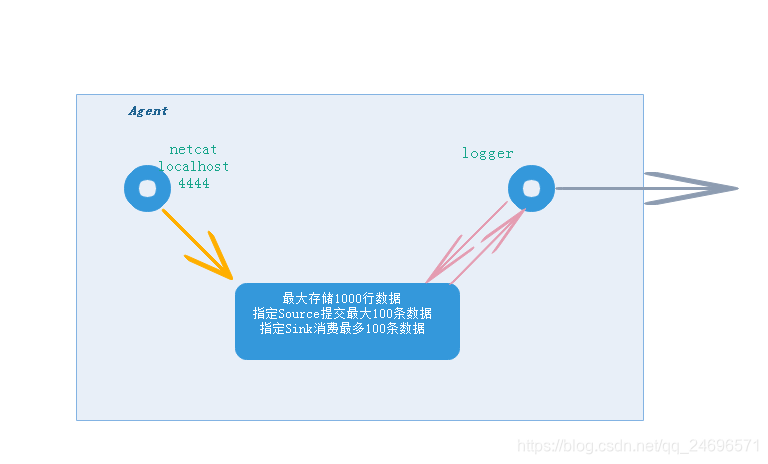
- netcat : 网络传输 , 监听一个指定端口,并将接收到的数据的每一行转换为一个event事件。
- exec : 监听数据文件 , Unix,Linux等操作系统执行命令行 , 如 tail cat
- avro: 是序列化的一种,实现了RPC(Remote Procedure Call),RPC是一种远程调用协议 。监听AVRO端口来接受来自外部AVRO客户端的事件流
- logger:本地控制台进行打印输出
- 1 . 指定服务器节点控制台输入数据,本地服务器节点控制台输出数据(本地输入,本地输出,控制台输入,控制台输出)
(使用代码请去注释)
# 1.netcat_logger  http://flume.apache.org/releases/content/1.8.0/FlumeUserGuide.html

# example.conf: A single-node Flume configuration

# Name the components on this agent
a1.sources = r1
a1.sinks = k1
a1.channels = c1

# Describe/configure the source
a1.sources.r1.type = netcat
a1.sources.r1.bind = node01	#指定ip地址或ip地址别名
a1.sources.r1.port = 44444	#指定访问端口
# 其他服务器节点通过 telnet node01 4444 命令来提交数据

# Describe the sink
a1.sinks.k1.type = logger

# Use a channel which buffers events in memory
a1.channels.c1.type = memory
a1.channels.c1.capacity = 1000	#指定最大存储数据
a1.channels.c1.transactionCapacity = 100 #指定最大操作数据

# Bind the source and sink to the channel
a1.sources.r1.channels = c1
a1.sinks.k1.channel = c1
-
运行
flume-ng agent --conf-file [脚本文件路径+文件名] --name [agent名称] -Dflume.root.logger=INFO,console
flume-ng agent --conf-file /root/flume/netcat_logger --name a1 -Dflume.root.logger=INFO,console
-
指定端口运行:
telnet [ip地址] [端口]
telnet localhost 44444
- 2 . 本地文件读取到控制台(本地文件读取,控制台输出)
(使用代码请去注释)
# 2. exec Unix等操作系统
# example.conf: A single-node Flume configuration

# Name the components on this agent
a1.sources = r1
a1.sinks = k1
a1.channels = c1

# Describe/configure the source
a1.sources.r1.type = exec # exec 系统操作
a1.sources.r1.command = tail -F /root/flume.log # "/root/flume.log":数据源  "tail -F":一行一行打印

# Describe the sink
a1.sinks.k1.type = logger  # 输出到控制台

# Use a channel which buffers events in memory
a1.channels.c1.type = memory # 基于内存
a1.channels.c1.capacity = 1000 #上限1000
a1.channels.c1.transactionCapacity = 100 # 每次100

# Bind the source and sink to the channel
a1.sources.r1.channels = c1  #r1的source 向 c1的channel提交数据 ,多个source可以同时向多个channel提交
a1.sinks.k1.channel = c1  #k1的sink向 c1的channel消费数据 ,多个sink同时只能向1个channel消费数据
-
运行
flume-ng agent --conf-file [脚本文件路径+文件名] --name [agent名称] -Dflume.root.logger=INFO,console
flume-ng agent --conf-file /root/flume/exec_logger --name a1 -Dflume.root.logger=INFO,console
- 3 . 指定某服务器节点将文件发送本服务器,数据显示在控制台(其他服务器指定文件传送本服务器,本服务器控制台输出)
(使用代码请去注释)
# 3.avro_logger
##使用avro方式在某节点上将文件发送到本服务器上且通过logger方式显示
##当前flume节点执行:
#flume-ng agent --conf ./ --conf-file avro_loggers --name a1 -Dflume.root.logger=INFO,console
##其他flume节点执行:flume-ng avro-client --conf ./ -H 192.168.200.211 -p 55555 -F ./logs
# Name the components on this agent
a1.sources=r1
a1.channels=c1
a1.sinks=k1

# Describe/configure the source
a1.sources.r1.type = avro  #RPC
a1.sources.r1.bind=192.168.200.211 #指定服务器节点,其他服务器节点可以访问该ip来提交数据
a1.sources.r1.port=55555 #指定端口

# Describe the sink
a1.sinks.k1.type=logger  #输出到控制台

# Use a channel which buffers events in memory
a1.channels.c1.type = memory #基于内存
a1.channels.c1.capacity = 1000 #上限1000
a1.channels.c1.transactionCapacity = 100 #每次100

# Bind the source and sink to the channel
a1.sources.r1.channels = c1  #r1的source向c1的channel提交数据,多个source可以同时向多个channel提交
a1.sinks.k1.channel = c1  #k1的sink向c1的channel消费数据,多个sink同时只能向1个channel消费数据
-
运行
flume-ng agent --conf-file [脚本文件路径+文件名] --name [agent名称] -Dflume.root.logger=INFO,console
flume-ng agent --conf-file avro_logger --name a1 -Dflume.root.logger=INFO,console
-
指定服务器运行
flume-ng avro-client --conf ./ -H [提交服务器ip] -p [提交服务器端口] -F [提交数据路径]
flume-ng avro-client --conf ./ -H 192.168.200.211 -p 55555 -F ./flume.log
- 4 . netcat读取到hdfs(其他服务器控制台输入,输出到hdfs系统)
(使用代码请去注释)
#4 netcat_hdfs
#Name the components on this agent
a1.channels = c1
a1.sources = r1
a1.sinks = k1

#Describe/configure the source
#基于端口接受
a1.sources.r1.type = netcat
#绑定节点node01  /  192.168.200.211
a1.sources.r1.bind = node01
#指定端口
a1.sources.r1.port = 41414

#Describe the sink
#数据消费到hdfs
a1.sinks.k1.type = hdfs
#数据放置到hdfs的位置 , 集群名+路径+年月日
a1.sinks.k1.hdfs.path = hdfs://Credi/myflume/%y-%m-%d
#如果指定了时间,必须要写时间戳, 否则报错
a1.sinks.k1.hdfs.useLocalTimeStamp=true

#Use a channel which buffers events in memory
#基于内存
a1.channels.c1.type = memory
#上限1000
a1.channels.c1.capacity = 1000
#每次100
a1.channels.c1.transactionCapacity = 100

# Bind the source and sink to the channel
#r1的source向c1的channel提交数据,多个source可以同时向多个channel提交
a1.sources.r1.channels = c1
#k1的sink向c1的channel消费数据,多个sink同时只能向1个channel消费数据
a1.sinks.k1.channel = c1
- 5 . 基于4 , 4的写入会产生非常多个小文件 , 5对于4进行优化,实际工作中常用
#5 netcat_hdfs
#Name the components on this agent
	a1.channels = c1
	a1.sources = r1
	a1.sinks = k1

#Describe/configure the source
#基于端口接受
	a1.sources.r1.type = netcat
#绑定节点node01  /  192.168.200.211
	a1.sources.r1.bind = node01
#指定端口
	a1.sources.r1.port = 41414

#Describe the sink
#数据消费到hdfs
	a1.sinks.k1.type = hdfs
#数据放置到hdfs的位置 , 集群名+路径+年月日
	a1.sinks.k1.hdfs.path = hdfs://Credi/myflume/%y-%m-%d
#如果指定了时间,必须要写时间戳, 否则报错
	a1.sinks.k1.hdfs.useLocalTimeStamp=true
#不基于统计
	a1.sinks.k1.hdfs.rollCount=0
#不基于个数
	a1.sinks.k1.hdfs.rollInterval=0
#数据超过多少进行合并
	a1.sinks.k1.hdfs.rollSize=10240
#数据多少时间后合并文件
	a1.sinks.k1.hdfs.idleTimeout=5
#以数据流不断写
	a1.sinks.k1.hdfs.fileType=DataStream

#Use a channel which buffers events in memory
#基于内存
	a1.channels.c1.type = memory
#上限1000
	a1.channels.c1.capacity = 1000
#每次100
	a1.channels.c1.transactionCapacity = 100

# Bind the source and sink to the channel
#r1的source向c1的channel提交数据,多个source可以同时向多个channel提交
	a1.sources.r1.channels = c1
#k1的sink向c1的channel消费数据,多个sink同时只能向1个channel消费数据
	a1.sinks.k1.channel = c1

# 3.运行
	flume-ng agent --conf-file /root/flume/netcat_hdfs --name a1 -Dflume.root.logger=INFO,console
# 3.指定服务器运行
	telnet node01 41414
- 6 . 联合使用
node02运行
flume-ng agent --conf-file avro2 -n a1, 然后等待node01执行脚本
a1.sources = r1
a1.sinks = k1
a1.channels = c1

a1.sources.r1.type = avro
a1.sources.r1.bind = node02
a1.sources.r1.port = 60000

a1.sinks.k1.type = logger

# Use a channel which buffers events in memory
a1.channels.c1.type = memory
a1.channels.c1.capacity = 1000
a1.channels.c1.transactionCapacity = 100

# Bind the source and sink to the channel
a1.sources.r1.channels = c1
a1.sinks.k1.channel = c1
node01运行
# example.conf: A single-node Flume configuration
#flume-ng agent --conf ./ --conf-file netcat2_logger --name a1 -Dflume.root.logger=INFO,console
#flume-ng --conf conf --conf-file /root/flume_test/netcat_hdfs -n a1 -Dflume.root.logger=INFO,console
#telnet 192.168.235.15 44444
# Name the components on this agent
 a1.sources = r1
 a1.sinks = k1
 a1.channels = c1

 # Describe/configure the source
 a1.sources.r1.type = netcat
 a1.sources.r1.bind = node01
 a1.sources.r1.port = 44444

 # Describe the sink
 a1.sinks.k1.type = avro
 a1.sinks.k1.hostname = node02
 a1.sinks.k1.port = 60000


 # Use a channel which buffers events in memory
 a1.channels.c1.type = memory
 a1.channels.c1.capacity = 1000
 a1.channels.c1.transactionCapacity = 100

 # Bind the source and sink to the channel
 a1.sources.r1.channels = c1
 a1.sinks.k1.channel = c1