前言:实时流处理架构和技术选型

一、简介
Flume的使用基本上就是写配置文件!
特点:分布式、高可用、高可靠
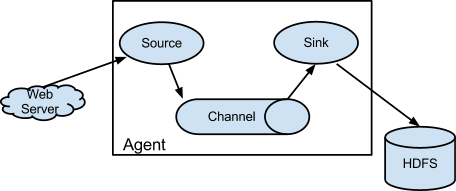
一个Flume服务器就理解为一个Agent。
三大组件:Source、Channel、Sink
Source:数据源,一般要和Web server对接上(收集);
Channel:通道,数据收集到暂时缓存的地方(聚集),类似于一个数据缓存池;
Sink:把Channel里的数据输出、写入、下沉到HDFS或其他文件系统中(输出)。
一句话总结Flume的作用就是:将日志从A地方收集、聚合、搬运到B地方去!
Flume支持很多种数据源,使用Java语言开发。
多Agent架构:


二、Flume环境部署
前置条件:
- Java1.7及以上
- 足够的内存(channel到内存中的)
- 磁盘空间也要足够
- 权限,由于涉及到文件操作,所以要对文件有读写权限
安装:
1、下载、上传、解压
tar -xzvf apache-flume-1.6.0-bin.tar.gz
vi /etc/profile
export FLUME_HOME=/soft/flume
export PATH=$PATH:$FLUME_HOME/bin
source /etc/profile
2、配置
进入conf文件夹,复制一份配置模板flume-env.sh.template为 flume-env.sh,修改里面的JAVA_HOME为本机的。
3、检测是否安装成功
进入bin目录下,运行命令 flume-ng version
可能会提示如下错误:
错误: 找不到或无法加载主类 org.apache.flume.tools.GetJavaProperty
Flume 1.6.0
Source code repository: https://git-wip-us.apache.org/repos/asf/flume.git
Revision: 2561a23240a71ba20bf288c7c2cda88f443c2080
Compiled by hshreedharan on Mon May 11 11:15:44 PDT 2015
From source with checksum b29e416802ce9ece3269d34233baf43f
原因:
1、jdk冲突
2、安装了hbase就会报着个错
解决:
1、卸载openjdk
2、安装jdk7.
3、将hbase的hbase.env.sh的一行配置注释掉
# Extra Java CLASSPATH elements. Optional.
#export HBASE_CLASSPATH=/home/hadoop/hbase/conf
4、或者将HBASE_CLASSPATH改为JAVA_CLASSPATH,配置如下
# Extra Java CLASSPATH elements. Optional.
export JAVA_CLASSPATH=.:$JAVA_HOME/lib/dt.jar:$JAVA_HOME/lib/tools.jar
三、Flume实战
需求1:从指定端口采集数据并输出到控制台
使用Flume的关键就是写配置文件,配置文件的构成:
1、配置source
2、配置channel
3、配置sink
4、把以上三个组件串起来
下面为一个配置文件实例:
# example.conf: A single-node Flume configuration
# Name the components on this agent
a1.sources = r1
a1.sinks = k1
a1.channels = c1
a1表示的是agent的名称,启动的时候是需要指定agent的名称的。a1.sources指定数据源(source),可以为多个,这里就只定一个r1;同理,k1就是sink的名称,c1就是channel的名称。

# Describe/configure the source
a1.sources.r1.type = netcat
a1.sources.r1.bind = hadoop0
a1.sources.r1.port = 44444
配置数据源r1的各项属性,type=netcat表示数据源的类型(source),此类型可以用于监听某个端口,当然了还有其他的类型,bind表示绑定的主机名或者IP地址,port为端口号

# Describe the sink
a1.sinks.k1.type = logger
配置sink,此agent中sink只用到了一个就是k1.此处类型是logger

# Use a channel which buffers events in memory
a1.channels.c1.type = memory
a1.channels.c1.capacity = 1000
a1.channels.c1.transactionCapacity = 100
配置channel,类型是memory,还有容量和其他等。

# Bind the source and sink to the channel
a1.sources.r1.channels = c1
a1.sinks.k1.channel = c1   把以上三个组件串起来。注意:一个source可以输出到多个channel,所以a1.sources.r1.channels 这里使用了复数。但是,一个channel输出到的sink只能是一个(一个sink只能有一个渠道)。
把上面的配置语句写进配置文件,一般情况下可以把配置文件放进conf目录下面。
配置完成之后,启动agent。
$ bin/flume-ng agent --name a1 --conf $FLUME_HOME/conf --conf-file $FLUME_HOME/conf/example.conf -Dflume.root.logger=INFO,console--name后面跟agent的名字;
--conf 后面是flume安装目录下的conf文件夹
--conf-file 后面是自己写的配置文件路径
-Dflume.root.logger=INFO,console Java配置,结果输出到控制台
启动起来之后使用telnet进行测试。
yum install telnet
telnet hadoop0 44444
输入内容,回车后内容就会打印在控制台。
2019-02-16 16:19:26,169 (SinkRunner-PollingRunner-DefaultSinkProcessor) [INFO - org.apache.flume.sink.LoggerSink.process(LoggerSink.java:94)] Event: { headers:{} body: 68 65 6C 6C 6F 0D hello. }
Event是flume数据传输的基本单元,Event=可选的header+byte array,一条记录就是一个Event。
需求2:监控一个文件,实时采集新增的数据,并输出到控制台
Agent选型:
source选择Exec ,channel还是memory,sink还是选择logger
配置文件和需求一的大同小异,直接复制过来,修改,红色为修改部分。
# example.conf: A single-node Flume configuration

# Name the components on this agent
a1.sources = r1
a1.sinks = k1
a1.channels = c1

# Describe/configure the source
a1.sources.r1.type = exec
a1.sources.r1.command = tail -F /soft/flume/data/data.log
a1.sources.r1.shell = /bin/sh -c
监控/soft/flume/data/data.log这个文件,新增的数据打印在控制台

# Describe the sink
a1.sinks.k1.type = logger

# Use a channel which buffers events in memory
a1.channels.c1.type = memory
a1.channels.c1.capacity = 1000
a1.channels.c1.transactionCapacity = 100

# Bind the source and sink to the channel
a1.sources.r1.channels = c1
a1.sinks.k1.channel = c1
配置文件名是exec-memory-logger.conf ,还放在conf文件下。运行
$ bin/flume-ng agent --name a1 --conf $FLUME_HOME/conf --conf-file $FLUME_HOME/conf/exec-memory-logger.conf -Dflume.root.logger=INFO,console
需求3:将A服务器上的日志实时采集到B服务器(重点)
生产中假设日志在web Server中,如何把实时产生的日志收集到数据分析服务器(Spark集群)上呢。这种需求使用的最多,重点掌握。
如下图示例:

技术选型:
机器A : exec source + memory channel + avro sink
机器B:avro source + memory channel + logger sink(输出控制台)
机器A(hadoop0)配置文件exec-memory-avro.conf配置内容:
exec-memory-avro.sources = exec-source
exec-memory-avro.sinks = avro-sink
exec-memory-avro.channels = memory-channel
agent名称设置为exec-memory-avro

exec-memory-avro.sources.exec-source.type = exec
exec-memory-avro.sources.exec-source.command= tail -F /soft/flume/data/data.log
exec-memory-avro.sources.exec-source.shell= /bin/sh -c

exec-memory-avro.sinks.avro-sink.type = avro
exec-memory-avro.sinks.avro-sink.hostname= hadoop1
exec-memory-avro.sinks.avro-sink.port= 44444

exec-memory-avro.channels.memory-channel.type = memory

exec-memory-avro.sources.exec-source.channels = memory-channel
exec-memory-avro.sinks.avro-sink.channel = memory-channel
机器B(hadoop1)配置文件avro-memory-logger.conf配置内容:
avro-memory-logger.sources = avro-source
avro-memory-logger.sinks = logger-sink
avro-memory-logger.channels = memory-channel
agent名称设置为exec-memory-avro

avro-memory-logger.sources.avro-source.type = avro
avro-memory-logger.sources.avro-source.bind= hadoop1
avro-memory-logger.sources.avro-source.port= 44444

avro-memory-logger.sinks.logger-sink.type = logger

avro-memory-logger.channels.memory-channel.type = memory

avro-memory-logger.sources.avro-source.channels = memory-channel
avro-memory-logger.sinks.logger-sink.channel = memory-channel启动的时候一定要先启动avro-memory-logger.conf(机器B)
$ bin/flume-ng agent --name avro-memory-logger --conf $FLUME_HOME/conf --conf-file $FLUME_HOME/conf/avro-memory-logger.conf -Dflume.root.logger=INFO,console
再启动exec-memory-avro.conf(机器A)
$ bin/flume-ng agent --name exec-memory-avro --conf $FLUME_HOME/conf --conf-file $FLUME_HOME/conf/exec-memory-avro.conf -Dflume.root.logger=INFO,console