Preface
博主刚放假回家就进了医院,今天刚完事儿,来续写第二本书

Ready
我们来总结一下上一本书的笔记中我们的一些规定
1. 数学表达式
我们采用小写粗黑体代表向量,大写粗黑体代表矩阵,其他代表标量
2.我们将eye(or camera)发出的光线称为视线(sight)
3.我们目前将所有的非特定(不专属于任何一个类)的通用物理数学运算函数封装到泛型库中,并以lvgm命名空间限定,暂时不准备划分子命名空间
4.我们写库,拟采用全hpp书写,因.h和.cpp之间关于父类纯虚函数的子类相关声明与实现出现了无法链接的神奇编译错误,问过很多大佬,最后还是采用hpp
基础工程代码见第一本书总结篇
Chapter 1 Motion Blur
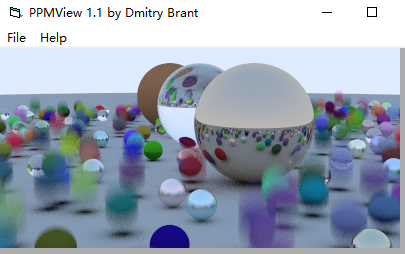
今天先来一个开胃菜,一个简单易懂的技术——运动模糊
先看效果
好像我们之前也提到过类似的模糊,例如:散焦模糊(defucos blur)
它和今天的模糊还是有一定区别的,从物理成因上讲,defucos是因为未正确对焦,如果没有玩过生活中的相机也没关系,大家都用手机拍过照吧,有些时候,手机相机打开对着拍摄对象,屏幕中的物体或字迹的边缘是模糊的,通常我们会做一个动作,即,点一下屏幕(会出现一个小框),然后图像就会变清晰(边缘明显)
运动模糊的意思是,现实世界中,相机快门开启的时间间隔内,相机内物体发生了位移,画面最后呈现出来的像素,是移动过程中像素的平均值。它不是由相机造成的,而是由物体运动状态造成的形状模糊,比如,你拍摄一张正在下落小球的照片,它所造成的模糊是在段时间内停留在历史轨迹中的重影
弄清楚这个,就开始我们的正题
如何模拟真实生活中的运动模糊,我们先来回顾一下光线追踪的过程
1. 我们选定屏幕中的一个位置,作为待计算的像素点
2. 从eye发出一条视线指向该上述位置周围的采样点
3. 如果中途有物体相交,那么根据物体表面材质进行视线计算
3. 至多递归计算50次,确定该位置的一个采样值
4. 该位置周围采样100次,计算均值作为该位置的最终像素值
那么我们看一下上述过程中,需要改动哪些地方以支持模拟物体的运动模糊行为
首先,我们只需要模拟相机快门开启的时间间隔内的物体运动情况,所以,物体一定有一个运动的起点和终点位置
如果是球体,我们用球心代表运动的位置(heart1,heart2),另外相机时间间隔是一段时间,需要起止时间点确定(time1,time2)
其次,我们模拟物体运动模糊,还要根据相机原理:画面最后呈现出来的像素,是移动过程中像素的平均值
所以,我们依旧采用随机取样,我们之前已经确定采样像素点为100个,采样周围点是为了抗锯齿,这一节我们更重要的是要采样物体的运动位置
我们有物体运动的起止位置和起止时间点(确定运动时间间隔),所以我们取0~1的随机数作为物体从heart1到heart2运动路径长度比例,进而确定物体在该随机时刻的具体位置heart,我们取多个随机时间进行采样,之后再进行均值处理,作为移动过程中像素的平均值
完成上述理论,还需在光线追踪过程中下手
第一步就不用说了,就是确定屏幕位置
第二步就很重要了,视线发出就要接触物体,也就是说视线产生就要确定该时刻的物体具体位置,因为它要和物体进行相交计算,所以,视线承担着记录当前时间点的作用
而我们还需要做运动位置采样,所以,eye需要发出多条视线,基于不同的随机时间,这样我们就做到了根据不同的随机时间发出多条采样视线对物体的运动位置进行采样
我们不妨把抗锯齿的采样和运动位置采样视线生成放在一起
ray.hpp
/// ray.h

// -----------------------------------------------------
// [author]        lv
// [begin ]        2019.1
// [brief ]        the ray-class for the ray-tracing project
//                from the 《ray tracing The Next week》
// -----------------------------------------------------
#pragma once

#include "RTdef.h"

namespace rt
{

    class ray
    {
    public:
        ray()
            :_a{ rtvec() }
            , _b{ rtvec() }
        {  }

        ray(const rtvec& a, const rtvec& b, const rtvar time = 0.)
            :_a(a)
            , _b(b)
            ,_time(time)
        {  }

        ray(const ray& r)
            :_a(r._a)
            , _b(r._b)
        {    }

        inline rtvec origin()const        { return _a; }

        inline rtvec direction()const    { return _b; }

        inline rtvar time()const        { return _time; }

        inline rtvec go(const rtvar t)const { return _a + t * _b; }

    private:
        rtvec _a;

        rtvec _b;

        rtvar _time;

    };
}
camera.hpp


这样,我们就做好了产生记录随机时间的视线
接下来就是采样了
main.cpp

我们再来说第三步,视线和物体的相交计算
这个是最重要的,我们要 根据视线记录的随机时间,来确定物体的轮廓,然后进行计算交点
显然,我们不能用之前的sphere了
下面是我们新写的moving_sphere
/// moving_sphere.h

// -----------------------------------------------------
// [author]        lv
// [begin ]        2019.1
// [brief ]        the moving_sphere-class for the ray-tracing project
//                from the 《ray tracing in one week》
// -----------------------------------------------------

#pragma once
#include "ray.h"
#include "intersect.h"

namespace rt
{

class moving_sphere :public intersect
    {
public:
    moving_sphere() {  }
    moving_sphere(rtvec heart1, rtvec heart2, rtvar t1, rtvar t2, rtvar r, material* mp)
        :_heart1(heart1)
        , _heart2(heart2)
        , _time1(t1)
        , _time2(t2)
        , _radius(r)
        , _materialp(mp)
        {
        }

    virtual bool hit(const ray& r, rtvar tmin, rtvar tmax, hitInfo& info)const override;

    inline rtvec heart(rtvar t)const
        {
        return _heart1 + ((t - _time1) / (_time2 - _time1)) * (_heart2 - _heart1);
        }

private:
    rtvec _heart1;
    rtvec _heart2;
    rtvar _time1;
    rtvar _time2;
    rtvar _radius;
    material* _materialp;
    };

bool moving_sphere::hit(const ray& sight, rtvar t_min, rtvar t_max, hitInfo& info)const
{
    rtvec trace = sight.origin() - heart(sight.time());
    rtvar a = dot(sight.direction(), sight.direction());
    rtvar b = 2.0 * dot(trace, sight.direction());
    rtvar c = dot(trace, trace) - _radius * _radius;
    rtvar delt = b*b - 4.0*a*c;
    if (delt > 0)
    {
        info.materialp = _materialp;
        rtvar x = (-b - sqrt(delt)) / (2.0*a);
        if (x < t_max && x > t_min)
        {
            info._t = x;
            info._p = sight.go(x);
            info._n = (info._p - heart(sight.time())) / _radius;
            return true;
        }
        x = (-b + sqrt(delt)) / (2.0*a);
        if (x < t_max && x > t_min)
        {
            info._t = x;
            info._p = sight.go(x);
            info._n = (info._p - heart(sight.time())) / _radius;
            return true;
        }
    }
    return false;
}

}
我们用vec3 heart(time);来计算某个随机时间某个物体从开始位置向终止位置运动time时间之后的具体位置
第四步和第五步就不说了,都是上述过程的重复自动计算
下面是开篇图片中球体参数设置
intersect* random_sphere()
{
    int cnt = 50000;
    intersect **list = new intersect*[cnt + 1];
    list[0] = new sphere(rtvec(0, -1000, 0), 1000, new lambertian(rtvec(0.5, 0.5, 0.5)));
    int size = 1;
    for (int a = -10; a < 10; ++a)
        for (int b = -10; b < 10; ++b)
        {
            rtvar choose_mat = lvgm::rand01();
            rtvec center(a + 0.9 * lvgm::rand01(), 0.2, b + 0.9*lvgm::rand01());
            if ((center - rtvec(4, 0.2, 0)).normal()>0.9)
            {
                if (choose_mat < 0.75)
                    list[size++] = new moving_sphere(center, center + rtvec(0, 0.5*lvgm::rand01(), 0), 0., 1., 0.2,
                        new lambertian(rtvec(lvgm::rand01()*lvgm::rand01(), lvgm::rand01()*lvgm::rand01(), lvgm::rand01()*lvgm::rand01())));

                else if (choose_mat < 0.9)
                    list[size++] = new sphere(center, 0.2,
                        new metal(rtvec(0.5*(1 + lvgm::rand01()), 0.5*(1 + lvgm::rand01()), 0.5*(1 + lvgm::rand01())), 0.5*lvgm::rand01()));

                else
                    list[size++] = new sphere(center, 0.2,
                        new dielectric(1.5));
            }
        }

    list[size++] = new sphere(rtvec(0, 1, 0), 1.0, new dielectric(1.5));
    list[size++] = new sphere(rtvec(-4, 1, 0), 1.0, new lambertian(rtvec(0.4, 0.2, 0.1)));
    list[size++] = new sphere(rtvec(4, 1, 0), 1.0, new metal(rtvec(0.7, 0.6, 0.5), 0.));

    return new intersections(list, size);
}
相机参数设置
rtvec lookfrom(13, 2, 3);
rtvec lookat(0, 0, 0);
float dist_to_focus = 10.0;
float aperture = 0.0;
camera cma(lookfrom, lookat, rtvec(0, 1, 0), 20, rtvar(W) / rtvar(H), aperture, 0.7*dist_to_focus, 0., 1.);
还有水平运动模糊的图片正在渲染中,完成之后会贴在下面
感谢您的阅读,生活愉快~