前言
开坑一个新系列,由笔者带你不用api,只用最基本的C++语法写光线追踪,本系列可以看做是对《Ray Tracing in One Weekend》的翻译,当然原文虽然是英文,但有点基础都能懂,并且讲的非常好,本系列就基于此,加上自己的理解带你从零开始造轮子,理解光线追踪的底层逻辑,当然有时间还是希望各位看官去看看原文(写的真的非常好)。
本篇博客先介绍一部分内容,如有不好或者错误欢迎各位批评指正!
本系列文章链接
带你从零开始徒手撸光线追踪代码(1)—— Ray Tracing in One Weekend
带你从零开始徒手撸光线追踪代码(2)—— Ray Tracing in One Weekend
带你从零开始徒手撸光线追踪代码(3)—— Ray Tracing in One Weekend
行文目录
准备工作
工具准备
工具方面,只要是C++编译器即可,笔者使用的Visual Studio,具体安装可以参考笔者另一篇文章:《手把手教你games101环境搭建(图文并茂)——Visual Studio安装,Eigen库,Opencv配置》的Visual Studio安装部分。
ppm格式文件
这是《Ray Tracing in One Weekend》中显示图形的一种方式,说简单点,PPM格式其实就是RGB数据加上一个简单的文件头, 文件头部表示了图像的宽度和高度以及最大的RGB值,其文件要求满足文件头+RGB数据的结构
PPM的格式如下:

我们先熟悉一下这个如何用代码生成一个ppm文件,我们当然可以直接新建一个文本然后输入文件头和RGB数据,但是我们采用代码的方式生成更加可行,我们首先定义一幅图像的大小,假设宽高均为256,之后我们向标准输出流中输出文件头,之后我们循环遍历整幅图的像素点,计算每个像素点的位置的相对位置后乘以255.999作为其像素点。除此以外,我们还用标准错误输出流std::cerr,在控制台中输出进度新
#include <iostream>

int main() {


    // Image

    const int image_width = 256;
    const int image_height = 256;

    // Render

    std::cout << "P3\n" << image_width << ' ' << image_height << "\n255\n";

    for (int j = image_height-1; j >= 0; --j) {


        std::cerr << "\rScanlines remaining: " << j << ' ' << std::flush; // 输出进度
        for (int i = 0; i < image_width; ++i) {


            auto r = double(i) / (image_width-1);
            auto g = double(j) / (image_height-1);
            auto b = 0.25;

            int ir = static_cast<int>(255.999 * r);
            int ig = static_cast<int>(255.999 * g);
            int ib = static_cast<int>(255.999 * b);

            std::cout << ir << ' ' << ig << ' ' << ib << '\n';
        }
    }
}
之后我们打开控制台,来到工程编译出来的exe文件下,比如我用的VS,项目名称为rayTracing,放在如下的目录中。
G:\OpenGL\Hw5\rayTracing
最后我们进入该目录下,找到x64\Debug,并输入rayTracing.exe > image.ppm,完整的如下所示。
G:\OpenGL\Hw5\rayTracing\x64\Debug> rayTracing.exe > image.ppm
我们找到image.ppm并打开,会得到如下的图片。

动手写一个向量类(vec3 class)
一些说明
首先我们知道,要使用向量或者矩阵的话,C++可以有Eigen库使用,但是我们尽可能不使用任何api,因此我们可以自己写一个类,这个类是三维向量类,因为空间中的物体有x,y,z三轴,因此只需要一个三维向量类即可,至于齐次坐标的问题我们并不考虑,因为就我们这个而言,三个坐标来表示就已经足够了。因此只需要一个三维的向量。
类的功能分析
我们要知道我们需要这个类做什么,很显然这是个三维向量,那自然可以存储我们的空间坐标,还可以存储RGB三色。这是我们的目的。除此以外,我们这个类要进行一些基本操作,例如 输出(<<),取值([]),返负值(-),加(+,+=)减(-,-=)乘(*,*=)除(/,/=),点乘(dot),叉乘(cross),还有求模(length),求单位向量(unit_vector) 等,所需要的成员变量只有一个 三维数组。
上面我们分析了整个类最需要的几大功能,为了能让我们的vec3类在表示坐标的时候更直观,我们还定义了x,y,z这三个成员函数,分别返回数组的第一,第二,第三个值。
由于我们的vec3类可以表示空间坐标,也可以表示RGB三原色,因此为了代码的可读性也为了写代码更方便,我们给vec3类起了两个别名,一个叫point3,用来表示空间坐标,一个叫color,用来表示RGB。
功能实现
首先我们要先创建一个头文件,我们命名为vec3.h,在其中创建我们的类。此部分比较基础,我们就过得快一点。
主要介绍一下运算符重载,首先是返负值和取值,取反很容易理解,直接返回一个vec3,结果是每个数都取个负号即可。但是取值就有点问题,因为其可以作为左值,也可以作为右值,因此需要函数重载一下,一个是返回变量,一个返回引用。
	vec3 operator-() const {

     return vec3(-e[0], -e[1], -e[2]); }
	double operator[](int index) const {

     return e[index]; }
	double& operator[](int index) {

     return e[index]; }
然后是几个也需要返回自身的运算符(+=,-=,*=,/=),因此也都是需要返回引用类型,至于其他的运算符(+,-,*,/,dot,cross)都是需要两个形参,并且这两个形参不一定有一个是自己,但是其又是vec3相关的操作,因此我们可以在文件的最下面通过内联的方式加入这些工具方法。其中需要关注的就是乘法,乘法有向量乘向量,数乘向量的情况。关于点乘(dot)和叉乘(cross),我们就直接参考其数学公式来。
vec3类的完整代码
vec3.h文件中的代码如下:主要是定义了类,取了别名,用内联的方式写了工具方法。
#pragma once
#ifndef VEC3_H
#define VEC3_H

#include <cmath>
#include <iostream>

class vec3
{


public:
	vec3() : e{

     0, 0, 0 } {

    };		// 无参构造函数
	vec3(double e0, double e1, double e2) : e{

     e0, e1, e2 } {

    };   // 有参构造函数

	double x() const {

     return e[0]; }
	double y() const {

     return e[1]; }
	double z() const {

     return e[2]; }

	// 运算符重载
	vec3 operator-() const {

     return vec3(-e[0], -e[1], -e[2]); }
	double operator[](int index) const {

     return e[index]; }
	double& operator[](int index) {

     return e[index]; }

	vec3& operator+=(vec3 t)
	{


		e[0] += t.x(); e[1] += t.y(); e[2] += t.z();
		return *this;
	}

	vec3& operator*=(double t)
	{


		e[0] *= t; e[1] *= t; e[2] *= t;
		return *this;
	}

	vec3& operator/=(double t)
	{


		e[0] /= t; e[1] /= t; e[2] /= t;
		return *this;
	}

	double length_square() const
	{


		return e[0] * e[0] + e[1] * e[1] + e[2] * e[2];
	}

	double length() const
	{


		return sqrt(length_square());
	}

public:
	double e[3];
};

using point3 = vec3;		// point 3D
using color = vec3;         // RGB

inline std::ostream& operator<< (std::ostream& out, vec3& v)
{


	return out << v.e[0] << ' ' << v.e[1] << ' ' << v.e[2];
}

inline vec3 operator+(const vec3& v, const vec3& t)
{


	return vec3(v.e[0] + t.e[0], v.e[1] + t.e[1], v.e[2] + t.e[2]);
}

inline vec3 operator-(const vec3& v, const vec3& t)
{


	return vec3(v.e[0] - t.e[0], v.e[1] - t.e[1], v.e[2] - t.e[2]);
}

inline vec3 operator*(const vec3& v, const vec3& t)
{


	return vec3(v.e[0] * t.e[0], v.e[1] * t.e[1], v.e[2] * t.e[2]);
}

inline vec3 operator*(double t, const vec3& v)
{


	return vec3(v.e[0] * t, v.e[1] * t, v.e[2] * t);
}

inline vec3 operator*(const vec3& v, double t)
{


	return t * v;
}

inline vec3 operator/(const vec3& v, double t)
{


	return 1 / t * v;
}

inline double dot(const vec3& v, const vec3& u)		// 点乘
{


	return v.e[0] * u.e[0] + v.e[1] * u.e[1] + v.e[2] * u.e[2];
}

inline vec3 cross(const vec3& v, const vec3& u)		// 叉乘(按照叉乘公式写)
{


	return vec3(
		v.e[1] * u.e[2] - v.e[2] * u.e[1],
		v.e[2] * u.e[0] - v.e[0] * u.e[2],
		v.e[0] * u.e[1] - v.e[1] * u.e[0]
	);
}

inline vec3 unit_vector(const vec3& v)				// 求单位向量
{


	return v / v.length();
}

#endif
创建颜色
颜色函数,用于写颜色,格式同ppm的格式。
#ifndef COLOR_H
#define COLOR_H

#include "vec3.h"

#include <iostream>

void write_color(std::ostream &out, color pixel_color) {


    // Write the translated [0,255] value of each color component.
    out << static_cast<int>(255.999 * pixel_color.x()) << ' '
        << static_cast<int>(255.999 * pixel_color.y()) << ' '
        << static_cast<int>(255.999 * pixel_color.z()) << '\n';
}

#endif
借用我们write_color函数,我们可以将main函数循环中间颜色的代码采用write_color函数进行替换,结果如下。
#include "vec3.h"
#include "color.h"

int main(void)
{


	// image_size
	const int width = 256;
	const int height = 256;

	// render
	std::cout << "P3\n" << width << ' ' << height << "\n255\n";


	for (int j = height - 1; j >= 0; j--)
	{


		std::cerr << "\rScanlines remaining" << j << ' ' << std::flush;
		for (int i = 0; i < width; i++)
		{


			color pixel_color(static_cast<double>(i) / (width - 1), static_cast<double>(j) / (height - 1), 0.25);
			write_color(std::cout, pixel_color);
		}
	}

	std::cerr << "\nDone.\n";

	return 0;
}
一些小tips
一定要创建的是.h文件,而不能是.c或者是.cpp文件,不然就会同时出现LNK2005 和LNK1169 错误,这是因为在Visual Studio中的每个cpp源文件在没有被main.cpp引用时也都会被编译为obj文件,如果在后续包含该文件,就会被直接#include引入cpp文件时报出已定义的错误。具体可以见博客:关于VS2019 C++项目同时出现LNK2005 和LNK1169 error 的解决办法
定义光线与圆的相交
定义一个光线
我们都知道,光线是沿直线传播,尽管不严谨,但不妨碍我们先这么假设,那么我们就可以理解为一道光是一个射线,由点光源向外辐射。因此我们对于一个光线的定义,就可以用三个量来衡量,并写成一个函数
P ( t ) ⃗ = A ⃗ + t b ⃗ \vec{P(t)} =\vec{A}+t \vec{b} P(t)=A+tb
其中 A ⃗ \vec{A} A是光源(origin), b ⃗ \vec{b} b是辐射方向(direction),t是一个包含距离信息的实数,示意图如下所示:
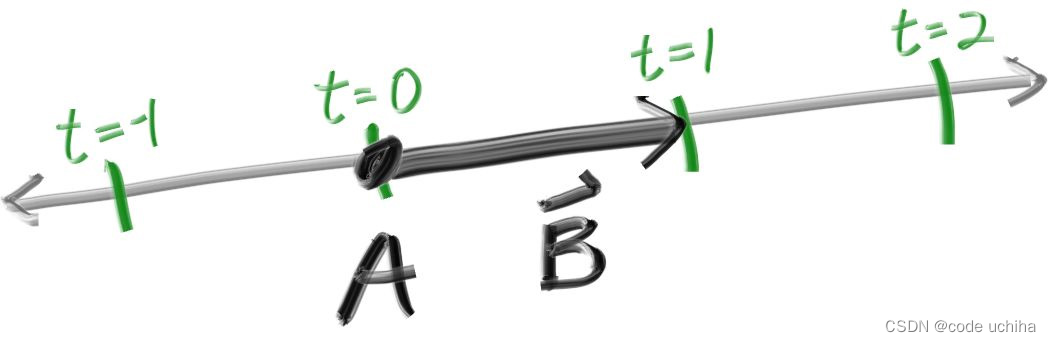
据此我们就可以创建一个光线类(ray),可以求出在t处的光线。
#pragma once
#ifndef RAY_H
#define RAY_H

#include "vec3.h"

class ray
{


public:
	ray() {

    }
	ray(const point3 origin, const vec3 direction) : orig(origin), dir(direction) {

    }

	point3 origin() const {

     return orig; }
	vec3 direction() const {

     return dir; }

	point3 at(double t) const {

     return orig + t * dir; }
public:
	point3 orig;
	vec3 dir;
};

#endif
将光线放入场景中
我们之后就定义一个场景,那么我们就需要一个视口,就是观察这个图片并成像的窗口,我们规定,宽高比是16:9,视口的高度为2,视口距离摄像机的深度为1,由于我们是按照z轴的负向看的,因此视口平面上的z轴坐标值均为-1。那么由于相机放于视口中间,那么y轴的取值范围为[-1, 1]。示意图如下图所示,方形的是我们定义的视口,坐标轴原点是我们的摄像机位置。

该场景我们使用渐变色来实现,颜色从color(1.0, 1.0, 1.0)到color(0.5, 0.7, 1.0),即从白色到蓝色的渐变。渐变的实现是使用线性插值公式:
b l e n d e d V a l u e = ( 1 − t ) ∗ s t a r t V a l u e + t ∗ e n d V a l u e blendedValue = (1-t) * startValue + t * endValue blendedValue=(1−t)∗startValue+t∗endValue
很明显,此处的t值是一个介于[0, 1]之间的值,书中要求我们是按照y方向来进行渐变,即我们的t是要将平面的y值归一化到[0, 1]的,具体做法就是 ( y + 1 ) ∗ 0.5 (y+1)*0.5 (y+1)∗0.5。
那么剩下的压力来到光线这边,我们需要从原点进行辐射,辐射到整个屏幕上,假设我们从视口的左下角开始,那么我们首先得知道左下角的坐标。其实也很简单,就是减去一般的宽和一半的高,唯一要注意的就是记得视口的z值是-1并且我们运算需要转换成向量。假设视口的宽是horizontal,高是vertical,左下角是lower_left_corner,原点是origin,那么数学表达式如下:
l o w e r _ l e f t _ c o r n e r = o r i g i n − v e c 3 ( 0 , 0.5 ∗ h o r i z o n t a l , 0 ) − v e c 3 ( 0.5 ∗ v e r t i v a l , 0 , 0 ) + v e c 3 ( 0 , 0 , − 1 ) lower\_left\_corner = origin - vec3(0, 0.5 * horizontal, 0) - vec3(0.5 * vertival, 0, 0) +vec3(0, 0, -1) lower_left_corner=origin−vec3(0,0.5∗horizontal,0)−vec3(0.5∗vertival,0,0)+vec3(0,0,−1)
当然最后一个加上 v e c 3 ( 0 , 0 , − 1 ) vec3(0, 0, -1) vec3(0,0,−1)是为了好理解,最后的z变成-1,在书中作者是直接定义了一个深度focal_length为1,最后一项是减去 v e c 3 ( 0 , 0 , f o c a l _ l e n g t h ) vec3(0, 0, focal\_length) vec3(0,0,focal_length)。
大的问题基本都解决了,就剩下用origin和direction定义光线了,光线的origin很明显就是原点(0, 0, 0),方向就是对应视口的像素坐标值减去origin得到方向向量。而这个像素坐标又是有点说法的。我们通过计算原图像中该点的横纵坐标值相对于整个宽高的比例(u, v)来反过来计算得到一个视口坐标,然后从左下角的坐标加上我们新计算的时候坐标值即可得到正确的坐标。具体代码如下所示:
#include "color.h"
#include "ray.h"
#include "vec3.h"

#include <iostream>

color ray_color(const ray& r) {


    vec3 unit_direction = unit_vector(r.direction());
    auto t = 0.5*(unit_direction.y() + 1.0);
    return (1.0-t)*color(1.0, 1.0, 1.0) + t*color(0.5, 0.7, 1.0);
}

int main() {


    // Image
    const auto aspect_ratio = 16.0 / 9.0;
    const int image_width = 400;		// 图像的宽
    const int image_height = static_cast<int>(image_width / aspect_ratio);

    // Camera
    auto viewport_height = 2.0;			// 视口的高
    auto viewport_width = aspect_ratio * viewport_height;
    auto focal_length = 1.0;			// 视口的深度

    auto origin = point3(0, 0, 0);
    auto horizontal = vec3(viewport_width, 0, 0);
    auto vertical = vec3(0, viewport_height, 0);
    auto lower_left_corner = origin - horizontal/2 - vertical/2 - vec3(0, 0, focal_length);		// 计算左下角坐标

    // Render

    std::cout << "P3\n" << image_width << " " << image_height << "\n255\n";

    for (int j = image_height-1; j >= 0; --j) {


        std::cerr << "\rScanlines remaining: " << j << ' ' << std::flush;
        for (int i = 0; i < image_width; ++i) {


            auto u = double(i) / (image_width-1);				// 计算原图像中该点相对于整个图像宽高的比例
            auto v = double(j) / (image_height-1);
            ray r(origin, lower_left_corner + u*horizontal + v*vertical - origin);		// 用origin和direction定义光线
            color pixel_color = ray_color(r);
            write_color(std::cout, pixel_color);				// 输出整幅图的图像
        }
    }

    std::cerr << "\nDone.\n";
}
最后编译并转化为ppm后得到的结果如下所示,这就是我们的场景:

在场景中加入一个球
我们都知道,如果我们已知一个球的球心,半径,那么其表达式是
( x − C x ) 2 + ( y − C y ) 2 + ( z − C z ) 2 = r 2 (x-C_x)^2+(y-C_y)^2+(z-C_z)^2=r^2 (x−Cx)2+(y−Cy)2+(z−Cz)2=r2
而一个光线的表达式我们之前提到过,是
P ( t ) ⃗ = A ⃗ + t b ⃗ \vec{P(t)} =\vec{A}+t \vec{b} P(t)=A+tb
那么一个物体,我们光线打到其上才能看到,同理,就是我们要求光线与球的交点,于是就变成了如下的式子:
( P ( t ) x − C x ) 2 + ( P ( t ) y − C y ) 2 + ( P ( t ) z − C z ) 2 = r 2 (P(t)_x-C_x)^2+(P(t)_y-C_y)^2+(P(t)_z-C_z)^2=r^2 (P(t)x−Cx)2+(P(t)y−Cy)2+(P(t)z−Cz)2=r2
( P ( t ) ⃗ − C ⃗ ) ⋅ ( P ( t ) ⃗ − C ⃗ ) = r 2 (\vec{P(t)}-\vec{C})\cdot(\vec{P(t)}-\vec{C})=r^2 (P(t)−C)⋅(P(t)−C)=r2
( A ⃗ + t b ⃗ − C ⃗ ) ⋅ ( A ⃗ + t b ⃗ − C ⃗ ) = r 2 (\vec{A}+t \vec{b}-\vec{C})\cdot(\vec{A}+t \vec{b}-\vec{C})=r^2 (A+tb−C)⋅(A+tb−C)=r2
相乘后展开并移项,得到式子
t 2 b ⃗ 2 + 2 t ( A ⃗ − C ⃗ ) ⋅ b ⃗ + ( A ⃗ − C ⃗ ) ⋅ ( A ⃗ − C ⃗ ) − r 2 = 0 t^2\vec{b}^2+2t(\vec{A}-\vec{C})\cdot\vec{b}+(\vec{A}-\vec{C})\cdot(\vec{A}-\vec{C})-r^2=0 t2b2+2t(A−C)⋅b+(A−C)⋅(A−C)−r2=0
其中 A ⃗ \vec{A} A代表原点,即origin, C ⃗ \vec{C} C代表球心, b ⃗ \vec{b} b代表光线方向,那么唯一的未知数就是t,如此看来这就是一个二次方程,运用二次方程的求根公式 − b − b 2 − 4 a c 2 a \frac {-b-\sqrt{b^2-4ac}} {2a} 2a−b−b2−4ac。
到这里,会有同学说,博主博主,你这个少个根呀,不光有 − b − b 2 − 4 a c 2 a \frac {-b-\sqrt{b^2-4ac}} {2a} 2a−b−b2−4ac,还有 − b + b 2 − 4 a c 2 a \frac {-b+\sqrt{b^2-4ac}} {2a} 2a−b+b2−4ac,我们可以分析一下,我们之前说过,t 是一种带距离信息的实数,此处求的根是光线与物体的交点,那么我们都知道,如果一个根,那就是相切,是加是减都一样,如果相离,那就没有实数根(不考虑虚数情况),如果相交,那么是两个根,一个加一个减,那么势必对应一个是光进球体的交点和光出球体的交点,那么很明显,t 小的那个对应的是进球体的交点。抛开透明的情况,我们的光打到一个物体,那么后面的理应是看不到的,因此,我们只需要找到最近的一个点,所以此处的 t 我们只要 − b − b 2 − 4 a c 2 a \frac {-b-\sqrt{b^2-4ac}} {2a} 2a−b−b2−4ac。

说这么多,我们直接上代码,在该代码中,我们创建一个球,球心是(0, 0, -1),如果我们的光线遇到球,就显示的是红色,hit_sphere函数中我们分别用a, b, c表示上述关于 t 的二次方程的a, b, c,返回的是 b 2 − 4 a c b^2-4ac b2−4ac是否为正,为正就表示相交,光线遇到球,那么显示的颜色就是红色,如果小于0,就表示光线与球没有交点,返回场景的颜色。值得注意一下,关于相切的处理并没有严格的规定,因此处理成任意一种情况均可。
bool hit_sphere(const point3& center, double radius, const ray& r) {


    vec3 oc = r.origin() - center;
    auto a = dot(r.direction(), r.direction());
    auto b = 2.0 * dot(oc, r.direction());
    auto c = dot(oc, oc) - radius*radius;
    auto discriminant = b*b - 4*a*c;
    return (discriminant > 0);
}

color ray_color(const ray& r) {


    if (hit_sphere(point3(0,0,-1), 0.5, r))
        return color(1, 0, 0);
    vec3 unit_direction = unit_vector(r.direction());
    auto t = 0.5*(unit_direction.y() + 1.0);
    return (1.0-t)*color(1.0, 1.0, 1.0) + t*color(0.5, 0.7, 1.0);
}
编译完我们输出为ppm格式,出来的效果如下图所示:

表面法线
我们上面只是当光打到物体的时候让其显示红色,那我们需要对其进行着色,那么我们就需要求球的法线。我们规定球的法线就是球的表面与球心连线并指向球外的单位向量作为其法线。这点很好理解,我们假设过该点作一个平面,该平面与该球有且只有一个交点就是这个点,那么我们连接球心与该点应该是垂直于这个平面的,那么这条线所代表向外的单位向量自然就是该点的法向量。

我们在hit_sphere函数中我们需要返回的是光线与球的交点,前面我们讨论过为什么这里 t 取的左根,因此我们直接返回这个左根即可,如果没有交到球,就返回-1。然后我们在ray_color函数中接受值,如果小于0的话证明光线没有打到物体,那么就和上面一样正常按照场景的操作进行即可;如果返回的 t 值大于0,那么我们就要计算一下该点的法线。交点的坐标很好求,知道了t,并且origin和direction也是已知的,那么我们可以用光线的方程求到坐标,直接利用ray类的at函数即可。然后该点坐标减去圆心坐标并求单位向量就得到指向球外的法线。
由于我们作了单位向量,那么我们最极端的两种是平行于xoy平面等坐标平面,以平行于xoy平面为例,这时候法线向量有(1, 0, 0),(-1, 0, 0),(0, 1, 0),(0, -1, 0),我们可以发现,x, y的取值范围都会在[-1, 1]内,同理也可以得到z的范围也是[-1, 1],那么我们可以对x, y, z都进行归一化,得到一个三维向量,我们将其作为RGB,即球的颜色显示出来。
double hit_sphere(const point3& center, double radius, const ray& r)
{


	vec3 oc = r.origin() - center;
	double a = r.direction().length_square();
	double b = 2 * dot(oc, r.direction());
	double c = dot(oc, oc) - std::pow(radius, 2);
	double discriminate = b * b - 4 * a * c;
	if (discriminate < 0)
		return -1.0;
	else
		return (-b - std::sqrt(discriminate)) / (2 * a);
}

color ray_color(ray r)
{


	double t = hit_sphere(point3(0, 0, -1), 0.5, r);
	if (t > 0)
	{


		vec3 normal = unit_vector(r.at(t) - vec3(0, 0, -1)); // normal
		return 0.5 * color(normal.x() + 1.0, normal.y() + 1.0, normal.z() + 1.0);  // x, y, z归一化
	}
	vec3 unit_dir = unit_vector(r.direction());
	t = 0.5 * (unit_dir.y() + 1.0);    // 归一化
	color rayColor = (1.0 - t) * color(1.0, 1.0, 1.0) + t * color(0.5, 0.7, 1.0);		// 插值

	return rayColor;
}
编译后输出为ppm格式文件结果如下:

对于上面求得的 − b − b 2 − 4 a c 2 a \frac {-b-\sqrt{b^2-4ac}} {2a} 2a−b−b2−4ac,我们发现,求b的时候会有一个2倍的关系,我们不妨让b = 2h。这样我们的表达式就变成了 − 2 h − 4 h 2 − 4 a c 2 a \frac {-2h-\sqrt{4h^2-4ac}} {2a} 2a−2h−4h2−4ac,于是我们可以将分子的 2 提取出来并约分,就会得到简化后的表达式: − h − h 2 − a c a \frac {-h-\sqrt{h^2-ac}} {a} a−h−h2−ac。计算代码如下所示:
double hit_sphere(const point3& center, double radius, const ray& r) {


    vec3 oc = r.origin() - center;
    auto a = r.direction().length_squared();
    auto half_b = dot(oc, r.direction());
    auto c = oc.length_squared() - radius*radius;
    auto discriminant = half_b*half_b - a*c;

    if (discriminant < 0) {


        return -1.0;
    } else {


        return (-half_b - sqrt(discriminant) ) / a;
    }
}
多个物体
一个可被击中的抽象类
对于同一类物体,我们自然想到了用面向对象的设计思路设计我们的代码,虽然叫可被击中的类,但其实就是物体类,这个物体可以被光线击中从而可以被看到。
在我们设计该抽象类之前,我们将光线击中的顶点进行一个简单的封装,这个点的特征有点的坐标,法线,以及光线击中该点时的 t 值。现在我们就来定义这样一个抽象类,这个类中只有一个功能,那就是被击中做出何种反应,因此定义一个虚函数 hit() 。
#ifndef HITTABLE_H
#define HITTABLE_H

#include "ray.h"

struct hit_record {


    point3 p;
    vec3 normal;
    double t;
};

class hittable {


    public:
        virtual bool hit(const ray& r, double t_min, double t_max, hit_record& rec) const = 0;
};

#endif
接下来我们用该抽象类定义一个球类,球中需要有球的半径以及球心坐标,在此基础上,我们给定一个无参构造函数和有所有成员变量的构造函数,并重写hit函数。hit 函数中主要干的事情是判断光线与物体是否有交点,如果有,交点是否有效,有效的话,将交点的各种信息保存进变量中并返回true,其他情况均返回false。
那各位会有疑惑了,什么叫有效呢?那当然是我们的物体没有被遮挡啦。如何知道有没有被遮挡呢?那就要靠我们自己维护的两个值 t_min 和 t_max 了。t_min负责记录光电在该方向上打到的最远和最近的交点的 t 值。那我们求到的 t 值自然需要满足关系: t_min < t < t_max。
#ifndef SPHERE_H
#define SPHERE_H

#include "hittable.h"
#include "vec3.h"

class sphere : public hittable {


    public:
        sphere() {

    }
        sphere(point3 cen, double r) : center(cen), radius(r) {

    };

        virtual bool hit(
            const ray& r, double t_min, double t_max, hit_record& rec) const override;

    public:
        point3 center;
        double radius;
};

bool sphere::hit(const ray& r, double t_min, double t_max, hit_record& rec) const {


    vec3 oc = r.origin() - center;
    auto a = r.direction().length_squared();
    auto half_b = dot(oc, r.direction());
    auto c = oc.length_squared() - radius*radius;

    auto discriminant = half_b*half_b - a*c;
    if (discriminant < 0) return false;
    auto sqrtd = sqrt(discriminant);

    // Find the nearest root that lies in the acceptable range.
    auto root = (-half_b - sqrtd) / a;
    if (root < t_min || t_max < root) {


        root = (-half_b + sqrtd) / a;
        if (root < t_min || t_max < root)
            return false;
    }

    rec.t = root;
    rec.p = r.at(rec.t);
    rec.normal = (rec.p - center) / radius;

    return true;
}

#endif
法线方向的变更
有读者肯定要困惑了,为什么要变更法线方向呢?首先不妨让我们回顾一下我们现在的法线,我们现在的法线的方向是从球心指向交点,简单来说就是指向球外。但是这样有个问题,我们先假设光源在物体外面,当光线打到物体上时,第一次相交的交点的法向方向是相对于光线方向是逆着的,等到光线从物体射出的时候,法线的方向是顺着光线方向的。
这就会导致一个问题,那就是法线方向与光线方向是不统一的。那为啥子要统一呢?最简单的例子就是玻璃球,我们按道理来说跟着光线去看,那么面对光源的一侧的外面理应会被我们观测到,背对光源的一次理应会被我们观测的里面,综合来看,我们就需要将球的法线更新一下,统一逆着光线的方向。
具体处理起来也很容易,只需要将我们求得的法线与光线的方向做个点乘,看最后出来的值是否为负,负的话就不需要改变,正的话就将法线取反。这个属于我们交点的属性,于是这个函数我们就也放入 hit_record 中,同时在球类的hit函数中进行调用,更新。
struct hit_record {


    point3 p;
    vec3 normal;
    double t;
    bool front_face;

    inline void set_face_normal(const ray& r, const vec3& outward_normal) {


        front_face = dot(r.direction(), outward_normal) < 0;
        normal = front_face ? outward_normal :-outward_normal;
    }
};
bool sphere::hit(const ray& r, double t_min, double t_max, hit_record& rec) const {


    ...

    rec.t = root;
    rec.p = r.at(rec.t);
    vec3 outward_normal = (rec.p - center) / radius;
    rec.set_face_normal(r, outward_normal);

    return true;
}
创建一个球类列表
我们创建一个类,专门用于存储各个物体,并在此直接通过遍历每个物体与光线的相交,解决物体的遮挡问题。具体的解决方法就是利用 t_min 和 t_max 。原理前面已经说明此处就不再赘述。
类中的成员变量自然只有存储物体的列表。物体采用智能指针,指向每个被创建的物体,当有物体需要被加入的时候,调用add函数加入列表中,同时创建一个清空函数并重写hit函数。
hit 函数中主要是遍历每个物体,同时记录该物体与光线最远的交点,当我们遍历每个物体的时候,我们会调用其 hit 函数,如果我们求到的物体是可以被看到的,不是被遮挡的,那么 t_max 会被置成目前离得最近的点的 t 值。返回值是我们的光线按照当前方向是否能够碰到物体。
#ifndef HITTABLE_LIST_H
#define HITTABLE_LIST_H

#include "hittable.h"

#include <memory>
#include <vector>

using std::shared_ptr;
using std::make_shared;

class hittable_list : public hittable {


    public:
        hittable_list() {

    }
        hittable_list(shared_ptr<hittable> object) {

     add(object); }

        void clear() {

     objects.clear(); }
        void add(shared_ptr<hittable> object) {

     objects.push_back(object); }

        virtual bool hit(
            const ray& r, double t_min, double t_max, hit_record& rec) const override;

    public:
        std::vector<shared_ptr<hittable>> objects;
};

bool hittable_list::hit(const ray& r, double t_min, double t_max, hit_record& rec) const {


    hit_record temp_rec;
    bool hit_anything = false;
    auto closest_so_far = t_max;

    for (const auto& object : objects) {


        if (object->hit(r, t_min, closest_so_far, temp_rec)) {


            hit_anything = true;
            closest_so_far = temp_rec.t;
            rec = temp_rec;
        }
    }

    return hit_anything;
}

#endif
收尾
我们这里先需要定义一个工具类,比如几个常量——π,无限大,以及角度制转弧度制的函数。
#ifndef RTWEEKEND_H
#define RTWEEKEND_H

#include <cmath>
#include <limits>
#include <memory>


// Usings

using std::shared_ptr;
using std::make_shared;
using std::sqrt;

// Constants

const double infinity = std::numeric_limits<double>::infinity();
const double pi = 3.1415926535897932385;

// Utility Functions

inline double degrees_to_radians(double degrees) {


    return degrees * pi / 180.0;
}

// Common Headers

#include "ray.h"
#include "vec3.h"

#endif
最后我们将main函数更新一下
#include "rtweekend.h"

#include "color.h"
#include "hittable_list.h"
#include "sphere.h"

#include <iostream>
color ray_color(const ray& r, const hittable& world) {

    		// 更新的地方
    hit_record rec;
    if (world.hit(r, 0, infinity, rec)) {


        return 0.5 * (rec.normal + color(1,1,1));
    }
    vec3 unit_direction = unit_vector(r.direction());
    auto t = 0.5*(unit_direction.y() + 1.0);
    return (1.0-t)*color(1.0, 1.0, 1.0) + t*color(0.5, 0.7, 1.0);
}

int main() {


    // Image

    const auto aspect_ratio = 16.0 / 9.0;
    const int image_width = 400;
    const int image_height = static_cast<int>(image_width / aspect_ratio);

    // World     更新的地方
    hittable_list world;
    world.add(make_shared<sphere>(point3(0,0,-1), 0.5));
    world.add(make_shared<sphere>(point3(0,-100.5,-1), 100));

    // Camera

    auto viewport_height = 2.0;
    auto viewport_width = aspect_ratio * viewport_height;
    auto focal_length = 1.0;

    auto origin = point3(0, 0, 0);
    auto horizontal = vec3(viewport_width, 0, 0);
    auto vertical = vec3(0, viewport_height, 0);
    auto lower_left_corner = origin - horizontal/2 - vertical/2 - vec3(0, 0, focal_length);

    // Render

    std::cout << "P3\n" << image_width << ' ' << image_height << "\n255\n";

    for (int j = image_height-1; j >= 0; --j) {


        std::cerr << "\rScanlines remaining: " << j << ' ' << std::flush;
        for (int i = 0; i < image_width; ++i) {


            auto u = double(i) / (image_width-1);
            auto v = double(j) / (image_height-1);
            ray r(origin, lower_left_corner + u*horizontal + v*vertical);
            color pixel_color = ray_color(r, world);		// 更新的地方
            write_color(std::cout, pixel_color);
        }
    }

    std::cerr << "\nDone.\n";
}
最后的结果如下所示:

总结
这期主要是介绍了PPM格式文件,定义了一个自己的三维向量类,定义了光线,并向场景中加入一个圆,这期就先更新这么多,主要是内容太多了(并且博主还没看完),后续等博主继续跟进还会继续更新,如果有哪里写的不好或者不对欢迎各位评论区讨论或私信指正,十分感谢各位能看到这里!
参考文献
[1] Ray Tracing in One Weekend
[2] PPM格式解析
[3] 关于VS2019 C++项目同时出现LNK2005 和LNK1169 error 的解决办法