之前我其实已经介绍过调用这个objection实现目标检测的方法,安装上次的那个教程我们可以调用摄像头实现目标的实时检测,这篇文章则是向大家介绍如何对离线下载好的视频进行检测。
一、环境配置
环境配置部分和上次基本相同,这里我不再赘述,如果对此有疑问可以参考上一次的教程:
手把手教你如何用objection detection API实现实时目标检测(一)
手把手教你如何用objection detection API实现实时目标检测(二)
手把手教你如何用objection detection API实现实时目标检测(三)
二、文件下载
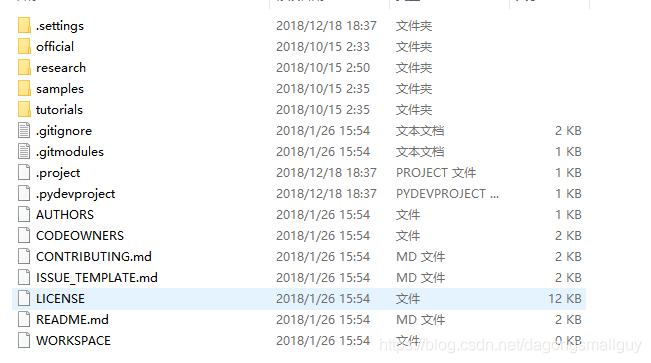
我们可以从GitHub地址中下载我们这个项目所需要的所有文件如下:
同时我们需要从地址中下载protoc文件,用于对相关程序进行编译来运行文件。
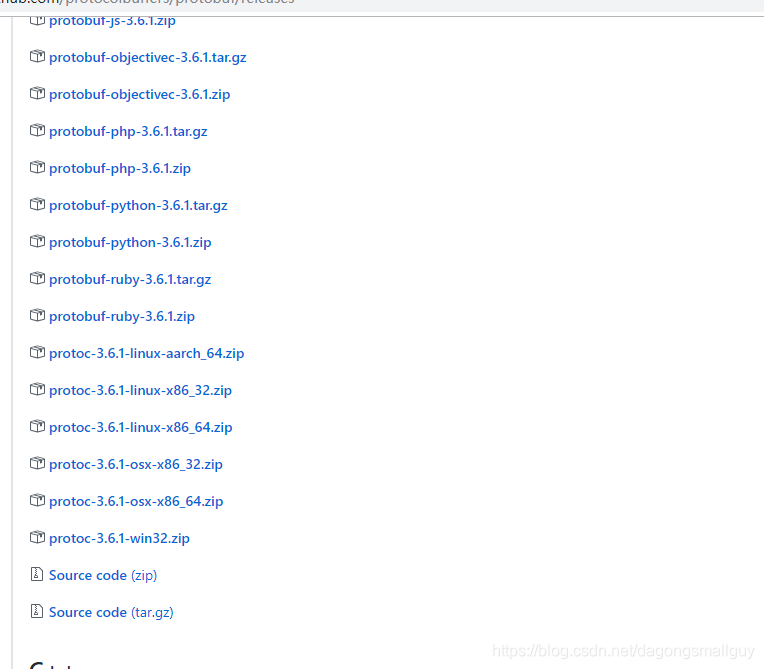
我们选择下载的是protoc-3.6.1-win32.zip文件。
将其解压后把文件中的protoc.exe文件复制到我们的c:、Windows\system32目录中,相当于把这个文件配置到环境变量里。
三、导入视频
我们把需要检测的视频命名为video1.mp4保存在objection detection中。
四、运行源码
1、我们首先需要导入这个模型所需要的各种库:
import numpy as np                    #numpy是python的数值计算扩展,可用于储存和处理大型矩阵
import os                             #os模块提供了大量的方法来处理文件和目录
import six.moves.urllib as urllib     #six是一个专门用来兼容 Python 2 和 Python 3 的库。网站都是基于HTTP协议的,我们使用urllib可以处理URL,从而用来访问网站。
import sys                            #python在 sys.path 变量中所列目录中寻找 sys 模块文件。然后运行这个模块的主块中的语句进行初始化,然后就可以使用模块了 。
import tarfile                        #tarfile模块可以方便读取tar归档文件,用于处理rar压缩
import tensorflow as tf               #导入TensorFlow
import zipfile                        #处理zip压缩

from collections import defaultdict   #从collection中导入模块
from io import StringIO               #StringIO可用来作字符串的缓存
from matplotlib import pyplot as plt  #导入plt模块
from PIL import Image                 #导入PIL,而Image是PIL中最重要的一个模块
在这过程中如果我们发现有哪个包没有安装,则直接pip install 即可。
2、接下来,我们需要对运行的环境进行配置
通过sys.path.append("..") 回到上一个文件夹中。
# This is needed since the notebook is stored in the object_detection folder.
sys.path.append("..")                 #返回上一级文件夹(objection_detection)寻找相应的包
from object_detection.utils import ops as utils_ops
3、检查TensorFlow版本
这里要求TensorFlow的版本需要1.4.0以上(如果是按照我的操作流程,我安装的是TensorFlow 1.8.0的gpu版本)。如果版本低于1.4.0,则会进行报错,需要我们更新TensorFlow到更高的版本。
#此处用于检测TensorFlow的版本,如果版本低于1.4.0,则提示需要更新TensorFlow
if tf.__version__ < '1.4.0':
    raise ImportError('Please upgrade your tensorflow installation to v1.4.* or later!')
4、导入objection detection的对应模块
# 导入objection detection所需要的模块
from object_detection.utils import label_map_util
from object_detection.utils import visualization_utils as vis_util
5、设置信息提示等级
我们在这里表示只显示 warning 和 Error
os.environ['TF_CPP_MIN_LOG_LEVEL'] = '2'
6、设置模型下载的文件名称和下载地址
这里我们调用了已经训练好的模型ssd_mobilenet_v2_coco来进行检测,如果使用我们自己训练的模型也是可以的,详细的流程可以参考一下手把手教你如何用objection detection API实现实时目标检测(三)这篇文章。
但是自己训练模型的成本比较大,训练的效果应该会不会太好,我之前自己训练了一个只能检验手机的一个模型(熟悉一下流程还是不错的)
# 这里设置了模型下载到的文件名称和下载地址
MODEL_NAME = 'ssd_mobilenet_v2_coco_2018_03_29'
MODEL_FILE = MODEL_NAME + '.tar.gz'
DOWNLOAD_BASE = 'http://download.tensorflow.org/models/object_detection/'
当然了,我们也可以从Tensorflow detection model zoo下载其他的模型:

只需要修改下载地址和文件名即可:
MODEL_NAME = 'ssd_mobilenet_v2_coco_2018_03_29'
MODEL_FILE = MODEL_NAME + '.tar.gz'
DOWNLOAD_BASE = 'http://download.tensorflow.org/models/object_detection/'
7、导入训练好的模型和标签
我们把实际使用的模型和标签导入,并设置标签的数目为90
# 导入训练好的模型(这里我们需要提示的是,我们在这里导入的可以是自己训练的模型,也可以是别人已经训练好的,本文用的是别人已经训练好的,我自己训练的数据集太小)
PATH_TO_CKPT = MODEL_NAME + '/frozen_inference_graph.pb'

# 导入每个box已经训练好的label
PATH_TO_LABELS = os.path.join('test', 'mscoco_label_map.pbtxt')

NUM_CLASSES = 90  #能识别出的物体类别数目是90
8、解压文件并将模型和标签载入
tar_file = tarfile.open(MODEL_FILE)      #这里对我们刚才下载的ssd_mobilenet_v2_coco_2018_03_29.tar.gz文件进行解压
for file in tar_file.getmembers():       #对解压后文件的子文件夹进行检查,
  file_name = os.path.basename(file.name)
  if 'frozen_inference_graph.pb' in file_name:
    tar_file.extract(file, os.getcwd())

## 我们把已经下载好的模型传入内存之中
detection_graph = tf.Graph()
with detection_graph.as_default():
  od_graph_def = tf.GraphDef()
  with tf.gfile.GFile(PATH_TO_CKPT, 'rb') as fid:
    serialized_graph = fid.read()
    od_graph_def.ParseFromString(serialized_graph)
    tf.import_graph_def(od_graph_def, name='')

## 把下载好的label载入
label_map = label_map_util.load_labelmap(PATH_TO_LABELS)
categories = label_map_util.convert_label_map_to_categories(label_map, max_num_classes=NUM_CLASSES, use_display_name=True)
category_index = label_map_util.create_category_index(categories)
9、import 所需要的视频导入模块
如果在import过程中发生错误,则根据提示将相应模块进行pip install即可
import imageio                                   #这里我们导入imageio模块,用来进行视频的读取
imageio.plugins.ffmpeg.download()                #这里会下载一个ffmpeg程序,用于对视频进行剪辑,也可提前下载好

from moviepy.editor import VideoFileClip
from IPython.display import HTML
10、生成box和相应的标签置信度
def detect_objects(image_np, sess, detection_graph):
    # 扩展维度,应为模型期待: [1, None, None, 3]
    image_np_expanded = np.expand_dims(image_np, axis=0)
    image_tensor = detection_graph.get_tensor_by_name('image_tensor:0')

    # 每个框代表一个物体被侦测到
    boxes = detection_graph.get_tensor_by_name('detection_boxes:0')

    #每个分值代表侦测到物体的可信度.
    scores = detection_graph.get_tensor_by_name('detection_scores:0')
    classes = detection_graph.get_tensor_by_name('detection_classes:0')
    num_detections = detection_graph.get_tensor_by_name('num_detections:0')

    # 执行侦测任务.
    (boxes, scores, classes, num_detections) = sess.run(
        [boxes, scores, classes, num_detections],
        feed_dict={image_tensor: image_np_expanded})

    # 检测结果的可视化
    vis_util.visualize_boxes_and_labels_on_image_array(
        image_np,
        np.squeeze(boxes),
        np.squeeze(classes).astype(np.int32),
        np.squeeze(scores),
        category_index,
        use_normalized_coordinates=True,
        line_thickness=8)
    return image_np
11、输出视频并保存为gif文件
我们对视频的第16-65秒进行检测,并把检测后的视频命名为:video1_out.mp4保存,并转化为gif格式也保存一份。
def process_image(image):
    # NOTE: The output you return should be a color image (3 channel) for processing video below
    # you should return the final output (image with lines are drawn on lanes)
    with detection_graph.as_default():
        with tf.Session(graph=detection_graph) as sess:
            image_process = detect_objects(image, sess, detection_graph)
            return image_process

white_output = 'video1_out.mp4'
clip1 = VideoFileClip("video1.mp4").subclip(15,65)
white_clip = clip1.fl_image(process_image) #NOTE: this function expects color images!!s
white_clip.write_videofile(white_output, audio=False)

from moviepy.editor import *
clip1 = VideoFileClip("video1_out.mp4") #将检测完成之后的视屏以video1_out.mp4的名字输出
clip1.write_gif("final.gif")            #将视频转化为gif的格式进行保存
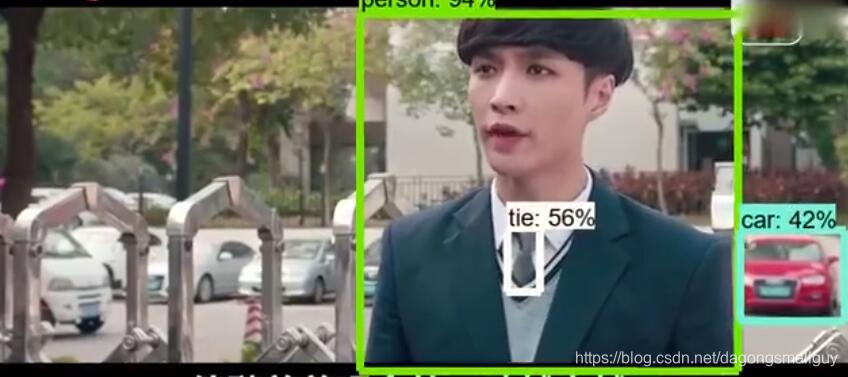
五、效果检测
这里我导入一段长为10分钟左右的视频(为了减少检测时间,我只选择了15-65秒的视频),检测的效果如下:
视频和gif都太大了,我上传了到了优酷中,大家可以看看:优酷地址
截图如下: